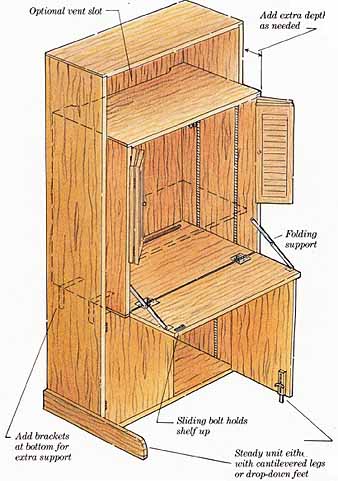
This add-on unit is specially planned to accommodate a personal computer. In the illustration, you can see that it has been designed to fit into an existing bookcase, which originally was not deep enough and had no special provisions for the computer.
Among the features included in the design is a shelf for a keyboard, at typing height; shelves that can be adjusted to suit a variety of computers; and holes and slots for cables, cords, and printer paper stored in the cabinet below.
This project can also be built as a freestanding unit simply by extending side panels down to the floor and adding a back. The design can be adapted to a general-purpose writing desk by installing the unit higher (29 inches is standard desk height) and eliminating the holes and slots.

Note: A slot at back of desk allows you to feed paper to a printer
Drill holes for cords and cables. Optional vent slot; Add extra depth;
Add brackets at bottom for extra support; shelf up Sliding bolt holds;
Steady unit either with cantilevered logs or drop-down feet
Dimensions
Many personal computers fit onto shelves 16 inches deep but a few larger models require a shelf 19 inches deep. Measure your computer when you plan the case, being certain to include the depth of the cable connectors (generally located at the back) in your measurements.
The bottom of the case should be at typing height, typically 26 to 27 inches above the floor. As the case is 34 inches high, this puts the top approximately 60 inches above the floor, a convenient height for storing tall or flat items.
If the case will be inserted into an existing bookcase, use inside dimensions to determine the width of this project. On the other hand, if you are building a freestanding unit, make it any width appropriate for your computer. Bear in mind that shelves or surfaces wider than 30 inches either need vertical dividers or stronger shelving.
Building the case
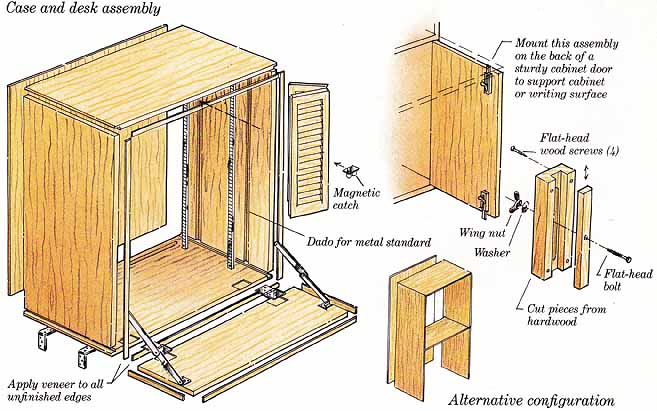
Once you have determined dimensions for your case, building it is a straightforward process. Cut top and bottom panels out of hardwood-veneered lumber-core plywood. From the same material, cut side panels to height of cavity. Drill and cut required holes and slots in the bottom panel. Rout dadoes for shelf standards and rabbets for back panel, if you are attaching one.
Fit pieces together, gluing and nailing top to sides and gluing and screwing bottom to sides; use 2-inch screws every 4 inches. Secure back, if there is one, with glue and brads.
Calculate the area of surfaces that will overhang your case when desk unit is mounted. Apply veneer to all visible surfaces. After trimming the sides, glue veneer onto front edges of case. This covers with hardwood all exposed edges except the holes and slots in the bottom. These can be painted black later.
Building the desk
Cut a piece of plywood for the f lip- down typing surface. Measure this piece so that it fits inside the front opening of case. Be sure to allow for thickness of veneer that will face the edges. A 10-inch-deep shelf will hold most computer keyboards. Taking measurements from folding supports you plan to use, mark and cut rabbets in edges of shelf to accommodate brackets when shelf is in up position.
After applying veneer to the edges of shelf, check it for fit, then hinge shelf onto bottom front of the case. Cut accurate mortises into shelf and case to accept hinge leaves.
Finishing the case
Select doors and trim them to fit upper portion of case. (The illustration shows bifold doors but you can select other types. See our article on Doors.) Mount doors to check them for fit, then remove doors and shelf from case and finish all pieces.
When the finish is dry, mount computer desk into your bookcase, using 6 or 8 screws per side. For extra support, attach two 2-inch L brackets at the bottom of sides of the book case. Mount flip-down shelf, sliding bolt or magnetic catches, shelf standards, and doors.
Before setting the computer in place, either secure the whole book case to the wall by screwing it to studs, or add stabilizer feet at the bottom (see illustration) to keep the cabinet from tipping forward. Sturdy doors at the bottom of the unit can also serve as stabilizers.

Case and desk assembly; Alternative configuration: Mount this assembly
on the back of a sturdy cabinet door to support cabinet or writing surface
Prev.: Drawers
Next: Hidden Double-Bed
Cabinet (aka Murphy Bed)
Full guide: How to Plan & Build Bookcases, Cabinets & Shelves
Product
Catalog
