“Fun” and “liberating” are the two words I’ve heard most often about free- machine embroidery. Free-machine embroidery is done after removing the presser foot, lowering or covering the feed dogs, and moving the fabric freely in any direction while stitching. People who are not comfortable drawing with a pencil usually blossom with free-machine embroidery, achieving spontaneous effects they’d never dreamed they could.
Preparation Since preparation of each machine is slightly different, the best way to find out what works on your machine is to read its instruction guide and to talk to your sewing machine dealer. Follow the same instructions as for darning. You need to know whether you can lower the feed dogs on your machine, where the bobbin tension screw is and how to tighten or loosen it, and how to bypass the bobbin tension altogether. Fig. 4-2 is a brief chart of the major brands and how to adapt them to free- machine embroidery. If your brand isn't listed here, look online (use Google) or in the yellow pages of your telephone directory for the address of your nearest dealer. Since you’ll be using a hoop, you may also want to extend the amount of working space around the needle. If you have a flat-bed extension, use it. If not, you can rig one by stacking up books around the free arm to the level of the needle plate. Remember that there is more than one way to adapt your machine to free- machine embroidery. The only way to find out what works best for you is to experiment. When I started with free- machine embroidery, everyone told me that you had to lower the feed dogs. For a while I was paralyzed because there’s no way to do that on the machine I was using. Then I realized that darning is similar to free-machine embroidery, so I put the darning plate over my feed dogs, and the darning foot on instead of the presser foot. Naturally I didn’t follow my own advice about practicing on a test cloth. I plunged in to work on a huge banner for my mother. To my utter frustration, about every two minutes the darning plate popped off and if I didn’t notice it immediately, the needle soon struck loose metal and broke. Later, my favorite sewing machine dealer calmly pointed out that the stitch length dial must be set at 0 or the feed dogs move back and forth, dislodging the darning plate. (I never finished the banner either.) Meanwhile, before I discovered this secret, I was so spitting mad at the darning plate that I took it off permanently—and found out that it didn’t make any difference whether the feed dogs were lowered, covered, or other wise hidden. As long as I put on the darning foot — which holds the fabric down during the formation of each stitch and thereby prevents skipped stitches, broken thread, and snapped needles — I could freely stitch. Others with different brands of machines have told me the same. Depending on how heavy the stitching is, they often don’t bother to lower the feed dogs at all; re moving the presser foot, releasing the pressure, and holding the fabric taut in the vicinity of the needle (with hoop, fingers, darning foot, etc.) works perfectly well. So experiment on your ma chine and have fun while you learn. Fig. 4—2 CHART OF MAJOR BRANDS:
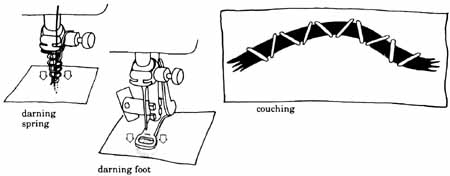
It is extremely important to choose the correct size needle and appropriate thread for the fabric you are practicing on, so consult the Needle and Thread Chart at the end of the guide. Remember that the function of the needle is to make a hole large enough for the thread. Briefly, you can free-machine embroider on almost any fabric, al though tightly woven fabrics are some times more difficult to work on and knits tend to stretch. You can always back these fabrics with stabilizer (typing paper, tear-away, lightweight interfacing, or water-soluble stabilizer) before putting them in the hoop. Practice free-machine embroidery on some medium-weight cotton fabric with two different colors of the same weight thread on top and bobbin, so that you can easily judge whether your bobbin thread is loose or tight. Use a spring- type machine-embroidery hoop. If you don’t have one, use an ordinary 6” (15 cm) or 8” (20.5 cm) wood or plastic embroidery hoop, but put it on back wards — that's , the top part of the hoop with the screw goes on the bottom; next comes the fabric; and last goes the bottom of the hoop (Fig. 4-4). Push the inner ring 1/8” (3 mm) below the outer ring for a snug fit. The fabric should be tight as a drum. It also helps to wrap the rings of the embroidery hoop with strips of cotton fabric, bias binding, or electrical tape to keep the fabric from slipping. In a pinch, you can pleat the edge of the fabric between the inner and outer hoops, to make your fabric tight. Some wooden hoops are adapted for machine embroidery by an indentation on the wood and a slim height, both factors allowing easy slipping of the hoop under the needle. However these hoops are hard to find (check the Supply List). You can file a half-moon on the upper and lower edge of your embroidery hoop if it’s too thick to go under the needle. You can also tip the hoop on its side and slide it carefully under the needle — or merely take off the needle while sliding the hoop under the presser-bar lever, and then put the needle back on. You can free-machine embroider with no foot on the machine (with the fabric in a hoop), but if ever you were destined to sew together your fingers, this would be the time. To be on the safe, unpainful side, I recommend using the darning foot for free-machine embroidery while you’re learning. The darning foot acts like a tiny hoop around the needle, pressing the fabric against the needle plate at the moment a stitch is being formed, but lifting with the needle so that you can maneuver the fabric in any direction. (Some machines use a darning spring rather than a foot.) If your darning foot is plastic or metal, you may want to cut out the front part of it, so you can see better. (See Section 3 for instructions on altering the appliqué foot.)
Free-Machine Embroidery Check your set-up against mine: I have medium-weight cotton fabric in a 6” (16 cm)-diameter machine-embroidery hoop; a size 12(80) needle, and ordinary 100% cotton sewing machine thread (two different colors in top and bottom); stitch length set at 0; darning foot on; zigzag needle plate. (You lower your feed dogs if possible, or cover them. I prefer to ignore them. Also release the pressure, if your machine has that feature.) Because I will be moving the hoop vigorously, I’ve put the extensions on my free-arm to make a large flat working surface. All right, your machine is ready, your fabric stretched in the hoop, and you’re ready to experiment. Setting the needle at its highest point, slide the hoop under the needle. My hoop is only 3/8” (1 cm) thick; if yours is deeper, you may need to take off the darning foot first, slide the hoop under the needle, and then put on the darning foot. And don’t forget to lower the presser-foot le ver. This lever controls upper tension — and I could kick myself every time I have forgotten to depress the lever, only to rip out unwanted loops in the upper thread. (Jane W. has a new Brother computer machine that talks. If she forgets, it reminds her “Please put the presser-bar lever down.”) Your machine may be different from mine, however. On some models, the machine actually stitches better if you don't lower the presser-bar lever but instead tighten the top tension to eliminate big loops on the underside. Start by experimenting with the directions I give you. Then if your machine balks, experiment with changing one element at a time, until you find out what works for your machine. First, always, you need to lock the initial stitch. Hold the thread in your left hand, hand-turn the wheel to make one stitch, and draw up the bobbin thread. Holding the two threads firmly, take about three stitches in the same hole (Fig. 4-6). You have now locked that first stitch and can cut off the two threads. Be careful not to cut the wrong threads, which I’ve (grumble, snarl) done a million times. Sometimes I wait to cut the threads until I’ve stitched several inches away from them. Now try writing your name in thread. Place your hands firmly around the hoop, keeping your index and middle fingers near the needle (but without impaling them, if you’re not using a darning foot). Do this, because at the moment the needle enters the fabric, the material must be pressed against the needle plate or a stitch can't be formed. I keep my pinkies and thumbs outside the hoop and move the whole affair with all my fingers pressing firmly but not tensely against the cloth (Fig. 4-7). Remember, you move the fabric, since there are no regular presser feet or feed dogs to guide it. Exciting, isn’t it!
Fig. 4—8 Amy C. has developed a clever way of portrait painting with the machine. She sandwiches a color photocopy between layers of organza and fills in the color with granite stitch and many changes of thread color. Oh, your needle just broke? That’s because you’re moving the fabric too fast, taking giant, jerky stitches and thereby bending the needle so that it doesn't enter the hole in the needle plate, striking metal instead. Slow down a little and try not to jerk the hoop around — so what if you take two stitches in the same place. Of course, if you take too many stitches in the same place, the thread may also break. Try every movement you can dream up — forwards, backwards, side-wards, loops, spirals, squares, ogees (what?). If you stitch lots of little “e’s” as a fill-in stitch, it’s called granite stitch. Try running the machine fast and slow (if you can switch your machine to slow speed, try that too.) At some point you will be backing up — and bang, run into the side of the hoop. What to do? Turn the hoop, of course; you can write your name upside-down or backwards in free-machine embroidery. If at any time the top thread loops underneath the fabric, stop stitching and rethread your machine. If that doesn’t work, tighten top tension until the loops disappear. Now let’s try some special effects. By manipulating bobbin and thread tensions and by changing the weight of cloth stitched on, a whole range of textural effects can be achieved. For example, by loosening the bobbin tension and not changing the upper tension at all, we can make the top thread lie on the surface in an even line similar to couching in hand embroidery. I like to use this effect with gold sewing ma chine thread (Fig. 4-9). Practice changing the speed of the machine, to see how it changes the look of the top and bob bin threads.
Whip Stitch It is also possible to bypass the tension spring completely, allowing you to use heavy thread in the bobbin and to bring the bobbin thread up to the surface in large loops, called a whip stitch. The heavy thread may be six-stranded embroidery floss, linen carpet warp, handspun wool, etc.—how to handle these is covered in Section 6. Whip stitch is an easy way to give subtle texture to your work and it’s twice as effective if you use two different colors on top and bottom (Fig. 4-10). Because it puckers the lighter fabrics badly, al ways use a hoop for this stitch. Bypassing bobbin tension is different on each machine; again, check the chart in Fig. 4-2 or your sewing-ma chine manual. Bobbin cases have either one or two screws. When there are two, the one on the left usually holds the whole thing together, and the one on the right is the tension screw (Fig. 4- 11). Turn it clockwise to tighten bobbin tension and counterclockwise to loosen. (Lucille Graham says “Right is tight” to remember which is which. This also applies to tension dials and most screws.) If you must loosen a screw to release the bobbin tension, place a piece of felt or a box under the bobbin case on the table to prevent the screw from falling out, bouncing off the table, and secreting itself in your shag rug. One of the machines has a hole in the (stationary) bobbin case through which I pass the end of the thread if I want to bypass bobbin tension.
If you have never played with bobbin tension and are worried that you can not return the tension to normal, ask your dealer or a machine-embroidery teacher to show you what normal tension is on your bobbin. Or test it your self by hanging a two-ounce weight on the bobbin thread (my heavy-duty Olfa cutter weighs two ounces) loaded into the bobbin case. Hold the case and let the weight dangle (Fig. 4-12). It should not slip. If it does, tighten the bobbin screw until the weight hangs. When you jerk the thread, it should slip down a little and then hang without slipping; if it doesn't slip when jerked, the bob bin tension may be too tight. When you find the location of normal tension, mark it with a tiny spot of white paint, typing correction fluid (temporary), or nail polish. Those of you with factory preset bob bin tension should consider buying a second bobbin case, to be marked with nail polish and used only for machine embroidery. The cases for some machines are expensive but will enable you to greatly extend your range of possible effects.
To whip stitch, tighten your upper tension (9 or the tightest position works best for me), and loosen or bypass bob bin tension. Your fabric is still in a hoop, the stitch length at 0, and feed dogs down or covered. I don’t use a darning foot because the loops are drawn up farther on the surface with out it. Be sure to start with a full bob bin because this technique uses lots of thread. Working whip stitch in spirals and loops pulls the bobbin thread into a pleasing flower-like form (and the back is nice too) (Fig. 4-13). I’ve found making the spirals and loops counterclockwise works better for me. When you are first practicing, if your bobbin thread only breaks once, you receive an A +. (When it doesn’t break at all, you graduate with honors.) Why does the thread break? See Section 2 for a detailed discussion, but briefly you are probably moving the frame too fast or using too small of a needle (try the Blue Stretch or Yellow Band special-purpose needles). You will have more loops on each petal if you move the frame slowly, and more spikes if you move it fast. If your bobbin thread refuses to come up to the surface in loops big enough for your taste, experiment with changing the weights of thread in top and bobbin. Remember that the heavier or stronger thread tends to pull the lighter to its side. Therefore, an extra-fine machine- embroidery thread in the bobbin will be more easily pulled to the surface if you use an ordinary thread in the top. Like wise, if you want a thicker thread to be pulled to the surface, you may want to use an even heavier or stronger thread on top, such as buttonhole twist or nylon invisible thread. Since these loops are fairly subtle, you may want to use a thread in the bobbin that catches the light more than cotton, such as rayon, silk, or polyester. In designing your own work, either clump your flowers or plan to lock off the threads at the beginning and end of each flower, as a trail of whip stitch on the surface of your fabric from one flower to the next can look busy and messy. Also, whip stitch doesn't cover printed fabric solidly, so design accordingly. You don't need to clip threads for each flower until you’re finished working. Simply lock the last stitches of the flower, turn the handwheel so the needle is in its highest position, pull out some thread above the needle, and move the hoop to the next flower, which you start by locking stitches. Later, you can clip all the excess surface threads (I don’t bother to clip those on the underside).
Another way to work whip stitch is in straight lines, moving the hoop slowly but running the machine fast (see Fig. 4-14). The more you practice free-machine embroidery, the easier it becomes. As you accumulate experience, you will develop a stitch style as distinctive as your handwriting—some people run the machine fast and move the hoop slowly; others stitch slower and move the hoop faster. When you feel comfortable with free- machine embroidery, you may want to dispense with the darning foot as long as your fabric is held taut by a hoop. If you keep your fingers around the hoop and not near the needle, you won’t impale yourself. This makes it easier to change thread colors often. As you draw your fabric away from the needle to cut off threads for tying, be careful: if you don't pinch the last stitch taken and pull the fabric gently to the side of the needle, the threads may draw up and pucker the fabric (Fig. 4-15).
Last, reset your tension settings to universal and your stitch length to its normal setting. Additional Ideas * Buy or construct an over-sized shirt, leaving the underarm and sleeve seams open. Decorate the sleeves and yoke with free-machine embroidered drawings of the universe with Halley’s Comet passing through. Date it “1986,” sew up the side and sleeve seams, and save it for your grandchildren. * Blow up to 4” tall and trace alphabet letters from Part Two onto the back side of sandpaper. Prepare 12 Nina’s Quilt Modules from Part Two. Take your supplies and machine to a pediatric ward of a hospital. Let a child pick out the letters of his or her name. Trace around each letter on a quilt module, and free-machine quilt everything in the center block but the letter, so it will stand out. Connect the modules three across and four down and give the lap quilt to the child. * Take a bag of solid-colored fabrics out into your garden. Study the colors of the garden. Then cut out simple circles and rectangles to represent the dominant colors in your garden. Back in the workroom, lay the fabrics on a backing. With whip-stitch, free-machine embroidery details of the flowers over the fabrics — stamens, outlines, stalks, leaves. * Make fabric place-cards by free-ma chine embroidering guests’ names on non-frayable fabric (like felt or inter facing), cutting out with pinking shears, and fusing to colored card board. * Fill in the letters of “March” for your fabric calendar with free-machine scribbling in rainbow colors. Outline them in bold couched thread. |
| PREV: Straight Stitch | NEXT: Machine Accessories | Home |
Tuesday, 2010-11-30 23:16