Visual Glossary:
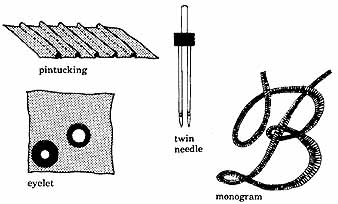
Pin-tucking; twin needle; eyelet; monogram
Jannie D. says, “Some people smoke; I buy Bernina feet.” It’s true: once you are hooked on machine em broidery, you’ll haunt your favorite store for the latest special equipment-- presser feet, needles, and needle plates. (If anyone complains about your habit, say “It’s cheaper than software or camera lenses.”)
Don’t assume that the foot for a brand different from yours won’t fit your machine. The feet are often interchangeable, depending on the length of the needle shaft and where the accessories attach (side, front, etc.). (See the chart in Section 6.) You can sometimes buy an adapter that allows you to use feet from a different machine—ask your dealer or a machine-embroidery teacher. You must know the shank measurement for your machine (Fig. 8-2).
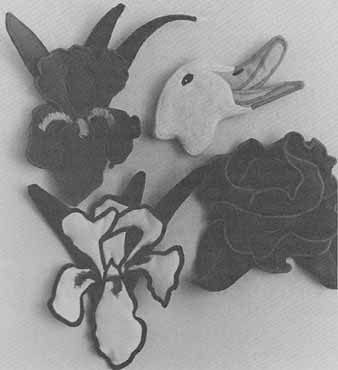
Fig. 8—1 Four name tags in three-dimensional appliqué by Barbara L.
The flower centers are worked with a tailor-tacking foot.
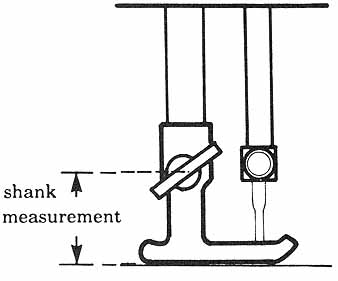
Fig. 8—2 Measure the distance from the center of the screw that holds
on your presser foot to the bottom of the foot when it's in the down position.
If it measures about 1/2 (12 mm), you have a low-shank machine; if it’s
about 1” (25 mm), you have a high shank machine. Accessories from similar
shank machines will sometimes fit your machine.
I take a presser foot from my machine with me when I shop; if it fits a different brand machine, the accessories for that machine will usually fit mine. Each brand has its own line of accessories, so check the competition when you’re in the market for new equipment. (I now carry a 3x5 card in my purse, listing the feet and plates I already have. I have been known to buy a foot I already own.)
I encourage you to make samples using all your special equipment. Follow the instructions given and then play with different tensions and threads. Bind your experiments into a sample book (see Part Two) or paste them into your machine manual or this guide.

Fig. 8—3 Know your presser feet (from left): multiple cord, open-toed
appliqué, straight stitch, rolled hem, roller, over-edge, craft or embroidery,
pin-tucking, no-snag.
Presser Feet
Many special presser feet have been developed for the sewing machine, with more coming out every day. To under stand their subtle differences, turn your presser feet upside down and ex amine the grooves and wedges on the underside. Each variation is designed for a specific purpose, to help hold the fabric flat against the needle plate without interfering with the stitches already formed. For example, as discussed in Section 3, the appliqué foot has a wedge scooped out on the under side to help it move easily over the previous buildup of threads in satin stitch and automatic stitches. Likewise, the piping foot has a channel underneath to ride over the cording inside your fabric.
Presser feet fall into four general categories: those that (1) handle special fabric, (2) help manipulate fabric, (3) apply something to fabric, and (4) manipulate thread.
Machines are set up to sew medium- weight woven fabric. When you sew either lighter or heavier materials or those that are not woven — that's , when you sew special fabric — you are pushing the limits of your machine. Then it's time to change presser feet (and needles and sometimes needle plates as well), to help your machine do a good job.
Lightweight fabrics call for fine thread, a small-sized needle, and a presser foot that's flat on the bottom, so that the fabric is sandwiched tight between the presser foot and the feed dogs. If you are sewing a straight stitch and can change to a single-hole needle plate, your stitches will lie evenly on the surface. In addition, you can buy a special narrow presser foot. (The stitch formed on the old treadles was so beautiful because of its single-hole plate and narrow presser foot.)
Two feet are useful for sewing on plastics (including vinyl), imitation leather, and leather: the roller foot and the Teflon embroidery foot. The roller foot prevents the friction that makes plastic stick to the sole of an ordinary presser foot. I also use the roller foot for sewing jersey-like knits. Instead of a separate foot, Viking has a press-on glide plate for the underside of its regular presser foot, to help it move over these nonwoven fabrics.
My all-time favorite foot for keeping layers of fabric from slipping is the walking foot. You don't necessarily have to buy the walking foot made for your machine, if you know what shank size your machine has.
The quilting guide, while not really a foot, helps you to quilt accurately in the middle of large pieces of fabric. Always start from the middle of the fabric and sew outwards. Be sure the quilting guide isn't pressing hard on the material, but resting lightly on the surface; otherwise it will make the fabric slide around. I also use the quilting guide anytime I can't see the guide marks on the needle plate. For example, I recently decorated the yoke of a ready-made work-shirt with automatic stitches. I used the quilting guide to keep uniform the distance of the stitches from the edge of the yoke.
Feet that help you manipulate fabric include the bias binder, ruffler, gathering, and piping feet. But the two feet used most often by machine embroiderers are the pin-tucking and the hemmer feet. The pin-tucking foot has spaced slots underneath to help guide pin-tucks regularly through the foot. More about this below when we talk about twin needles. The hemmer foot speeds up this time-consuming process by folding under a seam allowance as you stitch. You can use either a straight stitch or a decorative stitch to secure the hem.
On thick corners I like to use the hemmer with my home-made felt wedge, which is made by folding a 3” (7.5 cm) felt square in half twice. With a straight stitch, sew along the two long parallel edges. When you approach the edge of, say, a tablecloth, where four thicknesses of cloth are waiting to harass your needle, place the short end of the felt wedge under the hemmer foot, against the edge of one hem. The foot rises over the graduated thickness of the felt without getting stuck on the added bulk of the table cloth corners. At the corner, I sink the needle into the fabric, raise the presser-bar lever, pivot the material counter clockwise 90 degrees, place the felt wedge behind the presser foot against the edge of the tablecloth, lower the presser-bar lever, and stitch the remaining hem (Fig. 8-4).
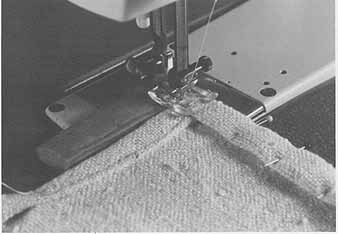
Fig. 8—4 Felt wedge.
For applying something to fabric— yarn, cord, braid, or more fabric—feet have been developed with a guide in front of the needle. Sometimes the guide is merely a hole in the cross-bar in front of the needle; sometimes the guide is under the foot in front of the needle (Fig. 8-5).
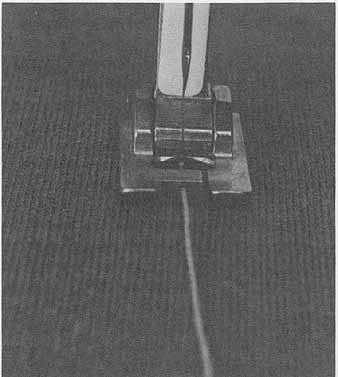
Fig. 8—5 Hole in presser foot allows cord to be applied to fabric easily.
The braiding foot, with its slot in front of the needle, is similar to the hemmer foot in guiding braid, soutache, or cord evenly through the foot. Automatic stitches worked on top of these trims are good-looking. (Our client Lynn uses her hemmer foot for the same effect be cause the braiding foot for her machine is so expensive.)
Similar to the braiding foot is an em broidery foot. It has a smaller hole in the cross-bar in front of the needle than the slot on the braiding foot. A simple satin stitch worked over fine crochet gives an elegant corded edge to appliqué. If the design is intricate, use the foot but put the fabric in a hoop, drop the feed dogs, and release the pressure. Then you can twist and turn the work easily.
If your machine doesn't have such a foot with a hole in the cross-bar in front of the needle, use the multiple-cord foot instead. The multiple-cord foot also helps you apply something to fabric. I like to put four different colors of fine crochet cotton in the holes (before put ting the foot on the machine) and stitch over them with the serpentine stitch or other automatic stitches (Fig. 8-6). A variation of this is to wind the elastic thread into the bobbin and then to stitch over the cords with automatic stitches. It makes a dainty gathered edge on a sleeve. If a multiple-cord foot came with your machine, turn it over. It usually has a wedge scooped out, to allow it to ride over the cords, and can be used as a substitute appliqué foot.
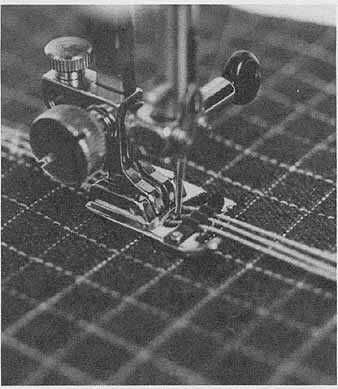
Fig. 8—6 The multiple-cord foot holds strands of cord in place while
you stitch over them with automatic stitches.
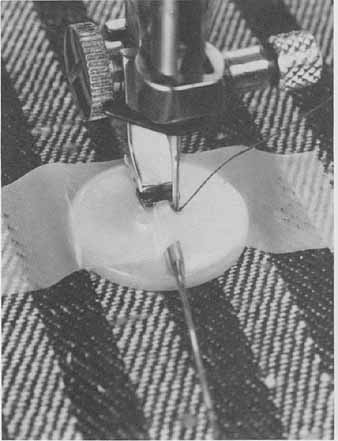
Fig, 8—7 The ankle on this machine serves as a button foot. A machine
needle has been taped to the top of the button to make a thread shank.
Another foot used to apply something to fabric is the button foot (Fig. 8-7). It holds the button securely to the fabric when the feed dogs are dropped. If you would like a thread shank underneath your button, so that it will sit above the buttonhole without puckering the fabric, tape a cocktail toothpick or a machine needle to the center of the button or to the foot itself. Loosen top tension slightly. The zigzag holding the button will form over the toothpick. When you remove the toothpick, you can pull the button to the top of the zigzag loop. (You can also apply buttons with no foot. Tape the button to the fabric while sewing and then tear off the tape.)
The final foot used to apply some thing to fabric gives two kinds of appliqué edges. Many of the machines now have a foot with a guide or wire under it in front of the needle to hold down the fabric for accurate stitching. These feet are called topstitching, blind hemmers, over-edge feet, etc. You can use them for appliqué in conjunction with the blind- hem stitch. The appliqué edge must be finished, so either use a non-frayable fabric or finish the edge (see Sections 2 and 3 for explanation of finishing methods—hidden appliqué, turned under edges, or satin stitch). For an invisible edge, use monofilament nylon in the top and stitch around the appliqué. The straight stitches fall on the backing fabric and the zig catches the edge of the appliqué. For an edge like a hand- stitched buttonhole edging, use a thread color that contrasts with the appliqué. You may want to use two threads in the top. Stitch so the straight stitches fall (3 mm) inside the appliqué shape and the zig points toward the backing. (See Fig. 8-8.).
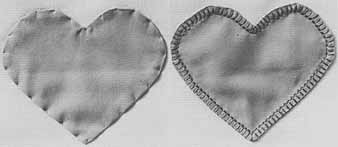
Fig. 8—8 Two kinds of appliqué made with an overedge foot. On the left,
nylon thread is used in the top, and the straight stitches of the blind-hem
stitch fall on the background fabric; the result looks like hand stitching.
On the right, the blind-hem stitch is worked with the straight stitches
on the appliqué to resemble buttonhole or blanket edging.
The fourth function of presser feet is to manipulate thread. I use the tailor- tacking foot for more than marking darts and basting seams. Since it leaves behind a loopy texture, I use it on items that won’t be washed (pillows, wall hangings, etc.) as a suggestion of grass and seeds, or in contrast to flatter texture. Worked in circles, the tailor-tacking foot makes a fluffy flower head; this is worked easier if you lower the feed dogs and decrease the pressure, stitching from the outside of the circle to the inside (Fig. 8-9).
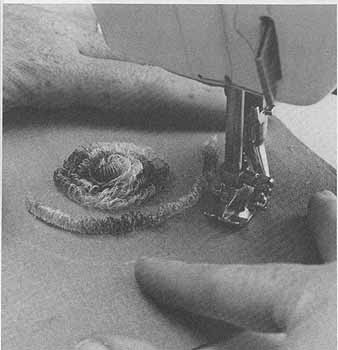
Fig. 8—9 The tailor-tacking foot can be used for circles or straight
rows. If iron-on inter facing is afterward bonded to the back, the thread
loops may be cut.
Bernina suggests using their tailor- tacking foot in two additional ways:
1. For a small fringe, butt water-soluble stabilizer or paper to a finished edge of fabric. Loosen top tension to 0 and sew down the middle of the two edges with a wide satin stitch. Carefully re move the bobbin thread and gently stretch the two edges apart, until they are joined only by the upper thread. Tighten top tension to normal and change to the appliqué foot. Anchor the left edge of the stitching with a satin stitch. Carefully remove the water-soluble stabilizer or paper, leaving a thread-loop fringe (Fig. 8-10).
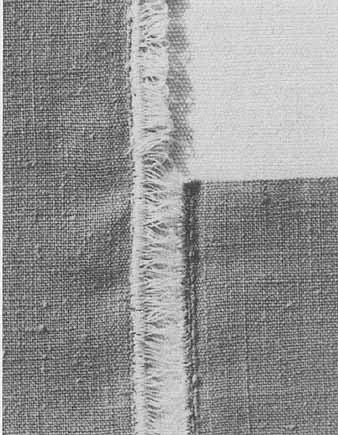
Fig. 8—10 Two more uses of the tailor-tacking foot: (top) fringe (see
text for explanation); and (bottom) another form of machine fagoting.
2. For another form of machine fagoting, follow all the steps in (1) above, but use two finished edges of fabric and anchor both sides of the stitch with satin stitch. This provides a way to cheat an extra 1/8-inch (3 mm) into the width of your satin stitch, and not to worry about missing an edge in the fagoting, as shown in Section 7, Fig. 7-2 1.
This discussion barely touches upon the wealth of presser feet available to you. Stay in touch with a good store and keep up on your reading to be informed of the latest. And don’t be afraid to alter your presser feet—drill holes in them, tape things to them, cut off parts of them.
Needles
Three special needles give unusual effects to machine embroidery: twin needles, the wing needle, and the wedge needle (Fig. 8-11).
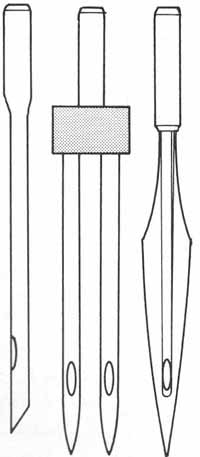
Fig. 8—11 Needles, from left: wedge, twin, and wing.
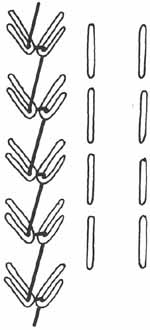
Fig. 8—12 How twin needle stitching works. (Left) under side, (right)
top.
Twin needles can be used in a vast variety of ways. The most straightforward use of them is decorative top stitching of seams. The twin-needle stitch is formed on the underside the same way a single stitch is formed, except that the bobbin hook grabs two loops of top thread instead of one. Therefore if you want your twin needle topstitching to lie flat, you must loosen upper tension. It would be nice to be able to lay two parallel thick threads on the surface in one operation (that is, with twin needles); however, unlike straight stitching with a heavier thread in the bobbin, you can't stitch from the underside with twin needles and expect the heavier ,thread to be laid on the surface in parallel lines of topstitching (Fig. 8-12). You could, however, exploit this look by using two different colors in the twin needles and plan to make the bobbin side the eventual topside (Fig. 8-13).

Fig. 8—13 Lynn likes the underside of twin needle
zigzag. The top tension has been loosened slightly, allowing tiny loops
to show on the underside.
Pin-tucking, which is a second use of twin needles, is formed when you don't loosen upper tension. The tightness of your upper tension determines how extensively your fabric is pulled. The use of the pintucking foot allows you to space rows of pintucking accurately. The grooves under the foot climb over previous rows of pintucking.
Another way to increase the bumpiness of your pintucks is to back the fabric you are pintucking with organza. Run your lines of pintucking. Then thread a tapestry needle with heavy yarn or thread — up to the size of rug yarn—and from the underside, run a line of this yarn into the channel formed by the twin needles between the organza and the fabric (Fig. 8-14). (If the garment is washable, don’t use wool yarn.) And if the line to be pintucked is rounded or squared, leave a small loop outside the channel at these points, to allow for shrinkage when washing.
Fig. 8—14 (above, right) Make a pintuck three-dimensional by backing the fabric with organza. Then thread a tapestry needle with heavy yarn and run it from the underside into the channel formed by the twin needles between the organza and the fabric.
An alternate method for this extra- raised effect is to guide a heavy thread under the fabric as you stitch, which is then caught in the pintuck channel (Fig. 8-15). Some machines have a gad get that attaches to the needle plate, through which tucking cord for the underside can be fed. Some machines have an extra hole in the needle plate in front of the needle hole through which cord can be fed. (Judy C. drilled a hole in her needle plate for this purpose.)

Fig. 8—15 Another way to raise a pintuck is to stitch over a heavy thread,
which is caught in the pintuck channel. Fig. 8—16 Turn corners with twin
needles by taking several small stitches.
Turning squared corners with the twin needles must be done in three or four small stitches. Stop the machine with the points of the needles barely touching the fabric. Raise the presser- bar lever and half-turn the fabric (less than 45 degrees). Lower the presser bar lever and hand-turn the wheel to take one tiny stitch, leaving the points of the needles just above the fabric. Repeat these small turns until you are around the corner and then continue pintucking (Fig. 8-16).
Marry B. has developed a stunning appliqué method with twin needles and gold lame tricot. See Fig. 8-17.
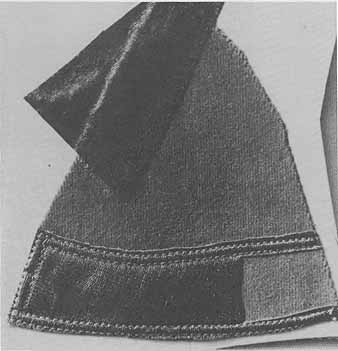
Fig. 8—17 Sample by Mary B’s technique for outlining with a narrow
gold band. She lays gold tricot lame over several layers of fabric, stitches
through all layers with a double needle, and then cuts around the inside and outside of shapes, leaving the gold outline. See the color section
for her screen worked in this method.
I like to use the twin needles to help mark fabric for hand-smocking. I run parallel lines of double stitching across a rectangle, the top and bottom of which I have marked with machine basting. I then hand-smock the fabric (Fig. 8-18). Remember to cut out the garment piece after smocking. Work the smocking or pintucking area and then lay the pattern piece on top of the fabric. If there is a skirt or full area under or above the worked area (as in a sleeve), don't stretch out the fabric for cutting, because when the garment is constructed, it will not hang right. Cut the sides of a dress, for example, on the straight of the fabric, with the fullness allowed to bunch under the pattern piece (Fig. 8-19).
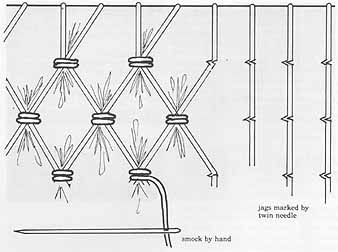
Fig. 8—18 Use the twin needles to mark a fabric for smocking. If you
have a blind hem stitch, set it for a narrow jag (otherwise the twin needles
will hit the needle plate) and line up each row accurately. Smock from
mark to mark.
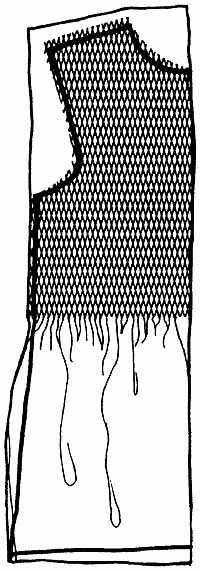
Fig. 8—19 Smock a material before cutting out the garment piece. Then
allow the material to bunch under the smocking and lay the pattern over
it for cutting. Do not pull out the material flat under the smocking because
the garment will not lay flat.
For another way to smock, see Thelma H’s method in Section 12.
Twin needles combined with automatic stitches can create very delicate effects (Fig. 8-20). In particular, the serpentine stitch lends a captivating color and pattern to otherwise ordinary materials. But watch the width of your stitch: if it’s too wide, the twin needles will hit the presser foot or needle plate. This will also happen if you leave the needle de-centered from a previous project. For some machines twin needles come in various widths, so you must check to be sure you can stitch the entire automatic stitch without hitting the side of the presser foot or the needle plate. Handwalk the unthreaded machine through an entire stitch cycle.
Don’t forget that you can free-machine embroider with twin needles, playing with different colors in the needles.
You can also buy a triple needle (Fig. 8-21).

Fig. 8—20 Twin needles and automatic stitches can be worked both with
the presser foot on and off. Fig. 8—21 Mary L. calls this the “Accident
Dress.” While playing with a triple needle, she invented this yoke for
a child’s dress, using a three-groove pintuck and a narrow zigzag. The
yoke is white batiste but the color of the threads makes it appear blue.
A second unusual needle is the wing needle (also called a hemstitch needle) which makes large holes and is especially lovely on fine fabrics like organza (see Section 9 for more information). Try using the wing needle in combination with those automatic stitches that stitch into a central hole several times.
If a line of zigzag worked with the wing needle is sewn 1/4 (6 mm) away from the bottom of a piece of organza, and then the fabric is trimmed along one side of the zigzag, a lovely picot effect is made (Fig. 8-22). More on the visual effects of the wing needle in Section 9.
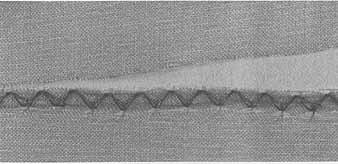
Fig. 8—22 Make this picot edge with a wing needle and an open zigzag.
Needle Plates
Many special needle plates are avail able to the adventurous machine stitcher. One of my favorites is the eye let plate. This usually comes with an awl for piercing the fabric, to make a hole big enough to fit over the eyelet shaft on the plate. Work eyelets with the fabric on a hoop, stretching the material before making the hole with the awl. You will have to remove both the foot and the needle to fit the hoop onto the eyelet plate, and you will not be able to use any foot (unless your machine has a special eyelet foot). De-center the needle to the left and don’t forget to lower the presser-bar le ver. It is important to run both the machine and the hoop at a constant, medium speed so that the eyelets will be evenly formed. Stitch around at least three times for each eyelet. To end off, de-center the needle to the right, change the stitch width to 0, and take several stitches in one place to lock the threads (Fig. 8-23).
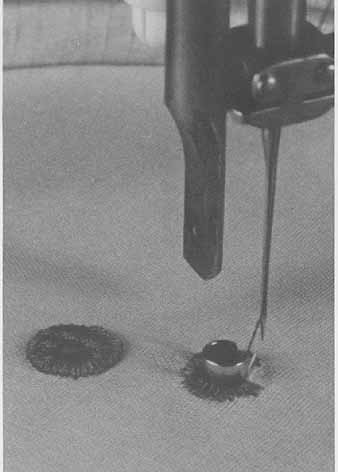
Fig. 8—23 On the left is an eyelet made over felt. On the right is an
eyelet in progress.
I have tried several methods to pad eyelets. One is to use crochet cotton in the bobbin and work with the under side of the fabric up, in order to make a heavier line of satin stitch. Decrease bobbin tension and tighten upper tension. Another is to make a small felt cutout, to be stitched over. Poke the awl through the felt first and then cut out a circle 1/8” (3 mm) around the hole. Coax this felt doughnut over the eyelet shaft and loosen top and bobbin tensions. As you sew, hold the felt down on the side opposite where the stitches are being formed. A third way to pad an eyelet is to use a bead that has a big enough hole for the eyelet plate yet is low enough for the zigzag needle to clear. Stitch over the bead for a nice raised effect. Always experiment first on a test cloth.
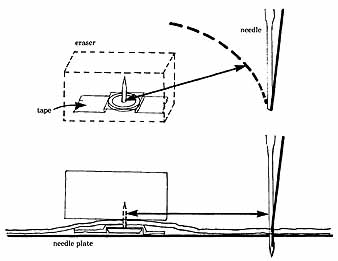
Fig. 8—24 Make your own jig for sewing circular designs by taping a
thumbtack upside down on the bed of the machine a radius away from the
needle. Put the material in a hoop and stick the fabric onto the thumbtack
wherever you want the center of the circle to fall. Secure the fabric with
an eraser impaled on the thumbtack. Keep the fabric taut between the thumbtack and the needle as you sew a circular design.
Some machines have extended needle plates to sew circular designs. The fabric must be stiffened with a stabilizer, though, as it's apt to pull out of shape when stitching in circles. These plates are not cheap, but you can improvise a less expensive (but not as ac curate) way to stitch circular designs. Decide how large you want your circle and measure the distance from the center of the circle to one side (the radius). To the left of the hole in the needle plate, tape a thumbtack upside-down a radius away from the hole. Back your fabric with stabilizer and put it into a hoop. Stick the fabric over the thumb tack wherever you want the center of the circle to fall on the fabric. Now, to hold everything together, put an eraser or a cork onto the point of the thumb tack sticking through the fabric. With out stretching the fabric out of shape, keep the fabric taut between the thumbtack and the needle, as you sew slowly and carefully in a perfect circle (Fig. 8-24).
A variation of this circular plate is called a flower stitcher. By varying automatic stitches and width of the zigzag, you can come up with a variety of sizes and designs (Fig. 8-25).
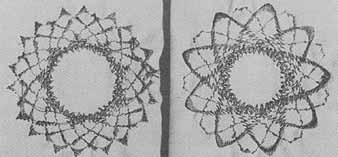
Fig. 8—25 Jan W’s tower-stitcher attachment produces designs like these.
Some machines also have a template for perfect monogramming. It is similar to the quilting guide in that you watch an extension to the right of the machine, and by making it follow a stencil cutout of a letter, you make a perfect satin-stitched monogram. For directions on a more free-hand monogram, see Section 10.
The Singer computer machine makes monogramming even easier. You change to a special needle plate with a built-in hoop, position the fabric where you want the monogram, make sure you have a full bobbin, select the style of lettering, and put a weight on the foot pedal. The machine stitches a large monogram while you have a cup of coffee.
Be sure to ask your sewing machine dealer what new special equipment has been developed for the various machines, so you can constantly expand your repertoire of machine-embroidery effects.
Additional Ideas
* Stitch an exaggerated meander pat tern on a white cape with twin needles. Thread cording through the underside but pull it to the surface at some curves. Clip the cording and un ravel it, for an unusual surface texture.
* Make a detachable collar of solid eyelets.
* Hemstitch a large piece of red organza with a wing needle, enough for several valentines. Insert heart shapes with satin stitch in postcard- sized pieces of interfacing on which you have already typed an address and message. Stitch the stamp on with straight stitch and mail.
* Construct a color wheel of thread, using the tailor-tacking foot.
* Use the twin needles to mark a long red rectangle for white hand-smocking. When finished, seam the panel to another blue rectangle of fabric on which you have monogrammed a white “July” for your fabric calendar.
