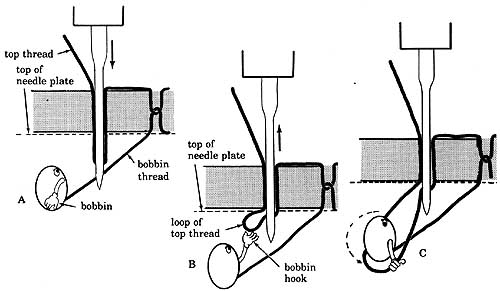
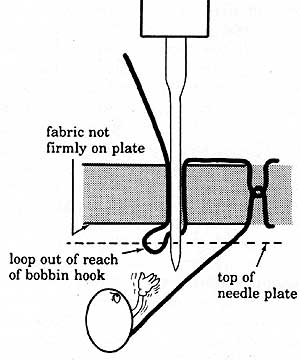
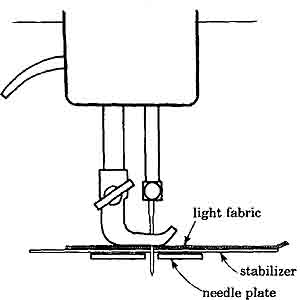
The straight stitch is so versatile that even if you did nothing but straight-stitch machine embroidery, you would have enough ideas and work to keep you busy the rest of your life. In its simplest form straight stitch looks like the drawn line, as in the scenes on Shirley F’s vest (Fig. 2-1). Similarly, you can distort rows of straight stitch to create pattern, as Lois E. has done in Fig. 2-2. Straight stitch is often used to out line a shape (Fig. 2-3). It is also used to emphasize a line with a thicker thread, like buttonhole twist in topstitching. How a Stitch is Formed But before going any further, let me ask you an embarrassing question: Do you really know how a stitch is formed on the sewing machine? Don’t laugh — understanding how the machine works explains how it doesn’t. And don’t be embarrassed—in a continuing private survey, I’ve discovered that most people don't understand how a stitch is formed, even if they have been sewing on a machine all their lives. After examining Figs. 2-4 and 2-5, you can see that if, for example, the fabric isn't flat against the needle plate at the moment the needle enters the fabric, the shuttle hook on the bobbin will not catch the loop of top thread, and therefore a stitch will be skipped. Remember this, especially when you are doing free machine embroidery.
Troubleshooting Stitching Problems Some of the other stitching bugaboos you might run into, and why they occur, are: 1. The upper thread breaks: a. The machine isn't threaded properly or the needle is inserted wrong way round or at the wrong height. b. Upper tension is too tight. c. The thread is dry and brittle; or too thick for either the needle or material; or knot ted somewhere between the top spool and the needle. d. The needle is bent or blunt. e. The presser foot isn't lowered. f. You are taking the first stitch too fast for the thread being used (e.g., rayon)— start slowly. 2. The lower thread breaks: a. Lower tension is too tight. b. The thread is unevenly wound on the bobbin or brought up incorrectly. c. The hole in the needle plate is old and scarred and needs a light filing with a machinist’s file (sewing machine dealer can do this). 3. The needle breaks: a. The material has been jerked during sewing, bending the needle and causing it to hit the presser foot or needle plate. b. The upper tension is too tight for the machine. c. The needle is mounted incorrectly. 4. Stitches are uneven or skipped: a. The bobbin innards are linty and clogged. b. Needles being used are not made expressly for machine. c. The needle has a scooped-out part (called a scarf) too shallow for the thread or stitching method being used — use a Yellow Band or Stretch needle. d. The machine is incorrectly threaded. e. The fabric was not touching the needle plate at the moment the stitch was formed. 5. The material puckers: a. Thread is too thick for the material — use a stabilizer. b. Upper and /or lower tensions are too tight. c. Stitches are too long. d. Fabric was jerked away from needle at end of stitching, gathering fabric, rather than pulled gently to the side, pinching ends of threads. e. Fabric needs added body to withstand heavy stitching (especially in zigzag stitching) — use stabilizer. Any other machine irregularities, such as poor timing or sluggishness, should be checked by a dealer. I won’t fill your ear with the details of which needle and thread to use with which fabric. If I start listing them here, you’ll just yawn and say “Oh, that” and you won’t learn anything at all. So right now I’ll tell you the barest minimum and when in the future you need more specific information, you can turn to the Needle and Thread Chart in Section 13, Know Your Tools. Incidentally, American, Japanese, and European needles have different numbering systems, which is why I always give two numbers—e.g., Size 14(90) means Size 14 for American machines and Size 90 for European and Japanese machines.
Thread As for thread, we now have a cornucopia of choices — cotton, rayon, polyester, silk, metallics, cotton-wrapped polyester. Since the numbering system used for threads isn't uniform throughout the world—e.g., an American size 50 thread is thicker than a European size 50—I will avoid confusion by describing threads as extra-fine, ordinary, and heavy, rather than by size number. See the Supply List for brand names under each category. I use ordinary cotton-covered polyester for garment construction, but hardly at all for machine embroidery, as the outer fiber tends to shred, causing the thread to knot and break. But I do use extra-fine cotton-covered polyester for satin stitch. Since new threads are being introduced all the time, don’t reject any thread without giving it a thorough workout. Experiment with loosening top tension and using a larger sized needle if your thread breaks while playing with it. Fabric stores now carry European, Indian, Thai, and Japanese threads of 100% cotton, rayon, silk, or polyester that are extra-fine and that produce, in particular, remarkable free-machine embroidery. Check the Supply List for Internet and mail-order sources and ask your favorite fabric store to stock a full range of colors.
In most cases you will use a size 12(80) or size 14(90) needle with ordinary sewing-machine thread, but re member that you choose the thread to suit the fabric and the needle to suit the thread. On organza, for example, you would choose extra-fine cotton, rayon, or silk sewing-machine thread matched with a size 10(70) needle. Remember that the purpose of the needle is to make a hole in the fabric big enough for that diameter of thread. If the hole isn’t big enough, the thread is cut by the edges of fabric surrounding it. If you backed your organza with stabilizer, you are working with a heavier fabric than plain organza alone; therefore, you may need the next larger size of needle.
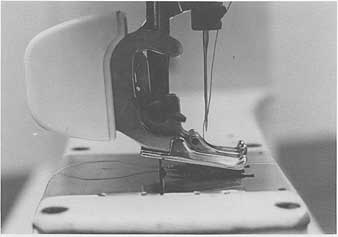
Preparing Fabric / Preventing Puckering You’re impatient to start sewing, aren’t you? But before you can do even an inch of straight stitch, your fabric must be prepared. If your fabric will later be washed, preshrink it now by wetting the fabric and drying it in a hot dryer (except for permanent press fabrics—use a cool to warm dryer). If you’re making something that will be washed, be sure your threads are color fast (silk floss, for example, isn't guar anteed colorfast). Iron fabrics with wrinkles. Some fabrics will need extra body to keep the stitches from puckering the material. Medium- and heavyweight woven fabrics may not need any help (always make a test cloth), but the lighter weight cottons and almost all knit fabrics need to be stiffened by a stabilizer (your choices were listed in Section 1). Which stabilizer is best? The answer varies. When you enter the world of the machine-embroidery sub-cult, you enter a busy, happy hive of opinionated quirks. One person uses only paper as stabilizer and that paper must be Women’s Wear Daily because it’s the correct weight and the ink doesn’t rub off. “Paper!” screams another aficionado in horror. “I can’t stand that clackety, clack sound and it dulls the needle. Only tear-away for me, thank you. And I don’t put the stabilizer in the hoop— only the fabric.” Use what you like and what you can afford. (Jackie Dodson says she once found a Chinese newspaper behind em broidery on a T-shirt from Taiwan.) Most often you will use tear-away stabilizer, which comes in light and crisp weights. You can also use water-soluble stabilizer, which disappears when wet. But if you run out of either, don’t despair. There are other ways to prevent puckering. Putting a piece of typing pa per between the fabric and the needle plate helps. The paper is then gently torn away after stitching (Fig. 2-6). The paper trapped by the stitches disappears with the first wash. The weight of paper you choose depends on how heavy the stitching will be, whether or not you’re using a hoop, or whether the embroidered article will be washed before use. Use typing- weight paper if you don’t use a hoop. Choose tissue paper if you use a hoop and want the embroidery to have a soft feel even if it isn’t washed. (You can al ways put the fabric in a hoop and pin the stabilizer underneath it.) If you have a large piece of fabric to stitch in long rows, tear the typing paper in long strips or use adding machine tape. If you have large areas to stitch, use shelf paper. A third kind of paper to use is plastic-coated freezer paper from the grocery store, which is ironed onto the underside of your fabric and acts like a square hoop. Remove it by ironing again, which loosens it, and tear it off.
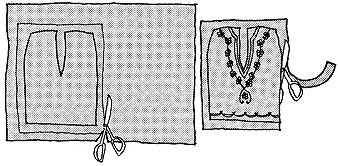
Other ways to prevent puckering include spray-on starch ironed into the fabric to give extra body for intricate stitching. More often I back fabrics with a piece of organza, organdy, or lightweight iron-on interfacing. You can even draw your design on the organza or interfacing and decorate the piece from the wrong side, as described in Section 1. For all garments to be home-sewn and embroidered, be sure to do the embellishing before you cut out the con tours of the pattern piece, for two reasons: (1) you can use a hoop even near the edge of the piece; and (2) if any puckering occurs, you can sometimes make adjustments in cutting out the piece, whereas if you had cut the piece first and then stitched it, the puckering would be unalterable (Fig. 2-7).
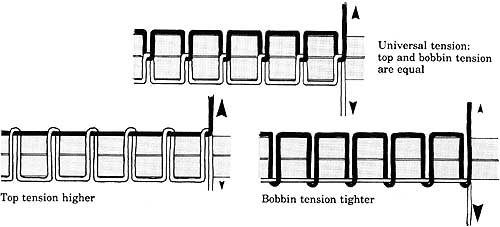
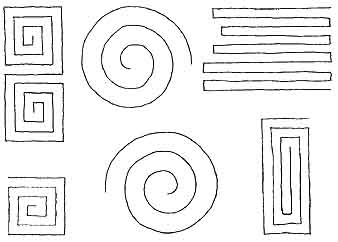
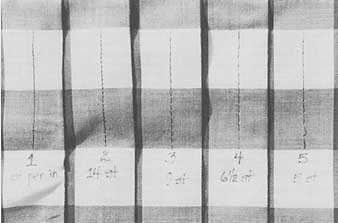
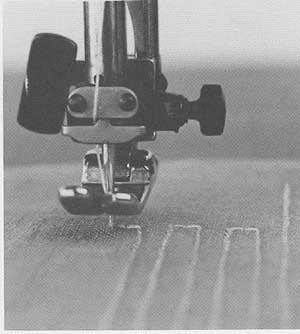
To do this, first cut off the excess tis sue paper around the pattern piece, anchor it with weights or pins, and trace around with pencil or tailor’s chalk. Re move the pattern piece and machine- baste the lines you drew, so you can see them on the underside and so that bias edges are not stretched. Cut a large rectangle around the garment, allowing at least two inches (5.5 cm) of extra fabric all the way around. Transfer your design to the appropriate place on the garment piece and do the stitching. Then press on the wrong side, so you won’t flatten the stitching. Put the original pattern piece over the fabric. Draw new outlines if the fabric has shrunk slightly because of the embroidery. Then cut out the actual contours of the garment piece. Top and Bobbin Tensions Before you try a straight stitch on your fabric, run a line of it on your test cloth: set up a small rectangle of the same fabric you’re sewing on and try a line of straight stitch on it. Does it pucker the fabric? Are you happy with the stitch tension? What does it look like if you tighten the top tension? Loosen the top tension? Tighten the bobbin tension? Loosen it? If you have never manipulated your tension set tings, this is the time to experiment, because the rest of the guide constantly involves adjusting the settings. Don’t worry if your machine can only, say, manipulate top tension. Work within your machine’s limits—but find out what they are by playing. Most machines have a midway point for both upper and lower tension set tings. When both indicators are set at these midway points and you have the same thread in top and bobbin, you have what I call a universal tension set ting. If you don't know how to loosen your bobbin tension, consult the instruction manual for your sewing ma chine or ask your dealer. The bobbin tension of some machines is preset in the factory. Therefore, the instruction manual will tell you not to fiddle with bobbin tension. If you want to explore the full range of effects possible with machine embroidery, ignore the manufacturer’s warning. Put a dot of nail polish on the bobbin to mark the factory setting. Specific details on what to do are in Section 4. For now, merely manipulate top tension and play with different weights of thread in the top and bobbin; remember that the heavier thread tends to pull the lighter thread to its side of the fabric. If no tension setting seems to keep the fabric from puckering, put a piece of stabilizer (interfacing, tear-away, pa per, or organza) under the test cloth and try again. As you change the tension settings for the test cloth, write them down directly on the cloth. Threadless Practice The first time I ever sewed on a ma chine, I was given a sheet of printed straight lines and spirals, both curved and squared. Using an unthreaded ma chine, I sewed slowly and carefully along the lines. It taught me to take my time and to watch the stitch that was being formed, at the same time looking ahead to where the needle would enter the fabric next. I learned to vary the speed at which I sewed, slowing for curves, turns, and intricate places, and speeding up on the long lines of straight stitch (Fig. 2-8). If you haven't had much practice sewing on the machine, you might want to copy your cartoons onto typing paper and then practice stitching the main lines with an unthreaded machine. If you’re satisfied with your work, you could then use the paper to transfer the design to fabric, via the tailor’s chalk method (see section 1). If you have a European or Japanese machine, take the time to make a stitch-length sample (Figure 2-9). This will tell you how many stitches per inch each setting makes. Avoiding Headaches
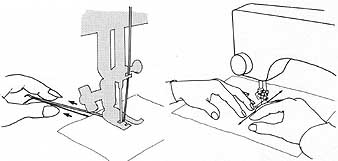
Remember to save yourself head aches by holding the threads together behind the presser foot as you begin to sew. Otherwise, the fabric is sometimes dragged through the needle plate into the bobbin-case area, and valuable time and psychic energy is lost in unsnarling the mess (Fig. 2-10). And do yourself a favor: anytime you hear the machine making horrible noises, stop sewing and investigate. Don’t keep sewing, hoping the noise will go away. Usually the culprit is a thread in the wrong place. When you spend hours at the ma chine, your comfort depends on your posture and the way you hold your arms and fingers. If you slump, and at the same time flap your elbows in the air like pelican wings, you will have a backache and be exhausted in a short time. Hold yourself erect, with a straight spine and tight abdominals. Lean forward from your hips. Rest your elbows on the sewing surface and place your fingers as shown (Figure 2-11). Experiment to find the ideal height for your machine. I like my portable ma chine about three feet above the floor. When I perch on a stool, my machine embroidery is about chest-high, up where I can see it. I don’t have to hunch over at all. I don’t wear glasses, however. If you do, you may need to change the distance between your eyes and your work—or change your glasses. Barbara Lee Smith of Oak Park, IL, also likes her machine on a high worktable (she puts her foot pedal on a box so that she can still use the knee-lift on her ma chine). She found that her eyes were about 13” from her work and that she needed half-frame glasses just for ma chine embroidering. Eye tests are usually given from about 16”, which may not reveal the problems you have in seeing work closer than that.
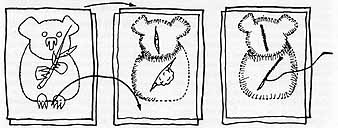
Straight-Stitch Appliqué At last, you may begin the machine embroidery. One good use of straight stitch is for appliqué, and there are at least four good ways to do it (Fig. 2-12).
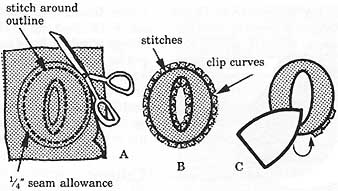
Method 1: Cut out your shapes with a ¼” (6 mm) seam allowance and then straight stitch along the seam line, so that when you clip the curves and press the seam allowance under, the edge is crisp and neat. Pin the shape to its backing, using a glue stick on the back of the appliqué or lots of pins to keep the fabric from shifting while stitching, and sew 1/8” (3 mm) away from the turned edge (Fig. 2-13). If you do a lot of this, check the feet that came with your machine and check with your dealer— there may be a special foot that helps guide the fabric evenly (e.g., blind hemmer, topstitching foot, etc.). By holding your fingers as shown in Fig. 2-11, you will prevent the fabric from puckering. When you reach sharp turns in the shape, stop the machine with the needle in the fabric, lift the presser-bar lever, and turn the fabric slightly so that the presser foot is aimed in the right direction. If you force the fabric under the presser foot at turns, you may stretch the material on the bias, which results in unsightly bulges (Fig. 2-14).
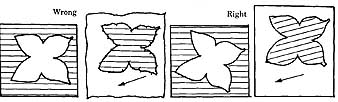
Method 2: A second method for straight-stitch appliqué is to cut the appliqué shape with a 1/4" (6 mm) seam allowance. The same shape is cut from lightweight fabric. Seam the two shapes right sides together all around the edges. Clip curves. Cut a slash in the middle of the lightweight fabric. Pull the appliqué fabric right side out through the slash. Press edges. Sew appliqué shape to backing fabric with straight stitches. This handy method is called “hidden appliqué”. (Be careful on light-colored fabric — sometimes the slash shows through the appliqué.) Method 3: In the third method, the edges are left deliberately frayed as part of the design. Cut appliqué shape with no seam allowance. Topstitch ¼” (6 mm) in from the edge. Use a pin to fray the edges. Method 4: And finally, a method I learned from Peggy M., who is clever at using ordinary scraps in innovative ways: lay small scraps of fabric on a foundation (old sheet, muslin, etc.). Sew back and forth with close rows of straight stitch. Bond iron-on interfacing or fusible web to the back of the fabric and cut out your appliqué shape. Topstitch it to the backing. If you are not bonding the back of your appliqué and your piece will receive heavy wear (such as washable clothing), you must be concerned about matching grain lines. Try to cut out your appliqué shapes so that when they are pinned to the backing, the grain lines of both the appliqué and backing are lined up. For example, I once made an appliqued butterfly, fluttering at an angle on the backing fabric. Instead of cutting out the butterfly on the straight grain of the appliqué fabric, I cut it on the bias so that when I pinned it at an angle on the backing, the grains would line up, as indicated by the arrows in Fig. 2—15. How do you handle enormous appliqué shapes, say for a bedspread or wall hanging? First of all, work on a flat surface when you are pinning the appliqués to the backing, so everything will lie flat. Pin liberally or fuse by web, gluestick, or disappearing basting tape, so the fabric won’t shift as you sew. Keep your hands to the sides of the fabric, using your fingers as guides, as shown in Fig. 2—11. You can backstitch the first and last stitches, but I prefer to pull the ends to the back and tie off in knots. When you have a large number of ends to finish, however, you may want to pull them to the back and put a spot of fabric glue on them, which will hold through repeated washings.
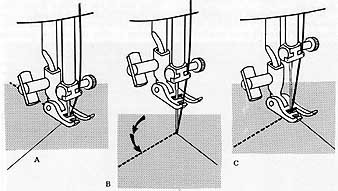
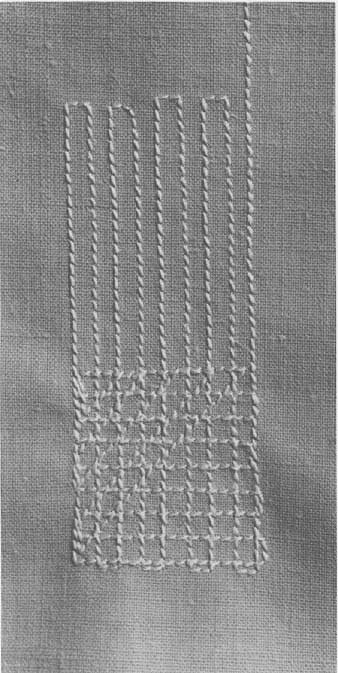
Crosshatching Crosshatching is an easy way to fill in large areas with color or texture. It is done by laying intersecting lines of straight stitching on top of each other in a grid. The following description of how to crosshatch is accurate, but it makes an easy maneuver sound complex. Study the pictures and try not to be boggled by the text. Stitch down a line. At the bottom, leave the needle in the fabric, raise the presser-bar lever, turn the fabric 90-degrees, and lower the presser-bar lever. Take one or two stitches. Repeat the procedure by leaving the needle in the fabric, raising the presser-bar lever, turning another 90 degrees, lowering the presser-bar lever, and stitching another long line of stitches. Use your presser foot as a spacing guide between rows of stitches. It’s hard to declare how far the second line should be away from the first line because the length of your stitches at the bottom of each row determines how far away you will be from the first row of stitching. Maintain this spacing to keep your lines parallel. When you have finished a rectangle of parallel stitches, turn the fabric 90 degrees and stitch rows of straight stitch, perpendicular to the previous rows (Figs. 2-16 and 2-17).
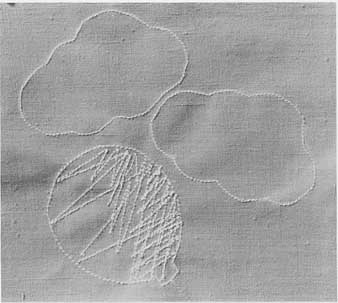
It is annoying to run out of bobbin thread halfway through crosshatching a project, so start with a full bobbin. Since you won’t see the bobbin thread, use up old spools and odd colors of thread. The finer the thread, the more you can get on the bobbin, the less often you will have to change the bobbin. Crosshatching can also be done in an irregular manner by using the back stitch lever on a machine (Fig. 2-18).
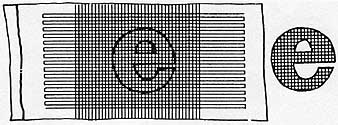
Since we use a straight-stitch cross- hatching for texture, choose a thread that has some sheen to catch the light. If you do row upon row of stitching with 100% cotton, the effect will be lost and you might as well use checked fabric. But if you use polyester, thin silk, or rayon thread and perhaps play with the color changes of variegated thread, you create the vibrant feeling characteristic of all embroidery. A hint: I once tried filling in small shapes, such as initials and little flowerpots, with crosshatching. With all the irregular turns and twists in the shapes, I nearly pulled my hair out from frustration. Then I realized that it would be easier to make a large rectangle of crosshatching, with long lines of stitching. After bonding a piece of iron- on interfacing or fusible web to the back of this rectangle, I cut out my small shapes and appliquéd them by machine to a backing. The bonding kept the edges from fraying (Fig. 2-19). This method works particularly well for lettering. If you design the letters to touch each other, you can appliqué them in one operation, as if they were script. Some people like to use cello-tape in stead of pins to hold appliqué to a backing, stitching right through the tape and later pulling it off. I can't recommend cello-taping these letters to the backing when the edge is so vulnerable to fraying. When you pull the tape off, it destroys your bonded edge. But cello- tape works well for nonwovens like leather and vinyl. Quilting Quilting with the presser foot on is best done for items with straight lines or broad, sweeping curves. Otherwise, the fabric begins to creep and before long, puckers will be caught on the front and back of the piece. (If your ma chine has adjustable presser foot tension, use it; also see Section 12 for quilting with the darning foot. For a more thorough discussion of machine quilting, consult our guide, The Complete Guide to Machine Quilting, listed in the bibliography.) I once quilted an enormous piece of striped fabric for a king-sized bedspread. I worked on a ping pong table to support the fabric and loosened both top and bottom tensions slightly to accommodate the extra thickness of top, batting, and bottom. I also stitched on top of adding machine tape to keep the fabric from creeping. Today I heartily recommend using a walking foot when machine quilting with the presser foot on (Fig. 2-20). It keeps all the layers from creeping. Ask your machine dealer to show you the proper walking foot for your machine. You may have to use a foot made for another brand of machine. Trapunto is the name of another form of quilting in selected areas. Back a fabric with organza or muslin and straight stitch around a shape on the topside of the fabric. Turn the fabric over and slit only the organza. Stuff batting, felt, or yarn (depending on whether the article is washable or not) into the opening and pad the area evenly. Don’t overstuff it or the fabric will pucker. Either cover the slash with iron-on interfacing or sew up the slash in the organza by hand, using a whip-stitch or a catch-stitch (Fig. 2-21).
Additional Ideas * Copy the decorative design on an old sewing machine. Blow it up slightly and simplify it for appliqué. Using non-frayable but washable fabric such as knits, appliqué the shapes with straight stitch to the Sewing Machine Cover in Part Two. * Using the hidden appliqué method, appliqué bright-colored garden tool shapes to a ten-pocket tote for gardeners. * On a length of fabric, draw a mother quail from the side and enough babies behind her to make a door towel to place at the bottom of a door to keep cold air out. Quilt the features and outlines with straight stitch. * Crosshatch a large area of fabric with silk or rayon thread in basket-weave patterns. Bond fusible webbing to the back of the entire piece. Then cut out basket shapes and appliqué to a backing. Fill the baskets with fabric flowers, using the petal shape from Part Two. * Crosshatch in icy blue and cut out the word “January,” appliquéing it to a canvas rectangle that's the be ginning of a fabric calendar, and that will also serve as a sampler of the techniques you’re learning. Watch the Additional Ideas section at the end of each section for the coming months of the fabric calendar.
|
| PREV: Introduction to Machine Embroidery | NEXT: Simple Free-Machine Embroidery | Home |
Tuesday, 2010-11-30 23:05