General Rules. Home dressmakers can do their own fitting, unless they
have an unusual fitting problem, because the lengthwise and crosswise grainlines,
which you marked, on sleeves, on front and back of bodice and skirt sections,
will indicate how the garment hangs and fits. Have someone assist you.
If pattern
was altered, and all body measurements checked, only minor adjustments will need
to be done when fitting.
* Try on the garment. Close opening, using exact seam allowances.
* If too snug, let out at side seams.
* If too loose, take in at side seams.
* All lengthwise grainline markings and seams should sit perpendicular to the floor.
* All crosswise grainline markings should sit parallel to the floor.
* Shoulder line seams should fall exactly along top of shoulder.
* Each dart should be in line with the highest point of the body curve that it fits.
POSSIBLE ALTERATIONS
* Crosswise grainline at bust level dips to the left and the lengthwise grainline swings to the right. Cause — the left shoulder is slightly lower than the right shoulder. Remedy — Open left shoulder seam. Raise it until crosswise grainline sits parallel to floor. Pin carefully. Observe that the lengthwise grainline will move to the grain perfect position. Side seams also move to correct position.
* Check position of all darts in relation to body curves. Raise or lower, if necessary. Lengthen or shorten.
Deepen lengthwise darts if you wish garment to hug the body more closely. Let out if too snug.
* Observe the depth and shape of the neckline.
* Are pockets in desired and becoming position?
* Remove garment, mark alterations with chalk or basting stitch.
Fitting and altering sleeves — Section 17
Fitting and altering pants — Section 13
BODICES
Alterations in size of necklines and armholes — make corresponding alteration in facings. Use of shoulder pads will remedy many minor problems. If pads are in fashion, adjust size of pad.
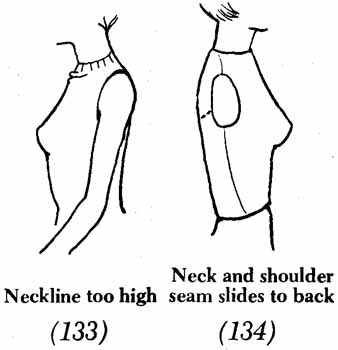
Neckline too high. Seam stitching line represents finished neck edge. Clip seam at regular intervals. Will neck be comfortable when finished? If not, establish new stitching line with a row of pins. Draw with pencil on wrong side of fabric. Do not trim. Pin facing to garment. Stitch on new line. Trim facing and garment in one operation, blending seam.
Neckline slightly loose. Is it stretched? Did you stay-stitch? Check size on paper pattern. Draw up threads to fit or to make slightly smaller.
Neck and shoulder seam slides to back. Rip shoulder seam. Let out seam allowance on back only.
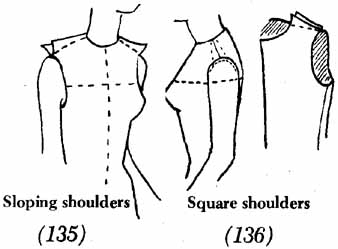
Sloping shoulders. Deepen shoulder seam at armhole edge until crosswise grainline sits level.
Square shoulders. Let out shoulder seam at armhole end. Take narrower seam allowance in sleeve cap area. Draw a new stitching line, keeping a smooth flowing curve.
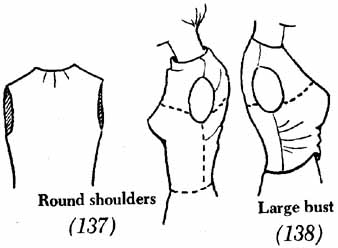
Round shoulders. Probably caused by poor posture. If not, rip shoulder seam; rip side seam. Drop back neckline and back shoulder seam near neck. Pin shoulders, allowing narrow seamline on shoulder and neckline edge. Pin side seams, lifting back of bodice at armhole slightly, if necessary. Observe crosswise grainline. Take in back neckline fullness with 2 or 3 one-eighth inch darts or tucks — see diagram. Tie string around waistline to determine any adjustment at waistline edge.
Remember: Darts shape the fabric to fit over a body curve, the wider dart the larger the curve produced. Hence, large bust and large buttocks require more fabric and wider darts. Small busts and flat buttocks require narrow darts. So, altering to fit is a logical procedure (common sense). Stitch or pin darts of various widths in scraps of fabric and observe the size of the curve produced to understand procedure.
Small bust. Rip side seams and darts at underarm and waistline. Pin narrower darts to fit size of bust curve. Pin side seams. Observe that the notches on front of garment will be lower than corresponding back notches. Adjust extra length on front at lower edge.
Large bust. Procedure is the reverse of small bust. Widen the darts. Adjust length at lower edge of back section. Adjust width of waistline at side seams.
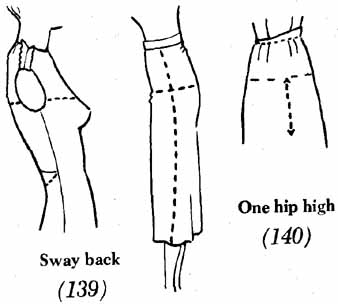
Sway back (lordosis). Wrinkles appear above waistline on bodice and below waistline on skirts. Probably caused by poor posture. If not, alter garment. One-piece garment — pin a crosswise dart. Stitch. The stitching line can be covered with a belt or half belt. In separate skirt pin crosswise dart below waist the depth required to make crosswise grain-line level. Measure this amount. Trim waistline seam, tapering to side seams. (See diagram 139.)

Neckline too high; Neck and shoulder seam slides to back

Square shoulders; Sloping shoulders

Round shoulders; Large bust

Sway back; One hip high
SKIRT ALTERATIONS
Again, if pattern was adjusted, minor alterations can be made at side seams.
One high hip. Tie string around waistline. Raise low side until crosswise grainline levels, or lower high side, or do a little of both. (See diagram 140.)
Large or small hips. Follow procedure of widening or narrowing darts as for bodice. Adjust waistline at side seams.
Large tummy (embonpoint). Probably poor posture. Crosswise grainline lifts in center front. Widen darts on garment front. Adjust waistline at side seams. Gain extra length by using a narrow seam allowance at waistline. Are side seams and lengthwise grainlines perpendicular?
