How PANTS SHOULD FIT
- Side seams and creases should sit perpendicular to the floor.
- Ease through hips and legs sufficient for comfort at all times.
- Crotch fit close enough to look neat when standing, yet have sufficient
ease for comfort when sitting.
- Waistline not pulled down noticeably in back when bending.

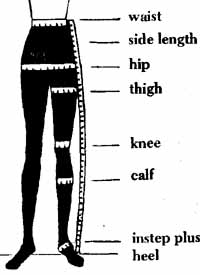
TAKING MEASUREMENTS (See diagram 60.)
Wear snug fitting panties or panty hose, no shoes. Tie a string around
waist.
Side length — measure from waist level to floor, or desired length.
Hip — around fullest part; make a note of this distance from waist (6
to 10 inches) so you can compare with paper pattern.
Waist — measure at natural waistline.
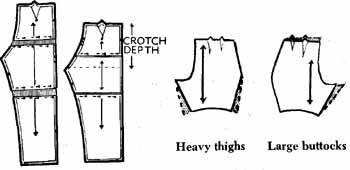
Crotch depth Sit on a flat surfaced chair. Measure from waistline to chair. Add 1/2 to 3/4 inch for ease. (See diagram 61a.)
Crotch length — Stand. Measure from center back waistline, between the legs, to center front waistline. Add 1-1/2 to 3 inches to total length. (See diagram 61b.)

Thigh — Take at fullest part. Note distance from waistline.
Knee — girth of knee. Note distance from waistline.
Calf—girth. Note distance from knee.
Instep and heel — Necessary for tight-legged pants.
When checking crotch length with pattern, consider your figure when deciding on ease; e.g., if normal tummy and normal round in back, 1-1/2” total ease, adding 3/4” to each pattern piece. If rounder in back, a 3/4” on front and more on back. Consider amount for large abdomen; for large abdomen as well as round back. Common sense will aid your decision.
Remember: (1) A large curve requires extra length as well as extra width — see diagram; the amount added to center seam at waist and crotch will be the total increase on that pattern section, and it must be related to crotch length (front + hack). (2) Woven fabrics require more ease than knits or stretch fabrics. Slacks made from knits or stretch fabrics can fit closer to the body.
Suggested ease — waistline, 1/2 to 1 inch; fullest part of hip, 2 to 4 inches; thigh, 2 inches or more; crotch length, 1-1/2 to 3 inches; side leg length, 1/2 inch; crotch depth, 1/2 to 3/4 inch. Check length of darts. Darts should end just above the fullest part of the body curve.
Make a chart — listing your measurements, pattern measurements, adjustments, similar to body measurement chart in Section 6.
Pattern size — Consider waist and hips and decide which would require the least pattern adjustment for your figure. Hip measurement is usually the better size.
Draw a horizontal line, at right angles to the grainline, at crotch depth level (point of crotch to side seam), if the crotch line isn't indicated. Thus you check measurements plus ease on pattern. If you have heavy thighs, draw a horizontal line at thigh level.

- To increase crotch depth — Draw a cutting line across the pattern at about hip level. Cut. Spread the required amount. Pin to strips of lined
paper as suggested in Section 8. (See diagram 62.)
- Lengthen the leg halfway between the crotch and the hem.
- To decrease crotch depth or leg length, fold a tuck in the pattern in the same position as for increasing. (See diagram 63.)
- Large hips — To increase for the around-the-hip measurement, increase at the side seams, as in a skirt (Section 8). Divide the total amount by 4. Mark increase on fabric at hip level; carry same amount down to lower edge, using yardstick. This will increase width at lower edge. Taper in crease if you prefer to keep legs same width. Carry amount of increase to waist on back pattern, and deepen darts slightly to give a large curve. On front, taper increase to waistline.
- Large waist — increase at side seams, taper to hip level.
- Small waist — decrease at side seams at waistline, taper to hip level.
- Large abdomen — increase required amount on front only.
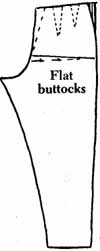
- Large buttocks — increase on back only. (See diagram 64.)
- Large abdomen and large buttocks — increase as in diagram on both front and back. (See diagram 64.)
After pieces are cut and marked (be sure to mark the waistline), fold each front and each back in half, right sides out, Press crease. front crease in line with first darts, if darts in pattern; back crease, stop at crotch level. Edge stitch crease if desired, stitching as close to fold as possible — otherwise you will make pants somewhat smaller.
For your first pants it's advisable to baste and fit before machine stitching. Be accurate in seam allowances. Machine base for better fit because hand basting isn't firm enough. Baste darts if there are darts in pattern; baste side seams; baste inside leg seams.
Place one leg inside the other, right sides together. Baste crotch seam. Fit.
FITFING
You may need an assistant. Tie a string around the waist. If elastic is to be inserted in a casing it will draw the excess fullness in to size; check. Check fit at hip level. Mark level of string at center back. Bend over and check as to back length. Sit, then check.

- Excess fullness in hip area can be taken out at side seams.
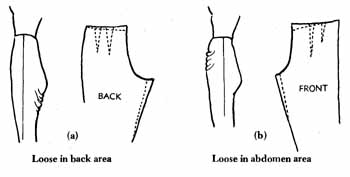
- Loose in back area (baggy seat) — Try taking a deeper seam in center back. If this doesn't correct the problem, reverse the procedure for large buttocks, decreasing on back only, at back crotch and waistline. (See diagram 66a.)
- Loose in abdomen area — same as for loose back, decreasing on front only. (See diagram 66b.)
- Crotch too tight — Narrow seam at upper inside leg, tapering to a point 6-8 inches on leg seam, to increase crotch length. If pants have waistband, obtain more crotch length by narrowing the waistline seam.
- Crotch too loose — Reverse the above procedure.
HINTS:
(1) A square of non-stretch lining fabric, tacked in the knee area will prevent bagging at the knees. Join the lining in with the side seams.
(2) If slacks are lined, construct lining separately. Do not fasten or tack fabric to the side seams so as to avoid pulling. May be tacked at crotch seam or just at waistline.
(3) To improve hang of legs — mark knee level on inside and outside leg seams, on both front and back. On the front. Place the front level 3/4 inch above the back level at both inside and outside leg seam. Ease in the extra fullness on front between knee and crotch. Ease in the fullness on back lower leg between knee and hem edge. This will press flat on seam edges.

