Mark lengthwise grainline from shoulder point to lower edge and crosswise
grainline at armhole level before removing pattern piece from fabric (see Section
12). This is necessary for fitting. The top of the sleeve is called the sleeve
cap.
To accommodate the curve of the arm at the shoulder, all sleeve caps have
“ease”, the sleeve cap stitching line being about 1-1/2 inches longer than
the corresponding armhole stitching line. The eased portion should sew in smoothly
with no tiny pleats or puckers. Long sleeves have “ease” in the elbow area.
Check shoulder to elbow measurement with middle point of “ease” on pattern
(your measurement plus 1/2 inch).
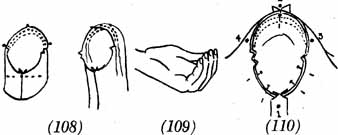
* Stitch 2 rows of machine ease on sleeve cap, one row on stitching line and the other about 1/8 or 1/4 inch from cut edge.
The slight “bulge” which often
appears at front and back of sleeve at lower end of eased portion can be avoided
if you start and stop machine ease stitching about 1 inch above the notches.
(See diagram 108.)
* Pull up ease threads to “cup” sleeve cap. Cup fingers.
Place fingers in
sleeve cap to observe whether or not sleeve will hang “square” when held free.
(See diagram 109.)
Place sleeve in armhole of garment, right sides together. Match and pin underarm seams; shoulder point to shoulder seam; back and front notches.
* Pin underarm area, pinning from sleeve side; cut edges even, pin on stitching line; pins at right angles to cut edges, about 1 inch apart.
* Roll upper section over left hand, sleeve cap uppermost; place pins 1/2 inch apart, pinning on stitching line at right angles to cut edges; cut edges exactly even. Spread gathers evenly; work back and forth between shoulder seam and notches. Keep seam flat 1 inch above notches (to avoid “bulge”). (See diagram 110.)
* Baste from sleeve side, using 1/8-inch stitches, flatten stitching line with fingers to avoid pleats or puckering. Overlap basting thread ends; run fingers around stitching line. A tight basting will result in a puckered machine stitching. Check basted seamline from right side for tiny pleats.
Tightly woven fabrics and fabrics with special finishes are difficult to ease and produce a smooth stitching line. Hint: Place a second row of stitching toward garment side of regular stitching line, 1/8 inch from first row. Start at notch, taper to nothing at shoulder point and taper to other notch, keeping a smooth line.
* Try on garment. Does sleeve hang “square” — vertical grainline perpendicular to floor; horizontal grainline parallel to floor; underarm sleeve seam falling on side bodice seam?
* Machine stitch slowly, stitching from sleeve side.
* Check machine stitching. Line must be smooth — no waves. Run fingers around stitching line to ease out any puckering.
MOST COMMON FITTING and ALTERING PROBLEMS
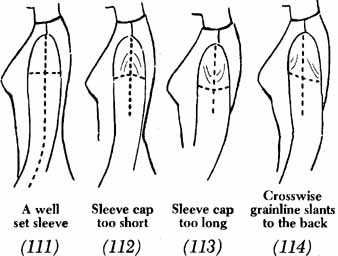
1. Crosswise grainline “lifts” in center. Sleeve cap is too short for upper arm curve. Snip basting at shoulder point; let out sleeve cap seam allowance until grainline sits parallel to floor. Pin carefully. Re-baste.
2. Crosswise grainline “droops” in center. Sleeve cap too long. Deepen sleeve cap seam allowance.
3. Crosswise grainline slants to the back. Caused by distribution of flesh on individual. Shoulder point of sleeve cap must be shifted to front of shoulder seam. Loosen entire sleeve, Shift shoulder point about 1/4 to front of shoulder seam; notch on back of sleeve will be 1/4 inch above notch on garment; notch on front of sleeve will be 1/4 inch lower. Under arm seams may or may not match.
4. Crosswise grainline slants to front. Reverse the procedure for above, shifting shouldering point to back of shoulder seam.
* Elbow ease Bend elbow. Mark point with chalk. Is mark in center of eased section or dart? Adjust by opening seam.
FINISHING SLEEVE OPENINGS
Openings in long, fitted sleeves may be finished by:
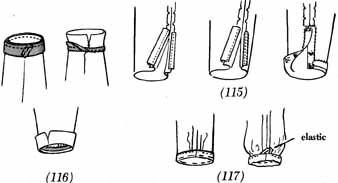
Ribbon seam binding or strip of self fabric with one selvage — Press seam open. Cut 2 strips 1 inch longer than opening. Pin and stitch one strip on right side of front seam allowance 1/8 inch from seamline. Blind hem to sleeve. Stitch other strip to back seam allowance 1/8 inch from cut edge. Fold over cut edge and blind hem to machine stitching. Clip seam above ribbon to lie flat. Sew upper ends of ribbon together using small cross stitches. Overcast upper cut edges. Sew a strip of binding or fabric to lower edge. Turn up to form hem; miter corners; blind hem to sleeve. Sew on snap fasteners. (See diagram 115.)
Cuff attached with a bias facing — Make cuff. Baste to sleeve edge. Cut a strip of bias, 1-1/2 inches wide, of garment fabric or of a lining fabric. Baste bias to cuff and sleeve edge. Machine stitch. Trim seam, blending edges. Press bias against sleeve. Turn under free edge of bias. Pin and blind hem to inside of sleeve. Cuffs may also be attached with a shaped facing. (See diagram 116.)
Elasticized lower edge — Use 1/4 inch elastic. Turn up lower edge on fold line of pattern, 3/4 inch. Baste close to folded edge. Turn under 1/4 inch on cut edge. Stitch flat to sleeve, leaving a small opening at the underarm seam to insert elastic. Use a bodkin or safety pin to insert elastic through casing. Lap ends 1/2 inch and sew together securely. Close opening with hand stitching. (See diagram 117.)
Sleeve with continuous placket and band cuff and shirt sleeve closing and cuff — follow directions on pattern sewing guide.
SLEEVES CUT in ONE with BODICE
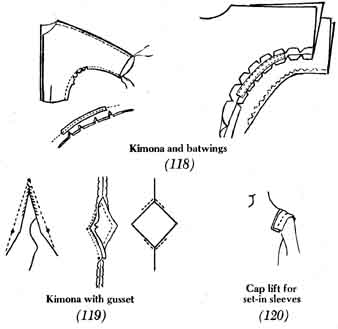
Kimona, batwing — easiest of all sleeves to make; requires little, if any, fitting and no special techniques. Underarm must be slashed at curve. Reinforce slashed curve with a narrow strip of ribbon or a strip of selvage, stitched over original stitching. Press seam open. Or, press seam open, then center reinforcement strip over pressed seamline. Baste. Zigzag, from right side, over the seamline.
Dolman sleeve — fitted smoothly into deep armhole, extending almost to waistline, often fitting smoothly at wrist. Set in as shown in pattern sewing guide.
Kimona with a gusset — to permit freedom of movement, the front and back bodice sections are slashed at underarm. On wrong side of fabric mark seamline of slash with pencil and stay stitch, using short stitch length, before cutting slash. Overcast slashed edges. Stitch gusset to garment. Press seams together away from gusset (guesset lies flat). From right side of garment, edge stitch the seam to the body of the garment close to the folded edge. Some sewing guides face slash with a strip of fabric.
Raglan sleeve — extends to neckline; has slanting seam from underarm to neckline in front and back; has shoulder line dart. Follow instructions and diagrams on sewing guide.
Hints for stiffening sleeve caps for fashion trends and for sloping shoulders (see diagrams):
1. Cap lift for set-in sleeves — Cut bias strip, 6” x 1-1/2”, of self fabric or of flannelette or lining fabric. Fold in half lengthwise. Center at shoulder seam. Hand stitch to sleeve cap stitching line. Press toward sleeve. Blend or taper long edges of strip if necessary. (See diagram 120) to stiffen a gathered or pleated sleeve cap.
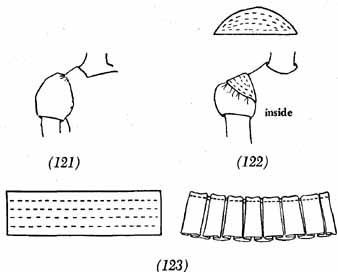
2. Under line upper part of sleeve cap with organdy, net or lining fabric. (See diagram 121.)
3. Crescent pad — Cut crescent-shaped pieces of stiff fabric in suitable size for area to be stiffened. Cut 2 pieces for each sleeve. Cut 2 coverings, same size, allowing 1/4” seam on straight edge. Stitch straight edges of covering together. Press seam open. Tack two pieces of stiffening together. Fold cover over stiffening. Pin and baste. Machine stitch as in diagram — the closer the rows of stitching, the stiffer the pad. Pink or overcast curved edge. Hand stitch straight edge to armhole seam. (See diagram 122 below .)
4. Gathered sleeve caps — two strips of taffeta, each strip folded in half lengthwise; cut three times desired length and width. Machine stitch as in diagram. Pink or overcast cut edges. Box pleat to required length, approximately 6 inches. Hand stitch to armhole seam. Ribbon of width desired could be used instead of taffeta. (See diagram 123.)
