You require a zipper foot. For regular type zippers use the one ac companying your machine. For invisible zippers use the make corresponding to the zipper.
It is advisable to launder to pre-shrink the zipper as you did your fabric.
Care — Close zipper before washing, dry cleaning or ironing. When pres sing,
use press cloth or brown paper over all zippers.
Nylon zippers can be damaged
by excessive heat. Zipper not running smoothly — lubricate with beeswax or
candle wax.
—Use Magic tape to hold zipper in place, also to hold back seam allowances temporarily.
—Hand sewn zippers give a custom look to your garment.
—Beginners are advised to use “lapped construction”, if suitable; only one row of top stitching is visible.
—There are various makes of zippers and various methods of applying zippers. Try the different methods and select the one best suited to the garment design and fabric.
—Until you have mastered the technique it's advisable to baste each step before machine stitching.
—Custom dressmakers apply most zippers with hand-stitching, especially if the fabric is soft, flimsy or inclined to stretch. Why? Because machine stitching stiffens any fabric. It is easier to control easing and stretching. Hand-stitching is less conspicuous in knits, velvets, satins, etc. On some fabrics hand-stitching is used in the last step only to give a custom made look to the garment.
—Choose the weight of the zipper most suitable to the fabric and type of garment.
—Another custom touch is stitching on a slant across the lower end for the “lapped” application, and forming a V at the lower end for the “centered” application. See diagrams which follow.
—Stay-stitch seam edges to prevent stretching if the seam isn't cut on the grain of the fabric. It can be removed later on sheers, or if it stiffens the fabric.
—Many dressmakers allow a 3/4 or 7/8 inch seam allowance for all zipper openings when cutting out the garment, and mark the original seamline with tailor’s tacks.
—If the fabric is bulky or frays easily widen the seam allowance with seam binding. Use a bias strip if the seam is curved. Apply the binding carefully to avoid stretching the opening; lay the opening on a flat surface, pin and baste.
—The length of the zipper opening should be 1 inch longer than the actual zipper to allow for the seam allowance at the top, plus the space to sew a hook and eye. Lay the zipper along the opening and check the length carefully.
—If the zipper fits over a body curve, such as over the hip, ease the fabric slightly, otherwise the zipper will “buckle” and the fabric will be strained. As you gain experience these “tricks of the trade” will become automatic.
—A guide line for stitching is woven in on most zipper tapes. These guide lines are followed in the “centered” application.
—Read entire directions and observe diagrams carefully, as you read, before beginning to apply any zipper. Note position of seam allowances, of zipper foot and of garment in each diagram.
Lapped Application
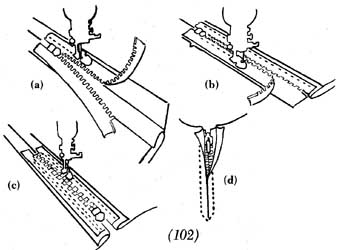
1. Machine-baste opening closed along the usual stitching line. Press seam open. Press a shaped hip area over a tailor’s ham. Clip machine-basting at 2-3 inch intervals to assist in removal later.
2. Attach adjustable zipper foot to machine. Adjust to right side of needle. Open zipper. Working on inside of garment, extend right seam allowance, garment folded back, as shown in diagram. Place zipper face down with teeth edge at seamline. Pin or use magic tape, and baste if necessary. Machine stitch from bottom to top, through zipper tape and seam allowance only. Sew close to zipper teeth.
3. Adjust zipper foot to left side of needle. Close zipper, turn face up. Press fabric away from zipper with fingers or iron (if nylon zipper don't touch with iron), making a narrow fold in the seam allowance along the zipper. Starting at bottom end of tape, edge-stitch on fold, stitching through fold and tape only.
4. Spread garment flat. Turn zipper face down over free seam allowance, forming a pleat at the lower end of the opening. Baste across bottom and up along the side of the zipper, basting through zipper tape, seam allowance and front of garment.
5. Adjust zipper foot to right side of needle. From the right side of the garment, machine stitch across the bottom and up the side, stitching about 3/8 inch from seamline. Press, using press cloth. Remove machine basting. Tie thread ends on inside of garment. Press again from inside, using press cloth. (See diagram 102.)
Centered Application
1. Machine-baste opening closed. Press seam open.
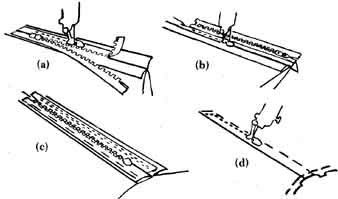
2. Attach zipper foot to machine. Adjust to right side of needle. Open zip per; keep pull tab up. Working on inside of garment, extend right seam allowance, garment folded back. (See diagram 103a.) Place zipper face down with teeth edge at seamline. Pin, baste, or anchor with magic tape. Machine stitch fro bottom to top, following the woven-in guideline, stitching through zipper tape and seam allowance only. (See diagram 103h.)
3. Adjust zipper foot to left side of needle. Leave zipper open. Extend left seam allowance. Place free side of zipper, with the teeth along the sea keeping pull tab up. Pin carefully so teeth and top of zipper match the other half. Beginning at the top of the pull tab stitch through the zipper tape and seam allowance only.
4. Close the zipper. From right side of garment, stitch around entire zipper. Stitch by machine or by hand, stitching through garment, seam allowance and zipper tape. Form a point at lower end. Keep the two sides exactly even. Baste before doing final stitching if necessary. Press, using press cloth. Remove machine basting. Press again, from inside, using press cloth.
Invisible Zipper Application
The application of an invisible zipper is completely different from the lapped or centered methods. A special zipper foot is required. Be sure you purchase an invisible zipper of the same brand name as your invisible zipper foot. Instructions for application accompany the zipper. Follow them carefully.
FASTENERS
—Velcro tape fastener — has tiny interlocking loops. Press together to close, peel apart to open. Place hook half away from skin; stitch in place by hand or machine, fastening thread ends securely. Used to fasten waist bands, belts. Available by the inch, in round, square and tab versions.
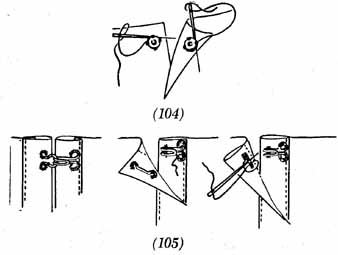
—Snap or dome fasteners — Ball part has a tiny hole through which a pin or needle may be inserted for marking position of underpart. Sew ball part on upper section of opening, 1/8 inch from outer edge. Sew through facing and interfacing. Do not let stitches show through on right side of garment, and hide thread under the snap when crossing to next hole. Pin opening closed and mark position of underpart. Sew through all layers of fabric. (See diagram 104.)
—Silk covered snaps come in assorted sizes; large size used for furs and outer garments. You can cover your own snaps with silk fabric to match the garment.
—Gripper or hammer-on snaps come in a kit. Follow instructions for attaching to garment.
—Hooks and eyes — Use straight eyes or make thread eyes when edges overlap. Use round eyes when edges touch. See diagram. Set hooks back 1/8 inch from edge. Round eyes extend 1/8 inch over edge of closing. Overhand or blanket stitch through rings of hooks and eyes. Fasten end of hooks securely. To make a thread eye, sew several strands of thread in desired position and blanket stitch over the strands, reversing needle and using needle eye forward. (See diagram 105.)
—Silk covered hooks and eyes are large; used for fur coats and outer- garments. Come in several colors.
—Trouser hooks and eyes—useful on skirt bands as well as pants.
—Buttons—Close opening, mark position of buttons, using pins. See diagram. All buttons should be sewn on with a shank, the length of the shank depending on the thickness of garment fabric. To leave a shank, use pin or nail as a gauge for length of shank. Place gauge over button and sew over it. (See diagram 106.) Stitches on wrong side of garment should be placed on top of preceding stitch. Remove gauge, wind the thread over threads under button. Fasten thread securely on wrong side. Hide knots under button if possible. Buttons can be reinforced by using a small button or piece of fabric on wrong side of garment.
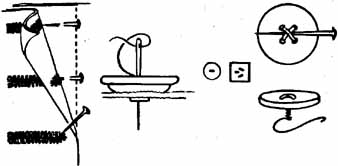
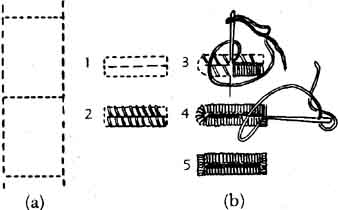
—Buttonholes. Unless you can make a neat hand-worked buttonhole, make them by machine. (Sewing centers will make any type of buttonhole.) Practice making some by hand. Mark position and size by bas ting or pencil. Set machine stitch at 20. Stitch around marking once or twice, preferably twice, placing 2 or 3 stitches across ends. Cut. Overcast the cut edges carefully, starting at lower right hand corner and working from right to left. Then work buttonhole with purl or buttonhole stitch, working from right to left. (See diagram 107b.) To form purl, insert needle, bring thread from eye of needle around needle from right to left. Pull up stitch — note the purl or twist formed. The purl stitches lie along cut edge. Form a fan at both ends, or a fan at garment edge end and a bar at other end. Bar is formed by taking several stitches across end and working the purl stitch over the bar and through the fabric.
—Tailored, worked buttonholes — machine stitch as before. Punch hole at end nearest garment edge. Overcast, work purl stitch, form bar at opposite end. For a cord edge, purl stitch over a heavy thread or tailor’s gimp.
