|
Before you begin serging with any model, take time to familiarize yourself with the parts of that machine and the accessories available. Think of it as if you’re checking out all the operating features on a car you’ve never driven. It won’t take long, and you’ll feel much more comfortable when you begin to use it.
Set Up the Machine Reorganize Your Sewing Area The first step, even before taking your serger out of the box, is to find a place to put it. Because the serger works in tandem with your sewing machine, you’ll need to move easily from one machine to the other for maximum productivity. Reorganize your sewing space so that you can reach both machines comfortably.
There should be adequate room between the serger and sewing machine for natural
work flow (we recommend 24”). I store my serger on a rolling computer stand in a closet so she can roll it out to a convenient position for use. Set Up the Machine Take the serger out of the box. This may seem a formidable, frightening experience for some. Don’t procrastinate: just lift the machine out of the packing material and place it on the table or stand you’ve selected. Remove the owner’s manual and all other parts and accessories. Save the box and packing material in case you ever need to transport the machine. Position the front of the serger approximately 4” from the table edge. Because it was probably oiled thoroughly at the factory, wipe off any parts that may touch the fabric. Use a soft, clean, lint- free cloth. If your spool base (the support on which the spools or cones sit during serging) isn’t assembled, attach it now, following instructions provided (usually in the owner’s manual). Tips:
Tip: Read the owner’s manual from cover to cover. It may be difficult to understand (some manuals are not clearly written), but try to plow through It as best you can. At the very least, you’ll learn the type of information Included so you can refer to it later. Tip: Read your owner’s manual through while sitting in front of your serger. It’s less boring, and the instructions and drawings will make much more sense. Hook Up the Foot Control The foot control is attached to a cord with a machine plug and a standard household electrical plug, similar to the control on most conventional sewing machines. Plug the foot control into the machine socket first, then the household socket. The machine socket is usually located on the lower right side of the machine. If you can’t find it, refer to the machine diagram in your owner’s manual. (Fig. 3-3)
Now you’re ready to turn on the power. On many sergers the power switch controls both the power and the light. If you leave the machine, be sure to turn off the power. The power switch is usually located near the machine socket (check your owner’s manual). Identify and Define the Parts Open your owner’s manual to the machine diagram. Double-check to see that the model number in the diagram is the same as your machine. Read about the machine parts listed below and locate them on your serger. (They are listed here in alphabetical order for easy reference.) Due to brand and model variations, our generic diagrams may not match your machine exactly, but will provide a general concept of the appearance. TIPS:
+ Differential feed selector (not available on all models)— a knob or lever located on the side of the serger is the handwheel or under a side or front cover by the stitch length lever. (Refer back to our brief description of differential feeds. You’ll learn how to use it in Section 8.) + Feed dogs—rows of metal teeth located under the presser foot. The feed dogs work similarly to those on a conventional ma chine, gripping the fabric and pulling it through the machine. (Differential feed works with two separate sets of feed dogs; a front set feeds the fabric in at a different speed than the back set pulls it out.) + Foot control—a pedal that regulates the stitching speed. (See Fig. 3-3) To operate it, press (or let up on) the control with your foot. Some sergers have an electronic foot control which allows a maxi mum speed change with only a small movement of the pedal. + Foot control socket (ma chine socket)—the opening where the foot-control cord plugs into the machine. (See Ag. 3-3) K Front cover (looper cover)—a protective cover on the front of the machine, keeping lint, fabric, and fingers away from the moving parts. To open the cover, either pull it forward, slide it to the right and then tilt it forward, or release a lever and swing it open to the right. Does your model have a built-in safety system, turning off the power (but not the light) when the cover is open? (Fig. 3-4) + Handwheel (flywheel)— similar to the one on a conventional sewing machine.
The handwheel on a serger is usually located on the tight side of the machine.
It may turn forward (counterclockwise) as on a sewing machine or in the opposite
direction (clockwise).
+ Knives (cutters)—located in front of the needle(s) on all serger models. Two knives work together like shears to trim the fabric before is serged. One knife remains stationary (usually the inner, lower knife) while the other moves up and down with each stitch of the machine (usually the outer, upper knife). (Fig. 3-5) One knife is made of a strong carbide steel that doesn’t wear as quickly as the other, softer blade. If a pin is accidentally hit, the softer, less expensive blade gives and is damaged, while the harder blade will resist and usually will not need replacing. If the cut edge of the fabric is ragged, check the knives. Replace knives with worn or nicked blades. Also check for an improperly positioned knife. (The lower, inner knife blade should be even with the top of the needle plate.) See your owner’s manual for information on how to change and position the knife. TIP: Check for blade sharpness by serging a scrap of nylon tricot. Dull cutting edges won’t cut tricot at all. TIPS:
+ Loopers—shaped metal fingers used to position thread when forming a serged stitch. The loopers available on your machine depend on the stitch types your machine was designed to perform (stitch types are described in Section 1). A thread passes through a hole (called an eye) at the end of each looper being used. To form a basic 3-thread stitch, the upper looper goes over the top of the fabric, leaving a thread loop that's caught by the needle thread on the seamline. At the same time, the lower looper goes under the fabric to catch the needle thread. At the edge of the fabric, the looper threads interlock with each other. (Fig. 3-7)
+ Needle(s)—either one or two are necessary for every serger stitch. Needle requirements vary from one serger model to another. TIP: To avoid problems, don’t interchange different brands of needles. Consult your owner’s manual or dealer to verify which needle size and type your machine uses. Three general categories of needles are available—household, industrial, and custom: Household needles are the same type as those used on conventional sewing machines. One side of the shank is flat, making them easy to insert. Industrial needles are more durable to withstand the stress of fast serger
stitching. They vary in the length of the needle and the position of the
eye and often have a round shank. Insert industrial needles with the scarf
(the short indentation that extends from just below the needle eye to partway
up the shaft) toward the back and the long groove toward the front. (Fig.
3-8) Custom needles are those that have been specially designed to fit a particular serger model. Fig. 3-8: Industrial needles usually have a round shank. Position the scarf to the back and the groove to the front. TIPS: Find the long groove by running your thumbnail down the length of the needle.
+ Needle plate—a flat metal plate, located on the bed of the machine, under the presser foot and around the feed dogs. (Fig. 3-10) Some models have only one needle plate, while others have specialized ones for rolled edges or wider stitching. + Power switch—controls all the power to the serger, usually located on the lower right side of the machine. (See Fig. 3-3) Some models may have separate power and light switches or a single power switch with a separate setting, enabling the light to be on with the rest of the machine’s power off.
+ Presser-foot pressure regulator (not available on all models)—adjusts the amount of force applied to the fabric by the presser foot. Available on most models, it's a screw on the top of the machine similar to those on many sewing machines. When you purchase your machine, the factory has preset the pressure. It seldom needs adjusting for basic serging, even when you are sewing with different weights and textures of fabric. You’ll learn more about presser-foot pressure in Section 8 (See Fig. 3-4) + Presser foot—holds the fabric against the feed dogs as the serger stitches. Check to see if your model’s standard presser foot has built-in features such as a cording guide or an elastic/tape guide. Are optional presser feet available for your machine? Does your serger have a swing-out foot for easier access to the needle or snap-on presser feet for quick changes as well as better access? TIPS:
+ Stitch length selector—often a dial or lever used to adjust the stitch length. On other models, you’ll press a release button while turning the handwheel to change the stitch length setting. The method varies from model to model, so check your owner’s manual. Turn to the highest number for the longest stitch and the lowest number for the shortest stitch. We’ll discuss stitch length adjustment in Section 7. + Stitch width selector—varies widely among machines. Some sergers have a stitch width selector that moves the knife position. Others have two needles, and by omitting one needle, you can vary the width. On some machines you change the stitch finger to change the stitch width. (In Section 7, you’ll practice changing the stitch width on your machine.) + Tension controls—either knobs or inset dials. Inside each tension control are two discs. The thread runs between them, and the amount of pressure exerted determines how much tension is placed on the thread. Tension controls are used to vary the appearance or function of a stitch. (In Section 6, you’ll learn how to regulate serger tension controls.) Fig. 3-12: Spool caps and cone holders will stabilize spools and cones, allowing for even feeding. + Thread guides—slots, holes, or hooks through which the thread passes on its way to a looper or needle. Each thread has several guides. A missed thread guide can result in poor stitch quality. + Thread-guide pole—a support rod at the back of the machine that holds the initial thread guides to draw the thread evenly from all the spools and prevent it from tangling. Be sure the thread-guide pole is extended to its highest point or the stitching may be uneven. (See Fig. 3-4)
Know Your Accessories + Cone holders—placed onto the spool pins to support cones or large spools
of thread. Cone holders vary in shape and size from manufacturer to manufacturer.
Some machines come with cone holders pre-attached to the spool pins. (Fig.
3-12) + Lint brush—a stiff-bristled brush used to clean the lint and trimmings from the machine workings. It’s important to keep the area around the serger’s moving parts as lint-free as possible. (See our Serger Care and Maintenance.) TIPS:
+ Looper threader—helps make threading a looper easier, especially when you are using difficult-to-thread strands, such as woolly nylon or yam. With the most common type of threader, you’ll insert the thread into the large eye. Then push the straight, pointed end of the threader through the looper hole from front to back. Pull the threader with the thread completely through the looper. A dental-floss threader (available at any drugstore) makes an ideal and inexpensive looper threader. (Fig. 3-14) Place the thread through the plastic loop and feed the single end of the threader through the looper hole. Purchased wire needle or looper threaders and thread cradles also work well.
TIPS: Because it's so easy to lose dental floss threaders, I tell my students to tape one to the side of their serger. Looper threaders with short handles also work well. Push the threader through the looper from the back side, put the thread through it, and pull. + Oiler--for proper care and maintenance. It’s important to oil your machine regularly—approximately after every fifth garment (except for some newer models that are “self-oiling” and don't require oiling at all). Use sewing machine oil only; household oil will be too heavy. Consult your owner’s manual for where to oil and how much oil to use. + Screwdrivers—one or two small ones, included with the serger. These are used for changing needles, knives, presser feet, needle plates, or any other parts that may need removing for cleaning, replacing, or switching. + Spare knife—to replace a worn or nicked blade. As explained under Knives, earlier in this section, the softer metal blade will probably need changing first. An extra knife is usually included with the serger. Some sergers are designed for easy knife replacement, but the knife positioning is a precision task—error will affect the cutting quality. Study your manual; if you are uncertain about replacing the knife, let your dealer do it the first time and show you how. Note: The lower knife (often the softer metal) is usually much easier to replace than the upper knife because the top of the lower blade lines up with the top of the needle plate, allowing for more accurate positioning. + Spool caps—used with conventional, parallel-wound thread spools. They prevent spools from bouncing and thread from getting caught on the spool edge. When using conventional spools on your serger, remove the cone holders, place the spools directly on the pins, and push the caps onto the pins over the spool tops. For machines that have cone holders attached to the spool pins, place the spools onto the pins above the cone holders and place the spool caps directly over the spools. (Fig. 3-12) + Thread nets—net-like tubes that prevent thread from tangling or feeding irregularly. They are particularly useful when you are serging with fine, slippery, or low- twist thread, which is likely to fall loose from the spool. The net tubes go completely over the spool or cone or him back at the top edge. (Fig. 3-15)
+ Tweezers—almost essential for threading a serger. Use them for threading loopers, needles, or thread guides or for guiding thread in any limited-space area. + Vinyl machine cover—keeps your serger dust-free when not in use. One is often included with the machine. If not, purchase a cover from a dealer, fabric store, or mail-order serger supply company. TIPS: I recommend at least one pair of tweezers for the serger and one for the sewing machine for many uses such as:
Don’t cover your serger with non-breathing plastic in humid climates. Instead, cut apart your plastic cover on the heat-pressed seams, and use the sections as a pattern to make a fabric cover. TIPS:
|
| PREV: Before You Begin | Next: Don’t Let Threading Intimidate You | More Serging Articles |
Saturday, 2010-05-15 18:00


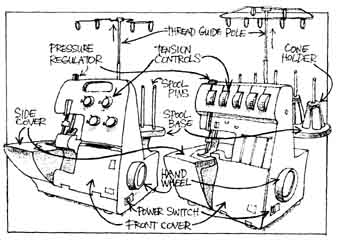
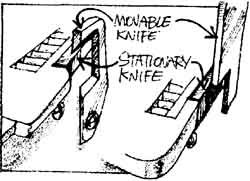


 Fig. 3-13 If tenacious lint won’t go away with forced air or soft serger-cleaning
brushes, try a small stencil brush. The blunt end effectively removes the
most stubborn lint. Look for stencil brushes at your local craft shops.
Fig. 3-13 If tenacious lint won’t go away with forced air or soft serger-cleaning
brushes, try a small stencil brush. The blunt end effectively removes the
most stubborn lint. Look for stencil brushes at your local craft shops. 
 Fig. 3-15 Thread nets help the thread feed evenly without tangling.