Before you begin, you’ll probably need to purchase a serger and serging supplies. Prior to shop ping, review the guidelines suggested in Section 1. Then keep the information in this section handy when making your purchasing decisions. If you already own a serger, check to see which of the features described in this section is available on your model.
Basic Serger Features
Stitch types
A few serger models have only one stitch available, but most sergers feature a combination of stitches. You’ll select which stitch to use based on the task at hand and the desired result. Before purchasing your machine, consider your serging needs. Then calculate which stitches will be most useful to you.
2-thread overedge stitch (Fig. 2-1)—Available on some sergers, this stitch uses one needle thread and one looper thread. The looper thread lies on top of the fabric while the needle thread is pulled to the edge on the under side. Because the two threads don’t form a locking stitch at the needleline, it's called an “over edge” rather than an “overlock” stitch. Uses include:
+ Edge-finishing—less bulky than a 3-thread stitch, preferable for finishing lightweight or delicate fabrics.
+ Flatlocking—ideal for light weight flat-locked seaming and decorative flatlocking without any adjustment. (You’ll learn all about flat-locking in Section 13.)
+ Rolled edging—some models also have a 2-thread rolled-edge capability, which is useful for lightweight fabrics.
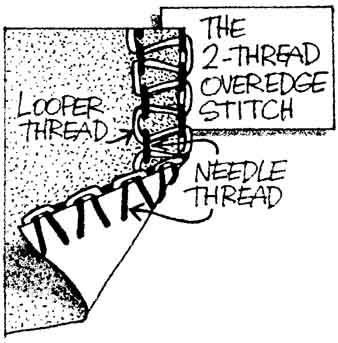
Fig. 2-1: Formed with a needle thread and a looper thread.
You can also loosen the lower looper and tighten the needle tension to form a 2- thread reversible stitch. The lower looper thread will show on both sides, while the needle thread won’t show and only holds the decorative lower looper thread in place.
3-thread overlock stitch (Fig. 2-2)-The most common serger stitch, found on practically every serger model, a 3-thread overlock has one needle thread combined with an upper-looper and lower-looper thread. The upper-looper thread lies on top of the fabric and the lower-looper thread lies on the underside. The looper threads interlock with each other at the edge of the fabric and with the needle thread at the seamline. Uses include:
+ Seaming—makes a very stretchy seam, ideal for knits. It is also suitable for wovens, but may need additional reinforcement for areas of stress.
+ Edge-finishing--goad seam finish. Also excellent for balanced- tension, decorative stitching using specialty threads.
+ Flatlocking (with tension adjustments)—used for flatlocked seaming and decorative flatlocking.
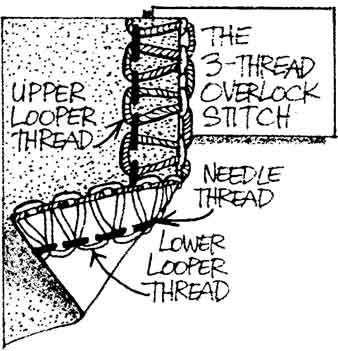
Fig. 2-2: Formed with a needle thread and two looper threads.
+ Flatlocking (with tension adjustments)—can be converted to a flatlock.
+ Rolled edging—must be converted to a 3-thread stitch before adjusting for this stitch.
2-thread chainstitch (Fig. 2-4)-A needle thread and a looper thread create this stitch, which looks much like a conventional straight-stitch on the top side of the fabric. The needle thread passes through the fabric, inter locking with the looper thread, creating a chain-like stitch on the reverse side. It is stable with little to no stretch. This stitch type is offered on sergers only in combi nation with other serged stitches. Uses include:
+ Seaming— it's usually combined with the 2-thread overedge or the 3-thread overlock stitch, but can be used by itself to serge a seam.
TIP: The 4-thread overlock stitch has the advantage of a safety stitch. If the sea mime thread breaks, the second row of stitching prevents the seam allowance from raveling out.
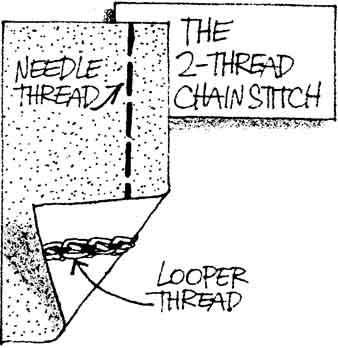
Fig. 2-4: Formed with a needle thread and a looper thread, but doesn't overcast the edge.
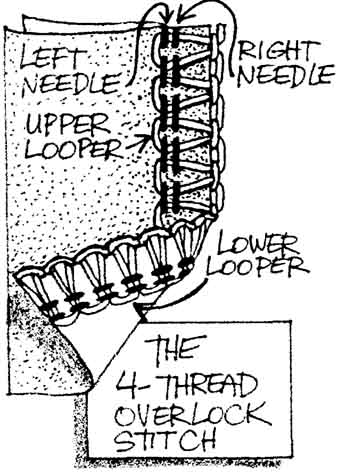
Fig. 2-3
+ Decorative detailing—unlike other serger stitches that must be sewn on an edge or fold, the chainstitch can be placed a distance away. With decorative thread, it can be used for top- stitching or other detailing.
4-thread safety stitch (4/2-thread stitch) (Fig. 2-5)—This wide stitch combines the 2-thread overedge stitch and the 2-thread chainstitch, using two needles and two loopers. Usually both the 2-thread chain and the 2-thread overedge stitch can be used independently, and the model will feature other stitch types as well. Uses include:
+ Seaming—stable on loosely woven, ravelly fabric. Because the chainstitch portion of the stitch has little or no stretch, the 4-thread safety stitch isn't recommended for stretchable knit seaming.
+ Edge-finishing-—stable finish, especially on ravelly fabric. Not often used for decorative edging.
TIP: The 2-thread chain- stitch Is also a good basting stitch, because it will unravel easily for removal.
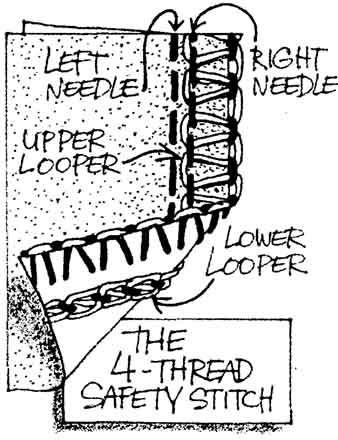
Fig. 2.5: Formed with a chainstitch and a 2-thread overedge stitch.
Stitch Types
4-thread mock safety stitch (Fig. 2-6)—Available on a few models, this wide stitch uses two loopers and two needles. It is similar to the 4-thread overlock stitch except, from the topside, it looks like the 5-thread safety stitch—the upper-looper thread interlocks with the right needle thread only and doesn't extend to the left needle. On the underside, the lower looper interlocks with both needles and extends the full width of the stitch, just the same as on the 4-thread overlock.
Note: When converting a 4-thread mock safety stitch to a
3-thread overlock stitch, only the right needle can be used, forming a narrow stitch. Models with the 4-thread mock safety stitch don't have the capability of a wide, 3-thread stitch. Uses include:
+ Seaming—more durable than a 3-thread stitch, but not as stretchy. It is ideal for stress areas on active wear or children’s wear and for ravelly fabric. It can be used on knits as well as wovens because it does stretch some.
+ Edge-finishing----stable finish, especially on ravelly fabric. Not often used for decorative edging.
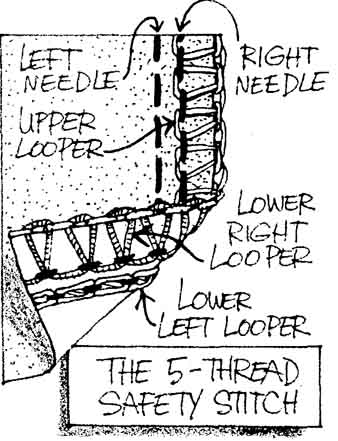
Fig. 2-6: Formed with two needle threads and two looper threads, but not available
on the same machine as a 4- thread overlock stitch.
5-thread safety stitch (Fig. 2-7)-This extra-wide (approximately 7mm to 8mm) stitch is formed by a 2-thread chainstitch and a 3-thread overlock stitch. It is created with two needles and three loopers. The left needle and the lower left looper (chainstitch looper) form the chainstitch, while a right needle and the upper and lower right loopers form the overlock stitch. With adjustments, a 5-thread machine can serge the 3-thread overlock stitch or the chainstitch independently, and one or more of the other stitch options are also available. Uses include:
+ Seaming—similar to the 4- thread safety stitch, the 5-thread stitch is very stable and recommended for loosely woven and ravelly fabrics or for stress-prone seams and edges. Because the chainstitch can't stretch, the stitch should be used for stable knits or wovens only.
+ Edge-finishing—the most stable finish, but not often used for decorative purposes.

Fig. 2-7: Formed with a chainstitch and a 3-thread overlock stitch.
Tension Adjustments
Tension controls (all containing tension discs) are used to vary the appearance or function of a stitch by controlling the speed at which the thread is fed through the loopers and needles. If the controls are round knobs on the front of the machine, the thread wraps around the knobs, sliding between two tension discs. If the controls are inset dials, the thread is laid vertically into slot-like openings at the top of the machine and engaged between the discs. (Fig. 2-8)
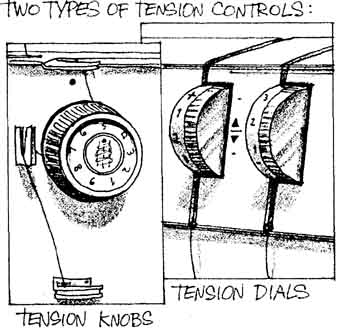
Fig. 2-8: Current serger models have either tension knobs or inset tension
dials.
Some sergers have numbered controls for easier tension setting, while others simply have plus (+) and minus (-) symbols to indicate the direction for lightening or loosening. Many machines also have helpful labels or symbols to indicate which knob or dial controls which looper or needle. Some of the latest models are designed with tension controls located closer to the corresponding looper or needle for more accurate tension adjustment.
Changing the tension settings isn't complicated if you follow a few basic guidelines. You’ll learn all the details in Section 6.
The uptake on a sewing machine is responsible for pulling enough thread from the spool for the next stitch. A serger doesn't have an uptake. Its method for allotting the correct portion of thread for each stitch is adjustment of the tension mechanism. For a shorter or narrower stitch, the tension mechanism is adjusted to squeeze tighter on the thread, allowing less thread for the stitch. Very long or wide overlock stitches need more thread, so the mechanism is loosened.
If your tension controls aren’t labeled and you tend to forget which control is for which thread, write the names on small pieces of masking tape. Place each label near or on the correct control (identify them in your owner’s manual to be sure). Leave the controls labeled until you know them by heart.
Stitch Length Adjustment
Stitch length is adjusted with a dial or lever. The higher the number, the longer the stitch, and , conversely, the lower the number, the shorter the stitch. On many sergers the stitch length control is conveniently located on the outside of the machine so you can adjust it while serging. Section 7 will lead you through stitch length adjustment.
The stitch adjustment on a serger is similar to a conventional sewing machine. The length of the needle’s straight-stitch (north and south) is the stitch length. The width controls the zigzag (east-west) part of the stitch.
Stitch Width Adjustment
Methods for changing the stitch width vary widely. (Fig. 2-9) On some sergers, the width is fully adjustable within a preset range. On others, you’ll have only a few width options. The most convenient stitch width control is a dial or lever that changes the width by moving the knife to cut away more or less fabric from the seam allowance. On other machines, you adjust the width by manually moving the knife or changing the stitch finger for a wider or narrower stitch. On 4-thread overlock models, removing the left needle will narrow the stitch width.
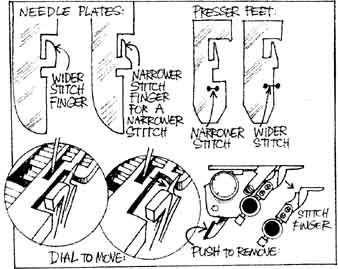
Fig. 2-9: Changing the stitch finger alters the stitch width. Depending
on the model, the stitch finger can be part of a needle plate or a presser
foot. Or it can be a separate part, easily moved or removed by a dial or
lever.
When shopping for a serger, evaluate the range of stitch widths available, the ease in changing the width, and whether the width control is conveniently located. Section 7 will help you practice stitch width adjustment, no matter what type of controls your serger has.
Rolled-edge Adjustment
Some machines have a built-in rolled-edge setting—a lever or dial is used to change or alter the stitch finger. On other machines, you’ll need to change the needle plate, the presser foot, or both. All serger models require stitch width, stitch length, and tension adjustments to convert to a rolled-edge stitch from balanced serging. You’ll practice rolled edges in Section 14.
Other Features
Check for other features that are often standard such as a built-in light, a waste container, a built- in thread cutter, and convenient accessory storage. Additional basic features to be considered when purchasing a serger or when getting to know your own serger are: maximum stitch width capacity, maximum stitching speed, stitch length capacity, accessories included, and overall ease of use.
Optional Serger Features
Most serger models on the market today have additional features that come on or with the machine or are available for purchase.
Specialty Feet
Some machines have special features built into the standard presser foot:
Snap-on feet can be easily switched or removed for threading or needle changing. (Fig. 2-10)
Elastic/tape guide or a cording guide for ease and accuracy in serging over thread, cording, tape, elastic, or other filler. This feature is especially handy for decorative serging applications and for certain utility tasks, such as stabilizing a seam or gathering.
Optional presser feet are also made for most serger models. (Fig. 2-11) Some of the following may be available for your machine; check with your dealer for information:
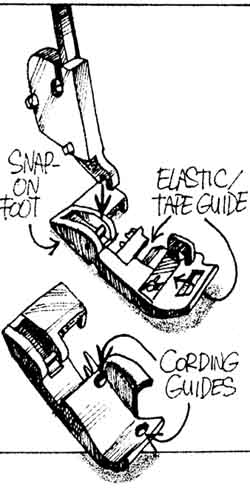
Fig. 2-10: Some standard presser feet have built-in guides to position
cording or tape while it's being serged over.
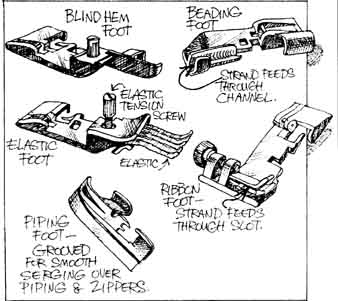
Fig. 2-11: A variety of optional feet are available for specialty serging.
+ blindhem foot
+ beading/pearl/sequin foot
+ elastic/tape foot
+ ribbon/tape foot
+ piping/cording foot
Threading Features
To alleviate the sometimes difficult and time-consuming task of threading a serger, many manufacturers have built in easy- threading features. These include self-threading lower loopers, built- in needle threaders, easily accessible thread guides, a swing-out presser foot, and color-coded threading systems.
Differential Feed
A very useful option available on many serger models is the differential feed. An adjustment knob or lever varies the speed of the machine’s two sets of feed dogs, controlling how taut or compacted the fabric is while being serged over. Differential feeding can prevent stretching of knits and puckering of fine or sheer fabrics. It can also be used for gathering or easing. In Section 8 you’ll learn how to use the differential feed.
Presser-foot Pressure Regulator
Especially on sergers without differential feed, regulating the presser-foot pressure can help prevent stretching, puckering, and skipped stitches. You’ll learn more about this control feature in Section 8.
Disengaging Knife
All sergers have two knives that work together to trim the fabric edge while serging. Sometimes, however, you won’t want to trim the edge (for example, when serging elastic, serging over a fold, or top-stitching with the 2-thread chainstitch). In this case, you’ll appreciate the optional feature (available on some machines) of disengaging one of the knives so there is no chance of inadvertently cutting the edge. (Fig. 2-12).
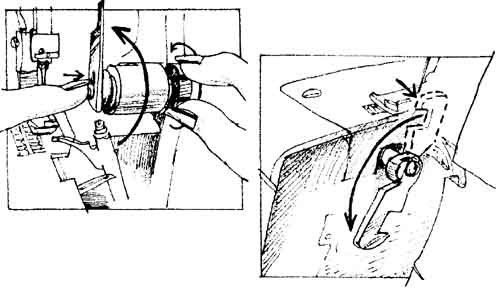
Fig. 2-12: On some machines you can disengage the knife.
TIP: Although disengaging the knife is a helpful feature, as a repair person, I want to caution you about the potential dangers of serging while it's disengaged. The reason all sergers have cutting blades is to make sure the edge of the fabric doesn't stick out past the right edge of the needle plate. If it does, it will be in the way of the upper looper path. The high speed of the loopers will cause a violent impact when they slam into the fabric. This is one of the leading causes of extensive serger repair. Sew very slowly and carefully when the knife is disengaged, and guide the fabric accurately.
Computerized Stitch Guide
Some newer serger models have a computerized liquid crystal display (LCD). After you enter the desired stitch, the panel indicates the necessary tension, stitch length, and differential feed set tings, as well as the position of the needles, knives, and loopers.
Safety Features
To prevent injury, all home serger models have some type of knife guard. Some machines also have guards to keep fingers away from the moving needles and exposed upper looper. On some sergers the power automatically shuts off when the front and side covers are opened.
Other Features
Additional features (available on only some serger models) include:
+ Bias binder—used with a 2-thread chainstitch to fold, position, and attach a bias binding strip.
+ Fabric separator—used with differential feed to gather one layer of fabric as it's serge-seamed to a non-gathered layer.
+ Tape or cording guides—used to position tape or cording before it reaches the presser foot and is serged over.
+ Stitching guides (also called cloth guides, edge guides, or ornamental serging guides)—used to position the fabric accurately as it's fed through the machine.
+ Special needle plate—used for extra-wide stitches.
+ Free-arm—used for finishing hard-to-reach areas.
Handy Serging Supplies
Before you begin serging, collect the necessary equipment and supplies: (Fig. 2-13)
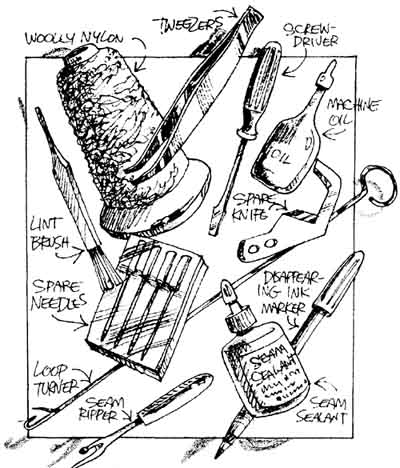
+ Serger
+ Owner’s manual
+ Brand- or model-specific workbook and /or video (if available)
+ Note cards or notebook to record test results and samples
+ Accessories and attachments included with the machine
+ Serger (or all-purpose) thread— three to five cones or spools (one for each thread path on your machine)
TIP: As you’re learning to serge, select a different thread color for each spool or cone. When you’re adjusting the tensions and perfecting the stitches, you can identify each thread much more easily. If your machine has colored symbols defining the various thread paths, match the thread color to the symbols.
+ Specialty thread (such as woolly nylon, mono-filament nylon, fusible thread, pearl cotton, and other decorative threads)
+ Needle-nose pliers or a needle inserter
+ Spare machine needles
+ Spare machine knife (one usually comes with the serger)
+ Seam sealant
+ Transparent tape
+ A loop turner, knit picker, latch hook, or darning needle to secure seam ends
+ Disappearing marking pens (both washable and air-erasable)
+ Clear elastic (most helpful in 3/8” and 1/2” widths)
+ Elastic thread or cording
+ Water-soluble stabilizer
+ Other conventional sewing supplies
+ A conventional sewing machine
+ Fabric swatches for testing.
TIP: As you proceed through this guide, it's important to test each stitch and technique. Stable, medium-weight fabrics are the easiest to test-serge, but as you progress, you’ll want to test other fabric types as well—knits, lightweights, heavier weights, and various textures. Cut long strips, approximately 4” wide. Longer strips are beneficial for practicing and perfecting the stitch, because you can test a few inches, look at the stitching behind the foot, make any necessary adjustments, and continue perfecting the stitch without having to serge on and off short swatches of fabric.