Pins ... You really can do without them; it just takes practice.

Sewing without pins is quick, safe, and precise. It’s a skill
that comes with practice. Start with straight seams; you’ll soon be easing
in sleeves.
A baseball player throws, 1 catches, and hits a ball hundreds of times before playing a game. In sewing, we read, “Sew shoulder seam,” and that’s our beginning. Practice in sewing to most people means ripping out and trying again.
So I’m about to ask you to cut perfectly good fabric into little practice pieces, many of which you will later throw away. I’m pitching a beginning sewing class that’s not just for beginning sewers. It’s a series of exercises that I developed so that my students could become skillful, employ able sewing-machine operators. But in demonstrating and mastering the exercises, my own sewing became faster, more accurate, and freer from the constraints that were limiting my style.
I’ve gradually thrown away my sewing pins. I keep one or two around for holding gathering threads, but that’s all. What started out as not pinning straight seams has evolved into a sewing method I use constantly. It’s the best of two very different approaches to clothing construction: factory sewing, with its emphasis on speed and ac curacy in one operation; and home sewing, which requires that one understand all the steps from cutting to finished piece.
There are advantages to sewing without pins. No one in my house steps or sits on pins. I don’t break machine needles sewing over them, and my overlock cutter has never been dulled by one. I recently sewed a satin gown in which every pinhole would have been preserved for centuries.
The most dramatic improvement has been in setting sleeves. After years spent avoiding sleeves altogether, I now look for ward to the sleeve with the anticipation of seeing magic happen. The key to this transformation is practice. Rather than wait until I had to sew in a sleeve, sweating over whether I could do this one well, I practiced a simple sleeve until it was no longer difficult, then moved to more difficult sleeves with more fullness and ease.
Building skills
Here are two exercises I devised to help you get a feel for sewing fabric without pre pinning. At the risk of sounding school marmish, I urge you to do each of these practices correctly at least six times before you try the sleeve.
If you have some expendable top-weight cotton (or poly/cotton blends) in your fabric collection, here’s a good way to use them up. Or buy a couple of yards of fabric from the remnant table. There is no need to prewash before cutting. Cut one yard into 3-in. (crossgrain) by 18-in. (lengthwise grain) pieces.
I use a ½-inch seam allowance in most sewing because it’s more efficient. I trim 1/8 in. from the seam allowance of patterns to keep my balance points in correct relation to one another and use 1/2 in. consistently, except for collars, which is another subject. If you are comfortable with 5/8-in., and your ma chine has a good mark on the throat plate at that distance from the needle, by all means substitute 5/8-in. where I say ½-in. If you are ready to try something new, find a good 1/2-in. mark for your seam allowance and try it my way. A wide presser foot and an infinitely adjustable needle make things easy. Simply set the right-hand edge of your foot as your ½” guide. If your machine doesn’t come so equipped, mark the throat plate with tape, typing correction fluid, or permanent marker so that you have a clearly visible guide line. Since you are training your eyes to work for you, don’t use a mechanical or magnetic seam guide.
Straight stuff—Place two fabric pieces right sides together with the ends and long cut edges matching (ignore the selvages). Position the pieces to be sewn under the presser foot so that the long edges are exactly on your ½-inch line and the top edges are directly under the needle. Lower the presser foot and sew forward three to five stitches.
Stop your machine and lower your needle to its lowest position in the fabric. Now move your hands toward you to the ends of the pieces, and align the two pieces exactly. Holding the fabric between your thumb and the first finger of your right hand, with your thumb on the bottom, tug the fabric gently toward you, pulling out the whole length of the seam.
If the edges don’t magically cooperate in laying themselves out to be joined, adjust them with your left hand until they do, without losing your right-hand grip. If the upper layer moves too far to the right, use the fingers of your left hand on top with the thumb on the bottom to pull the top edge back. If the under-fabric strays, place the fingers of your left hand between the layers, adjust the bottom layer, then hold them both down from the top.
Begin stitching the seam, holding the end in your right hand and the two fabric layers together against the machine bed with the tips of your left-hand fingers. Your left hand should start as far from the needle as your machine table allows, and follow along as the fabric flows under the presser foot. As it approaches the front of the presser foot, move your left hand back toward your right and continue sewing for ward. Should the fabric slip out of alignment, correct it as explained above. During the whole stitching operation, concentrate on two things: keeping the fabric edges exactly even and keeping those even edges exactly on your ½” guideline. Don’t worry about backstitching at this point. Re member, this is only practice.
Check your work in two ways: First, look at your fabric edges. They should be perfectly matched. An error of more than 1/16 in. should be redone. Second, place a straight edge along your stitching line. Once again, look for no more than a 1/16-in, deviation from the straight line. Each error here is doubled in the finished seam and multiplied by the number of seams in the garment. A 5/8-in, difference in each seam can mean a 1-in, difference in a four-seam garment.
Following curves— Of course garments aren’t made up of straight lines only. To build your skill at sewing evenly along curved edges, try this exercise. Cut twelve 8-in, diameter circles of fabric. The goal is to sew two circles together, one on top of the other, in a continuous seam with the edges evenly matched and your seam allowance consistently ½ in.
To rotate the fabric, anchor the center of the circle by pressing down onto the machine table with the index finger of your left hand and “walking” the fabric around with the other lingers. Keep your eye on the front of the presser-foot toe.

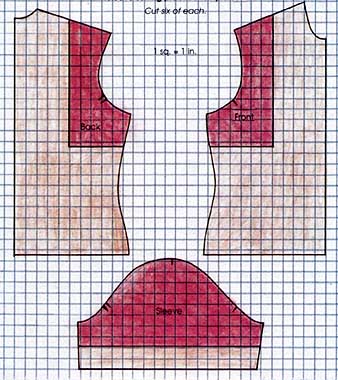
Sleeve-setting practice templates.
Easing on down—Now that you can follow a curve and sew a perfectly straight seam without pins, let’s add a little more challenge. Pattern pieces are often marked “ease” from one point to another. The two pieces being joined are not the same size, but need to come out even anyway. Easing is simple if you control the fabric yourself and feed it to your machine so that the ma chine can do the work. It’s much simpler than pulling up gathering stitches.
Trim ½-in. from the end of one of your practice pieces. Lay an untrimmed piece right side up on your machine table and the shorter piece right side down on top of it. The first rule IS: The longer piece must always be on the bottom. Begin as in the first exercise, lining up the top edges and those to be seamed together, and sew a few stitches to hold them.
Move your hands toward you and match the opposite ends. In the bottom fabric, you’ll find considerable slack, which will be eased into the seam.
The trick here is to let the feed dog of your machine do the work while you guide the fabric and nudge it into position. Hold back very slightly on the top fabric, while letting the feed dog pull the excess bottom fabric along. I lengthen my stitch a little to increase the throw of the feed dog. This will cause it to pull in more fabric with each stitch.
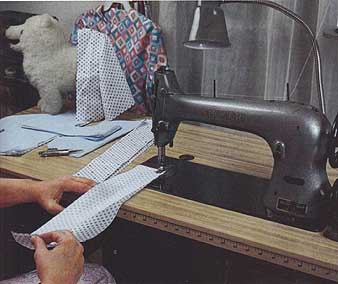
Hold the two pieces of fabric in your right hand, guiding from slightly above the level of your machine bed so that the lower piece won’t bind on the machine. Use your left hand between the pieces to keep the edges even and to push the lower fabric gently to ward the feed dog, as shown in the photo on the previous page. Stitch the entire seam, trying to ease evenly throughout the length. At first, you may find that you have an unwelcome amount left at the end of the seam, but practice will show you how much to pull the top layer and push the bottom so the pieces ease evenly from beginning to end.
Check your completed seam to make sure that the edges are even and that the stitching is 1/2 in. from the edge all along the seam. Once you can get consistent re sulfa with a 1/2-in, difference in the lengths, try cutting off more in 1/4-in. increments to see how much you can ease in neatly. Easing one inch over 18 in. isn't too difficult, with practice. See how far you can go before it becomes impossible.
For comparison, try the same exercise, but cut the pieces on the crossgrain. You’ll find a marked difference in the handling, and the easing will be much less difficult. Bias edges are simpler yet.
Easing gives a contour to what started out as two straight lines. This is the most important use of easing in garment construction: it molds and shapes the garment to our bodies.
Setting sleeves
To set sleeves without pins and pain, practice is absolutely crucial. Cut some practice pieces and sew a few sleeves: at least three left and three right.
You won’t need to make three whole blouses, or even one. Instead, make a set of templates from a favorite pattern with a set-in sleeve which needs some easing. Or use the grid to enlarge the templates show above. Don’t use a man’s shirt pattern or a sleeve with an a1most cap.
Cut the templates from oaktag, tracing the relevant portions of your pattern’s front, back, and sleeve. Cut six practice sets, laying the templates carefully on the fabric grainlines and cutting with a rotary cutter if possible. Accuracy in cutting will make all the difference between loving and hating sleeves. Make sure you have both left and right bodice and sleeve parts. Make 1/4-in. clips at the balance points: one clip on each garment front; two clips for each garment back; and corresponding clips on the sleeve to mark the back, front, and shoulder seam.
Sew all the shoulder seams of the garment pieces. Don’t press the seams open. The seam allowance will be turned toward the front when the sleeve is set.
Now for the fun part: Lay one sleeve on your machine bed, right side up. Lay one of your prepared garment sections on it, right side down. Make sure that the single and double notches of sleeve and garment match. If they don’t, you’ll set a left sleeve in a right armscye, or vice versa.
Line up the sleeve seam from the under arm to the notch. Put it under your presser foot and fasten the beginning of the seam with a backstitch, then stop with your needle lowered. This curve should match exactly without easing, so use your seaming techniques to align the fabric edges and stitch without easing from underarm to first notch, following the curve carefully and keeping the edges on your seam guide.
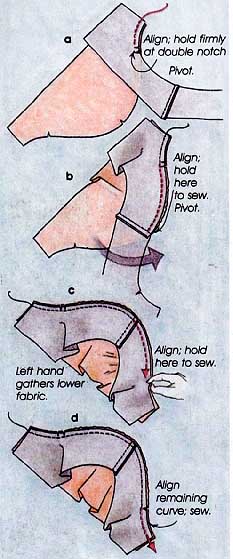
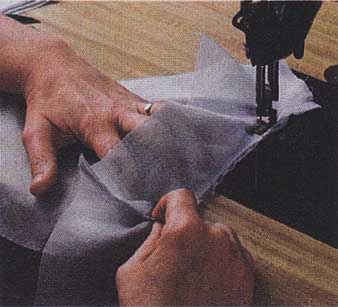
At the notch, stop your machine and lower the needle into the fabric. Lift the presser foot and pivot the garment to the left so that the shoulder seam falls a little to the right of the needle (drawing a, right). Letting the needle and the presser foot hold the sewn portion, match the shoulder seam to the shoulder notch of the sleeve and hold them together firmly with the thumb and first finger of your right hand. Turn the shoulder-seam allowance toward the single-notched front side of the garment, and hold it in place with your right hand. Don’t change this grip until you’ve sewn the first half of the seam. Place your left hand between the layers of fabric as shown in the photo at right, and , spreading your fingers to cover the distance between the presser foot and your right hand, gently pull the sleeve fabric to the left until the garment and sleeve edges are even. Making sure that you lead the fabric into the needle from slightly to the right of center, sew this seam leaving your hands in position. Stop as close to the shoulder seam as possible, and lower your needle. Lift the presser foot and once again pivot the fabric so you can control it from slightly to the right of the needle (drawing b, right). Move your right hand to the remaining notch; match and hold sleeve and garment while using your left hand to ease the seam (drawing c, right). Stitch to the notch, lower your needle, align the remaining seam, and stitch even to the underarm (drawing d).
Remove your work from the machine and check your sleeve. Are the fabric edges even throughout the seam? Did you maintain an even ½” seam allowance? Turn the piece right side out. Is the sleeve set cleanly, without pleats or puckers? Practice six times, and you should note a marked improvement.
I use this method for all sleeves now, including the puffy, full ones I put on my daughter’s dresses. For those, I run three lines of gathering stitches (sleeve right side up, loose thread tension) 1/8-in. apart, in the seam allowance. Before starting the sleeve set, I draw up the gathering threads until the sleeve edge is the appropriate length from notch to shoulder seam, and anchor the gathering threads with those few pins I mentioned earlier. I stitch even to the first notch, match shoulder seam and notch, then use a seam ripper to adjust the gathers in the sleeve between the presser foot and the notch held in my right hand.
I stitch the first half of the sleeve seam, pivot, and reposition my hands. I can then adjust the gathering threads, if necessary, and the gathers. Easing with my left hand, I sew the second half of the seam, stitching even from notch to underarm.
I have yet to meet a sleeve I can’t set using this method. From the flattest to the fullest, they go in like magic.

Setting a sleeve without pins

To set a sleeve without pinning or gathering, train your hands and eyes to hold and lead the fabric layers into the needle. Line up critical
match points and edges before you start stitching; stop to adjust, with the
needle down, at each notch and at the shoulder seam. The fingers of the left
hand are spread to control the longer piece of fabric, which is on the bottom.
