An 18th-century almanac cautions that "overplanted fields make a rich father but a poor son." This advice and its corollary--that good farmers are partners of the land, not exploiters-is as current now as when it was first written.
Care, consideration, a little knowledge, and a lot of common sense: these are the ingredients that will ensure rich harvests year after year, whether your farm is a window ledge in the city, a backyard in the suburbs, or wide acreage in the country. "Raising Your Own Vegetables, Fruit, and Livestock" shows how to keep your land healthy while reaping bumper crops each year. It explains how to grow fruits and vegetables without resorting to expensive synthetic fertilizers or dangerous chemical pesticides. The old-time kitchen garden is treated at length, but other aspects of small-scale agriculture-some traditional, some quite modern-are also covered. Among these subjects are fish farming, keeping bees, growing grain, raising dairy animals, keeping chickens and rabbits, and using horses as draft animals.
+++++++++++++++++++++++++++
The Kitchen Garden
Homegrown Produce -- Sense of Self-sufficiency
It is easy to list the material benefits that a kitchen garden can bring. Your vegetables will arrive on your table garden fresh. They will probably be far tastier than the often days old produce found on the shelves of food stores-and more nutritious too. And there will be impressive savings in your food dollar; experts say that for each $20 worth of supplies and labor invested, a return of more than $200 can be reaped.
But beyond such practical considerations are additional benefits: the pleasure of working with the soil, of watching seeds sprout and grow, and of knowing that the food on your table is a product of your own labor. It is these reasons, perhaps, more than mere economics, that account for the recent upsurge in home vegetable gardening.
The story of vegetable gardening in America goes back further than the current boom or even the victory gardens of World War II . The first gardeners, in fact, were the first Americans: the Indians who raised corn, beans, and squash in neatly tended plots. This food saw the Indians through the lean times of the year when game and fish were scarce. The colonists, like the Indians, depended on their gardens for survival. Life was hard, toil unending, and there was no room in the garden for any plant that was merely ornamental. What herbs and flowers were grown were used for flavoring, medicine, or dye.
For most people today, the home kitchen garden is no longer a necessity for survival. However, the garden still has an important role to play not only in economic terms but also in a well-earned sense of independence and accomplishment, as well as in the closer relationship with nature that working with the soil and its produce affords.
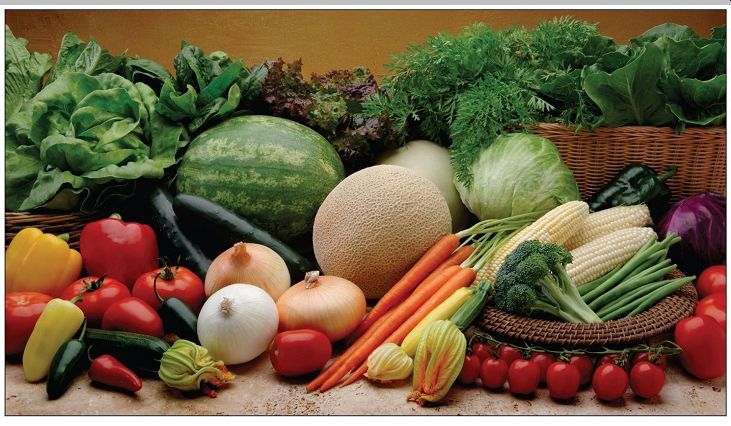
Garden goodies shown here are part of a bountiful harvest of delicious homegrown vegetables for freezing, canning, storage, and, of course, eating fresh. Even a small garden can make a big difference in your food budget, not to mention adding true garden freshness and flavor to your mealtimes. The only prerequisite is that you enjoy gardening.
Companion Planting
For centuries, observant gardeners have noticed that certain vegetables seemed to thrive in the company of one plant while doing poorly in the company of another. There is evidence that secretions given off by the roots of some plants are the cause of this effect. For example, the roots of black walnut trees exude a chemical that inhibits the growth of tomatoes. Onions apparently inhibit the growth of beans, peas, and several other vegetables. Tomatoes and basil, on the other hand, are believed to do well together, as are cucumbers and cabbage.
Another aspect of companion planting is that certain vegetables and herbs seem to repel the pests of other plants. Marigold roots, for example, exude a secretion that repels nematodes-tiny wormlike creatures that attack plant roots-and parsley is said to repel the carrot fly. Other plants lure pests away from their neighbors, as the eggplant lures Colorado potato beetles from potato plants. Although companion planting is a source of controversy among experts, it is certainly worth trying in your own garden.
The Gardener's Basic Tools
Surprisingly few tools are needed for a basic vegetable garden. To work a 15-by-20-foot plot, the only essential items are a spading fork, rake, hoe, watering can, and garden spade or round-point shovel. In addition, a string and two stakes are helpful for laying out rows, and a stout pair of gloves will protect your hands. Other useful tools are a trowel for transplanting, a mattock for dealing with rocks and roots, a hose, a soaker or sprinkler, a wheeled cultivator, and a cart for carrying sacks of fertilizer or other heavy loads. Power equipment is not necessary for the average kitchen garden except, perhaps, a rotary tiller, and this can be rented for the few days each year that it is needed.
Buy good quality tools; the extra expense will be worth it in the long run. Well-made tools last longer and are easier to use. Maintain your tools properly. Clean off soil and mud after each use and oil the tool lightly before putting it away.
An occasional coat of linseed oil helps preserve wooden parts.
-------------
Old-time planting lore
Plant corn when the oak leaves are the size of a squirrel's ear or when the hickory buds are as big as a crow's bill (about 1 in. long). By then the danger of frost will be past. Sprinkle plants with wood ashes or soot to keep bugs off.
Bury pieces of rhubarb in the row when planting cabbage to protect it against club root (a soil borne disease).
To keep cabbage heads from splitting, give each young plant a half-twist in the ground.
When planting corn or squash in hills, be generous with the seed to allow for mishaps: "One for the woodchuck, one for the crow / One for the slug, and one to grow." Much old-time lore involved astrological signs.
Planting under Gemini--the sign of the Twins-- was said to double the crop. As for the moon, farmers were enjoined to plant leafy vegetables when the moon was waxing and to plant root crops when it was waning. Such beliefs may be interesting, even charming, but their usefulness is dubious.
--------------
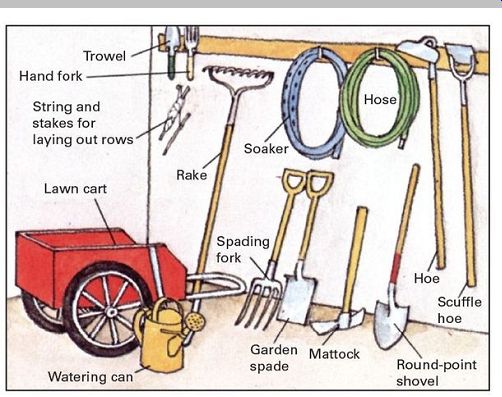
--------- This assortment of tools will handle practically any job that
needs to be done in the average home kitchen garden.
A Successful Garden Requires Planning
To get the most out of your garden plot, it is necessary to plan ahead. Whether you have an established garden or are starting a new one, the best time to prepare is in the off season, well before planting time.
A good location is even more important than good soil.
You can do a great deal to improve poor soil, but it is almost impossible to improve a bad site. The ideal kitchen garden should be sheltered from wind and have direct sunlight for at least six hours a day, preferably longer. It should be well drained; that is, the soil should not remain muddy after a heavy rain. It should be located away from trees, which can shade out light and whose roots may compete with vegetables for moisture and nutrients. Avoid locating your plot in a low spot where water and cold air tend to collect.
The garden should be near a tap, since watering will almost certainly be necessary at some time during the growing season. If you can manage to locate the garden close to the house, you will save many extra steps.
The site should be level or slightly sloping--if it slopes, a south-facing tilt is best, since it provides extra warmth in spring and fall. If the only available site is on a steep slope, terrace it to prevent soil erosion.
Another important decision is the size of the garden. This depends on the amount of arable land available and on how much of your own food you intend to grow. A garden to supply a family of two adults and two school-age children with staples the year round should cover at least 2,500 square feet (50 by 50 feet or the equivalent). However, a garden as small as 15 by 20 feet (300 square feet) can produce an amazing quantity of fresh vegetables.
Even a 6- by 8-foot mini-garden can add flavor and variety to your diet while reducing the food bill.
The traditional shape for a garden is rectangular-it is the easiest to plow and cultivate with horse or machine.
However, free-form shapes are becoming popular and can be adapted to the conformation of your lot as well as to obstacles such as rock outcrops and structures.
When breaking new ground for a garden, be sure either to remove the sod or plow it under so it can decay and enrich the soil. Remove stones, roots, and debris. Soil improvement is also an important part of planning. Test your soil each spring to determine what needs to be done to improve it, then set up a schedule for preparing the soil, planting your seeds, and setting out transplants.
The Right Crops Can Make All the Difference
The most obvious rule is to plant vegetables that you and your family like-it is a waste of time, labor, and garden space to raise produce that goes uneaten. You should also select vegetables that are suited to your local climate and growing season. It is a mistake, for example, to try to raise okra (a tropical plant that needs a long, warm growing season) in Maine or to plant potatoes, which prefer cool weather, in the Deep South.
Once you have decided on what vegetables to grow, you are faced with the problem of selecting the proper varieties.
Seed catalogs and garden centers offer many hybrids specially bred for disease resistance, productivity, size, and flavor, as well as for rapid development. Although hybrids are higher in price than standard varieties, their special bred-in qualities often make the extra investment more than worthwhile. Avoid so-called market or cropper varieties. These are for commercial growers who want crops that ripen and can be harvested at one time. If you plant one of these varieties, you will have a glut of beans, tomatoes, or cabbages for a few days and nothing for the rest of the season.
Plan your garden so that it will yield a steady supply of vegetables once it comes into production. Succession cropping and inter-planting are two methods of getting more out of your garden space. Another device is to stagger your plantings to yield a steady supply of snap beans, radishes, and other vegetables in season. Sow small batches at one to two-week intervals. An alternative is to plant early and late varieties together.
Remember to set aside time to care for your garden- you will need about three hours a week for weeding, cultivation, harvesting, and other chores. An untended garden usually fails; only weeds grow without help. Keep the rows short for easy maintenance. If you are a first-time gardener, plant only a modest plot; the smaller the garden, the simpler it is to manage.
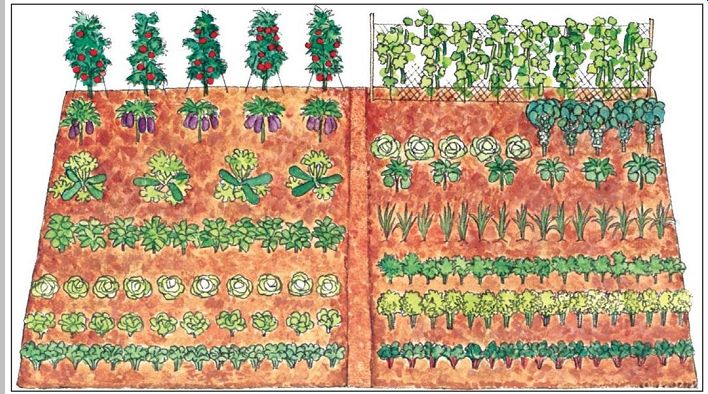
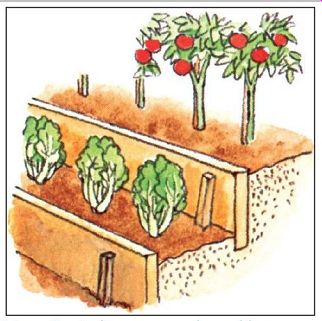
Vegetables should be placed where they will not shade each other. Plant tall vegetables, such as corn or staked tomatoes, on the north side of the garden or the side near a house or other light barrier. Low -growing vegetables such as beets and onions should be located on the side that gets the most light. Asparagus and other perennials should be planted out of the way of the annuals or in separate beds. So, too, should early crops such as peas; they can be plowed under and a new crop planted. The sample layout shown here can easily be expanded or altered or planted with other types of vegetables.
-----------
The Frost-Free Season, From Spring to Fall

-------- Last hard frost of spring and the first hard frost of fall mark
the limits of the growing season for tomatoes, corn, melons, beans, and other
tender vegetables. (A hard frost is one where the temperature falls significantly
below the freezing point for several hours.) The dates shown in the maps represent
averages over large regions. There is a wide variation in frost dates within
each region and sometimes within the same neighborhood. Elevation, landforms,
nearby bodies of water, and the proximity of big cities all affect the frost
date. The presence of water and urban development both tend to increase temperature
and therefore lengthen the growing season.
The effect of elevation is to lower average temperatures by 3°F per 1,000 ft. of altitude. Allow a few days leeway when planting in the spring to make sure your young shoots will not be caught in an unexpected freeze. Your county agent is a good source of information on local frost-free dates. For greater precision, you can maintain your own temperature and planting records. For this purpose, special thermometers are available that record the daily highs and low s.
Shapes to Suit Your Site and Taste

---------- An L-shape is well suited for a garden that must follow the
side of a house or is to be placed in the corner of a lot.
Each arm of the L can be extended as far as you wish to create a peripheral garden space around central lawn or patio. A path at the base of the L gives improved access to both areas of the garden.
---------- Terracing is the answer to the problem of gardening on a steep
slope. Make terraces 2 to 4 ft. wide; use a carpenter's level on a 2 × 4 when
laying them out. Hold the soil in place with either railroad ties, boards supported
by stakes, logs, or flat stones laid on edge. Terraces can be curved to follow
natural contours.
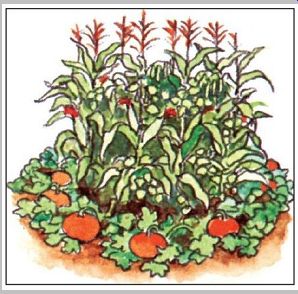
-------- The round garden, with corn, pole beans, and squash thriving
together, is based on a traditional American Indian plan. Almost any combination
of tall and low-growing plants can be used. Locate the tall plants in the center
where they will not choke out or shade their smaller but still desirable companion
vegetables.
--------------------
Two harvests in the space of one
Succession planting is a simple idea that can enormously increase your harvest. One technique is to plant successive crops of the same vegetable at one- to two-week intervals. Another is to follow an early-maturing spring crop with a fall crop planted in midsummer. The chart shows some of the best combinations, but you should experiment with others yourself. In areas with mild winters you may even get three crops by following your fall crop with a hardy vegetable such as collards. A related technique is to interplant quick-maturing vegetables, such as radishes, with slow growers, such as carrots or beets.
Early crop / Late crop
Beets / Kale
Carrots / Brussels sprouts
Corn / Winter squash
Lettuce / Winter radish
Mustard greens / Bush beans
Peas / Fall cabbage
Spinach / Chinese cabbage
Turnips / Fall lettuce
Turnips / Tomato plants
----------------------
A Life-Giving System Beneath Our Feet
Soil is a living, complex system to which our lives are linked in a very real sense. On the soil and its fertility depend the vigor and productivity of plants, the basis of our food chain.
Soil is composed of both inorganic and organic material.
The inorganic components derive mainly from the slow breakdown of rocks and minerals but also include air and water held in the pores between soil particles. Organic material comprises both the remains of once-living plants and animals plus a multitude of simple life forms such as bacteria, fungi, algae, and protozoans.
Other life forms also dwell in the soil, among them insect larvae, microscopic worms called nematodes, and the familiar earthworms. Some, such as nematodes, can harm plants by attacking their roots; others, such as ants and earthworms, help plants by their constant tunneling, which aerates the soil.
Most soils are a mixture of sand, silt, and clay. Sand and silt are chemically the same as the rocks and minerals from which they are formed, while clay has undergone chemical changes that alter its properties. Clay attracts and holds water and many nutrient chemicals, while sand and silt do not. The varying proportions of sand, silt, and clay give soil its character, and soil classifications are based on which of these mineral substances predominates.
Organic matter supplies nutrients to the soil and improves soil consistency. It increases water-holding capacity and adds body to loose, sandy soils; it loosens dense, heavy clay soils, making them easier to cultivate and easier for plant roots to penetrate. Manure, compost, and mulches such as grass clippings, spoiled hay, and dead leaves are good sources of organic matter to add to your garden soil.
The ideal gardening soil is soft, loose, and crumbly. It should also be rich in organic matter and free from stones, roots, and debris. Even if your soil does not have these characteristics, you can tailor it to your requirements by removing debris and adding organic matter.
---------------------
Testing the soil
How can you tell whether your soil is acid or alkaline? In many cases the weeds and the wild plants that grow on it are natural indicators. Sorrel and knotweed, for example, thrive in acid soil; wild blueberries usually indicate a very acid soil.
Sagebrush is a sign of alkaline soil. The familiar hydrangea bush blooms blue in acid soils, pink in alkaline. A carpet of moss indicates a damp soil that is poor in nutrients.
For a more precise analysis, simple and easy-to use soil testing kits are widely available from seed houses and garden-supply centers. Such kits can measure the soil's nutrient content as well as its pH. For testing a large area of soil the most practical procedure may be to send soil samples to your Cooperative Extension service to be analyzed by experts with sophisticated equipment.
---------
There are several simple ways to tell what kind of soil you have in your garden. One test is to place a small amount of soil-about a spoonful-in the palm of one hand. Mix it with water until it is thoroughly wet (but do not use so much water that it becomes runny). Then rub the wet soil out into a thin layer on your palm. Clay soil will feel slippery and look shiny. Sandy soil will feel gritty and look dull. Silty soil will feel slippery but will not shine. Another test is to roll the wet soil into a ball, then into a long, thin snake. Sandy soil is difficult to make into a ball; and when you roll it out into a snake, it will quickly fall part. Clay soil will hold its shape both as a ball and as a snake-the more clay, the thinner the
The Soil and Its Principal Constituents
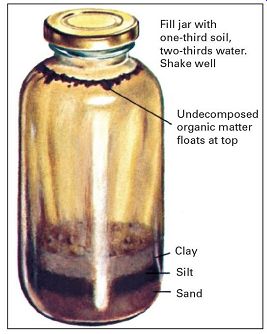
------------ Fertile, humus-rich soil consisting largely of sand, silt,
and clay is called loam. The ideal loam contains about 40 percent silt and
20 percent clay, with sand and organic matter making up the remainder. Such
soils have a good balance between drainage, looseness, and retention of moisture
and nutrients. To determine the makeup of your soil, mix a cupful with water
and shake well in a bottle. As shown above, the soil will settle in distinct
layers of sand, silt, and clay. The relative thickness of the layers indicates
the proportion of each. Sand particles are big enough to see with the naked
eye and are gritty to the touch. Sandy soils are loose and porous, absorbing
water readily but not holding it long. Plant roots penetrate them easily, making
them suitable for root crops such as carrots and beets. Because sandy soils
warm up and dry out quickly in spring, they usually can be worked several weeks
ahead of the denser clay soils. Clay particles are thin, flat plates, too small
to see without a microscope.
Clay is hard and bricklike when dry, greasy and plastic when wet. Clay soils absorb water very slowly but hold it for a long time. They also hold plant nutrients, a valuable quality in garden soils. Silt falls between sand and clay in its properties. The particles are about as fine as sifted cake flour. Silt feels powdery when dry, slippery when wet.
It adds bulk and moisture-holding capacity to soil. Heavy clay soil can be lightened by digging in sand for drainage and peat moss or compost to keep the soil from compacting into a concrete-like mass. How ever, for any type of soil the most important ingredient is organic matter, snake that can be rolled. Silty soil will feel like clay but will not hold together.
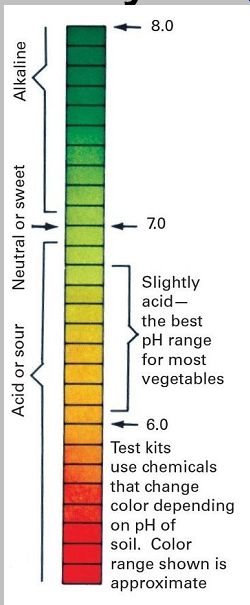
Acid or Alkaline -- The Mysteries pH
The health and vigor of plants depend to a great degree on how acid or alkaline the soil is in which they grow. This is because the degree of acidity or alkalinity controls the availability of important nutrients in the soil. If the soil is too acid or alkaline, the nutrients may be locked up in insoluble chemical compounds, and some may even become toxic to plants. Most plants do best in soil that is neutral to slightly acid, although some vegetables have different needs (see Grower's Guide, pp.114-122).
Acidity and alkalinity are measured by the pH scale, which runs from 0 to 14. Zero is extremely acid; 7 is neutral; 14 is extremely alkaline. Each point on the pH scale represents a factor of 10. A soil with a pH value of 5, for example, is 10 times more acid (10 times less alkaline) than soil that tests out at pH 6. A soil with a pH value of 9 is 10 times more alkaline (10 times less acid) than one with a value of 8.
For comparison, lemon juice, which is an acid substance, has a pH of about 3 and soapy water, which is alkaline, has a pH of 9. Most soils range from pH 4 to 8.5, and most vegetables thrive best between pH 6 and 6.8. Methods of correcting pH are suggested on the following pages.
Fertilizers for Productivity
Fertilizers are used to supply plants with nutrients that the soil lacks. Plants need at least 13 chemical elements for good health and growth. The big three-nitrogen, phosphorus, and potassium-are standard ingredients of almost all packaged garden fertilizers. Other necessary plant nutrients are calcium, magnesium, sulfur, and the so called trace elements: iron, copper, manganese, zinc, boron, chlorine, and molybdenum.
The signs of a nutrient deficiency are often obvious. A lack of nitrogen, for example, shows up in the form of stunted growth and yellow leaves. Symptoms of a phosphorus shortage are stunted growth and leaves of a darker than normal green. A lack of iron appears as yellowing in new leaves. An excess of a nutrient can be bad too. An overdose of nitrogen often results in a lush growth of leaves but weak, brittle stems and little fruit. Large amounts of trace elements can be toxic to plants.
A fertilizer is considered organic if it is derived from naturally occurring materials, such as manure, dried blood, bone meal, rock phosphate, and green sand. Synthetic fertilizers are based on man-made chemicals. The numerals on a bag of fertilizer denote its percentage of nitrogen, phosphorus, and potassium, in that order. A 100 pound bag of fertilizer labeled 5-10-5, for example, contains 5 pounds of nitrogen, 10 of phosphorus pentoxide, and 5 of potassium oxide.
Organic and synthetic fertilizers both supply the nutrient chemicals that plants need. However, the trend among small-scale gardeners is toward the natural and the organic, and away from the synthetic. There are practical reasons for this trend. Organic fertilizers release their nutrients slowly and over a long time; synthetic fertilizers act quickly and must be renewed more frequently. Most organic fertilizers add organic matter to the soil; synthetic fertilizers do not. Organic fertilizers often improve soil texture as well as adding nutrients; synthetics do not. Organic fertilizers naturally contain trace elements and other necessary plant foods; synthetics do not. Earthworms and other beneficial organisms are sometimes harmed by synthetic fertilizers.
Synthetics are more concentrated than organic fertilizers and so are more prone to burn delicate plant roots and destroy valuable soil organisms. Perhaps most important, however, is that more and more people are making their own compost, raising animals that provide them with manure, and otherwise finding or creating their own homegrown fertilizer.
Excellent results can be achieved with either type of fertilizer, however, provided the correct amount is used- neither too much nor too little. The art of efficient fertilization consists of feeding the plants, not the soil.
Improving the Soil
Garden soil is seldom ideal when first tilled. It may be too sandy, have too much clay, or be full of roots, rocks, and debris. The pH may be too low or too high and often the soil is deficient in organic matter.
The most important soil-improvement and conditioning task is usually to add organic matter to the soil. This is best done in fall, while the soil is still warm enough to promote the activity of bacteria and fungi and when the decay process will not use up the nitrogen needed by growing crops. Manure and compost are excellent additives, as are lawn clippings, dead leaves, and so-called garden trash- the leaves and stems of plants that have died or ceased producing. But do not use plants that are diseased or insect infested. They will contaminate the soil and cause problems in future years.
If you have used organic mulch on your garden during the summer, turn it under at the end of the season. Green manure, a cover crop grown for the purpose of being added to the soil, is much used. Rye, alfalfa, and clover are favorites for this purpose, particularly alfalfa and clover, which have nitrogen-fixing bacteria growing on their roots.
In addition to improving the structure of the soil, organic matter provides food for earthworms and other beneficial soil organisms.
Organic material should be thoroughly mixed into the topmost 12 inches of soil but no deeper-the roots of most common vegetables do not penetrate beyond this depth.
Since organic matter is at a premium, it should be used where it does the most good.
Overly acid soil can be corrected by adding lime, which also contributes calcium-a major plant nutrient-and improves soil structure. Alkaline soils can be made more acid by adding powdered sulfur, which is slow acting but long-lived, or aluminum sulfate.
The Art and Science of Soil Improvement
Composting is a method of converting garden trash, kitchen scraps, and other organic wastes into humus-a partly decayed form of organic matter that is an important ingredient of rich soils.
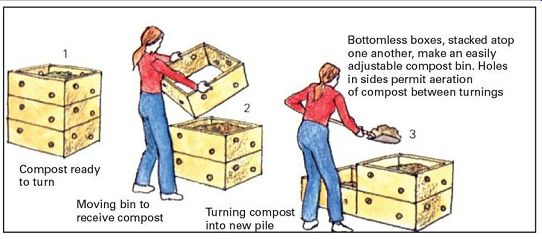
There are many variations in composting techniques, but the basic idea is to let the biological action of bacteria and fungi heat the interior of the compost pile to 150°F, killing weed seeds and disease organisms. The most efficient way to produce compost is in a bin or container to keep the material from spilling out.
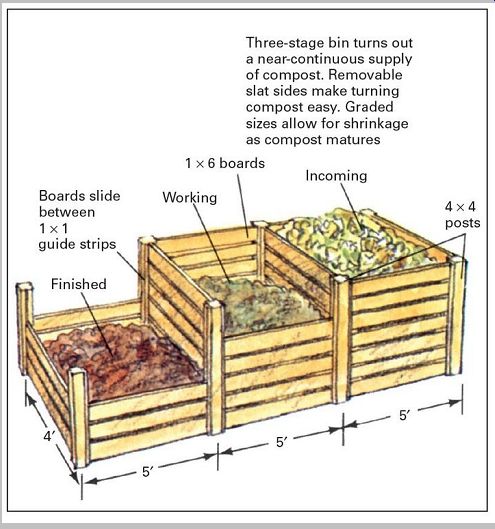
A compost pile is built up like a layer cake with each layer watered as it is completed. Optimum height for a compost pile is about 4 feet. A lower pile loses too much heat; a higher one tends to pack down and interfere with the biological action. Length and width are optional, but remember that two small piles are easier to handle than one huge one. Start with a 2- to 3-inch layer of coarse materials, such as cornstalks, twigs, or straw (the purpose is to let air into the bottom of the pile). If coarse material is not available, you can use a layer of sawdust or other absorbent material or omit it entirely. In any case, only one layer of coarse or absorbent material is necessary. Next, add a 3- to 6-inch layer of organic material, such as garden trash or dead leaves. Over this place 2 to 3 inches of manure (or a light sprinkling of synthetic fertilizer) to supply the nitrogen needed for the breakdown process. Other good sources of nitrogen are dog and cat droppings, feathers, hair clippings, and dried blood. The next layer should be a thin cover of topsoil or old compost. At this point some gardeners cover the heap with a sprinkling of lime. Repeat the process until the pile is about 4 feet high; then shape the top of the pile into a shallow saucer to let water soak in.
Moisture content is important for good composting. If the pile is too dry, the breakdown process slows to a halt; if too wet, undesirable biochemical reactions take place. The pile should be about as damp as a just-squeezed sponge. In dry weather water it every few days; in very rainy weather cover it with a tarp or plastic sheet.
The pile should be turned about once a week to aerate it.
This procedure speeds decomposition, combats odor, and mixes the material so that it will decay at a uniform rate. To turn compost, take apart the old pile and put it together backward so that the material that was on the outside of the old pile is in the center of the new pile.
Compost is ready to use when the pile no longer gives off heat or odor when opened up and the material has turned brown and crumbly.
Tilling the Soil
Since the beginning of agriculture, man has tilled the soil.
Tilling serves several purposes. It breaks up and buries sod and weeds that would otherwise compete with cultivated plants for space, water, and nutrients. It loosens the soil, permitting water and air to reach the plant roots. It kills eggs and larvae of many insect pests. And it enriches the soil by turning under organic matter.

------------ A catalog of organic fertilizers
Refuse into compost, quickly and easily
----------- Shredding and plenty of nitrogen are the keys to the fast 14-day
method of compost making.
The schedule: 1st day. Shred the material and build pile. (Use a compost shredder or run a rotary mower over the material spread on the ground.) 2nd and 3rd days. Check pile for heating and moisture (insert a kitchen thermometer to check temperature). If it is heating too slowly, add high nitrogen fertilizer. 4th and 7th days. Turn pile; check temperature and moisture. 10th day. Turn pile once more; it should be cooling off. 14th day. Compost is ready for use.
--------------------
Some easy-to-build compost bins
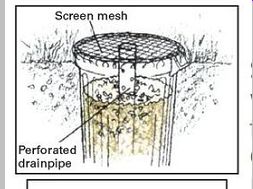
------ Sunken garbage can makes convenient compost bin when space is limited.
Punch holes in bottom of can for drainage and fill with alternating layers
of material. Cover with screening to keep out insects and scavengers.
Perforated drainpipe in center provides aeration.
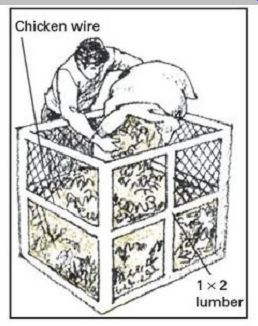
---------- Screened compost bin is made of chicken wire and light lumber.
It is easily disassembled for turning compost. Two L-shaped sections fasten
with hooks and eyes. To use, simply unfasten hooks and eyes, remove sides,
and set up in position to receive the turned compost. (The heap will remain
standing when sides are removed.)
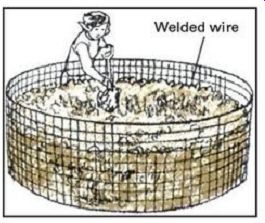
---------------- Wire mesh cylinder is one of the simplest of all compost
bins to construct. Use mesh with heavy gauge wire; support with stakes driven
into the ground. Often used for autumn leaves, it can handle any type of compost.
--------------
Rotating steel compost drum
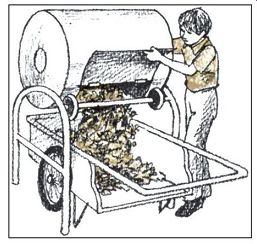
------ Rotating steel drum tumbles compost each time drum is turned, mixing
and aerating it.
Material is loaded through a hatch. These compact, durable units are available commercially and can also be built at home using an empty oil drum and 2 × 4 lumber for frame.
---------------
One of the oldest methods of tilling is with a spade and rake. The soil is first turned over with the spade (a broad tined garden fork will also serve); then the rake is used to break up clods and level the surface.
Almost as old as the spade and rake is the plow, a laborsaving invention that is essentially a spade moved through the soil by man, animal, or machine. When a plow is used to till the ground, a harrow usually takes the place of a rake. There are two basic types of harrow: tooth harrows and disc harrows. A recent addition to the roster is the rotary tiller, dating from the 1950s. This motorized device combines the functions of plow and harrow and mixes the soil thoroughly.
For full-scale farming or for a very large garden (an acre or more) you will need a plow and harrow and either a tractor or draft animal to pull them. For plowing land that has been cleared of sod a small tractor of 12 to 16 horsepower may be big enough, but for breaking and plowing in sod a tractor weighing at least 1 ton and with at least 40 horsepower is necessary. It is often more practical to rent equipment or to hire someone to do the plowing and harrowing for you than to invest in expensive equipment.
For an intermediate-sized garden (1/4 to 1 acre), a rotary tiller provides a good combination of high efficiency and low cost.
When tilling, go no deeper than the top 12 inches of soil.
This leaves the fertile topsoil in place, where plants can utilize it. It also helps keep the soil structure, or tilth, in good condition (porous and crumbly).
The soil should be fairly dry, without any trace of muddiness or stickiness, before you work it. If the soil is worked when it is wet, soil particles will become packed together, damaging the tilth. Heavy equipment is the worst culprit in this respect, but even a man walking on the soil will cause damage if the earth is wet.
If you do not use mulch to keep the weeds down, you should till the soil lightly between rows with a rake, hoe, wheeled cultivator, or rotary tiller as the growing season progresses. This light tilling, or cultivation, should be no deeper than 1 or 2 inches. Cultivation kills weed seedlings and reduces evaporation of water by pulverizing the soil's surface (this blocks off pores through which water vapor escapes). Cultivation also makes it easier for rainwater to soak in rather than run off.
Labor savers for the garden
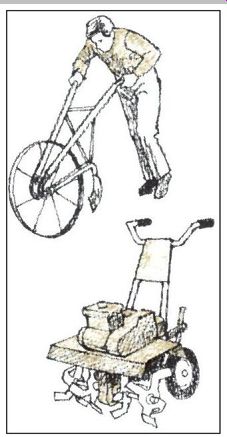
------------- Wheeled cultivator, an old-time implement still sold by many
supply houses, is valuable for cultivating between row s. Powered by hand,
it gives the user more "feel" for the soil than the motorized cultivator.
Rotary tiller, driven by a small gasoline engine, is meant for land that has
been cleared of sod.
Device doubles as a harrow . Rotary tillers can be either bought or rented. Type with power driven front wheels handles best.
Harrows for the farm
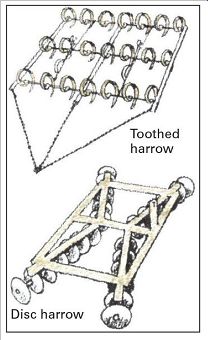
---------- Harrowing is done after land has been plowed.
Purpose is to smooth and level the soil-the same job raking does. The toothed harrow is the simplest type. The more versatile-and usually costlier-disc harrow , which also improves soil by turning under crop residues, is widely used in commercial farming. Harrowing should be done at an angle to furrow s made by the plow . Do not harrow unless soil is dry.
The standard plowing pattern
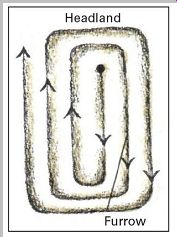
---------- Earth thrown off by plow should be directed to center of garden.
Follow a clockwise pattern with plows that throw earth to right (as most of
them do). Start at middle of one edge of field and plow from end to end. Use
headlands-narrow strips of land at either end of field-for turning.
Horse vs. tractor
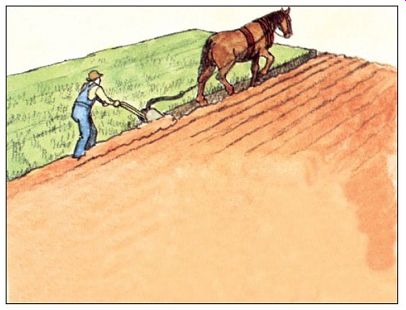
------------ In recent years there has been a resurgence of interest in
horses for farm work. A pair of good drafters can plow 3 acres a day. Although
the rate is considerably less than a tractor's, horses provide many other benefits:
they can work land too steep for a tractor, they supply manure, they are "fueled" with
grasses and grains that you can raise yourself, they do not pollute the atmosphere,
and they can be used for recreation and transportation. Of course, horses require
daily care and skill in handling. Such massive, muscular breeds as Clydesdale,
Belgian, and Percheron make the best draft horses, but any healthy horse can
be used.
Contour plowing for sloping land
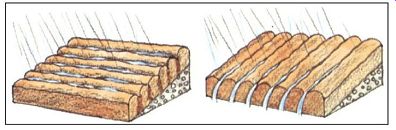
--------- Plowing turns over a slice of soil with each pass of the plow
, breaking up the soil as it goes.
The result is the familiar pattern of ridges and furrow s associated with newly plowed farmland.
Hilly and sloping land should be plowed by a special technique known as contour plowing. As shown (above left), each ridge and furrow on contour plowed land stays at the same height across the slope. Such a pattern traps rainwater. Letting it soak into the soil. The wrong way to plow (above right) leaves furrow s running uphill and downhill. This directs the rainwater into channels made by the furrow s, causing it to scour out gullies and carry off soil.
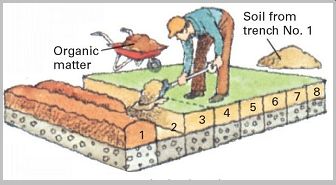
--------- Double-digging for better soil
Begin by digging trench No. 1 to one spade depth (about 10 in.) across one end of garden.
Put this soil to one side. Next, loosen the soil in bottom of trench No. 1 one spade depth and mix in organic matter. Now dig up the topsoil in trench No. 2 and use it to fill in trench No. 1; mix in organic matter and fertilizer. Continue digging and filling until you reach end of garden. Use topsoil from trench No. 1 to fill in last trench.
Double-digging is hard work, so spread it over several days.
Starting the Seed s for the Garden and for Your Table
You can gain weeks on the growing season by starting your vegetable seeds indoors, then setting out the seedlings when the danger of frost is past. Supermarkets and garden centers sell seedlings ready for planting, but serious home gardeners prefer starting their own. The cost is far lower, you can cull out all but the strongest seedlings, and you have a vastly greater choice of vegetables-typically, most outlets stock only the bestselling varieties, and some are limited to a few standbys such as tomatoes, peppers, and eggplant. Moreover, if you start your own seeds, you can be certain that no unwanted pesticides have been used.
Perhaps most important, however, is the satisfaction you have of knowing that the vegetables you harvest are the products of your own labor, from seed to tabletop.
The only equipment you need to start seeds are some small containers, a suitable growing medium, and a sunny window. Vermiculite, a mineral product, is a popular growing medium because it is light, inexpensive, porous, and holds water well. Old-time gardeners often used sand, mixing it with sphagnum moss to improve its moisture holding ability. Commercial potting compounds are usually a mixture of vermiculite, sphagnum moss, and plant food.
Compost from your compost heap is an almost ideal starting medium, but sterilize it first to kill disease organisms and insect eggs. To sterilize, bake the compost in a shallow pan in a slow oven until it reaches 180°F. You can check the temperature with a meat thermometer.
Garden soil is also a satisfactory medium. I t, too, must be sterilized before using it. Mix in vermiculite and sphagnum moss after sterilizing the soil in order to lighten it.
Unless the cost of seed is an important factor, do not use the tedious, old-fashioned method of starting seeds in flats (open trays) and transplanting them to pots. Instead, use small containers and sow three or four seeds in each.
Although almost any small container will do, the most convenient devices in which to start seeds are peat pots, peat pellets, or fiber cubes. Since the seedlings' roots will grow right through the growing medium into the soil, there is no need to disturb the seedlings when they are set out by removing them from the container. When the true leaves appear (see opposite), cut off all but the strongest seedling in each container at soil level. Do not pull up the unwanted seedlings, as this may injure the roots of the one you want to save.
Most seeds should be started in a warm room-the kitchen is often a good choice-since the soil must be fairly warm for the seeds to germinate. You can speed germination by keeping seeds in the dark; check them daily for soil moisture and sprouting. When they have sprouted, move them into direct light.
The starting medium should be kept moist but not soggy.
Excessive wetness may cause seedlings to die of damping-off, a fungus disease. A simple and efficient way to conserve moisture (and retain heat at night) is to make a mini-greenhouse by stretching plastic wrap over the seed containers. The plastic should be removed as soon as the seeds have sprouted.
When the seedlings have four to eight true leaves, they should be transplanted to the garden. If set out when older, they tend to be stunted and yield poorly. Before transplanting them, seedlings should be hardened off; that is, acclimated to outdoor conditions. About two weeks before planting time, begin putting them outdoors for short periods of time. Leave them out for about an hour the first day, gradually increasing the time until they are out all day.
Protect the seedlings from the wind and do not expose them to the midday sun for the first few days. Do not feed them the last week.
Do the actual transplanting on a cloudy day or in late afternoon to avoid the drying effects of the sun. When transplanting from flats or containers with several seedlings, make sure that each seedling has as much soil as possible around its roots when you remove it. (A teaspoon makes a good digger for removing seedlings.) Give each seedling a thorough watering when it is placed in the ground. Many gardeners shade their seedlings from direct sun the first few days after transplanting.
Homemade Starting Containers
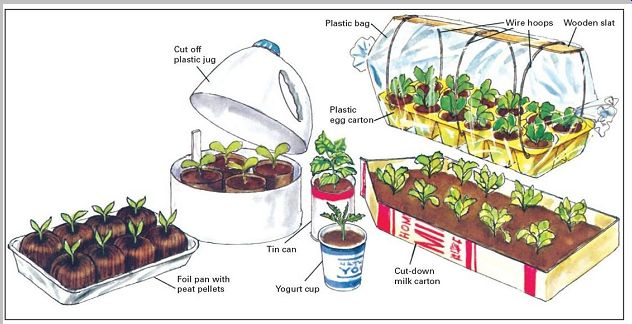
-------- Almost any container that is waterproof will serve for starting
seeds. Yogurt cups are convenient for individual seedlings; larger containers
will hold peat pellets and peat pots, or they can be used as old-fashioned
flats. You can make a miniature greenhouse from a plastic milk jug, with its
midsection cut out, or by rigging a plastic cover, supported on wire hoops,
to fit over a plastic egg carton.
--------------------
From seed to seedling
-----
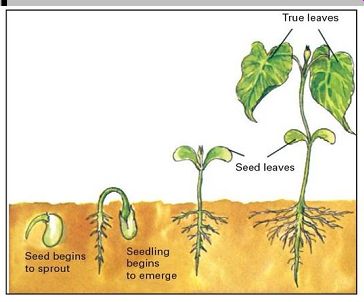
Four stages in the growth of a seedling are shown below. Note the difference between seed leaves and true leaves: seedlings should be set out when four to eight true leaves appear.
Seedlings do best in a window that faces south or east with at least six hours of sunlight a day; otherwise use 40-watt white fluorescent lights positioned about 6 in. above the seedlings.
---------------------
Saving Seeds for Future Use
There are two aspects to saving seeds: collecting them and storing them. Collecting seeds from your own plants is a gamble because the seeds you harvest in the fall are likely to be hybrids, or crosses, between different varieties planted nearby. These natural hybrids are unpredictable and usually inferior to the parent varieties. Many of the most popular varieties of garden vegetables produced by seed growers are specially bred hybrids (specified on the seed packet). It does not pay to save seeds from such vegetables nor from plants grown in close proximity to another variety, such as two varieties of squash that have been planted side by side.
If you decide to try your hand at harvesting seeds from your own garden, the safest course is to take seeds only from non-hybrid varieties of tomatoes, peppers, and eggplant. These vegetables are self-pollinating, and their seeds are likely to come true to type. Let the fruit become overripe on the plant. Mash it, scrape the seeds out, and let them soak in water for a day or two until they begin to ferment. Discard the pulp and the light, infertile seeds that float to the top. Dry the heavy, fertile seeds that sink to the bottom on a sheet of paper. Peas and beans are also a reasonably good risk for seed saving. Simply let the pods dry on the vine, then shell them.
Proper storage of seeds is important whether they are those you collect yourself or leftover commercial seeds from the spring planting. The key to storing seeds is to keep them dry and cool. (Moisture and warmth activate a seed's biological processes, not enough for sprouting but enough to use up the seed's food reserves.) Put seeds you have collected yourself in envelopes, label each envelope with date and vegetable type, and seal with tape. You can leave commercial seeds in their original packets; simply fold over the open end and fasten it firmly with tape, then mark each packet with the year you bought it. Place envelopes and packets in a tight container, such as a jar with an airtight top, and store them in a cool, dry location.
Sprouting Seeds for the Dinner Table
Seed sprouts, easy to grow and rich in vitamins and proteins, take only three to five days to raise. The basic techniques and equipment are simple. Seeds can be sprouted in almost any kind of household container, and the only space they require is a dark niche in a warm place, such as a kitchen cupboard.
The best-known sprouting seeds are mung bean (the sprouts are often used in Oriental dishes), soybean, and alfalfa, but many other kinds can be used including wheat, corn, barley, mustard, clover, and radish. Most health-food stores carry seeds for sprouting. Even dried peas, beans, and lentils from the grocery or supermarket make tasty, nutritious sprouts. However, you should never eat sprouts from seeds that have been sold for planting in the garden; they are generally treated with a poisonous chemical fungicide. Also avoid tomato and potato sprouts, both of which are poisonous. In addition, the seed sprouts of many ornamental flowers, foliage plants, and wild plants are poisonous.
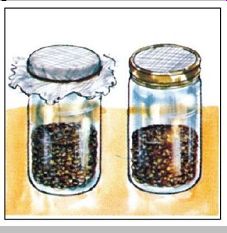
-------- Wide-mouthed jar makes a handy sprouter. Cover jar with
cheesecloth held by rubber band or with wire mesh inside screw -on rim.
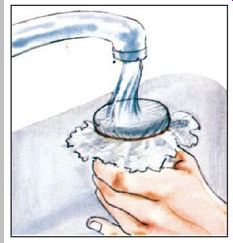
-------- Rinse seeds by running water into jar and swirling it around.
Method works well for small seeds, provided mesh is fine enough.
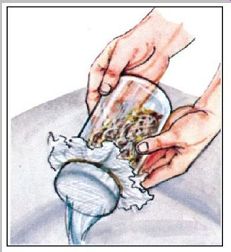
-----------To empty rinse water, invert jar so that water drains out through
mesh. Seeds should be kept constantly moist, but not wet or else they will
rot.
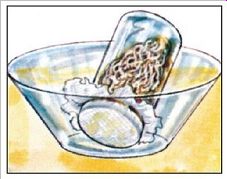
------------Place sprouting jar at an angle of approximately 45° inside a
large bow l to allow excess moisture to drain from sprouts between each rinsing.
The usable lifetime of common seeds
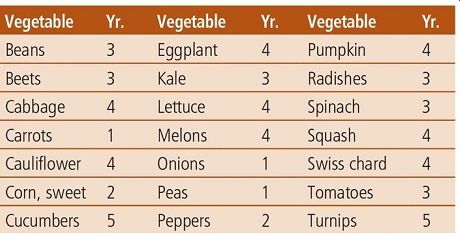
------------
The first step in sprouting is to measure out the seeds. With most seeds 1/4 cup will yield 1 to 2 cups of sprouts--enough for four average servings. Rinse the seeds thoroughly in a sieve or strainer, then soak them overnight in cool water. Allow at least four times as much water as seeds, since the seeds will absorb a great deal of moisture. The following morning, drain the seeds and place them in a clean, sterile sprouting container, such as a bowl, wide-mouthed jar, or flowerpot. Keep the seeds damp-not wet-and allow air to reach them. A shallow layer of seeds in a wide container is better than a deep layer in a narrow container.
Very small seeds, such as alfalfa and clover, are more easily sprouted on a moist paper towel than in a jar. Place the towel in a shallow bowl or dish, sprinkle the presoaked seeds onto it, and cover lightly with another paper towel.
Sprinkle water over the towels from time to time to keep the seeds moist. For added flavor, give alfalfa and clover sprouts a few hours of light on the last day of sprouting.
Seeds should be rinsed in a strainer twice daily in cold water when they are sprouting. Discard any that are not sprouting properly, drain the rest, and return them to the container. The seed hulls should come off and float away during the last few rinses. Chickpeas and soybeans should be rinsed four to six times a day.
Most seeds sprout well at room temperature (60°F to 80°F); soybeans and chickpeas do best at about 50°F. For use in salads most sprouts should be 1 to 1 1/2 inches long. Peas and lentil sprouts should be the length of the seed. As a general rule, the bigger the seed, the shorter the sprout should be for maximum flavor and tenderness.
Sprouts are best when eaten fresh but will keep four to six days in the refrigerator.
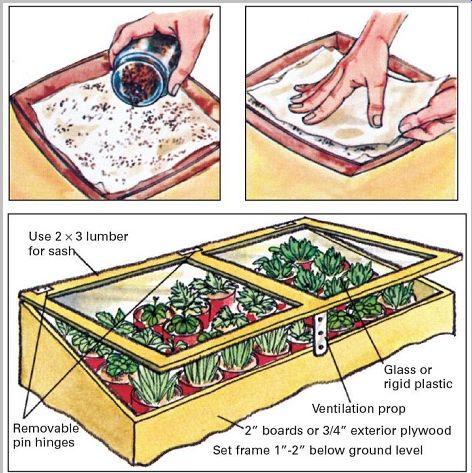
----------- Damp paper towel is excellent for sprouting small seeds.

------ Cold frames are simple and inexpensive to build. Tailor the dimensions
to fit your own needs or components at hand.
-------------------
A window greenhouse
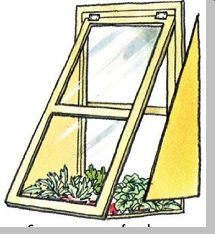
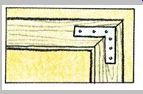
---------- Secure corners of sash with glue and dowels or with nails; reinforce
with corner braces.
Window greenhouse at left is made out of an old storm window . (You can also make your own storm window or buy one.) Sides and floor are 3/4 in. exterior plywood fastened to the sash with 1 × 1 strips. Seal all edges with caulking compound.
House heat helps keep plants warm.
-------------
---------------------
Trapping the Sun for Winter Farming
Cold frames, hotbeds, and greenhouses are devices for trapping the sun's energy to grow plants in cold weather.
The cold frame is the simplest of the three. Basically, it consists of a bottomless box with a movable top cover of glass. Sunlight passes through the transparent top, strikes the walls and soil inside, and is converted to heat. Most of the heat waves, however, will not pass back out through the glass and are trapped inside. This is known as the greenhouse effect. Transparent plastic can be substituted for glass.
The versatile cold frame has several uses. It can be used for starting seeds in spring or for hardening seedlings that have been started indoors. In fall and winter it can provide a steady supply of such cold-tolerant crops as lettuce, spinach, and cabbage. And by adding a source of warmth, such as an electric heater cable, a cold frame is quickly converted into a hotbed for starting seedlings of tender crops even in cold weather.
When building a cold frame, make the back several inches higher than the front so that the top is tilted. This, allows rain and melting snow to drain off and helps capture more rays from the low-angled winter sun.
For starting or hardening seedlings in a cold frame, it is easiest to have the seedlings in separate containers. For raising fall or winter vegetables dig out the bed of the cold frame to a depth of 4 to 6 inches and fill it in with good garden soil enriched with compost or manure.
A cold frame should face south for maximum exposure to winter sun. If this is not possible, east is the next choice, then west. The ideal temperature inside the cold frame is 65°F to 75°F during the day and 55°F to 65°F at night.
Keep an inexpensive outdoor thermometer in a shaded spot inside the frame for quick reference.
On sunny spring days raise the sash for ventilation or the temperature may rise to a point that kills delicate seedlings. Do not forget to close the sash at night. On cold nights cover the glass with hay, burlap, or an old blanket to retain warmth. In wet weather add an additional cover of waterproof material, such as a canvas tarpaulin or sheet of plastic.
A typical cold-frame measures about 3 feet by 6 feet and is 9 inches high in front and 15 inches high in back. When building a frame, the best lumber to use is a rot-resistant species such as redwood or cypress, but most woods can serve if they are treated with copper naphthenate, a wood preservative that is not toxic to plants. (The commonly used wood preservatives creosote and pentachlorophenol are both toxic to plants and should be avoided.) For the top, glass is most durable, but fiberglass is a close second.
Plastic film is cheap but short lived. Old storm windows make an economical and laborsaving cover. In fact, almost any kind of window can be recycled into a serviceable cold frame top; some economy-minded gardeners even use old window screens with plastic film tacked to them. When constructing a cold frame out of old parts, it is a simple matter to tailor the dimensions of the frame to fit what is available.
Converting a Cold Frame Into a Hotbed
The simplest way to convert a cold frame into a hotbed is to install an electric heating cable equipped with a thermostat.
Cables specially designed for this purpose are sold by many garden-supply centers and mail-order houses. First dig out the soil inside the cold frame to a depth of 1 foot.
Put in a 4-inch layer of coarse gravel for drainage and lay the heating cable on this. Note:
For safety and compliance with the law, make certain that your installation conforms to all local regulations governing outdoor electrical installations. Lay the heating cable in long, parallel U-shaped loops and cover it with 1/2-inch galvanized wire mesh to protect it from gardening tools.
Over this goes 2 inches of builder's sand and then 6 inches of topsoil or planting medium. If you plan to plant in containers rather than soil, omit the planting medium. On sunny days the hotbed must be ventilated just like a cold frame.
You can heat a hotbed without electricity by using the warmth of fermenting organic matter. Dig a pit 3 feet deep inside the frame and fill it with a 2 1/2-foot layer of straw-rich horse manure or raw compost with a generous dose of nitrogen to speed bacterial action. Wet the organic material thoroughly and cover it with a foot of soil. It will heat up rapidly. Put in seeds or seedlings when the soil temperature drops to 75°F. The warming effect should last for several weeks.
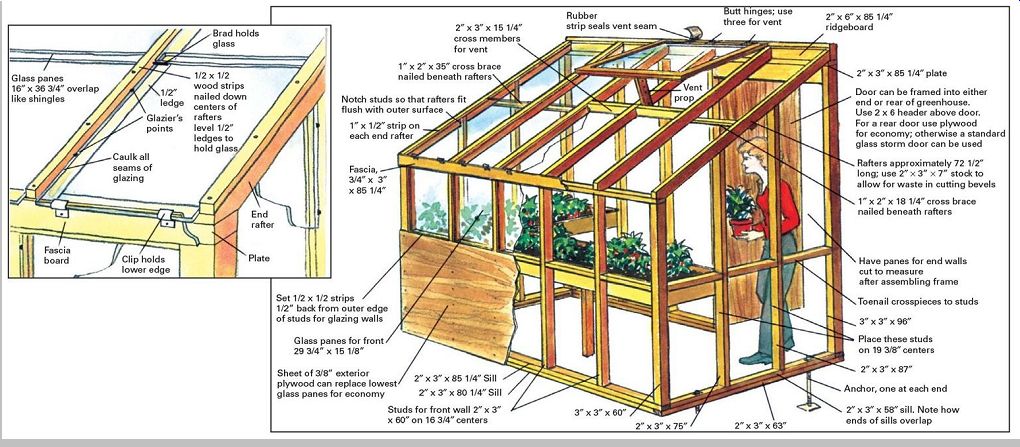
A Do-it-yourself Greenhouse
A greenhouse is basically a giant cold frame designed to hold large numbers of plants, including ones of considerable size. In most parts of the United States greenhouses are equipped with heating devices so that even tender crops such as tomatoes and peppers can be raised in the coldest months. Greenhouses also need shading devices to protect the plants on hot, sunny days.
Ideally a greenhouse should face south to get maximum winter sunlight. If this is not possible, the next best choice is east (plants benefit from morning light). A western exposure is also satisfactory, but vegetables will not grow in a north facing greenhouse.
Greenhouses can be bought or built in an almost infinite variety of sizes and designs, from a geodesic dome to a simple lean-to. Greenhouse manufacturers sell complete kits that the home handyman can assemble, but for economy and personal satisfaction many gardeners prefer to build their own from scratch. The simple greenhouse shown here is an economical design that uses materials available at local lumberyards.
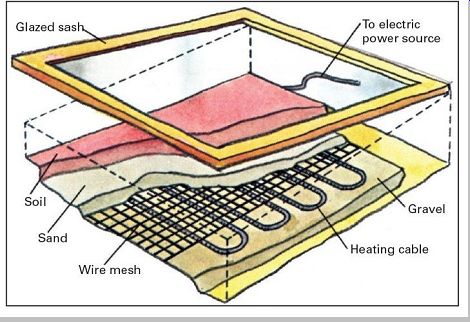
------- You can convert a cold frame into a hotbed using materials readily
available at hardware stores and garden centers.
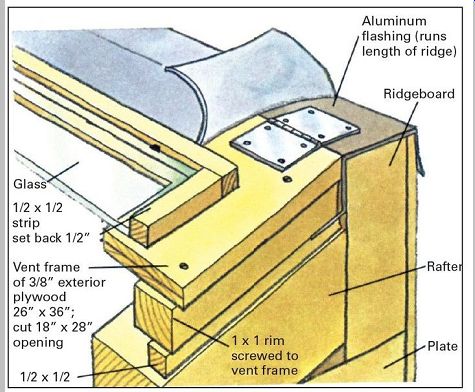
-------- Cross section show s construction details of rooftop vent.
Roof panes are 16 in. wide, 36 3/4 in. long, and made of double-strength glass to reduce breakage. For the walls use ordinary window glass. The roof panes overlap like shingles and should be bedded in caulking compound to prevent water leaks and drafts. Secondhand window s or storm window s, which can be obtained from house wreckers, may be used for the walls. In this case, the studs will be farther apart, and you will need to add a 2- by 6-in. board beneath the front wall plate for reinforcement.
The plans show a freestanding unit with a rear wall of weather-resistant exterior-grade plywood. The greenhouse can also be adapted to a lean-to design by butting the rear wall against the side of the house.
Note, however, that if the greenhouse is attached to the house in a region where winter temperatures drop below freezing, a concrete foundation should be laid that extends below the frost line. Otherwise frost heaving can distort the greenhouse's frame and cause glass breakage, structural damage, and even damage to your home.
If it is freestanding, the greenhouse can rest directly on the ground or on a base of 2-inch-thick patio blocks or 8 inch-thick concrete blocks. The sills should be of rot resistant redwood or else treated with wood preservative, especially if the greenhouse rests on patio blocks or on the ground. The floor need not be paved.
In windy areas the greenhouse should be secured to a permanent foundation or else anchored to the ground. For anchors use rods extending through the sills to 4-inch square steel plates buried 18 inches in the soil.
===