Mortarless Masonry: The Natural Alternative To Concrete and Tar
Stone is one of nature's finest building materials. It is plentiful, free, attractive, and enduring. Long before mortar was developed, stone was used to build walls, walks, roads, towers, and monuments. Some of these structures, like Stonehenge in England or the great monolithic statues of Easter Island, have withstood the ravages of time for millennia. In America mortar-less stone construction is chiefly associated with New England. There, colonial farmers made a virtue of necessity by using stones from their rocky fields for everything from walls to root cellars.
The principles of mortarless, or dry wall, construction have remained unchanged over the centuries: walls must be perfectly vertical, their individual stones should overlap each other, and the base of the wall should be as wide or wider than the top. Materials have remained largely unchanged, too, although brick has been added to the dry mason's repertoire and is especially useful for walkways, driveways, and patios.
Almost any size, shape, or variety of rock can be used for dry wall construction. Old foundations, loose rubble from an abandoned quarry, a rock-strewn field, or the bed of a stream are likely sources of building stones. If it is not your property, be sure to get the owner's permission before removing any rock. And never attempt to quarry rock without professional help; rock is massive (170 pounds per cubic foot for granite) and can break unexpectedly.
=============
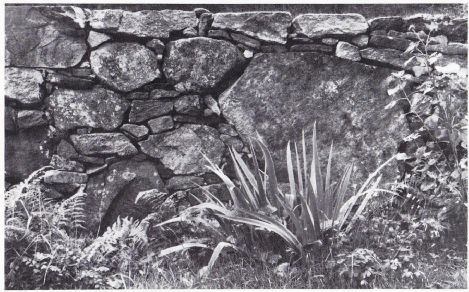
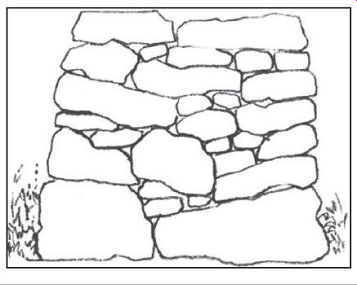
------ Stone masonry is an art when practiced by a dedicated
craft. The richly variegated wall shown above is the work of Christopher Hewat,
a Connecticut stonemason who walls incorporate rocks of every conceivable size,
shape, color, and character. The individual rocks have b carefully placed for
strength as well as beauty: massive stones are at the base, flat slabs are
on top to form a smooth surface, and every major rock overlaps at least one
other,

--------- Retaining wall is made largely of slabs and blocks
that are so perfectly rectangular they appear to have been dressed to shape.
Note long, ildt capstones and extensive chinking with smaller wedge-shaped
chips to allow maximum surface contact be tween stones. Slab sleps provide
access to terrace

----- Local stone is usually the best material for building
a wall: it is cheap, close at hand, and blends with the landscape. IbiS h fieldstone
wall is an excellent example ol the use oh local rock. Like all dry walls,
it has a certain amount Flexibility, or “give,” making it relatively immune
to frost heaving.

------- Mortarless dam is faced with massive, angular slabs
for maximum structural strength. Close fitting of stones limits leakage; p
derous weight plus the friction between rocks makes the d strong. Dam is backed
with earth. Over the years water pree forces more and more sediment into any
crack., that exist I tween the rocks and within the soil. The result is that
the d becomes increasingly watertight as the years go by.

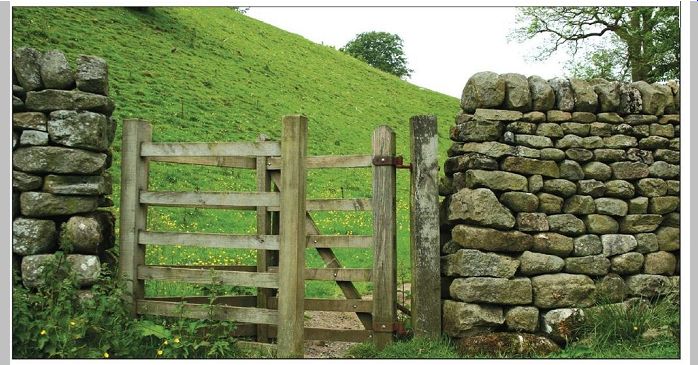
--------- Corner mortarless wall.
===============
Tools and Supplies
The tools and equipment needed for dry wall stonemasonry tend to be simple and rugged. Most, if not all of them, will already be part of your home stock of tools; others can be purchased as the need arises: there is little point in investing in special chisels and a set of steel wedges, for example, if you are not going to split stone. Whatever tools you buy, be certain their quality is high.
Rocks can be enormously heavy, and sudden, unexpected failure of a piece of equipment can cause serious injury.
You should also be sure to purchase and use the three items most connected with safety: heavy-duty steel-toed work shoes, a pair of sturdy leather work gloves, and safety goggles with plastic lenses to wear whenever you chip, shape, or otherwise dress stone.
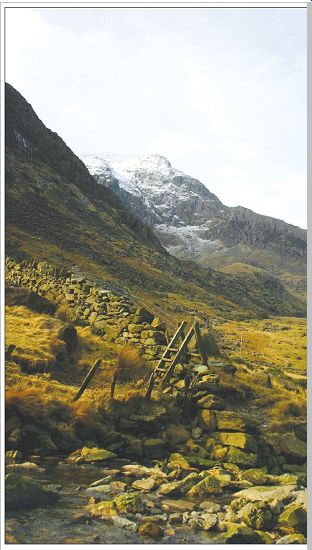
--- Old stone wall is constructed from fieldstone. The
turnstile allows ramblers to explore the moors more easily.
------------- Stone masonry is an art when practiced by
a dedicated craftsman. in the richly variegated wall shown above, stones have
been carefully placed for strength as well as beauty: the largest rocks are
at the base with stone decreasing in size as the wall gets higher. Like all
dry walls, it has a certain amount of flexibility, or "give," making
it relatively immune to frost heaving.
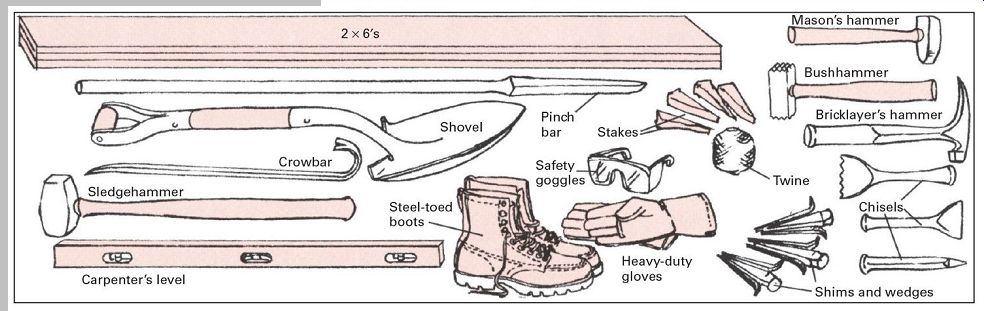
---- Most stonemason's tools are available in any good hardware store.
sturdiness is vital, but avoid tools that are too heavy for you.
Moving and Lifting Large Stones
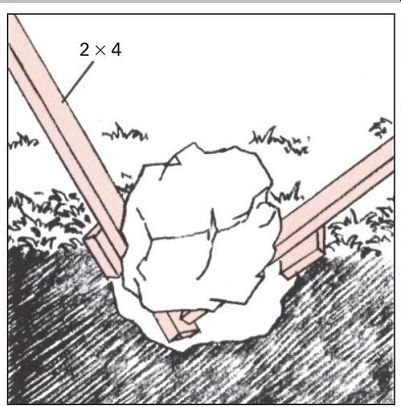
----------------- Pair of 2 × 4 s, worked in opposition,
are employed as levers to raise large stones. Pry first with one, then the
other, until one can be used as a ramp. Do not stand in hole with rock when
raising it.
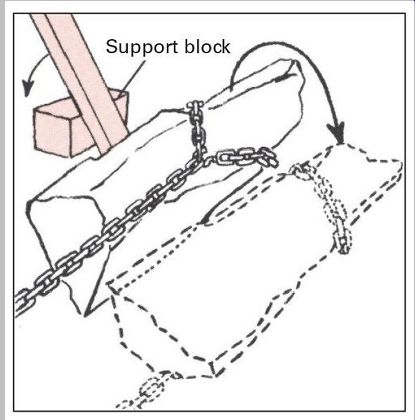
----------- Large rocks can be dragged short distances
with a chain hooked up to a winch, vehicle, or draft animal. After attaching
chain, flip rock over; tension of chain will keep rock from digging into earth.
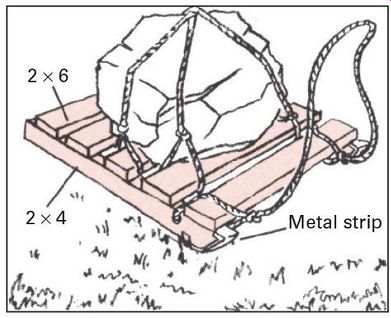
--------- Stone boat is good for moving large rocks. Make
the boat's bed of 2 × 6 s, the runners of 2 × 4 s. Line the front of each runner
with a metal strip. Tie boulders to the bed to prevent them from rolling off.
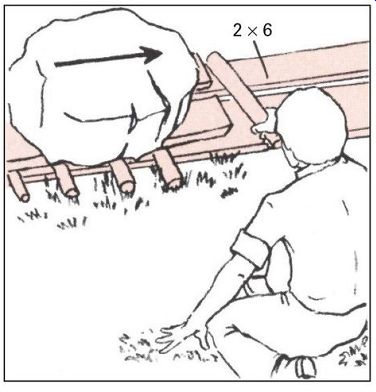
----------Boards and rollers serve as a temporary roadway
over limited distances. Pick rollers up from rear, lay them down in front of
advancing rock. Effort can be saved by levering the rock forward from behind
with a 2 × 4.
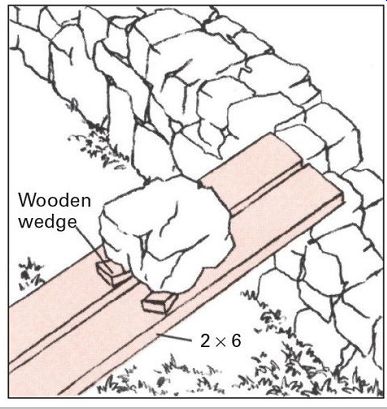
---------- Stones can be rolled up ramp to wall top.
Wooden wedges keep stones from slipping back. Make ramp out of long boards
so that the slope will be gradual. Before moving a stone, measure it to be
sure it will fit wall.
Shaping Stone
Shaping, or dressing, stone can be tough, exhausting work and should be avoided if possible. Moreover, the rough, natural surface of a rock will add much to a wall's character and beauty. Occasionally, however, a bit of dressing is essential. Use a chisel to chip off an unwanted.
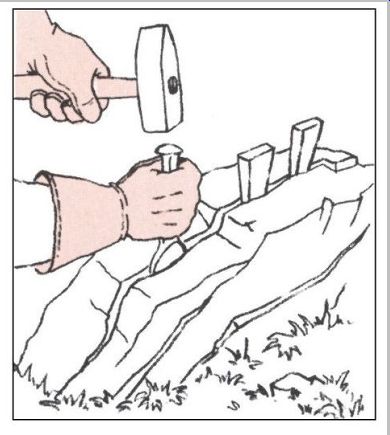
------To split a rock that has a stratified
(layered) structure, mark a line along the grain, then chip on the line with
the sharp end of a mason's hammer until a crack starts to form. Widen the crack
gradually by driving wedges into it at several points. When the crack is wide
enough, pry it apart with a crow bar.
Attention to the Basics Gives Lasting Results
There are three types of dry walls: freestanding, breast, and retaining. Breast walls are simply rock pavements laid into sloping ground to prevent soil erosion. Retaining walls are similar to freestanding walls except that they require dug-in foundations and are open on only one side-the other side butts against an earth terrace. Both retaining walls and dry walls are held together by friction protuberance on a flat side, a mason's hammer to dull a jagged edge, or a bush hammer to powder a point. Brute force blows with a sledgehammer can pulverize a lump or even an edge, but they may also split the rock. If a rock is too large to handle, it can be split. Whenever you split or shape rock, be sure to wear your goggles--a flying stone chip can blind you.
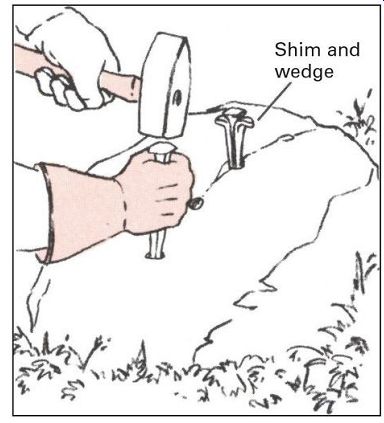
----------- Granite and other rocks with uniform textures
are difficult to split. start by drilling holes about 6 in. apart along the
split line with a narrow -bladed chisel that is rotated after each blow . Next,
hammer thin wedges into the holes. Follow these with progressively larger wedges
until the rock cracks in two.
and gravity. Friction is maximized by laying each stone so that it makes the greatest possible surface contact with the greatest number of stones around it. Since gravity works in only one direction-straight down-the wall must be perfectly vertical. If it is, the overlapping weights of the individual stones will effectively knit the structure together along its base line. I f the wall is out of plumb and leans, it eventually will be reduced to a pile of rubble. When constructing either a freestanding or retaining wall, set up stakes and stretch a line between them at the planned wall height. Along with a carpenter's level, the string and stakes will act as guides to keep the wall even and vertical.
Principles of a Freestanding Dry Wall
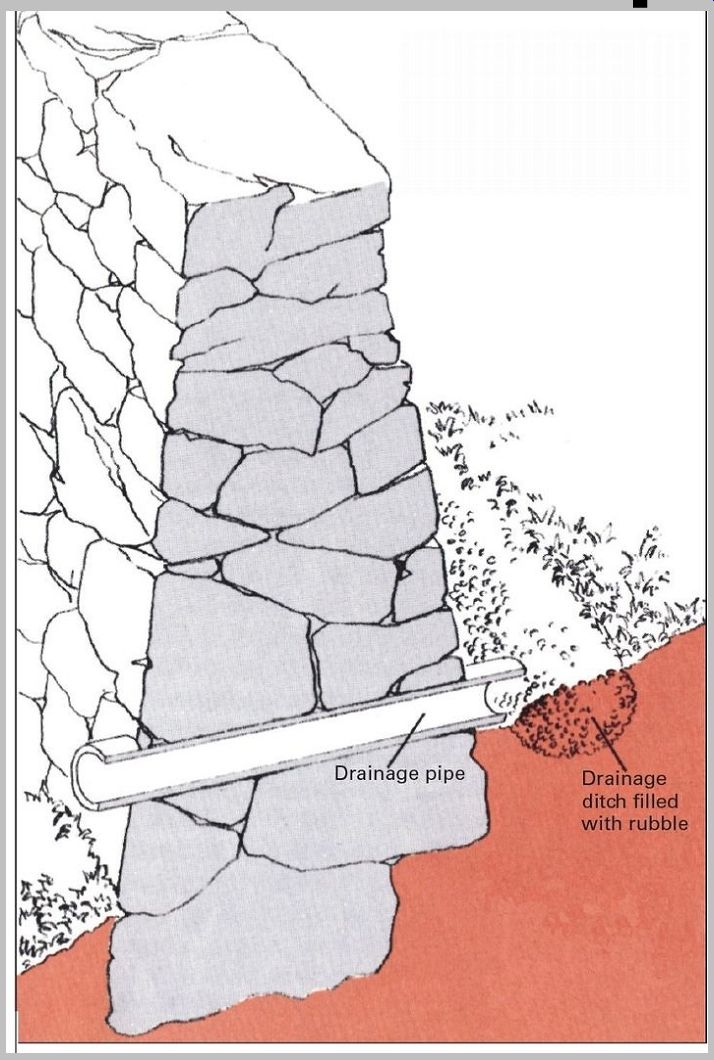
--- Pipe, angled down from ditch through base of wall,
carries off drainage. Large, deep-set base stones can replace pipe.
Cap the wall with heavier stones set aside during the building. Slab-like stones provide a level top.
Long stones should be set into wall; they help tie the wall together.
Drainage ditch must be dug on uphill side of a wall built on a slope. Fill ditch with stone rubble.
--------- Cross section show s rocks placed so that each
major stone bears on at least two others beneath it. Note chunky rocks wedged
inward by small slivers driven beneath them. Use small stones in interior only;
set largest stones at base.
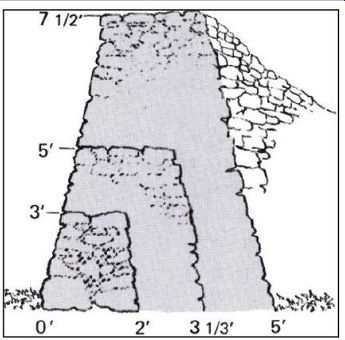
------- Proper wall width depends on height. Minimum width
of base is 2 ft. For walls higher than 3 ft., width of base should be two-thirds
of height, and wall should be tapered upward symmetrically so that center line
is plumb. For attractive appearance top the wall with flat slabs.
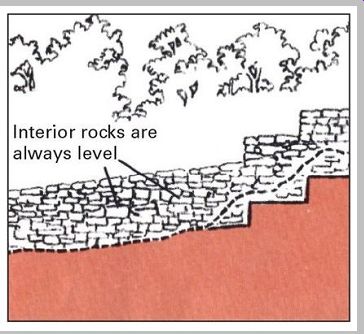
Keep wall level across uneven ground. Cut trenches through small rises or
build up base to fill small depressions. Wall running up a gentle slope can
have a sloped top, but interior rocks must be laid level. When slope is steep,
wall should be built in stepped sections, each with a horizontal top.
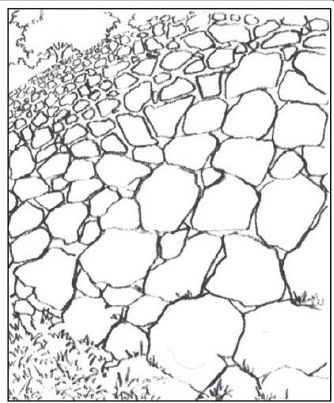
--------- Breast walls help stabilize soil on slopes.
Build wall from bottom up. if the wall is so high that the entire slope cannot
be paved from ground level, pave as much as you can, then allow several weeks
for bottom section to set before doing higher portions. Use chunk-type rocks
set level with each other in holes spaced as close to each other as possible.
Fill gaps with soil topped with pebbles. Grass seed can be added.
Retaining and Breast Walls

------ Retaining walls buttress earth terraces. They
are wider than other dry walls with bases that are set well into the ground
(2 to 3 ft.). Occasionally they are designed to lean slightly into the terrace.
if a retaining wall is more than 2 ft. high, its base should be wider than
its top but only on the open side. Pebbles between soil and wall help water drain
through openings. Pipes or drainage holes in the wall should angle down toward
the open face and be designed to prevent undermining of the wall by runoff. The
ground in front of the wall should slope down to help carry off water.
========
Paving With Brick or Stone, Alternatives to Blacktop
Driveways and walks made of inlaid brick or stone have proved their worth over the centuries. They are durable, attractive, and, unlike blacktop or concrete, allow the ground to breathe: moisture and nutrients can seep down to the roots of trees, and earthworms and other sub-soil creatures can continue to live undisturbed.
Brick is probably the easiest material to work with. Standard 8- by 4- by 3-inch bricks can be laid in an almost infinite variety of patterns or employed to fill rise areas with special motifs. In addition, the flat, even shape of the bricks allows tight gap-free packing.
Cobblestones-rocks smoothed by streams into roundish chunks the size of baseballs-are more lasting than bricks but make a very rough surface that is hard on the feet and almost impossible for bicycles. Belgian blocks and other dressed stone blocks are durable but expensive. Flagstones, useful and attractive for walks and patios, are too fragile for driveways.
Mortarless paving relies on a smooth underbase and the friction of individual pieces rubbing against each other to stay together. The edges of such paving should be held by some kind of frame, otherwise the outermost stones will gradually tumble away. In colonial times slabs of stone sunk upright were used to line pavements. Cinder-block slabs and railroad ties have been used in more recent days. For walks, patios, and short driveways, 1 x 4's, treated to prevent rot, will do the job. Moreover, these same edging boards can double as building frames.
Building sand makes an excellent underbase. The sand suppresses weeds, improves drainage, and infiltrates cracks, helping to lock the bricks together, yet letting them move with the earth. The result is a lasting, maintenance-free driveway.
Laying a brick walkway
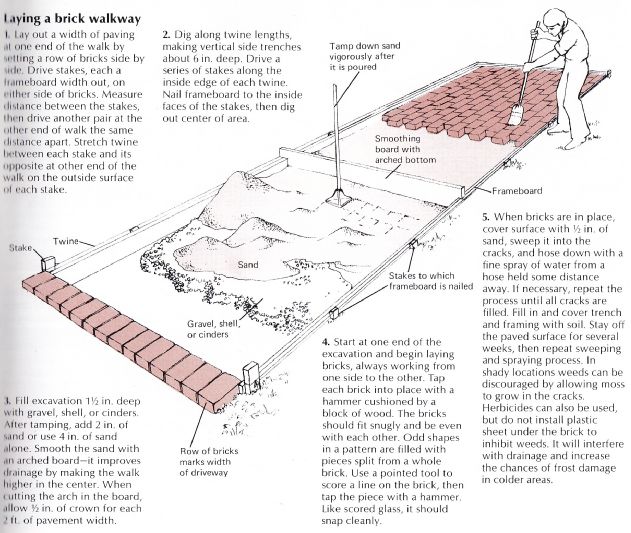
1. Lay out a width of paving it iii' end of the walk by ' a row of bricks side by Drive stakes, each a l.unui'hoard width out, on it I side of bricks. Measure 'liimce between the stakes, lien drive another pair at the ilner end of walk the same lii ance apart. Stretch twine taiween each stake and its III insite at other end of the 'sal k on the outside surface i in h stake.
2. Dig along twine lengths, making vertical side trenches about 6 in. deep. Drive a series of stakes along the inside edge of each twine. Nail frame-board to the inside faces of the stakes, then dig out center of area.
3. Fill excavation 1½ in. deep with gravel, shell, or cinders. '\tler tamping, add 2 in. of unl or use 4 in. of sand alone. Smooth the sand with iii arc hed board-it improves Ininiage by making the walk higher in the center. When nuing the arch in the board, illow V in. of crown for each ) II. of pavement width.
4. Start at one end of the excavation and begin laying bricks, always working from one side to the other. Tap each brick into place with a hammer cushioned by a block of wood. The bricks should fit snugly and be even with each other. Odd shapes in a pattern are filled with p split from a whole brick. Use a pointed tool to score a line on the brick, then tap the piece with a hammer. Like scored glass, it should snap cleanly.
5. When bricks are in place, cover surface with ½ in. of sand, sweep it into the cracks, and hose down with a fine spray of water from a hose held some distance away. If necessary, repeat the process until all cracks are filled. Fill in and cover trench and framing with soil. Stay off the paved surface for several weeks, then repeat sweeping and spraying process. In shady locations weeds can be discouraged by allowing moss to grow in the cracks. Herbicides can also be used, but do not install plastic sheet under the brick to inhibit weeds. It will interfere with drainage and increase the chances of frost damage in colder areas.
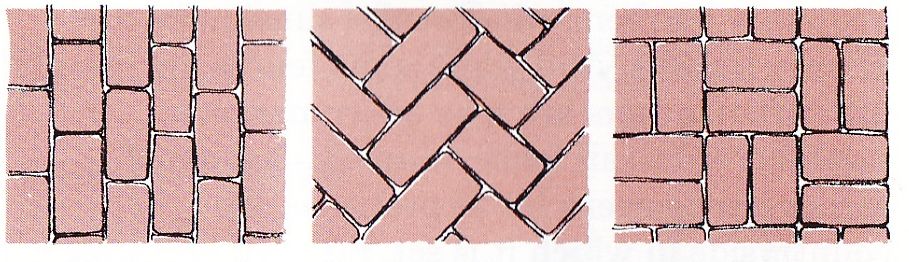
---------- Interlocking paving patterns are the most durable. Straight, or running, bond (left), herringbone (center), and basket weave (right) are classic examples. For driveways, two rows of thick, flat-topped rocks are sometimes added as auto wheel tracks.
Gravel and stone pavements

Gravel (or pebble, shell, or cinder) paving should he at least 3 in. thick. Usually wood or concrete framing is used, but occasionally the paving is edged with bricks buried vertically in the ground so that only 1 to 2 in. of each brick extends above the surface. Edging helps keep the gravel in place.
Stone paving is laid like brick. Use slabs or chunks 3 to 4 in. thick that have at least two parallel flat sides. Thick cubbies and big irregular chunks require an extra-thick sand base, Match adjacent rocks carefully to fit as closely as possible. Never lay a stone with a sharp bump on exposed side.
========