Building Fences for Beauty As Well as Practicality
The poet Robert Frost took exception to the old country notion that "Good fences make good neighbors." But there is no disputing the fact that good fences can be useful and attractive. Fences keep livestock in and pests out; they prevent small children from wandering off; they serve as boundary markers, windbreaks, sunshades, and privacy screens. And while some fences are merely utilitarian, others are true adornments: a rambling split-rail fence or an old-fashioned zigzag can be every bit as pretty as the countryside in which it is set.
Choosing a Fence to Fit Your Needs
Choosing a fence is an exercise in common sense. First, you should decide exactly what functions the fence is to serve, then you should consider such factors as cost, appearance, and durability. I f the main purpose of the fence is privacy, it should be tall and free of gaps. So-called stockade fences made of upright poles fulfill this requirement as do tightly spaced picket fences and fences of woven redwood slats. If you want to enclose a play area, the fence should be strong enough to resist the wear and tear of children and tall enough and tightly woven enough to prevent their squeezing out or climbing over. I t should also be free of dangerous projections and open enough to let you keep an eye on the kids. A welded wire fence would meet these requirements.
In rural sections barbed wire is an economical way to fence in livestock. The barbs are dangerous, however, and their use is forbidden in most residential areas. A better choice, especially for smaller lots in built-up locales, would be a split-rail fence. Not only will it do the job, but it is safe and attractive as well. In addition, split-rail fences are easy to erect, require little lumber, and are longer lasting and more maintenance free than most fences. (A picket fence, for example, requires periodic painting and is relatively fragile.)
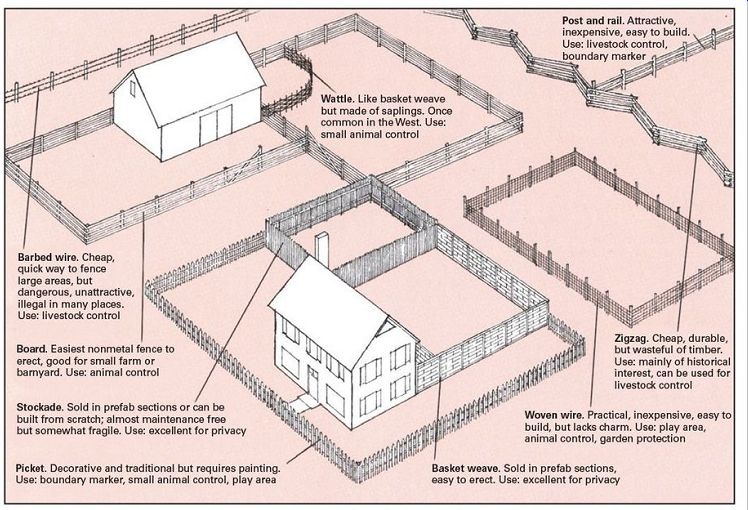
--------- Fence styles have evolved throughout the centuries into
a panorama of varieties designed to suit specific needs.
Fences require planning. To calculate the amount of wire or boards you will need and the number of fence posts that you will have to set, mark off the corners of the fence line with stakes and measure the distances between; the sum of these measurements is the amount of fencing you must obtain. In order to figure the correct number of posts, allow one for each corner and a pair for each gate. Along a straight fence line posts are usually spaced at 16-foot intervals for woven wire, at 12- to 14-foot intervals for barbed wire, and at 5- to 8-foot intervals for board or rail fences, depending on the lengths of lumber available.
When laying out a wire fence around a curve, space the posts more closely.
Take special care when building a fence along a property line. Unless you and your neighbors agree on legal provisions, you will have to make certain that the fence is on your own land. Zoning laws often stipulate that a professional boundary survey be made.
--------
Life expectancy of fence posts
Wood type | Untreated | Treated
Birch 2-4 yr. 10-20 yr.
Black locust 20-30 yr. Not needed
Cedar 15-20 yr. 20-30 yr.
Douglas fir 3-7 yr. 15-18 yr.
Elm 4 yr. 15 yr.
Hickory 5-7 yr. 15-20 yr.
Maple 2-4 yr. 15-20 yr.
Oak 5-10 yr. 15-20 yr.
Osage orange 20-25 yr. Not needed
Pine 3-7 yr. 20-30 yr.
Redwood 10-15 yr. 20-30 yr.
Sassafras 10-15 yr. 20-25 yr.
Spruce 3-7 yr. 10-20 yr.
----------
Making Post-and-Rail Fences
The familiar split-rail fence is an updated version of the rustic post-and-rail fences built by homesteaders out of timber cleared from their lands. Like the picturesque zig fence, a split-rail fence can be built by anyone who has timber and some simple tools.
Split-rail fences are economical to construct: they require relatively little lumber, they can be built from wood you harvest yourself, they require no hardware to hold them together, and they can be left unpainted-weathering will eventually turn the wood a soft silver gray that blends unobtrusively with the landscape. Any of the woods shown in the chart above can be used, although the difficulty of splitting certain woods, particularly elm, can add considerably to the work.
When splitting rails, you will find it easier to work with green freshly cut logs rather than seasoned timber. Also, since wood tends to split more readily in cold weather, try to do your rail-splitting in the winter and early spring. You will need an 8-pound splitting maul or sledgehammer and three or four sturdy wedges. Old-fashioned wooden wedges as well as wedges made from steel can be used, but you will need at least one steel wedge in order to make the initial opening. Poles can be employed rather than split rails if plenty of 3- to 4-inch-diameter timber is available; the fence will still be attractive, and a good deal of labor can be saved. Milled 2 × 4 s also can be used as rails, but the fence will cost more and lose much of its rustic charm.
When working with either split rails or poles, use a saw to taper the ends of the rails so they will fit side by side in the slotted posts. It is not necessary to taper the 2 × 4 s; simply place the rail ends one on top of the other in the slots.
For posts try to select a longer-lasting variety of wood, and be sure to treat the belowground portions by soaking them in creosote or other commercial preservative, such as pentachlorophenol. Digging post holes is usually done by hand with a clamshell-type post-hole digger, but gasoline powered augers are also available on a rental basis. In soft ground, fence posts can be sharpened with a chain saw and simply hammered directly into the earth with the aid of a post maul or sledge.
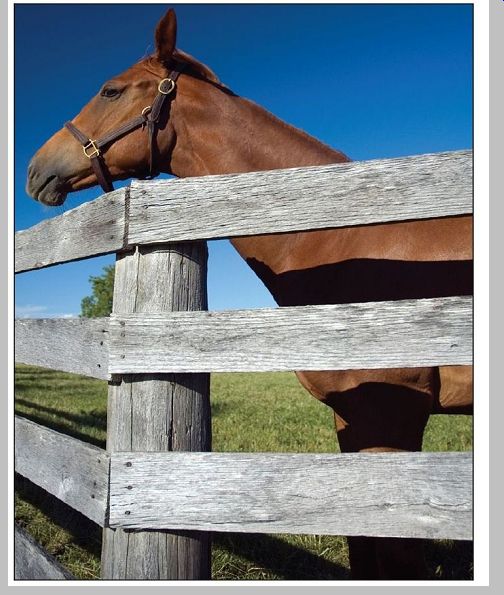
The number of tiers of rails that you should install depends on the use to which the fence will be put. For a boundary fence or for penning such small animals as sheep, a two-tiered fence is sufficient. Larger livestock require three to four tiers. The vertical distance between rails, and between the bottom rail and the ground, should be about 15 inches. Some livestock owners staple a strand of barbed wire across the top of the posts, inside the fence, to keep heavy animals from rubbing against rails and dislodging them or loosening the posts.
Fences for Farm, Home, Pastures, and Stockpen
Many traditional fence styles evolved as by-products of the land-clearing process, which produced enormous amounts of timber suitable for fencing. In heavily wooded sections of the country, such as Tennessee, Virginia, and Kentucky, the zigzag rail fence was the most popular type, especially for enclosing pastureland. Beautiful examples of the zigzag still stand in Cades Cove in the Great Smoky Mountains National Park. For small stockpens designed to contain sheep or pigs, portable wattle fences were common. Built of saplings, shoots, or branches, the wattle fence was a holdover from the settlers' European heritage, since fence timber had long been scarce in the Old World. The stockade fence was originally a protective structure around forts and settlements; the relatively flimsy modern version serves mostly as a fence for privacy.
Barbed wire and, later, woven wire replaced wood for use by settlers who reached the treeless prairie states. Not only was barbed wire less expensive than scarce lumber, it was far easier to install. I t came into such widespread use among cattlemen and sheep-men that historians claim its invention in 1870 deserves more credit than the six-gun for the taming of the West.
Splitting the rails
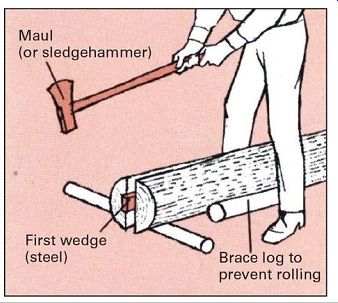
1. Use straight-grained logs with 9- to 12-in. diameters. Drive wedge into butt end to open a 2 ft.-long crack.
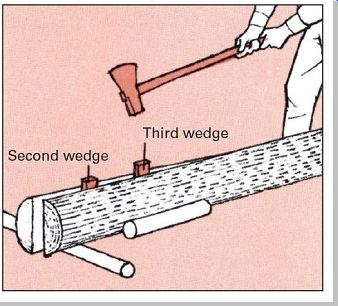
2. Lengthen crack by driving additional wedges until log splits along entire length. Work to keep crack centered.
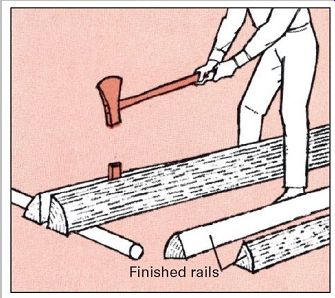
3. Lay split trunks flat side down. Then split each half into quarters (finished rails) by repeating steps 1 and 2.
Setting the posts and assembling the fence
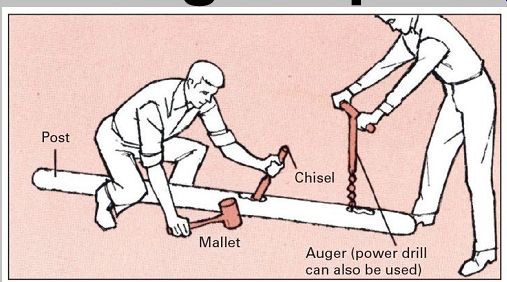
1. Use 5- to 6-in.-diameter logs for posts. To make slots for rails, bore groups of 2-in.-diameter holes in upper parts of logs, and trim aw ay waste with a heavy chisel and mallet.
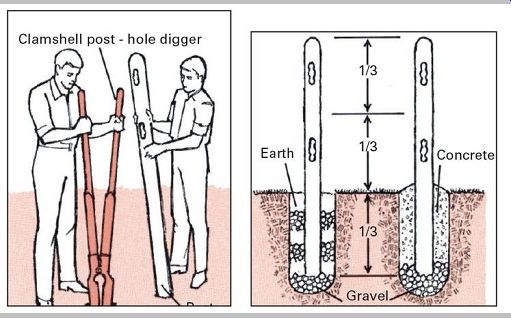
2. Post holes should be 2 1/2 ft. deep or one-third length of post, whichever is greater. set post in hole on gravel base. Fill with layers of earth and gravel; concrete capping is optional.
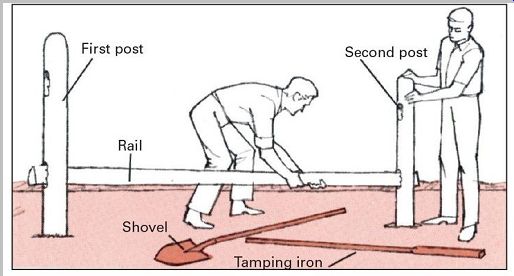
3. set the first post, and tamp soil firmly around it using an iron bar or tamping iron. Place second post in its hole; fill but do not tamp. install rails between posts.
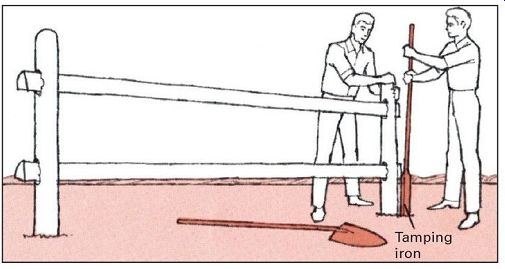
4. Tamp firmly around the second post. Continue assembling the fence by setting the next post loosely in place, installing the rails, then tamping the soil around the post, and so on.
A variety of wooden fences
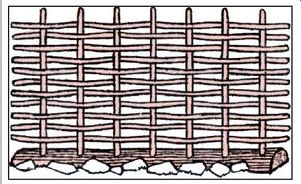
--- Wattle fence is constructed of woven saplings. Uprights are set in base
of flattened logs. Fence can be permanent or built in portable 8-ft. panels.
Pile stones on base logs for added stability.
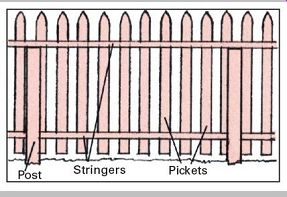
--------- Picket fence is made with 2 × 4 stringers nailed to 4 × 4 posts.
Pickets are 1 × 3 slats nailed to stringers at the top and the bottom. The
tops of pickets are generally pointed for style as well as to shed water.
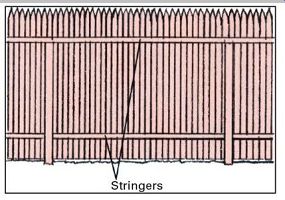
--------- Stockade fence is built like picket fence, but stakes
are longer and more closely spaced. Stakes can be round or half-round. Stakes
can be nailed to stringers or woven together with wire.
Gates and Stiles for Getting Through
Fences, whose primary job is to bar passage, must still be designed to permit legitimate movement. Gates of one sort or another are the most common solution to the problem, but for livestock fences around large pastures, an old fashioned stile-a device that bars animals but lets people through-can suit the purpose admirably.
Decorative gates for yard and garden fences may need to be only wide enough for a person to pass through, but a minimum width of 4 feet is required for gates that must accommodate such devices as lawnmowers, wheelbarrows, and garden machinery. Gates in farm and pasture fences should be 12 to 16 feet wide in order to admit livestock and large machinery. Regardless of size, the gate and its support must be strongly built, since it will receive more wear and tear than any other part of the fence. To prevent sagging and lessen stress on the far end of a gate, a diagonal brace of wood, wire, or steel cable is usually installed between the gate's low corner at the hinge side and its high corner at the far end. Gateposts must be sturdy, firmly set, and absolutely vertical. To keep them from loosening, shore them with lumber, strategically placed boulders, or poured concrete slabs.
Post and rail wood fencing systems use the least amount of wood, making them well suited for larger, more open areas of land. Zigzag fencing is made of overlapping tiers of split rails with a 1-ft. overhang. The rails zigzag, creating a 120º angle at each bend. No hardware is needed for zigzag fences, but they use much more lumber than post and rail fencing.
-----------
The art of stringing barbed wire
Barbed wire is used for fencing in horses and cattle. Popular types of wire are 12-gauge (heavyweight), with 4-point barbs, and 14-gauge (lightweight), with 2-point barbs. Use heavyweight wire for small areas, since small fences receive more pressure from animals; use lightweight wire for open pastures.
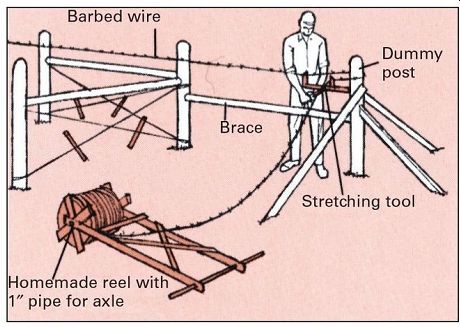
Barbed wire is stretched between posts, then stapled in place. A reel is needed for safety and to keep the wire from tangling; a stretching device makes the wire taut installers should wear thick gloves and should stand with a fence post between themselves and the wire during the stretching operation.
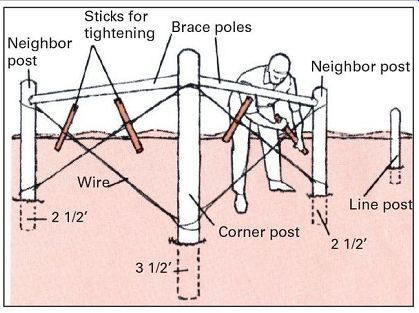
1. Corners are braced by fitting poles and wires between corner posts and neighbors on either side. Wires should be twisted tight. Corner posts are set deeper than others-about 3 1/2 ft.
2. Fencing is stretched between corners, using stretcher tool or block and tackle, then stapled to line posts. Temporary brace and dummy post (set 18 in. deep) support corner post during stretching.
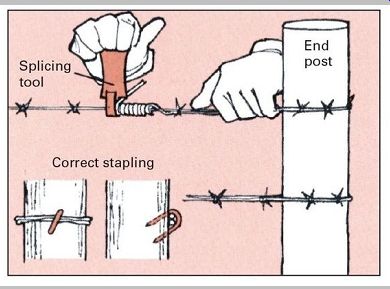
3. Final step is to splice each wire around last post. Each strand is drawn tight against post, stapled in place, then wrapped back on itself and twisted several times, using pliers or splicing tool.
Planting sturdy gateposts
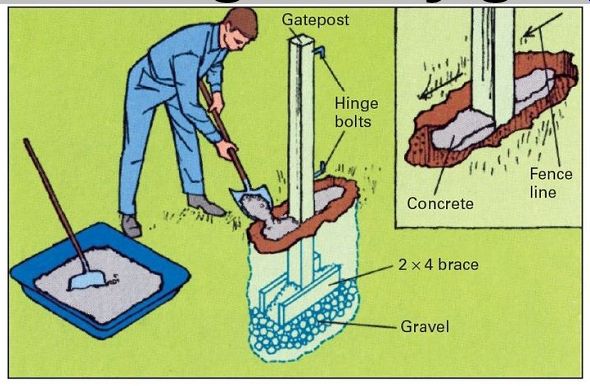
-------- Gatepost above is braced by 2 × 4's at base and cap of concrete
at top. Nail 2 × 4 braces to bottom of post, set in hole with braces parallel
to fence line, and fill with earth to within 1 ft. of surface. Then pour slab,
using about 1 cu. ft. of concrete.
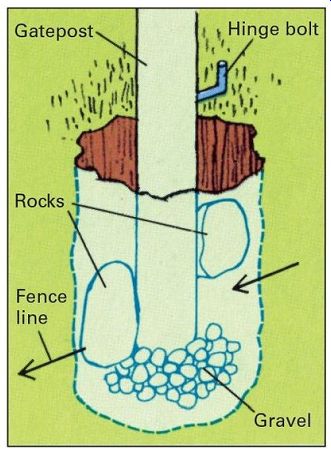
---------- Boulder-braced gatepost (above) is kept in place with rocks-the
bigger the better. Place them firmly against the post parallel to the fence
line.
A strong and simple gate
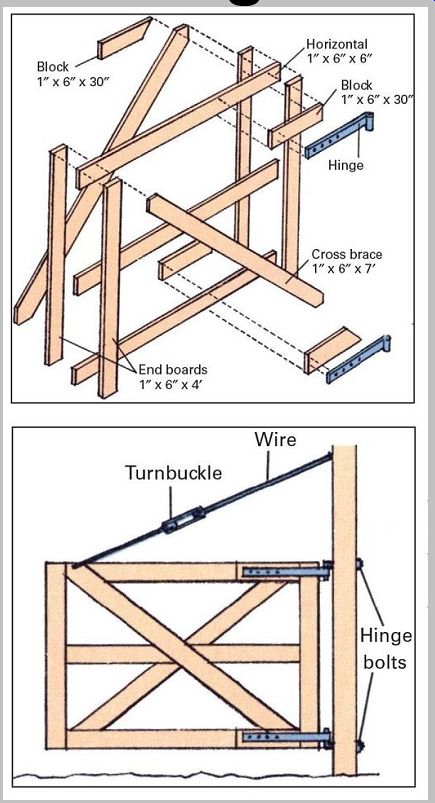
------------ Heavy-duty gate, 6 ft. wide, is made of 1 × 6's fastened
together with 3/8-in.-diameter carriage bolts. sandwich three horizontal members
between cross braces and vertical end boards. Use heavy steel strap hinges
to attach the gate to the post, and string wire diagonally from the top of
the gatepost to the end of the gate. install a turnbuckle in the wire to adjust
tension. Gate can be doubled in size by increasing the length of each horizontal
board and adding a second pair of cross braces and end boards.
Stiles: an old idea that still works
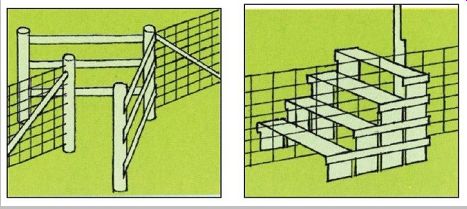
--------- Zigzag stile is built into fence. Openings in stile should allow
a man through but bar livestock.
Lightning protection
Wire fences with nonmetal posts are a lightning hazard unless metal ground rods are installed. Make ground rods from 8- to 10-foot lengths of 1-inch-diameter pipe. Attach them within 150 feet of each end of the fence and at 300 foot intervals in between. The rods should extend 6 inches above the fence posts and be sunk into the ground far enough to be in constant contact with moist soil. Attach the ground rods to the wire side of the posts.
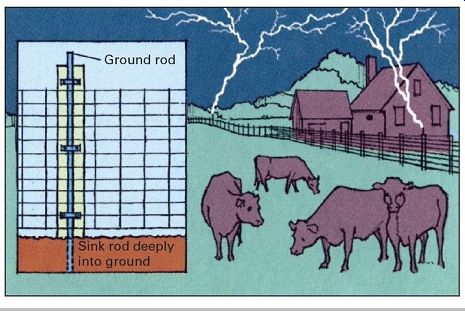
--------- Ground rods safeguard people and animals against lightning.