Maybe you need a new bedroom for a growing family, or a home office for a new career Perhaps you want a breakfast nook, sunroom, music or exercise room.
Whatever your family s needs, this section presents step-by-step techniques for building a basic, one-story addition from the ground up and the house out. Even complex additions that involve plumbing, several rooms, or multiple stories begin with the basic planning and construction techniques presented here.
A committed do-it yourselfer with some experience can build a simple addition. This section will help you decide whether you can handle such a project, as well as enable you to deal confidently with hired professionals.
Free-standing columns form a circle within the square of a library addition to a 1950s ranch house. The feeling of roundness is enhanced by a domed ceiling with skylight.
Building the Foundation
Building a foundation may seem an impossible under taking, but when you understand the steps involved and can break them into individual skills, the task is much more manageable.
Laying the foundation for a simple addition is also easier because the project is on a relatively small scale and you will be able to use the existing foundation to guide layout, leveling, and finishing details. In fact, the most difficult part of many addition foundations is getting materials and equipment into a tight backyard— and getting excavated dirt out of it.
Although construction techniques vary according to foundation type, they require many of the following skills: laying out perimeter lines, excavating for footings and possibly a basement or crawl space, tying the new foundation into the old, building level forms, setting reinforcing steel, pouring concrete, laying concrete block, setting anchor bolts, water proofing foundation walls, installing drainage around the perimeter, and backfilling.
Types of Foundations
Your foundation will probably be one of the following types:
Concrete slab on grade. This economical foundation allows you to finish the foundation and floor system all in one operation. It also keeps the floor close to the ground, an advantage where height is a problem or the floor must match an existing slab.
Perimeter foundation. This type of foundation supports a wood floor system and creates a low crawl space under the house. The foundation walls are concrete block or poured concrete. Intermediate beams or girders are supported on concrete piers within the perimeter.
Full basement foundation. In areas where frost line conditions require a deep foundation, it's a good idea to excavate for a full basement. The floor slab and the footing for the walls are concrete, but the walls them selves are usually concrete block. If your plans call for poured concrete walls, get professional help to build the tall forms. To avoid undermining the existing foundation, you should use a basement foundation only when the house already has a basement or deep footings.
Pier-and-grade-beam foundation. This type of foundation consists of concrete piers set deep into the ground and tied together by concrete beams at grade level. It is used for structures on steep hillsides or unstable soil and usually requires professional engineering. Forms for the beams are built on grade and follow the contour of the slope.
All-weather wood foundation. Techniques have recently been developed for building basement and crawl space foundation walls with pressure-treated lumber. The plans for your addition will probably include this type of foundation if your home already has one. These foundations require proper materials, assembly, and backfilling techniques, so seek advice from a foundation con tractor who specializes in them.
Anticipating Problems
Your project will run more smoothly if you anticipate needs and problems before they develop. The following questions will help you be prepared.
Excavation
Are there any obstructions that will make excavation harder, such as trees, utility lines, septic tanks, or old footings? You may also have nuisance plants to contend with, such as poison oak or berry bushes.
Is there access for a backhoe, concrete mixer, or other equipment you plan to use? If not, can you temporarily remove some fence or gain access through a neighbor’s yard?
Is your back ready to dig and lift heavy loads? Think also of your helpers’ backs.
Is there room to store lumber, steel, gravel, concrete blocks, and other bulky material? Where will it be de livered? How will it get to your site?
Where will the dirt go? (You will be amazed how much even a modest trench creates.) If you don’t have room in your own yard, ask your neighbors and friends, or investigate public landfills. For a large project you will probably need to hire an excavator who will dispose of the dirt as part of the job.
Will your schedule be affected by seasonal conditions such as snow, frozen ground, or soaking rains?
Will a deep excavation or pier holes create a safety hazard for small children? Be ready to provide a temporary railing around the excavation or to cover deep bores with plywood.
Is there other excavating to consider, such as a dry well for receiving subsurface drainage or trenches for drainage lines or new utility lines?
Form Building
Can lumber from your forms be re-used? Choose a form design that uses lumber you can recycle, such as 2 by 12s for floor joists or plywood for other concrete jobs.
Have you worked out lengths of the mudsill lumber so you will know where to place anchor bolts when pouring concrete? Also, are you thoroughly familiar with the plans and foundation requirements for later phases of construction, such as pipe runs, hold-downs for wall framing, and insulation details?
And don’t forget to think about the future: Will you want to expand up ward someday? It may be worth the extra effort to build the foundation for two stories instead of one.
Tools
In addition to general carpentry and garden tools, the following are often needed in foundation work.
- A water level, builder’s level, or transit for leveling points far away from each other. (For small additions, you can use a level and a long, straight board.)
- Two good wheelbarrows or a rented conveyor for hand digging.
- A square-nosed shovel for trimming trench bottoms.
- A rebar cutter/bender. For small jobs a hacksaw or reciprocating saw will do, and you can bend #3 or #4 rebar by hand against a firm object.
- A hammer drill for drilling holes into existing foundation.
- Concrete finishing tools for slab work (wood or magnesium floats, a tamper, a bull float, a fresno, a seamer, and a steel trowel).
- Tools for block work (a trowel, a 4- foot level, a joint finisher).
Laying Out the Foundation
The first step in building a foundation is to set up string lines to establish the outside edges of the foundation wall (not the foundation footing), the limits of excavation, exact location of footing trenches, and accurate placement of concrete blocks or form boards for foundation walls. String lines are usually stretched between temporary batter boards and can be taken down and put back up as needed. Because an addition abuts the house along at least one wall, you can use the house instead of batter boards for that side.
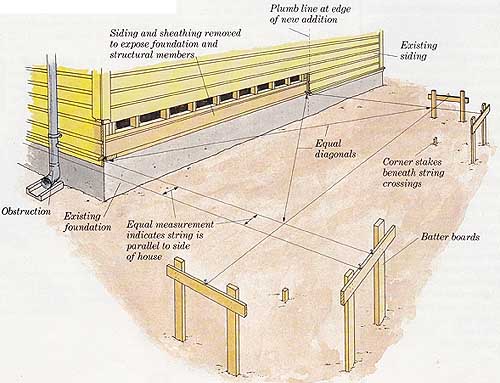
Laying out the foundation: Siding and sheathing removed to expose
foundation and structural members; Plumb line at edge of new addition;
Equal measurement indicates string is parallel to side of house; Corner
stakes beneath string crossings; Obstruction; Existing foundation.
If your addition will be close to the setback limits of your property, verify the property lines. Your building inspection department may even re quire a certified survey.
You will need one or two helpers to lay out string lines. The following procedure is for a simple rectangular addition, but similar techniques can be used for more complex additions.
1. Mark where outside edges of new foundation will intersect house foundation. Using level to keep lines plumb, scribe vertical lines onto siding at these two points. (No line is necessary if addition wall lines up with corner of house.) If edge of addition lines up with one interior wall, take accurate measurements from inside house and drill pilot holes from outside to make sure your line on siding corresponds with outside edge of intersecting wall stud.
Scribe a cutting line farther out from foundation line to allow for thickness of new siding on addition wall, depending on how new siding will be joined with old later on.
2. Remove siding and sheathing covering top of house foundation between marks. Remove enough to ex pose floor joists and subfloor to save doing it later. Use circular saw to make cuts, setting blade deep enough to cut through siding and sheathing but not into framing or foundation. Use carbide blade.
3. Study your plans and existing floor structure to establish where top of new foundation will be in relation to existing foundation. Even if they appear level, don’t assume that dimensions of new and old joists, mud sill, subflooring, and other lumber are the same. Modern lumber is milled to smaller dimensions than old lumber, and accumulated differences can make new floor lower than existing floor if you line up the foundations at the same level.
4. Once you have established top level of new foundation, mark that point on house framing or foundation by measuring from top of existing subfloor. Mark each corner of new foundation. Attach string line to each point, driving a nail into house framing or into cleat nailed into house framing. Tie nylon string, not cotton, to nails driven firmly into wood at angle so string does not slide up or down when pulled taut. To make sure strings are level with each other, use transit, water level, or long carpenter’s level set on a straightedge. If they are not level, lower string at higher corner to level with the one attached to lower corner. Adjust difference later when you frame floor. Make sure both nails are aligned vertically with marks indicating edge of new foundation wall.

(top) Using a water level; (bottom) Using a transit: Find a spot
from which you can see all the batter boards clearly. Level the transit
at the level you want and rotate it so you can tell your helper where
to mark.
5. Build batter boards for other ends of string lines by driving two sharpened 2 by 4s into ground about 3 feet apart and nailing level cross- pieces to back sides at level where string lines are attached to house foundation. Set batter boards 6 to 10 feet beyond addition corners so they don't interfere with excavating and form building.
6. Stretch the two string lines and tie to 6-penny (6d) nails driven into tops of batter boards. To locate nails so lines are parallel to each other and perpendicular to house wall, stretch one string line taut so it touches top of batter board. Slide it right or left along top of crosspiece until it's perfectly square to house. Drive nail into batter board at that point. Use “ 3-4-5 triangle” (a series of three measurements that form right triangle) to determine when lines are square. The two legs are 3 feet and 4 feet; the hypotenuse is 5 feet. For greater accuracy use longer measurements that are multiples of 3, 4, and 5 feet (for example, 9-12-15 or 12-16-20).
Pull second string line to second batter board and move right or left until lines are an equal distance apart at both ends. Set nail into batter board at that point and tie string line to it.
7. Build batter boards for fourth side of addition perpendicular to first two batter boards and set back 6 to 10 feet beyond corners. If cross-pieces are long enough, attach one end to original batter board stake and other to new 2 by 4 stake, forming L-shaped batter board at each corner. Both crosspieces must be level with string lines.
8. Stretch string line between two batter boards parallel to house and intersecting first two string lines at exact length of the two side walls of new foundation.
To make sure string lines are square, measure diagonals and adjust lines until diagonal measurements are within ¼-inch of each other (1/2 inch over 30 feet).
Note: If your house walls are out of square at a corner where you want to attach your addition, the newly ex tended wall of your home may actually look crooked if you lay out the string lines perfectly square. If the wall is not prominent, proceed with the layout as described above and plan to conceal the offending bend in the lengthened wall with tall plants.
If the wall is prominent, it may be better to align the addition wall with the existing house wall even if one wall of the addition will be slightly out of square with the rest. To do this, follow the layout procedures de scribed above, but align the corner string line with the side of the house. To make sure it's perfectly aligned with the house wall, stretch a new string line along the entire length of that wall, from batter board to front of house. Move the string line out far enough to clear any pipes or other obstructions along the house wall, making sure it's an equal distance from the house foundation at all points. Adjust the original string line parallel to the longer line.
Excavating for the Foundation
You can excavate foundation trenches by hand if your addition is small and has shallow footings (12 to 15 inches deep). If it has deep footings, a basement, or a sunken crawl space, you will need to hire a back- hoe service or rent a tractor with a backhoe.
To excavate, lay out excavation lines on ground with chalk, flour, or spray paint. They should be far enough outside string lines to allow for footing width plus work space (1 to 2 feet beyond outside edge of footing and canted outward toward the top).
Determine the excavation depth by checking plans for distance from top of foundation to bottom of footings. If top of new foundation is not level with house foundation, take that difference into account when measuring from string lines to bottom of the excavation.
For full basement foundations, excavate to the bottom of the floor slab first and then dig out footing trenches by hand.
Make the trench bottom level and the edges square. Do not dig deeper than necessary; codes don't allow throwing dirt back into trench unless it's engineered fill.
If soil is unstable or the excavation is more than 5 feet deep, cant sides outward at least 45 degrees or shore them up to prevent cave-ins.
Building Forms and Setting Steel
Construction techniques vary de pending on whether you are building a slab, perimeter, or full-basement foundation.
Slab Foundation
In moderate climates the slab and footing are poured as one unit. After you have removed 3 or 4 inches of soil from inside the perimeter and excavated the footing trenches, follow these steps.
1. Build forms around outside edge with 2-by lumber held by stakes every 1 1/2 to 3 feet. Use string lines to align forms and level top edge, which should be at least 8 inches above grade. Trench walls form footing.
2. Dig trenches for any pipes running under the slab, and then backfill over them.
3. Place 3 to 4 inches of sand or gravel inside perimeter of slab, cover with polyethylene vapor barrier, and cover barrier with 2 inches of sand.
4. Place horizontal reinforcing bars in trenches, resting bottom bar on dobies (small concrete blocks) and suspending top bar with tie wire hooked onto top of form. Tie vertical rebar onto horizontal bars.
5. Place steel reinforcing mesh over sand and under slab. Tie mesh to rebar in trench and place 2-inch dobies under it every 3 or 4 feet.
(New technology eliminates steel reinforcing mesh in slabs by mixing fiberglass strands into concrete. Consult with your local building department and concrete company before using this method.)
In climates requiring deeper footings, slab and footings are usually poured separately. If the slab is to rest on the footings, the trenches are adequate for footing forms. Just place horizontal rebar in trenches, fill with concrete, and place hooked lengths of rebar in fresh concrete to tie footing and slab together. Then build a slab form as described above; place gravel or sand, a vapor barrier, and another layer of sand within perimeter; tie reinforcing wire mesh to curved hooks embedded in footing wall; and pour slab.
If footing walls extend above grade and slab is poured within them, you should build footing walls the same as perimeter foundation. Prepare and pour slab as described above, placing special filler material between foundation wall and slab to form an isolation joint.
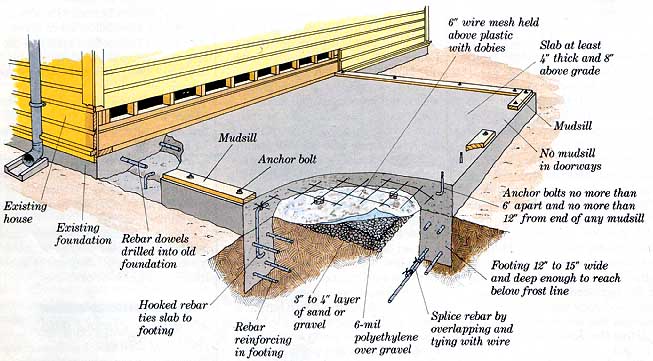
Slab foundation: 6” wire mesh held above plastic with dobies; Slab
at least 4” thick and 8” above grade; Anchor bolts no more than 6’ apart and no more than 12” from end of any mudsill; Footing 12” to 15” wide and deep enough to reach below frost line; Splice rebar by overlapping and tying with wire; 6-mil polyethylene over gravel; 3” to 1/4” layer
of sand or gravel; Rebar reinforcing in footing; Hooked rebar ties slab
to footing; Rebar dowels drilled into old foundation; Existing foundation;
Existing house.
Perimeter Foundation
For shallow foundations the footing and wall are poured together. For deeper foundations with higher walls the footing is poured first, and the wall is then formed and poured separately, or it's constructed of concrete blocks.
To build a perimeter foundation of concrete blocks, follow the steps for a full basement foundation. To build a concrete “inverted-T” foundation, follow these steps.
1. Excavate footing trenches so foundation wall (which is narrower than footing) aligns with string lines. Trench is form for the footing. Make trench bottom level, sides straight, and corners square.
2. Construct wall forms of 2-by lumber and reuse it for floor joists. Nail boards to tall stakes driven into bottom of trench, so inside faces of lumber enclose required width of wall (6 inches for one story, 8 inches for two stories). Space stakes every 3 or 4 feet Level tops of form boards with string lines, and make bottoms high enough to clear footing.
3. Insert special metal ties between form boards to keep heavy concrete from forcing them apart. Wedges or other fastening devices at each end of ties make it possible to free form boards after concrete sets.
4. Set rebar in place before the pour and fasten securely with tie wire. Bottom rebar can rest on dobies or similar devices. To make placing rebar easier, build one side of forms first, hang rebar, and then complete the forms.
Perimeter foundation: Rebar in footing and foundation wall; Rebar
dowels cemented into holes drilled into existing foundation.
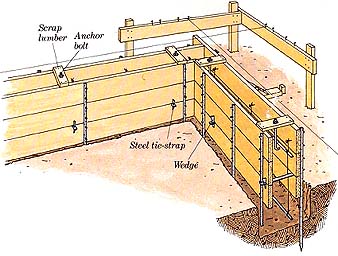
Forms and rebars for a perimeter foundation: The inside form
is placed in the same way as the outside form. The inside and outside
forms are then tied together with spacers and tie-straps. Steel tie-strap.
5. Mark locations for anchor bolts on forms and have bolts handy for day of pour, or build jigs in order to position bolts before the pour. Bolts are usually 1/2 by 10 inches for residential foundations.
6. A girder is usually required to support floor between foundation walls for joist spans longer than 16 feet. Note location of posts and excavate for pier footings at these points. Minimum footing dimensions are 18 by 18 inches and 12 inches below grade. Build simple box form to straddle footing hole, at least 8 inches square and 8 inches high. Pour pier and footing together and insert post- framing anchor into wet concrete.
To hold each end of girder, pour pilaster (column) on foundation wall or form a pocket in foundation. To form pocket, nail block of scrap lumber to inside of wall-form boards. To form pilaster, interrupt line of form boards with opening 12 inches wide extending from top of footing to point on top form board where bottom of girder will rest. Allow extra 11/2 inches for sill block. Build tall box form around opening, extending out from wall at least 8 inches.
Full Basement Foundation
If the walls are concrete they will need tall forms, a job for which you should hire professionals. If the walls are concrete block, you can build the basement foundation using the following steps.
1. Excavate 8 inches below floor level, to allow for 4-inch slab and 4 inches of gravel. Check plans for other thicknesses that must be ac counted for, such as insulation.
2. Dig footing trenches deep enough to pour slab over them after wall is finished. (For example, footing 12 inches deep requires trench 8 inches deep if gravel bed is 4 inches thick.)
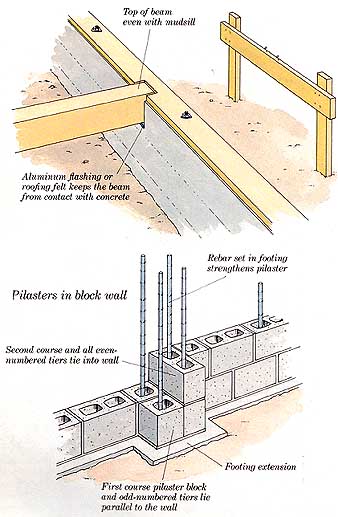
(top) Pocket for girder: Top of beam even
with mudsill, Aluminum flashing or roofing felt keeps the beam from contact
with concrete; (bottom) Pilasters in block wall: Rebar set in footing
strengthen pilaster, Second course and all even numbered tiers tie into
wall, Footing extension, First course pilaster block and odd-numbered
tiers lie parallel to the wall.
3. Build forms along hp of trench with 2-by lumber. Set height by measuring down from string lines a distance equally divisible by measurement of concrete block and mortar so blocks will come out even at top of foundation wall. Make tops of forms as level as possible, with no more than 1/2 inch variance along entire form. Hold forms in place with 1 by 2 stakes every 2 feet and 1 by 2 ties across top.
4. Place horizontal rebar in forms, holding it off ground with the help of 3-inch dobies.
5. Order pieces of vertical rebar (which usually has a hook at bottom) cut to length and bent as specified in plans. Mark their locations on form boards so blocks will slip over them, and have them available for pour. Do not drive them into ground.
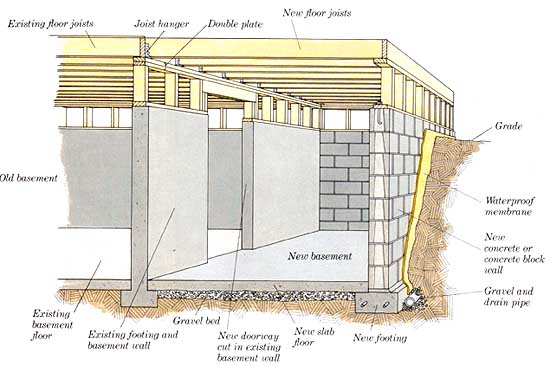
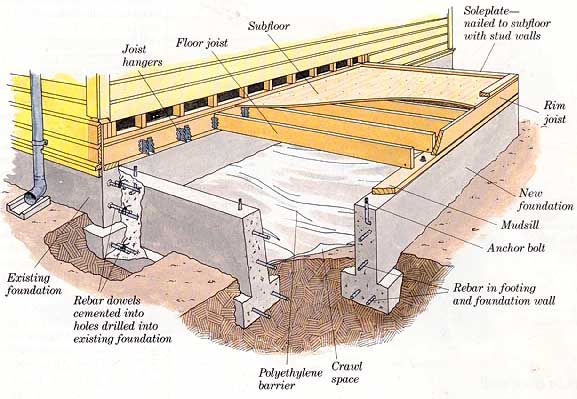
Full basement foundation: New floor joists; Existing footing and basement wall; Grade; Waterproof membrane; New concrete or concrete
block; Gravel and drain pipe

Footing forms for a basement foundation: Canted sides of excavation
or approved shoring; Rebar held 3” above bottom with dobies; Multiple
of concrete block height; String to bailer boards marks top of foundation.
Working with Concrete
No matter what kind of foundation you’re constructing, you’ll need to work with concrete. This section tells you how to order, pour, and finish it.
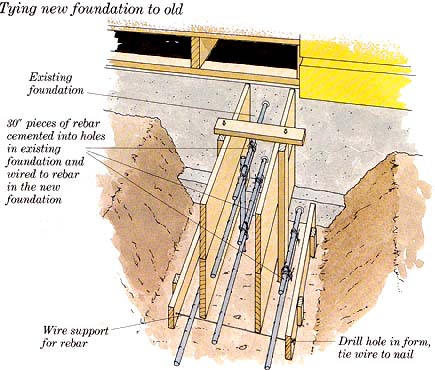
Tying new foundation to old: Wire support for rebar; Existing foundation;
30” pieces of rebar cemented into holes in existing foundation and wired
to rebar in the new foundation
General Tips on Forms Keep the following principles in mind as you build forms and work with reinforcing steel. Tying into house foundation. Attach rebar for new foundation to shorter lengths of rebar embedded into existing foundation. First drill 5 diameter holes at least 4 inches into foundation and blow dust out (tire pump works well). Cut 24-inch lengths of rebar and cement one into each hole with special epoxy mortar or other com pound before building forms. Working with rebar. Plans for most residential foundations specify #4 rebar, which is 5/8-inch in diameter. This size can be cut and bent fairly easily. Larger sizes are more difficult to handle. Use special cutting and bending tool for rebar, or cut it with metal cutoff blade in a circular saw or hacksaw blade in a reciprocating saw. The advantage of the specialized tool is that it also bends rebar. Splice rebar with tie wire. Codes specify that two pieces overlap by at least 40 diameters (equaling 20 inches for #4 bar) Codes also specify “concrete cover” (minimum thickness of concrete surrounding rebar). Where concrete is below grade, rebar must be placed at least 3 inches from ground on all sides. Where concrete is above grade, cover must be at least 1½-inches. Pouring concrete against wood. If new foundation wall will be higher than existing wall, due to sloping site or other conditions, protect wood portions of existing house against direct contact with new concrete. Tack aluminum sheet metal or other approved flashing against ex posed wood framing or sheathing before pouring concrete against it. Inspection. When forms and rebar are ready, call for inspection before pouring concrete. |
Ordering
Unless you need a very small amount of concrete, which you can mix by hand, order a ready-mixed concrete delivery. If the truck does not have direct access to your addition site you will also need to hire a concrete-pumping service or have an army of helpers with wheelbarrows.
When ordering concrete, specify the following.
Amount (in cubic yards). Estimate cubic yards by calculating cubic feet and dividing by 27. Once you have carefully figured the volume needed, add at least 5 percent for waste. It’s better to order too much than too little. Just decide before delivery where to pour the excess.
Aggregate size. Use 3/4-inch aggregate for most jobs, although some codes require a specific size. If you are having the concrete pumped, check with the pumping company to see if their hoses will handle the size aggregate you are using.
Cement content. This is specified as the number of sacks of cement per cubic yard of concrete. A five-sack mix is normally specified when the aggregate is ¾-inch. A six-sack mix is recommended for 3/8-inch aggregate or for jobs where a higher strength of concrete is needed.
Other factors. You may also need to specify water to cement ratio (1 to 2 by weight is recommended for most residential foundations); slump (4 inches for most jobs; 6 inches for filling concrete block); and air entrainment (an additive for cold climates, usually specified as 6 percent).
Concerning charges, you may have to pay other fees in addition to the per yard for delivery. A pumping service is extra, usually an hourly fee and a charge for each yard pumped. You may also have to pay a short-load charge for orders under a certain minimum, such as 7 yards. A stand by charge is a fee for any time the concrete truck must remain at your job site after an allotted time limit (usually about 5 minutes per yard). This fee can skyrocket if you are unprepared when the truck arrives.
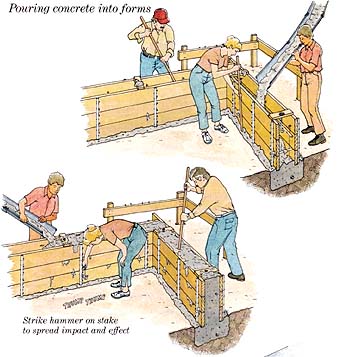
Pouring concrete into forms: Strike hammer
on stake to spread impact and effect
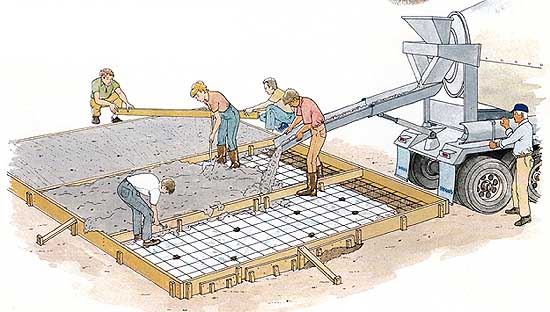
Preparing, pouring, and leveling the slab.
Placing
On the day of the pour, have plenty of help lined up. As you pump or place concrete in forms, start at the lowest point. For deep forms or inverted-T foundations, fill footing area before pouring walls.
Don’t handle concrete too much— just enough to get it into place. Then use a rod, shovel, or vibrating ma chine to consolidate it. Bang outside of forms with a hammer in order to release air pockets.
After concrete settles, level top by dragging a screed (a piece of 2 by 4) across top of forms. Use a sawing motion to push excess concrete along in front of screed and fill in low spots behind it. Allow concrete to stiffen slightly before setting anchor bolts or lengths of vertical rebar in place.
Finishing
Don’t try to finish the slab without professional help unless you are experienced in working with concrete.
After screeding, tamp concrete with a special tamper so aggregate settles slightly and a creamy mixture rises to surface. Then float slab, using a bull float with long handle to reach center. If slab is larger than 10 by 16 feet, run groove, or seam, down center to control cracks. Use long 2 by 4 for a straightedge.
After concrete has stiffened slightly and surface bleed water has evaporated, finish surface with steel trowel and set anchor bolts or vertical rebar.
Cover slab with polyethylene sheeting for 10 to 14 days to cure. If there is danger of freezing, which can prevent the concrete from setting up properly, cover plastic with straw or similar insulating material to hold in heat.
Laying Concrete Block
To lay concrete block, start with the two outside corner blocks of the first lead, or course. Set each block into a layer of mortar and press down to within 3/8-inch of footing. Stretch a line between them to guide the rest of the first course.
Be sure to set blocks right side up. The edge of the block (the “web”) is wider on the top of a block than on the bottom.
Lay mortar on footing and butter one end of each block as you set it in place. Keep buttered end raised slightly and lower it to fit snugly against preceding block in one smooth motion. Use trowel handle to tap block level and blade to scrape away excess mortar. Butter both ends of last block for each course. Constantly check your work with a level, both horizontally and vertically.
Fill wall with concrete after finished wall has dried overnight. Even if your plans don't require concrete in every space, you will have to fill holes every 4 to 6 feet for setting anchor bolts. If codes don't require concrete filling, pour insulating material, such as vermiculite, into finished wall.
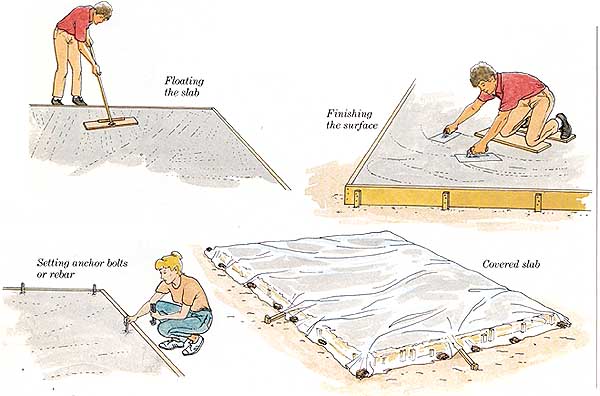
Finishing the slab: Floating the slab; Setting anchor bolts or
rebar; Finishing the surface; Concrete slab.
Waterproofing
Before you backfill against a foundation wall, especially a basement wall, cover outside surface with water proofing material such as asphalt emulsion or bentonite. Your plans may also specify a drain line next to the footing. Place drain rock in bottom of trench and then lay down perforated drainpipe. Pipe should slope 1/4 inch per foot and tie into solid drainpipe that leads to a dry well, storm sewer, or daylight outlet. To prevent water from collecting against foundation wall, place special drain mat against wall before backfilling. To backfill, cover pipe with 2 to 3 inches of drain rock, cover rock with burlap or roofing felt to prevent clogging, and fill trench with compacted topsoil. Grade surface to slope away from foundation ½-inch per foot for at least 6 feet.
For crawl space foundations, place polyethylene sheeting on ground to reduce moisture in crawl space area.
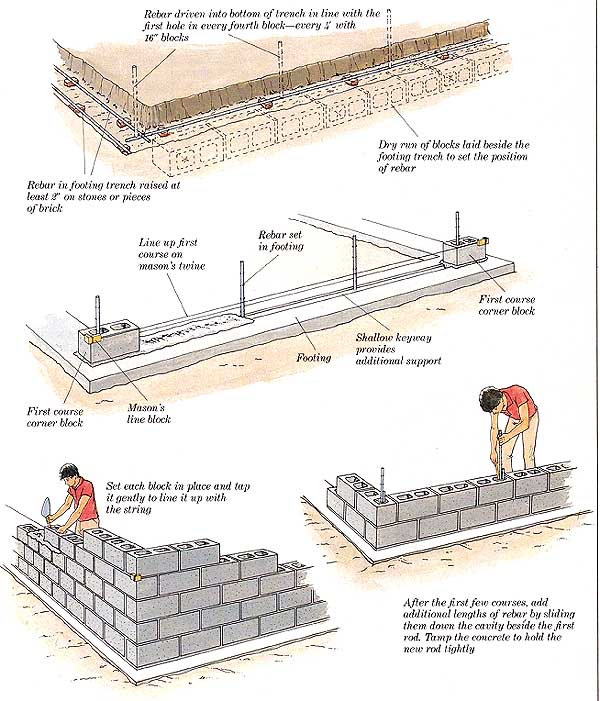
Laying concrete block: Rebar driven into bottom of trench in line
with the first hole in every fourth block—every 4’ with 16” blocks; Dry
run of blocks laid beside the footing trench to set the position of rebar;
Line up first course on mason twine; First course corner block; Shallow
keyway provides additional support; Footing; Mason’s line block; First
course corner block; Set each block in place and tap it gently to line
it up with the string; After the first few courses, add additional lengths
of rebar by sliding them down the cavity beside the first rod. Tamp the
concrete to hold the new rod tightly