Water enters an ice maker through an inlet valve and flows into the ice maker mold. The water is then frozen by the cold air in the freezer compartment. When the temperature in the mold has dropped to around 10 or 15 degrees, a thermostat starts a motor and the mold heater. The heater melts the ice slightly from below the mold, and the motor slowly drives the ejector blades clockwise to push the ice from the mold into the bin below. Next, the shutoff arm rises and the ejector blades return to their original position to start a new cycle. When the bin is full, the shutoff arm rests on the accumulated ice and stops the next cycle.
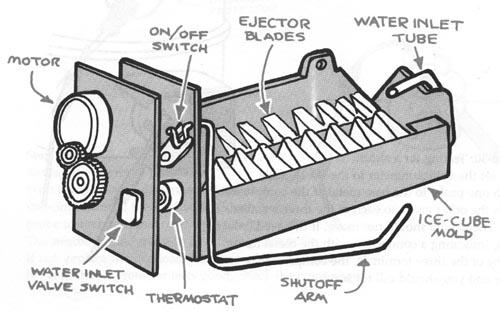
Tools & Materials:
- Screwdriver
- Small socket wrench and sockets
- Kitchen knife
- Volt-ohmmeter or continuity tester
- Thermometer
=============
TROUBLESHOOTING GUIDE
----------
Problem
Ice maker doesn't make ice
Ice maker doesn't stop making ice
Water overflows from ice maker
Ice maker doesn't eject ice cubes
--------------
Probable causes
Water supply to ice maker shut off
Freezer compartment too warm ON/OFF or holding switch faulty
Water inlet valve switch faulty
Water inlet valve faulty
Motor faulty
Thermostat faulty
--
Shutoff arm out of position
ON/OFF switch faulty
--
Ice maker not level
Water inlet valve switch faulty
Water inlet valve faulty
Too much water delivered to ice cube mold
--
Motor faulty
Holding switch faulty
Thermostat faulty
-----------------
Solutions
Open water valve under sink or behind refrigerator.
Check temperature of freezing compartment--it must be no higher than 100 F.
Check ON/OFF switch and holding switch.
Check water inlet valve switch.
Check water inlet valve.
Check motor.
Check thermostat.
--
Reposition shutoff arm.
Check ON/OFF switch.
--
Adjust refrigerator leveling feet.
Check water inlet valve switch.
Check water inlet valve.
Adjust water adjustment screw.
--
Check motor.
Check holding switch.
Check thermostat.
-----------------
=================
------
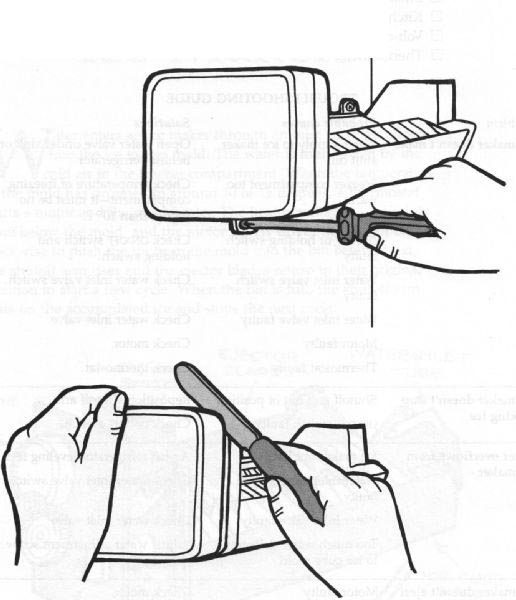
Step 5-1. Removing the ice maker.
Unplug the refrigerator and remove the ice bin.
Use a screwdriver or small socket wrench to remove the screw from the bottom bracket of the ice maker.
Step 5-2. Removing the cover of the ice maker.
Remove the top two screws and unplug the ice maker from the refrigerator wall. Use the edge of a kitchen knife to pry off the cover.
-----------

Step 5-3. Looking for the gears. Make sure the refrigerator is unplugged and
the ice maker is disconnected before you continue. With the cover removed,
you should see two gears-a larger one, about an inch and a half in diameter,
and a smaller one, which is the motor gear. If you do not see the large gear,
do not remove the mounting plate. You need professional service.
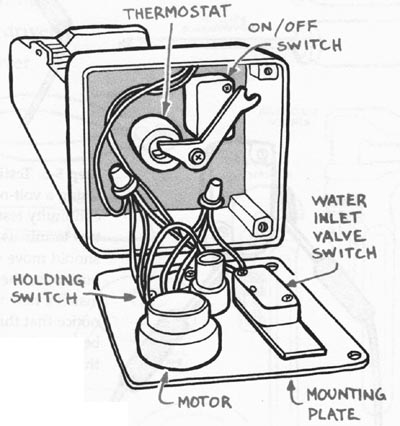
Step 5-4. Removing the mounting plate.If your unit has both gears, remove
the three screws holding the mounting plate in place. With the plate removed,
you should have access to the ON/OFF switch, the holding switch, and the water
inlet valve switch.
------

Step 5-5. Testing the ON/OFF and holding switches. Label the wires and disconnect
them from all three of the switches.
The ON/OFF and holding switches have three terminals, but the water inlet valve switch has only two. Set the volt-ohmmeter to the R x 1 scale or use a continuity tester. Touch one probe to the common terminal located on the side of the ON/OFF switch and the other probe to each of the two terminals on the end. The meter should show continuity at one terminal and not at the other. Press in the button on the switch and repeat the test. The results should be the opposite. If the switch fails either test, replace it with a new one. Check the holding switch the same way.
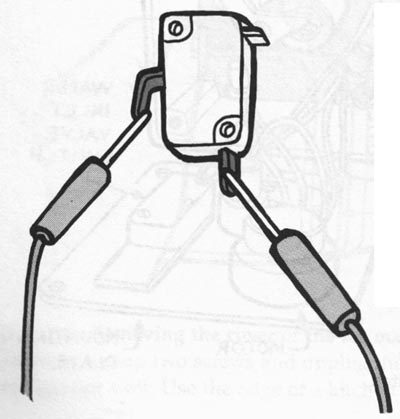
Step 5-6. Testing the water inlet valve switch. Using a volt-ohmmeter set on
the R x 1 scale or a continuity tester, touch one probe to each of the two terminals.
With the button out, the needle should move to 0, showing continuity. With the
button in, the needle should not move. If not, install a new water inlet valve
switch. You will notice that this switch has an insulating disk between it and
the mounting plate. Reinstall this insulator when replacing the switch.
-----------
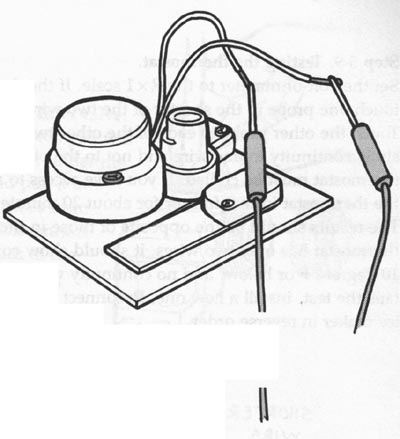
Step 5-7. Checking the motor. With the refrigerator unplugged, and the ice maker and the mounting plate removed, disconnect the wires to the motor. Set the volt-ohmmeter to the R x 10 scale. Now touch a probe to the bare end of each wire. The needle should move to about 500 ohms. If the needle does not move, the motor is bad and needs to be replaced. To replace the motor, simply remove the screws holding the motor to the mounting plate. Install the new motor by fitting the motor gear into the large gear on the mounting plate, reinstalling the screws, and reconnecting the wires.
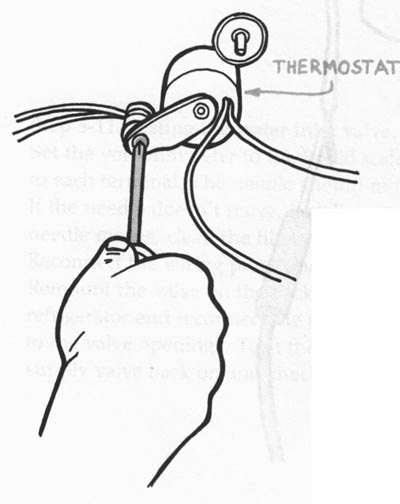
Step 5-8. Removing the thermostat. The thermostat is held in place by a clamp
fastened by a screw. Remove the screw and clamp holding the thermostat. Then
remove the thermostat. The thermostat will have at least two wires, possibly
three. One wire will be connected to other wires by a wire nut. The other wire,
or wires, will have terminal connectors. Label and disconnect the wires to
the thermostat.
------------

Step 5-9. Testing the thermostat.
Set the volt-ohmmeter to the R x 1 scale. If the thermostat has three wires, touch one probe to the shorter of the two wires with terminal connectors. Touch the other probe to each of the other two wires. The meter should show continuity to one wire and not to the other. For the next test, the thermostat must be chilled. If you have access to another freezer, place the thermostat in that freezer for about 20 minutes; then repeat the test. The results should be the opposite of those in the first test. If your thermostat has only two wires, it should show continuity when cold, at 10 degrees F or below, and no continuity when warm. If the thermostat fails the test, install a new one. Reconnect the wires and reassemble the ice maker in reverse order.
--------------

Step 5-10. Disconnecting the water inlet valve. Turn off the water supply
valve, which you will find either behind the refrigerator or under the sink.
Unplug the refrigerator and pull it away from the wall. Disconnect both tubes
from the water inlet valve openings. Disconnect the water inlet valve from
the back of the refrigerator. Now disconnect the wiring plugs and any ground
(green) wires.

Step
5-11. Testing the water inlet valve. Set the volt-ohmmeter to the R x 10 scale
and touch a probe to each terminal. The needle should move to about 300 ohms.
If the needle doesn't move, install a new inlet valve. If the needle moves,
clean the filter on the inlet side of the valve. Reconnect the wiring plugs
and connect the ground wire. Remount the valve on the back of the refrigerator
and reconnect the tubes to the valve openings. Turn the water supply valve
back on and check for any leaks.
++++++++++++++++++
Home Guide/index top of page