Troubleshooting and Repairing--Automatic Washer (part 1)
| HOME | Troubleshooting | DIY Tips |
|
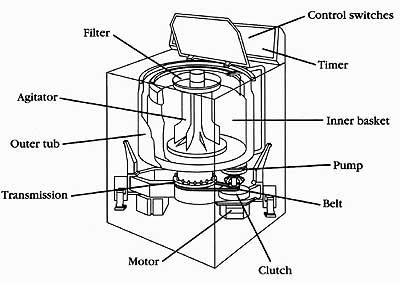
The automatic washer is a complex electromechanical machine ( Figr. __1). It per forms various cycles to clean clothes. There are times when a washer fails to operate properly. Don’t let its complexity intimidate you. This section will provide the basics needed to diagnose and repair the washing machine. PRINCIPLES OF OPERATION The clothes are placed evenly into the washer basket, being sure that the washer is not overloaded, and that the proper cycle is selected. The user activates the washer through the timer. The internal switches of the timer distribute the electricity to activate the other components in the washing ma chine during a given time period, designated by the internal cam of the timer. The water enters the tub through the water fill hoses, the water inlet valve, and water inlet hose. Hot, warm, or cold water is selected by the user via the water temperature selector switch, located on the console panel. On some models, the water temperature selection is controlled by the timer.
The amount of water that fills the tub, is controlled by the water level control (pressure switch). The water level control offers a choice of water levels depending on the amount of clothing being washed. As the water level rises in the tub, it forces air through the air dome and up the plastic tube to the water level control. The pres sure that is exerted on the water level control’s diaphragm, will trip the water level switch from empty to full, supplying electricity to the washer drive motor and, thus, operating the transmission. The transmission is operated by the drive motor, either by belt drive or by direct drive, depending upon the model. Agitation is accomplished by the agitator, which is located in the center of the basket, and which is driven by the transmission. The agitator turns clockwise and counterclockwise, creating a water motion that moves the clothes within the basket. When the washer goes into the drain mode, the agitator will stop agitating, and the water leaves the bottom of the tub through the water pump, to be pumped into the drain. The water pump may operate by belt drive, or by direct motor drive. A final deep rinse cycle (the tub fills to the selected water level, and begins to agitate) will be introduced, to wash off any remaining residue of soap or dirt. The timer will now select the spin cycle, and the washer will then go into the spin mode. In the spin mode, the washer spins the clothes, to remove most of the water out of the clothing by centrifugal force. Some models use brief sprays of water to remove any residue of soap or dirt remaining on the clothes in the spin cycle. --Functions and cycles The removal of soil from clothing and fabrics is accomplished by a combination of mechanical and chemical processes. 1. Mechanical process Soil is removed by agitating and by forcing the detergent through the clothing. 2. Chemical process The detergent used will dissolve and loosen the soil in the clothing. M the washing machine operates through its cycles, it’s aided by hot, soft water, which increases the chemical processes of the detergent being used. Washing machines perform four basic functions, that are modified and put together in different ways, to create the various cycles. The four functions are: 1. Fill 2. Agitate 3. Drain 4. Spin SAFETY FIRST Any person who cannot use basic tools, or follow written instructions, should not attempt to install, maintain, or repair any automatic washers. Any improper installation, preventive maintenance, or repairs could create a risk of personal injury or property damage. If you don’t fully understand the installation, preventive maintenance, or repair procedures in this section; or if you doubt your ability to complete the task on the automatic washer, then please call your service manager. The following precautions should also be followed: 1. Never bypass, or disconnect, any part or device (originally designed into the washer) as a temporary repair. 2. Always reconnect all ground wires, and be sure that they are secure. 3. Be careful of moving parts and sharp edges. Before continuing on, take a moment to refresh your memory of the safety procedures in Section 2. AUTOMATIC WASHERS IN GENERAL Much of the troubleshooting information in this section covers automatic washers in general, rather than specific models, in order to present a broad overview of service techniques. The pictures and illustrations that are used in this section are for demonstration purposes; to clarify the description of how to service washing machines, in no way to reflect on a particular brand’s reliability. Location and installation of automatic washer: Listed are some general principles that should be followed when performing the installation of a washing machine. 1. Locate the washing machine where there is easy access to existing drain, water, and electrical lines. 2. Be sure you observe all local codes and ordinances for the electrical and plumbing connections. 3. The washing machine should be installed and leveled on a firm floor to minimize vibration during operation. 4. Don’t install the washing machine in an area where the temperature might be below freezing. 5. To reduce the risk of a fire, never install a washing machine on any type of carpet. 6. Always follow the installation instructions that are provided with every new washing machine model purchased. Water supply: The water supply for an automatic washer should have a hot and cold faucet, located within 5 to 7 feet of the washer. The faucets should be 3 type to accept the fill hose connection. The water pressure must be between 25 and 125 pounds per square inch for the washer to operate properly. The water coming out of the fill hoses should be equal in both pressure, and in the volume of water, to prevent unacceptable water temperature changes when entering and filling the washer. The hot water supply to the washer should be between 130 and 150 degrees Fahrenheit. If the hot water temperature is below 70 degrees Fahrenheit, the clothes being washed won’t clean properly, and the detergent won’t dissolve properly. You can check the temperature of the hot water by operating the washer in the fill mode, with the water temperature setting on hot. Let the water run until it’s as hot as possible, then insert a thermometer into the stream of water. If the thermometer reading is below 130 degrees Fahrenheit, then you will have to raise the water heater thermostat setting. The cold water temperature should be between 70 and 100 degrees Fahrenheit. When the washer is in its rinse stage, the cold water will prevent wrinkles from set ting into the fabrics. Some fabric manufacturers require that their fabrics be washed in cold water, both to prevent shrinkage, and to eliminate the possibility of destroying the fabric. When the user selects the warm fill, the temperature of the water should be 100 degrees Fahrenheit. It’s recommended that the consumer read the use and care manual before per forming a wash. Most use and care manuals have a water temperature guide to assist the user in the proper selection of the water temperature. Drain requirements: The drain, to which the washer’s drain hose is connected, must be able to accept at least a 20 to 30 gallons per minute flow, in order to remove the water out of the tub. The standpipe should be at least 32 inches high, and not to exceed 60 inches in height. The internal diameter of the drain pipe should be a minimum of 1 inches, in order to provide an air gap around the drain hose and, thus, to prevent the suction from siphoning the water Out of the tub during the following cycle. Detergent: The kind, and the amount, of detergent that is used is an important part of getting the clothes clean. Different brands of detergent contain different amounts of phosphorous, which works to soften the water and to boost the cleaning action. If the water is hard, you might need to recommend a detergent with a higher phosphorous content. If the water is soft, the user can use a low-phosphorous detergent. Some areas restrict the phosphate content to 8%, or even less. This means that the user will have to increase the amount of detergent used, in those areas where the water is hard. This is done by adding a certain extra amount of detergent manually, to the wash cycle. It’s recommended that the consumer read the use and care manual before per forming a wash. Most use and care manuals have a detergent guide, to assist the user in the recommended amount of detergent to be used. Water hardness is measured in grains. • 0 to 3 grains, soft water • 4 to 9 grains, medium hard water • 10 to 15 grains, hard water • over 15 grains, very hard water. If you don’t know the hardness of the water supply, contact the local water department. STEP-BY-STEP TROUBLESHOOTING BY SYMPTOM DIAGNOSIS In the course of servicing an appliance, don’t overlook the simple things that might be causing the problem. Step-by-step troubleshooting, by symptom diagnosis, is based on diagnosing malfunctions with their possible causes arranged into categories relating to the operation of the washer. This section is intended only to serve as a checklist to aid you in diagnosing a problem. Look at the symptom that best de scribes the problem that you are experiencing with the washer, then proceed to correct the problem. --No water entering washer 1. Is the washer plugged in? 2. Check for proper voltage at the wall receptacle. 3. Is the water supply turned on? The fill hoses should feel stiff. 4. Test the water temperature switch contacts for continuity. 5. Check for an open circuit in the timer contacts. 6. Check for loose wires to the water valve solenoid. 7. Test water valve solenoid coils for continuity. 8. Check the water valve inlet strainer screens. Remove the fill hoses to inspect these filters. 9. Test the water level control switch for continuity. 10. Are the water supply hoses kinked? --Motor won’t run 1. Check for a proper voltage at the wall receptacle. 2. Is the washer plugged in? 3. Check for a blown fuse or a tripped circuit breaker. 4. Check for a faulty timer. 5. Are there any loose wires to the timer, motor, etc.? 6. Test the motor windings for continuity. 7. Test the thermal overload in the motor for continuity. 8. Test the water level control switch contacts for continuity. 9. Test the motor speed selector switch contacts for continuity. 10. Are there any open wires in the washer circuit? 11. Test the capacitor on the motor. 12. Check the centrifugal switch in the motor. 13. Check for continuity of the lid switch contacts. --Washer won’t agitate 1. Check for a broken or worn belt. 2. Check the motor to transmission drive coupling. 3. Test the timer contacts for continuity. 4. Are there any loose wires within the wiring harness? 5. Are there any loose wires to the timer, motor, etc.? 6. Test the continuity of the motor windings. 7. Test the agitator solenoid on the transmission. 8. Check for loose pulleys on the transmission and motor. 9. Check the water level control switch. 10. Test for continuity of the start relay. 11. Test the capacitor on the motor. 12. Check the centrifugal switch in the motor. 13. Test for continuity of the lid switch contacts. 14. Test for continuity of the speed selector switch. 15. Check the clutch assembly. 16. Check the transmission. --Water won’t drain 1. Check for a clogged drain connection. 2. Inspect the pump for obstructions. 3. Check the drain hose, and be sure it’s not kinked. 4. Check the belt that goes to the pump. 5. Check for suds lock. If this happens, just add cold water and flush the suds Out of the pump. (Suds lock is caused by too much soap remaining in the tub, pump, and the connecting hoses. This condition will prevent water from draining effectively.) 6. Check the pump coupling. The pump and motor must be removed for a visual inspection of the coupling. 7. Check for air lock in the pump (air trapped inside the pump, caused by debris). 8. Check to be sure that the motor is not running in the agitation direction. 9. Check the height of the drain. 10. Does the pump pulley turn freely? --Washer won’t spin 1. Check for a loose or broken belt. 2. Check for loose pulleys. 3. Check the clutch assembly. 4. Check for loose or broken wires in the washer circuit. 5. Test the continuity for a faulty lid switch assembly. 6. Test the continuity for a defective spin solenoid. 7. Check for a broken drive coupling. The pump and motor must be removed for a visual inspection of the coupling. 8. Test the continuity of the water level control switch. 9. Test the continuity of the speed selector switch. 10. Test the continuity in the motor windings and the motor overload protector. 11. Test the timer contacts for continuity. 12. Check for clothing jammed between the inner basket and the outer tub. 13. Check all seals and mechanical linkages. 14. Check the transmission. 15. Check to be sure that the motor is running in the spin direction. COMMON WASHABILITY PROBLEMS If there are no mechanical problems with the washer’s operation, and the com plaints are that the washer does not clean the clothes properly, you have a washability problem. The next step should be to look at the cause that best describes the problem that the customer is experiencing with the washer. Then, proceed to correct the problem. If necessary, instruct the user how to get better results from their automatic washer. --Stains on the clothing Stains on clothing can be caused by a number of different things. As the servicer, you will have to determine if it’s caused by the washer’s components or from an external source. Many stains are blamed on leaking transmissions. This type of problem is related to the increasing use of synthetic fabrics, and to the poor washing practices of the user. Many of these stains consist of cooking oil or grease, and are not visible when they first occur during cooking or eating. The oil that is embedded in the clothing acts like glue, attracting dirt from the wash water. When the wash cycle is completed, the clothes come out dirty and spotted. If the transmission oil leaked into the wash water, there would be stains on all of the clothes in a random pattern. The color of transmission oil embedded into the clothing is usually a brownish-yellow stain. Transmission oil cannot be washed out of the clothes, it requires a solvent to remove the stains. Listed below are some stain removal rules for clothing in general: 1. Stains are easier to remove when they first appear on the clothing. If the stains are old, they might never come out of the clothing. 2. Before attempting to remove any stain, you must know: a. what type of stain, b. what kind of fabric, and c. how old is the stain? 3. Use only cold or warm water to remove stains. Hot water will set the stain permanently into the fabric. 4. When bleach is recommended for the removal of the stain, use a bleach that is safe for the fabric. When using a chlorine bleach, always dilute it with water to protect the bleach from destroying the fibers. 5. Always test stain remover products on a hidden corner of the garment to see if the color remains in the fabric. 6. When preparing to remove the stain from the fabric, face the stained area down on a paper towel or a white cloth. Then, apply the stain remover to the back of the stain so that the stain will be forced off the fabric, instead of through the fabric. 7. Some protein stains can be removed with an enzyme pre-soak, or with meat tenderizer. 8. When using dry cleaning solvents, always use them in a well-ventilated room, away from flames and sources of ignition, to prevent personal injury. • Alcoholic beverage stains: Alcoholic beverage stains turn brown the longer they stay on the fabric. As soon as the stain appears on the fabric, start treating the stain immediately. Wash or soak the stain in cold water, then wash the garment. • Blood stains: To remove blood stains, rinse or soak garment in cold water with an enzyme pre-soak product. You can use diluted chlorine bleach on white fabrics, if necessary. For colored fabrics, use a powdered oxygen- type bleach. Then, wash the garment. • Chewing gum stains: To remove chewing gum, use ice on the stain to make the chewing gum hard. Then, scrape most of it off the fabric. Next, use a non-flammable dry-cleaning solvent with a sponge to remove the excess chewing gum. Wash the garment. • Coffee or chocolate stains: To remove coffee or chocolate stains, soak the garment in warm or cold water. Next, make a paste of detergent mixed with hot water, and brush it on the stain. Wash the garment. • Milk product stains: To remove a milk product stain, use a non-flammable dry-cleaning solvent with a sponge. Wash the garment. • Antiperspirant and deodorant stains: To remove antiperspirant and deodorant stains, wash the garment with laundry detergent in the hottest water that is still safe for the fabric. If the stain remains on the fabric, then place the stain face down on a white towel, and treat the stain with a paste of ammonia and a powdered oxygen-type bleach. Let the paste stay on the Stain for 30 minutes, then wash the garment in the hottest safe water for the fabric. • Fruit stains: To remove fruit stains, soak the stain in cool water. Don’t use soap, it will Set the stain. Wash the garment. If the stain remains, cover the stain with a paste made of a powdered oxygen-type bleach, a few drops of hot water, and a few drops of ammonia. Let the paste stay on the stain for about 15 to 30 minutes. Then, wash the garment. • Iron or rust stains To remove iron or rust stains, apply some lemon juice mixed with salt. Then, place the garment in the sun. Alternatively, a commercial rust-removing solution can be used. Wash the garment. YELLOWING IN FABRIC Some of the causes of yellowing in fabrics are: • Poor body soil removal • Clothes washed in water treated with a water softener • Hard water, minerals in the water, such as iron • Body oils released into the garment • The water supply might pick up the color of decaying vegetation To remove body oils, the user will have to increase the amount of detergent, and use 150-degree Fahrenheit wash water. The user must also increase the frequency of using bleach in the wash. To remove the yellowing from the garments that are washed in water from a water softener; the user will have to decrease the amount of detergent used, approximately to the point that the decreased amount won’t affect the soil removal process. The user must also increase the frequency of using bleach in the wash. Hard water and minerals in the water can be treated with a water conditioning apparatus. The user might have to drain the water heater, and flush the tank. Never use chlorine bleach to remove hard water stains or iron stains. To remove body oils from the garment, use a paste made of detergent and water. Let it stay on the fabric for 15 to 30 minutes. Then, wash the garment. To remove the yellowing caused by decaying vegetation, increase the amount of detergent, and bleach more often. White fabrics will respond very well to bleaching. --Fabric softener stains Fabric softener stains are becoming more prevalent, because it’s now being recommended that some fabric softeners can be used in the wash cycle, instead of the rinse cycle. These types of stains show up on synthetics, as well as cotton fabrics. They can be removed from the fabric by pre-treating the stain with liquid detergent and following the washing procedures listed in the use and care manual. --Lint Lint is cotton fiber that has broken away from the cotton garment. Lint likes to at tach itself to synthetic fabrics. When this happens, the user often thinks that the washer is not performing properly. Therefore, to solve the problem of lint on synthetic fabrics, the user must sort the items before washing the clothes. For example: 1. The user must separate cottons from permanent press and knits. 2. The user must separate light colors from dark colors. Another cause of lint on the clothes is over-washing. This causes the clothes to wear out faster. To correct the over-washing problem, use only one minute of wash time per pound of dry laundry with normal soil. Any more time than this is a waste, and it usually does not get the laundry cleaner. If the drain cycle is excessive, this too will cause lint to remain on the garments. Check for improper drain hose connections. For example: 1. Drain hose is too long; over 10 feet, 2. Drain hose is too high; over 5 feet, or 3. Is the drain hose kinked? If excessive drain times still exist, then check the following: 1. Check the filter, located under the wash basket on most newer models. 2. Check to be sure that the pump is operating properly. 3. Check for any obstructions in the drain system. 4. Check for any obstructions within the water circulatory system of the washer. AUTOMATIC WASHER MAINTENANCE The interior is normally self-cleaning. However, there are times when you might have to remove objects from the inner basket. Clean the control panel and outer cabinet with a soft damp cloth. Don’t use any abrasive powders or cleaning pads. Clean and inspect the interior of the underneath of the washer. Read the use and care manuals for the proper maintenance of your brands of washers. (cont.) Prev: Electric water heaters Next: Automatic Washer--part 2 Home top of page All related articles |