From prehistoric times, when man-the-hunter built rude barricades of thorns to keep wild animals away, through thousands of years of building walls and fences to keep livestock in and trespassers out, barriers of one sort or another have provided privacy and protection. In modern gardens, walls and fences serve many purposes well beyond these, from screening bashful sun bathers to extending the apparent size of a house.
Low walls can mark off parts of a garden according to how each area is used, provide interesting changes of level, double as benches for casual sitting, or lift plants above ground level so they can be tended without bending and stooping. Higher dividers are used to screen off unsightly service areas, garbage cans, compost heaps and vegetable or cutting gardens that have passed their prime.
Along property lines, fences and walls can provide privacy, reduce noise and wind velocity, form sun traps that extend the use of a garden in cool weather and serve as backdrops for flowers, shrubs and climbing vines. As a safety device, fencing can confine children and pets, or keep them from falling into a swimming pool.
There are almost as many kinds of fences and walls as there are people to build them. Among the oldest, and still most widely used, are boundary fences. In 18th Century America, when wood was plentiful but nails were scarce, boundary fences were made from long, hand-split tree trunks simply stacked at angles in a zigzag pattern to make self-supporting barriers. These so-called rail fences contained the landowner’s livestock and put others on notice that he had staked his claim to the enclosed area.
As timber became more valuable and property lines more precisely defined, the kinks in the zigzag fence gradually disappeared. The split rails were stacked one on another in a straight line and the ends were held together by pairs of posts set firmly in the ground. From this evolved the familiar post-and-rail fence: single posts with holes in them to receive the ends of the rails. Finally, as machine-milled lumber became available, it replaced the hand- hewn parts. These post-and-board fences, still seen surrounding many a farm pasture and suburban yard, led to the picket fence and to all manner of contemporary designs.
---

A Revolutionary era wall skillfully constructed of fieldstones without mortar makes an impressive backdrop for a contemporary herb garden in Connecticut in which yellow hollyhocks also grow.
---
RAISING A BARRICADE
While boundary fences today are usually more esthetic than utilitarian, security fences are strictly practical. Among the most effective is the chain-link fence, with its unmistakable “no trespassing” look. Only a professional can install a chain-link fence properly, but an imaginative gardener can do many things to soften its appearance. One Washington, D.C., handyman, whose apartment terrace is separated from a parking lot by a chain-link fence, wove the slats from several old venetian blinds through the fence links. The resulting latticework blocks an undesirable view but allows ample ventilation for a border of peonies and pansies.
Aware of the appearance problem, manufacturers of chain-link fences offer cap rails to soften the jagged top edge, plastic-coated mesh in unobtrusive green or black, and slats of wood or plastic to weave through the links as the Washington gardener did. You can also lash panels of canvas or reed screening to such a fence. But the most effective way to modify the harsh look of a chain-link fence is to camouflage it with a dense, fast-growing vine—perhaps a Boston ivy, honeysuckle or Virginia creeper—making it look like a hedge.
---
STRETCHING WIRE-MESH FENCING
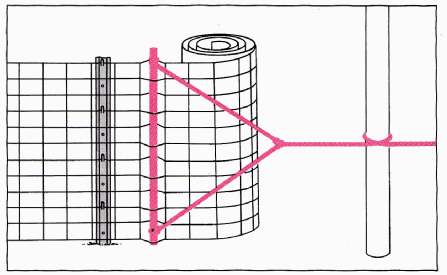
To stretch wire fencing, run a stick—a broom handle will do—through the standing mesh just past a fence post. Then attach a rope to both ends of the stick so it can be pulled evenly. Wrap the other end of the rope around a stationary object such as a tree or a firmly braced corner fence post. Tighten the rope; if necessary, use a block and tackle. For safety’s sake, don’t pull with a car. When the mesh feels springy to the touch, fasten it to the post nearest the stretching-stick, then release the rope.
---
An alternative to chain-link fencing is welded wire mesh, which has a more tailored rectangular pattern. It can be set into wooden frames to form unobtrusive low or high fences. To discourage climbers, use mesh with a narrow vertical dimension of 2 inches or less so toeholds will be difficult.
THE WORLD EXCLUDED
Between the extremes of decoration and security, there are many reasons to build a fence. For most homeowners, particularly those with cramped urban lots, privacy is paramount: they would rather not share all the details of their leisure hours with neighbors and passersby. A privacy fence should be at least 6 feet high, solid enough to screen undesirable viewing, yet not so solid that it will prevent cooling breezes from penetrating on a sweltering day.
Some homeowners rush out to buy instant privacy in the form of prefabricated fence sections, made either of flat boards butted solidly together or of saplings or half-round poles joined to form a modern version of the frontier stockade fence. Such fences unquestionably provide privacy, but they can present a formidable appearance that suggests all too well their rude and defensive origins.
A better and more economical solution is to build your own privacy fence to perform exactly the role you require. Several variations of the basic post-and-board fence are shown in the encyclopedia. Among these are the basket-weave fence, made of thin boards bent around vertical or horizontal spacers; fences with horizontal or vertical louvers set at an angle; and fences built with a board-and-board design.
BOARD-AND-BOARD DESIGN
The board-and-board fence, one of the easiest to build, consists of vertical boards nailed alternately on opposite sides of a simple wooden frame. A board-and-board fence presents a pleasing appearance on both sides and the deep shadow pattern it creates provides privacy with ventilation. A board-and-board fence can be built with less lumber than most other privacy fences and requires no complex joints. In a long fence, the repetitive pattern can be broken by nailing alternating sections in a horizontal pattern (although this permits easy climbing).
Surprisingly, a board-and-board fence—or any fence with a partly open structure—is usually more effective than a solid fence in shielding a sitting area from wind. The openings diffuse wind, while a solid fence often creates a swirling eddy that draws fast-moving air down from the top of the fence onto the lee side.
If you want to build a fence or wall on or near your property line and you are not sure exactly where that line is, by all means have your land resurveyed. In most communities, your neighbor’s side of any barrier exactly on the property line belongs to him—to modify, maintain or let go to ruin. You will certainly want to discuss the fence with him beforehand to avoid any misunderstanding or ill will. And you may be better off erecting your fence 12 to 18 inches inside the line. This gives you undisputed ownership and allows space for repairs and repainting without trespassing. Even if you set back the fence, however, choose a “good neighbor” design and keep it properly maintained on both sides.
PRECISION PLACEMENT
Once you have reconciled your fence design with local codes and with neighbors, you can plot its exact placement. A simple way to make sure the fence is properly located and of the right height is to tie a length of twine to a couple of long poles arid have two helpers move this rig around the yard. As you stand or sit in key areas, sight across the top of the string as your helpers adjust it up, down and sideways. Newspapers folded over the string will help you to visualize the view when the fence is erected. After experimenting, you may find that you need a higher or lower fence than you had thought, or that only some sections need be of a closed design.
The first step in building a fence is to locate the exact positions of the end and corner posts, drive a stake at each post location and tie a piece of string taut between the stakes. The corners of most residential lots form right angles, but your angle may not be precisely 90 degrees. You can check the angle with a carpenter’s square, but a surer method is to use another piece of string to form a so-called 3-4-5 triangle. To make this triangle, attach the third piece of string to the two pieces already forming the corner, tying it 3 feet from the corner stake on one side and 4 feet from the stake on the other. If this diagonal string (the hypotenuse of the triangle) measures exactly 5 feet, the corner angle is the desired 90°.
---
RIGHT ANGLES FOR A RECTANGLE

To set stakes at right angles marking the corner of a plant bed, a terrace or a yard being fenced, use a 3-4-5 triangle. Mark one side with two stakes and a string (red line). Stretch and stake a second string (black line) at an approximate right angle to the first.
Drive a stake just outside the first line 3 feet from the corner and another 4 feet from the corner on the adjacent side. Tie a third string (blue line) to these stakes. Adjust the second string until the diagonal is 5 feet long; the corner will be a 90°angle.
---
After you have squared up the corner, drive stakes along the twine to mark the positions of intervening posts. Most wooden garden fences are built with posts 8 feet apart and use crosspieces of standard 8-foot lumber, though a solid fence of heavy lumber or one subjected to strong winds is better supported every 4 or 6 feet. If you end with an odd length that upsets the fence’s symmetry, you can divide the run into equal sections and cut all horizontal pieces to fit, or you can fill the odd gap with a gate.
OBSTACLE COURSES
On some sites, natural or man-made obstacles may prevent laying out a fence in a straight line. If a tree is directly on the fence line, stop the fence short of the trunk on either side, leaving a few inches of space to allow continued growth. Never use a tree as a fence post; as the tree grows, it will push the fence out of line. Worse, driving nails into a tree will open pathways for infection.
If you build a fence on sloping or irregular ground, you can keep the top of the fence level by making some posts longer than others. On steeper sites, sections of the fence can step down like a flight of stairs.
Most garden fences are built on frames of 4-by-4 posts connected near the top and bottom with horizontal pieces called stringers or rails. The most critical part of fence building is getting this frame work solidly in place and perfectly in line. For stability, fence posts usually are sunk into the ground at least one third their total length. Thus, a fence 6 feet high would be built with 9-foot posts. In areas with extreme winter cold, posts long enough to reach below the frost line will be more stable. All posts should be of wood that has been pressure-treated with a preservative, or of heartwood of a naturally rot-resistant species like redwood or cedar.
SETTING A FENCE POST
In well-drained, stable soils, fence posts can be set in postholes without concrete. Dig the holes with a screw auger or a two-handled post-hole digger of the clamshell type; those dug with a shovel are too large and will need a lot of backfilling and compacting to keep the posts from wobbling. To provide drainage at the base of each post, the point most vulnerable to rot, place a flat stone at the bottom of each hole or line it with a 2- to 3-inch layer of gravel or crushed rock. Then put the post in the hole, using a carpenter’s level to get it vertical. While a helper holds the post, shovel in 2 or 3 more inches of gravel, tamp it with the end of a 2-by-4, then add soil and tamp until the hole is full, checking the post with a level every few inches to make sure it remains vertical. When the hole is full, mound up earth around the post so surface water will drain away.
For more solid footings for gateposts and corner posts and for those subject to frost heaving or strong wind, you can supplement the earth and gravel fill with one or more collars of concrete. The technique of setting a post in concrete without creating a pocket that invites rot at the bottom of the post is shown.
ADDING THE RAILS
When all of the posts are evenly in place, mark the position of the rails by tacking one string near the tops of the posts and another near the ground. With a helper keeping a lower rail level, toenail it in place by hammering galvanized nails diagonally through its sides into the post. For a stronger joint, you can toenail the rail through the top edge, keeping the rail in place by resting it on small wooden cleats nailed to the posts.
Top rails can simply be laid across two post tops and nailed onto them. A stronger fence can be made by using top rails that span three posts and meet at the center of every third post. In either case, the top rail serves the important function of keeping moisture from soaking into the tops of the posts. If you do leave post tops exposed, cap them with metal or bevel them slightly so moisture will run off.
SPACED SLATS OR BOARDS
Once the posts and rails are in place, you are ready to nail on the slats, pickets or boards that complete the design of your fence. The work will go quickly if you use a spacer board, made from a length of scrap lumber cut to the width of the gaps with a cleat nailed to one end to form a T. After you have nailed on the first picket or board, hang the spacer board’s cleat on the top rail, hold the spacer tight against the first board, and nail the second board next to it. Move the spacer for each new board.
As a general rule, only the fence posts should touch the ground. If you want to exclude small animals, you can tack wire mesh along the bottom rail. The fence can be finished with a coat of preservative stain or with one or more coats of exterior latex or oil-based paint. White is a safe traditional color for fences.
If you have a problem that a board fence won’t solve, you can adapt the basic frame to hold panels of exterior-grade plywood, plastic, glass or some other material.
Despite their myriad uses and charms, fences probably will never completely replace walls, the oldest and most durable of man-made dividers. Gardens and walls have gone together for thousands of years, combining permanence, privacy and dignity.
The most venerable walls are made of stone. Building a stone wall has always been an arduous craft, requiring not only patience and a strong back but a keen eye for composition and accurate fitting. For most homeowners, a stone wall is only an object to admire. But for a few, among them gardener Charles Fenyvesi, there is great satisfaction in building such a wall.
“It’s glorious how well a dry wall stands up to children and weather and time,” Fenyvesi wrote in The New York Times. “Walls define space. They declare where the children’s realm ends and the flowers’ begins. They grant one level to tall lilies; another to creeping phlox and portulaca.
“I mix shapes and sizes and I use everything that comes my way: chewed-up pieces of concrete, slag, the fragment of a colonade. I believe a broken brick looks good next to gray volcanic pebbles. I marry smooth black slate to rough, white rock crystal.
“Building a wall, I remember the terraced hills of Jerusalem, Java and China. I ponder the symmetries of Islam’s walled gardens. I daydream about stone towers overlooking a plain that invading foreigners cross.”
---
FENCES THAT FOLLOW A SLOPE
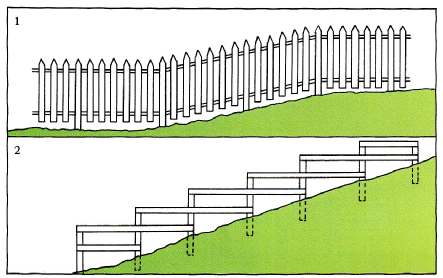
1. On a gradual slope, you can put up fencing that follows the natural contour of the land by setting posts of identical height at regular intervals and letting the rails parallel the incline. Use a carpenter’s level to keep posts and pickets vertical.
2. On a steeper slope, a fence may be stepped down in sections by connecting vertical posts with horizontal rails—again, use a carpenter’s level. Where the slope varies, set posts at different heights, but keep the rail length constant.
---
Even if walls don’t evoke such a vivid sense of romance for you, they are useful in defining garden areas and changing levels, preventing soil erosion and containing raised planting beds.
For the novice builder there are many widely available masonry materials that are easier to work with than stone, including bricks and precast concrete blocks. A low edging to hold a plant bed can be made simply by setting paving bricks on end so the tops protrude a few inches above the soil level. A popular decorative variation of this mortarless edging requires only that you tilt bricks in a trench at a 45-degree angle.
WALLS TO LIFT PLANTS
Not much harder to build are walls 1 to 3 feet high; gardeners are turning in increasing numbers to raised plant beds within such walls, because they make strong patterns, they raise plants to a level where they are easily tended, and they provide containers for a rich planting mix regardless of the quality of the soil beneath. Moreover, such raised planting beds protect vegetables and flowers from children, pets and pests. A Louisville, Kentucky, couple lost more than 100 tulip bulbs one year to mice and moles who found them easy pickings in an in-ground bed. The following year, with the bulbs ensconced in a raised planter, the couple lost not a single one.
The simplest raised bed can be built of 2-by-8 or 2-by-10 boards of rot-resistant or treated lumber, set edgewise an inch or two in the ground, nailed together at the corners and filled with soil. For a more permanent structure, lay one or more tiers of railroad ties or landscape timbers around the bed and join them at the inside corners with galvanized angle irons. Ties can be further stabilized by drilling holes through them, about 3 feet apart, and pounding lengths of galvanized pipe through the holes and into the ground beneath. You can also build a low retaining structure by piling up rough stones without mortar to form a rudimentary but serviceable New England-style dry wall. For stability, set the stones at a slight downward angle toward the inside of the wall and slope the wall back at least an inch for every foot of height.
A stone retaining wall higher than 3 feet is more difficult. It requires a solid foundation, or footing, usually of poured concrete. The wall itself generally must be built of mortared masonry or poured concrete, with weep holes to relieve water pressure and lateral members called “dead men” to anchor the structure into the slope behind. The construction of such a wall is best left in the hands of a professional builder.
=+++=
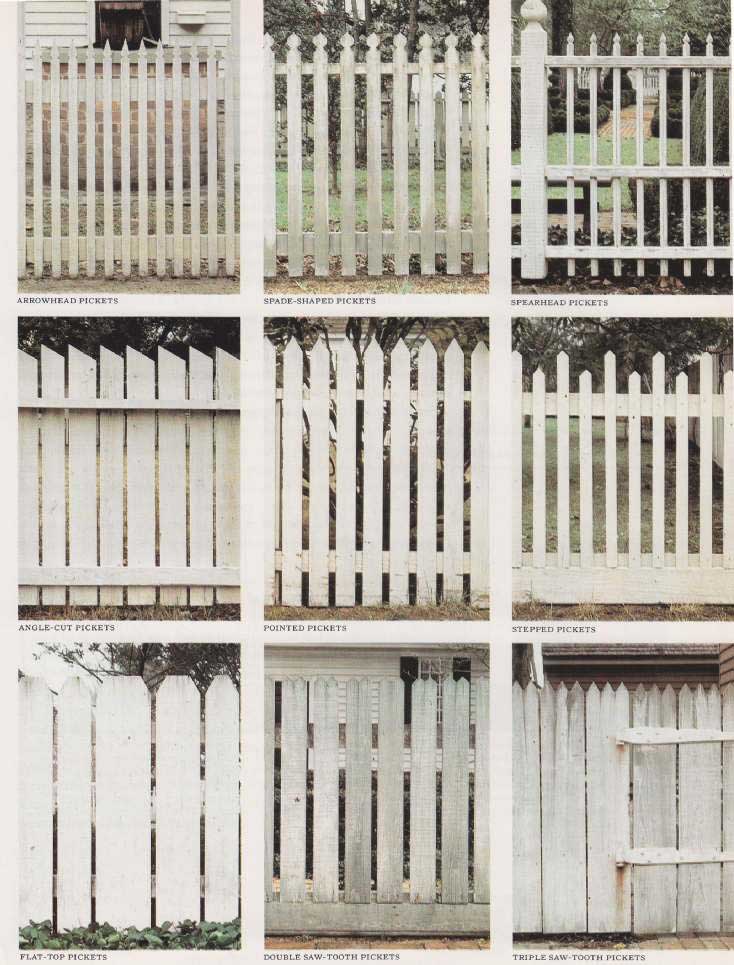
The picket ordered grace
Nearly half of the seven miles of fences in Williamsburg, the painstakingly restored capital of colonial Virginia, are picket fences—pointed stakes 3 to 4½ feet tall spaced evenly along horizontal rails strung between taller posts. The continuing popularity of such fences lies not so much in their functional role as in the decorativeness of their orderly and rhythmic vertical lines, punctuated at regular intervals by posts. Not the sort of fence for anyone craving privacy, the low and open pickets invite public appraisal of the architecture and gardens they enclose.
Though selected to complement colonial architecture, Williamsburg’s fences suggest the adaptability of pickets to almost any building style. The Victorians, in fact, narrowed their pickets to simulate wrought iron or cut the edges of broad pickets to echo the gingerbread cornices on their houses. The picket fence is as traditional as any structure can be, but it continues to evolve; one contemporary architect specifies pickets made of round dowels and painted earth colors instead of the familiar white.
--
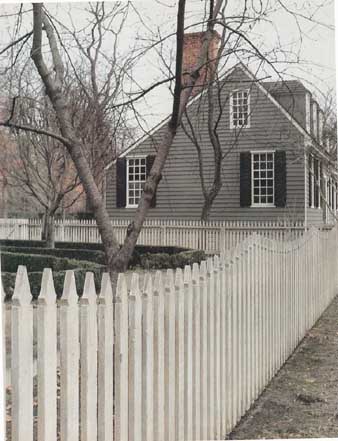
Affluent colonists discreetly expressed their taste with graceful fences like this one of gently undulating pickets.
Colonial conformity:
The lines of picket fencing in Williamsburg harmoniously merge the flat public commons they face with the well-kept gardens and tidy colonial homes behind them. The town’s uniformity is deliberate. Williams burg’s planners decreed by law that all houses occupy plots of at least a half acre, stand 6 feet back from the street, and be “paled in” to keep the livestock that grazed on the commons from nibbling at the tender shoots of vegetables in kitchen gardens. Wood was readily available in the young colony, and fences of pales (now called pickets or stakes) were easy to construct from hand-sawed lumber, boards torn roughly from logs (rived pickets) or even with plain, easily gathered, bark-covered saplings.
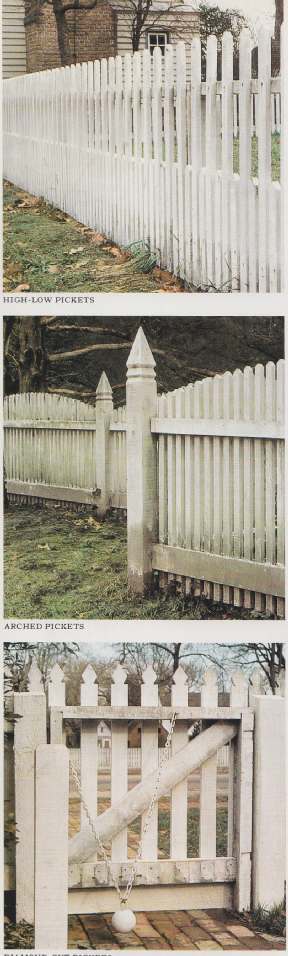

ROUNDED PICKETS; ANGLE-CUT PICKETS; ARROWHEAD PICKETS; SPADE-SHAPED PICKETS; SPEARHEAD PICKETS; POINTED PICKETS; STEPPED PICKETS;
=+++=
---
FIRM FOUNDATIONS FOR FENCE POSTS

Fence posts may be set in the ground with tamped earth (left) or held more firmly with concrete collars (right). Nails in the posts anchor them to the concrete. For good drainage, set each post on a large stone and mound up the fill at ground level.
For a firmer fence-post foundation, sink an H-shaped metal post anchor in concrete. Fasten the post to the anchor with bolts (left). To make a neat concrete collar, use a band cut from a plastic jug to shape the wet concrete (right).
If you are setting a post without a helper, tamp enough earth around it to hold it steady. Use a carpenter’s level to align the post, then brace it temporarily with scrap lumber and stakes. Keep checking the level as you add the fill around the post.
---
LAYING BRICKS OR BLOCKS
Many less complex walls can be built with bricks or concrete blocks. Brick is as handsome in walls as it’s in paving, and there are several decorative kinds of concrete block that can be used to create stunning grillwork effects.
For many garden uses, from low sitting or retaining walls to higher utility or privacy enclosures, a wall of ordinary concrete block is quite adequate. Blocks are more economical and go up faster than stone or brick; one hollow-core concrete block takes up roughly the same space as 16 bricks, though its 40- to 50-pound weight should be reckoned with (somewhat lighter cinder blocks and other lightweight blocks of 25 to 30 pounds are also available). Nor does a block wall have to look like the rear of a factory; it can be painted or stuccoed white or an attractive pastel color and further graced with plantings such as climbing vines. A solid, blank appearance, moreover, can be avoided by choosing specially sculptured or textured blocks, or open screen or grillwork blocks. The effect of screen blocks can also be obtained with ordinary blocks: simply lay all or some on edge to expose their hollow cores in patterns that will admit light, breeze and view without totally sacrificing privacy.
Building a low-to-medium-height wall of concrete block does not take a high degree of skill, and the techniques are essentially the same if you want to try brick instead. A typical hollow-core block has nominal dimensions of 8 by 8 by 16 inches but is actually enough smaller to allow for a 3 mortar joint between blocks. To complete ends and corners there are also half blocks and corner blocks with one end flat where it will be exposed; for special patterns you can also buy half-height and partition blocks measuring 4 by 8 by 16 inches; for topping finished walls with copings, you can use solid, coreless cap blocks 2 to 4 inches thick.
POURING THE FOUNDATION
Unless you are building a very low wall in a frost-free area in stable soil, you will probably need a foundation at least 6 inches deep and a foot wide, deeper if you have to go below the frost line so the wall won’t heave and crack. If the wall is not an extensive one, you can buy sacks of ready-mix concrete, add water and shovel it into a prepared trench that is reinforced with a lining of steel mesh. If the wall is more than 4 feet high or must hold back a heavy load of earth, it will need steel reinforcing rods ½ inch in diameter embedded every 4 feet in the foundation so they protrude about 2 feet in the air to anchor the concrete blocks. The reinforcing rods tie the wall to the concrete foundation for greater strength. Use a piece of board to smooth off the top of the concrete, keeping it straight with the help of a carpenter’s level, stakes and string.
When the concrete has hardened, generally in a couple of days, lay out a test course of unmortared blocks, allowing 3 gaps for the joints; mark the ends and set the blocks aside. The sturdiest all- round way to lay up block or brick is the conventional running bond, in which the units overlap. You can get an elegant modern look, however, by using a stacked bond, in which all vertical as well as horizontal joints align, though you should imbed strips of galvanized metal hardware cloth or special Z-shaped wire ties in the horizontal joints to increase stability.
Wet down the foundation with a hose and start laying the blocks from the ends inward, using a mortar made of 1 part masonry cement and 3 parts sand with just enough water added to yield a stiff mix that won’t squeeze out of the joints under the weight of the blocks. Check frequently with the carpenter’s level and a string stretched to mark the top of each course, tapping blocks with the handle of the trowel to get them in line. Tool the joints to a concave or V profile when they have hardened slightly, fill any cores containing reinforcing rods with a grout mix of cement and gravel and top off the wall with coping blocks. After the mortar joints have dried for a few days you can paint your wall with either exterior latex or masonry paint. The latter must be scrubbed into the wetted blocks with a wire brush but then becomes very durable; latex is almost as good and a lot easier to apply with a long-napped roller.
Wherever you build a fence or a wall, there are two final details to consider: access and compatible planting. If a garden path leads through a decorative barrier, you can just leave a gap. Such gaps, originally designed to permit the passage of a man but to stop farm animals, were common in rural America of the 19th Century, when they were called stiles or wickets. George Martin, the author of an 1887 book, Fences, Gates and Bridges, included this recommendation: “The opening in these stiles must be sufficient to allow a corpulent person to pass easily, even if a frisky bull is in uncomfortable proximity.” But Martin also noted that calves, sheep, pigs and dogs could work their way through the most ingenious of un-gated stiles. Therefore, stiles sometimes incorporated two short flights of stairs to permit a person easy passage over the top of the fence. It’s not likely that you will be confining a frisky bull in your garden, but if the purpose of your wall is to obscure the view beyond, offset the sections on either side of the opening by about 3 feet and overlap them a foot or two.
GATEWAY TO THE GARDEN
Other kinds of walls and fences require some sort of gate for security or appearance. Any gate, particularly one on an entrance walk, should be a decorative focal point. Like an unclosed opening, it should be at least 3 feet wide and the gate should swing inward from hinges located on the right.
You can build a simple garden gate on a framework of 2-by-4s sheathed with pickets, boards or slats. The gateposts should be sunk 3 feet or more into the ground or anchored to a nearby wall so the gate will swing freely and not sag after repeated use.
For the gardener, one of the special joys of building a fence or wall is the opportunity to train many varieties of climbing plants to grow up, around and over it, casting lovely patterns of light and shadow. Clinging vines such as English ivy, winter creeper and climbing hydrangea , for example, will climb right up a brick or stone wall. Avoid growing vines on a wooden fence, however, since they may encourage algae and keep the wood damp, causing it to rot. It’s also wise to avoid planting vigorous, heavy vines such as climbing roses or bittersweet on a lightweight fence. Unless you are willing to prune them back diligently, the plants will weigh heavily on the structure and may even pull it down.
VINES THAT TWINE OR COIL
The best vines to grow on a painted or stained wooden surface are those that twine as they climb—wisteria , for example—or those such as clematis that coil their tendrils around projections. For any vine, lightweight plastic-coated wire mesh attached to a wall or fence will serve as an inexpensive and virtually invisible trellis.
Fences and walls also make splendid backdrops for all manner of shrubs and flowers planted in front of them. Many tender plants that could not otherwise survive in northerly climates will thrive on the sunny side of a wall, sheltered from the wind. South-facing white walls or fences can bring spring bulbs and flowering shrubs into bloom weeks ahead of time. And for shade-and-moisture plants, from filmy ferns to spectacular tuberous begonias, the north side of a dark wall, under open sky, may be just right.
---
DRY STONE WALLS: STRONG AND STABLE
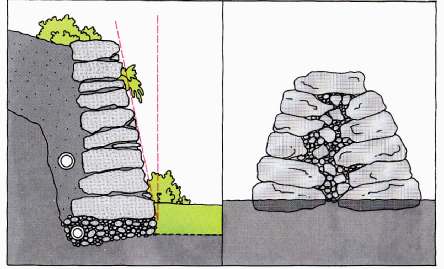
In a typical stone retaining wall built without mortar, the stones tilt upward at the front and the wall leans into the slope to forestall washouts. Additional drainage is provided by coarse gravel under the wall and by two courses of perforated drain tiles.
A sturdy wall of fieldstones can be built in front and back courses that lean inward, with individual stones sloping slightly downward at the center so gravity helps hold the wall erect. Fill the middle space with an interlocking rubble of smaller stones.
---
Articles in this Guide are based on now-classic Time-Life Encyclopedia of Gardening Series from the 1970s ... a timeless series, some titles of which are still available in libraries and bookstores... see our Amazon Store for purchasing options.