Space is always at a premium in the home, so use what you have effectively. Consider both shelf and cabinet space—there are many excellent ready-made units available. Alternatively, with some simple woodworking skills or the use of adaptable support systems, you can construct Attractive units tailor-made to fit your home and your needs.
Visit our online home-organization products shops:
Shelving Brackets
There are many brackets and support systems for shelves; some are screwed in position and some are adjustable. Styles vary, so a system can be found to fit most requirements. To prevent sagging, position brackets every 2 ft (600 mm) along its length. If the shelves are to store heavy items such as books, put the brackets slightly closer together.
Adjustable shelves


Above: (left) Bookcase strips: Strips can be rabbeted
(placed in grooves so they lie flush) into the side panels of a bookcase,
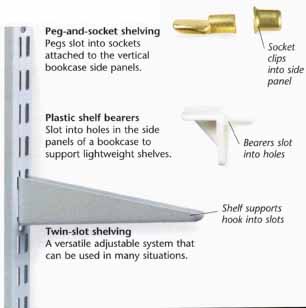
or surface-mounted. Support brackets clip into the strips; (right) Peg-and-socket shelving
Pegs slot into sockets attached to the vertical bookcase side panels. Socket
clips into side panel. Plastic shelf bearers slot into holes in
the side panels of a bookcase to support lightweight shelves. Bearers slot
into holes. Twin-slot shelving: A versatile adjustable system that
can be used in many situations. Shelf supports hook into slots.
Fixed shelves

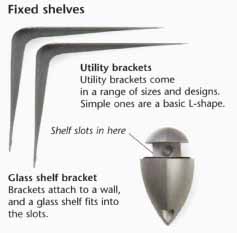
Above: Utility brackets: Utility brackets come in a range of sizes and designs. Simple ones are a basic L-shape. Shelf slots in here. Glass shelf
bracket: Brackets attach to a wall, and a glass shelf fits
into the slots.

Above: Threaded metal rods: These provide invisible support to
a “floating” shelf on a masonry wall. Rod goes into holes in wall and shelf.

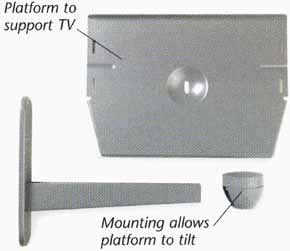
Above: Television bracket: Some manufacturers produce special brackets and shelves suitable for supporting particular items. A common example
is a TV bracket. Platform to support TV. Mounting allows platform to tilt.
Considerations when Planning Shelves
As well as choosing suitable materials, make sure that your shelves are strong enough for whatever is to be stored on them, and that they are level so that nothing rolls off.
Supporting heavy weights
Shelving needs to support its own weight as well as the items you wish to store or display. A few lightweight items will cause little difficulty, but a full shelf of books can be very heavy. Screws must be strong enough to stop shelves from collapsing—to support books, screws should penetrate masonry walls or wood studs by at least 2 in (50 mm), and supports should extend across two-thirds of a shelf’s depth. Screws for floating shelves are not always designed to support heavy loads, although if you can sink metal rods into a solid wall to a depth of two-thirds that of the shelf, you may be able to support greater weights.
Coping with undulating walls
Brackets must be precisely vertical and shelves horizontal. Use a level to assess all shelves’ positions before securing them in place. If the wall surface is not level, pack wooden shims behind shelf supports so that they lie square and support shelves on the level. For the best finish, scribe shelves so that they sit neatly against any undulations in a wall without leaving gaps. This can be difficult in alcoves—in which case consider using a card template.
STOCK PREPARATION
Shelving and storage “stock” systems are often inexpensive, easy to transport, and simple to assemble. Good preparation will prevent problems during or after construction.
- Check the dimensions of the finished item and the space it needs to fit into before buying it. If it's a tight fit—in an alcove, for example—check the width in several places.
- Consider whether the assembled item will be sufficiently sturdy and spacious for its intended purpose.
- The packaging should state if any additional screws and tools are needed for assembly: check it before starting. Make sure all parts are in the box and are undamaged— at the time of purchase, if possible, or soon afterward.
- Lay out the components in the order they fit together and make sure you understand the manufacturer’s instructions.
SHELVING MATERIALS
Ready-cut shelves can be bought in a range of materials, the most common of which are shown below. Check with the supplier that your chosen material is strong enough to provide the support you need—usually, most boards or lumber should be at least 1 in (25 mm) thick. If you want a material with a veneer or laminated edge, plan to use a standard sheet size so that you don't have to cut it, or plan it so that the uncovered cut edge will be hidden.
Softwood: Can be painted or have a natural wood finish applied. Avoid very cheap wood, which may be low- quality and may warp. Hardwood: The appeal of hardwood is in its color and grain, but it's more expensive than softwoods. Medium-density fiberboard (MDF): This versatile material can cater to shape, depth, and size requirements; however, it needs to be finished. Plywood: Very strong, but is usually used for shelves where a wood stain finish is not important. Veneered particle board: Looks like solid hardwood but at a fraction of the price. Use a standard sheet size to retain veneer. Melamine: Strong, laminated with colored, textured, or wood- effect plastic. Use a standard sheet size. Kitchen counter cutoffs: The thickness makes this ideal for floating shelves, because it's easy to drill into the edges. Wire shelving: Typical kitchen, pantry, and storage shelving, also comes in kits. Metal: Pressed metal shelving is a hardwearing option that does not need any kind of finish before use. Glass: Use tempered glass for shelving—its packaging will indicate what it can support. Standard clear glass is not strong enough. |
 |
TOOLS AND MATERIALS NEEDED:
Assembling twin-slot shelving: Level, screws suitable to wall type, wood offcuts, paint, paintbrush, wood finish, decorative molding, panel pins, filler, sandpaper.
Using furring strip or ladder supports in an alcove: Level, screws suitable for wall type, shelf material, paint, paintbrush, wood finish, decorative molding, panel pins, filler, sandpaper.
Invisible attachments on an open masonry wall: Threaded metal rods, thick shelving material, try-square, level, masonry drill and long bit, resin, paint, paintbrush, wood finish, decorative molding, panel pins, filler, sandpapers.
Building a closet: Level, screws suitable for wall/ceiling/floor, wood offcuts, tenon saw.