Flooring Installation: Square-Edge Strip Flooring
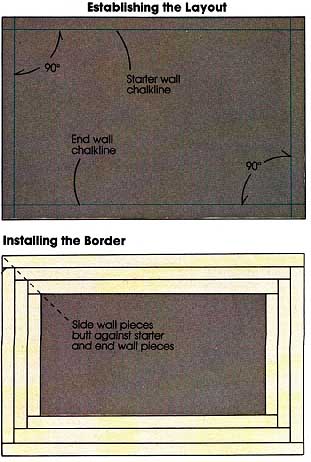
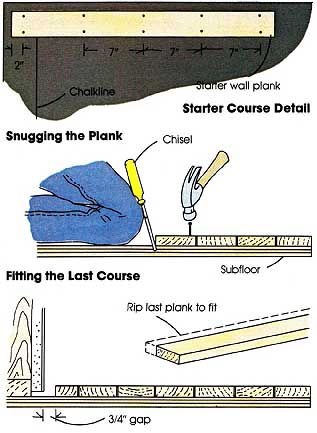
Square-edge flooring is less costly than tongue-and groove because of its reduced thickness (5/16 inch, 3/8 inch and ½ inch) and lesser milling waste. However, it requires face-nailing and nail-holes must be filled Square-edge strip is usually 2 inches wide. Plank is available in various widths, sometimes with beveled edges or V-joints. Stretch stringlines. Stretch the starter stringline. If you want to place a border all around the room (usually five or six boards deep), stretch stringlines along the two side walls and back wall, squaring all of them to the starter line (see the perimeter method of layout.) Install the starter course. Lay a long strip of flooring inside the starter stringline, leaving a 3 gap at the walls. Baseboard and shoe molding will cover this gap. Pre-drill nail holes at the board's ends, to prevent split ting. Keeping the board's edge aligned with the string line, face-nail the board with two 1-inch flooring nails every 7 inches. Finish the starter course. Floor with a border. If you are installing a border, install the end wall course next, and then the side wall courses to butt tightly between the starter and end wall courses See the illustrations below, Install the second course, beginning with the starting wall and left end wall. Use a miter box to cut a square end on the piece that ends each course. Snug each piece firmly against the first course by driving a screwdriver or chisel against its edge, into the subfloor, and use your knee to gain leverage. Use only enough nails to hold the board in place, but always nail in line with the 7-inch nailing pattern. Stagger the joints between boards. As you complete each concentric border, begin the next one at the starter wall, proceed to the end wall, and finish with the side walls. Floor without a border. Working from the starter course, loosely lay out courses of boards so that you can check the appearance of the joint patterns before nailing. When satisfied, snug the first piece against the starter course with the aid of a screwdriver or chisel as de scribed above. Continue nailing boards in place. When you reach the final course you may have to rip or taper the boards to fit. Go back over the floor and finish nailing. A rented pneumatic nailer will speed the process. To keep the nailing lines straight, snap chalklines or hold a long straightedge against the row you are nailing. Set the nail heads, and fill the holes and cracks with wood filler. Sand the floor with coarse- then medium-, and then fine-grit sandpaper. Stain and finish as desired. Reinstall trim. Prev.: Tongue-and-Groove Strip Flooring |
Tuesday, 2022-02-15 22:53

