Flooring Installation: Tongue-and-Groove Strip Flooring
Generally, strip flooring is installed perpendicular to the floor joists. If you’re installing a new wood floor over existing strip flooring, however, it will run perpendicular to the existing flooring’s direction. If the room would look better with the strips running parallel to the joists, the subflooring must be at least 3/4 inch thick and very sound. You can determine the direction and position of the joists by looking at the subfloor’s nailing pattern. Because you will need to know the exact locations of the joists later on, indicate the center of each joist along the walls. Do not mark this on the floor, because it will be covered by building paper. Prepare door openings. To avoid cutting and fitting the flooring material around complicated door trim, saw of the bottoms of all door casings and door stops (but not door jambs). Guide the saw with a scrap piece of flooring so that the saw’s blade cuts the trim exactly high enough for the flooring material to slide under it snugly. Prepare the subfloor, mark and remove doors if necessary, and remove baseboards. Install 15-lb felt building paper. Cover the floor with 15-pound asphalt-saturated felt building paper laid perpendicular to the direction of the new flooring. Overlap all edges 4 inches, and neatly trim the wall ends of the paper so the paper lies flat. Staple or tack it in place. Snap chalklines. Referring to the joist position marks on the wall, snap a chalkline onto the building paper, over the center of each joist, to guide nailing. Next, select the wall you will use as your starting point. To make sure the first course of flooring (row of boards) is properly aligned, you need a perfectly straight line as a guide. To make this line, measure out 3/4 inch at each end of the starting wall, and mark those positions on the floor. Fasten a nail at each mark, and stretch a string line between them. (The ¾-inch space, which allows expansion of the flooring, will later be covered by baseboard or shoe molding.) Note: If the starting wall is not square with the rest of the room (check by measuring the room’s diagonals) find the midpoints of the two adjacent walls. Then make sure the starting wall stringline is the same distance from both midpoints. If it isn’t, reposition the nails to hold the stringline so that it is. This technique will assure that the room looks in square, because the flooring will register to the centerline of the room.
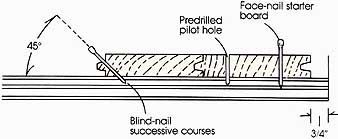
Install the starter course . For the first row of boards (the starter course), select a long straight flooring board and lay it against the starter line at the left side of the room so that the board's end is 1/2 inch from the adjacent side wall. (The left side is the side to your left when you are standing with your back to the starting wall.) Lay the board so that the tongue edge faces into the room, and the back edge is 3/4 inch from the starting wall. Carefully align the groove edge along the starter line and then, beginning from the left, face-nail the board with 8 penny finish nails into the joists and every 8 to 12 inches between them. Since face-nailing can split the board quite easily, it is best to pre-drill for each nail. Next, blind-nail the tongue edge by hand. Drive nails at a 45-degree angle at every joist and at the mid points between them. Set their heads below the surface with a nailset, being careful not to mar the face or tongue of the board. Complete the starter course with additional boards. Cut the last board 1/2 inch short of the side wall, and use the cutoff piece to start the next course.
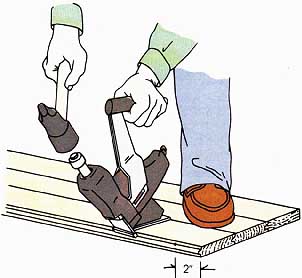
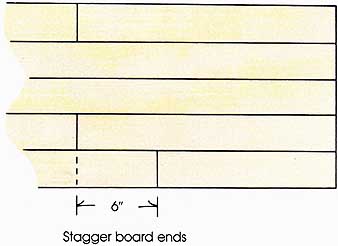
Hand-nail the next two courses . To ensure a random joint pattern in the finished floor, loosely arrange the next seven or eight courses of boards, mixing long and short lengths. (This process is called racking the floor.) Be sure all joints stagger at least 6 inches. Begin each course with the cutoff piece from the end of the previous course. Then nail the second and third courses from left to right. Blind-nail through the tongue at each joist, at the midpoints between joists, and 2 inches from each board end. Be sure every board has at least two nails in it, no matter how short it is. Machine-nail the field courses . The rest of the flooring, except for the last three courses, can be installed with a nailing machine. Start nailing each board 2 inches from its left end. Stand on the previously nailed courses so that your toes can hold down the board being nailed. Place the shoe flange of the nailing machine on the board’s edge and hit the plunger with the rubber mallet, using a firm but easy swing of the mallet. Continue nailing in the same pattern used for the first three courses, always moving from left to right along each course. If the flooring gets out of square for several courses, nail tighter on one end of the course, and looser on the other, until the problem is corrected. Make the adjustment over enough courses so you don’t end up with gaps. Special situations . If there is a hallway or closet along the starting wall, you’ll need to reverse the direction of the tongue edge. To do this, glue a slip-tongue or spline into the groove of the starter strip and proceed to install the reversed flooring courses. If the floor has register holes, posts, or other obstructions, cut and fit the flooring around them as you come to each one. In some cases you may want to frame a decorative border around the obstruction, Use a miter box to cut 45-degree angles on the board ends, and remove the exposed tongue by ripping the board on a table saw.
Install the last three courses. As you approach the opposite wall, there will not be enough room to use the nailing machine. Blind-nail the third course from the last by hand; the last two courses must be face-nailed. As you face-nail these courses, snug each board into position with a prybar. Install the last course leaving a ¾- inch gap along the wall. You may have to ripcut boards or cut off their tongues to fill the remaining space. Install a threshold. Where the strip flooring meets other flooring materials, usually in door openings, you need to provide a smooth and sate transition, Use a tapered threshold, stained and finished to match the strip flooring, or where surface heights are the same, cover the joint with a flat metal bar. Fill cracks and nail holes in all face-nailed boards. Use a floor filler for unfinished floors or a color matc putty stick for prefinished floors. Next, sand, stain, and finish unfinished floors as desired (see below for finishing techniques). Prefinished floors will probably need a light cleaning and buffing to remove dirt and scuffs caused by the installation process. Finish the floor and replace the base molding. Nail the baseboard back into the wall studs. If there is a shoe molding as well, nail it to the baseboard and not to the strip flooring, so that the flooring can expand and con tract freely underneath it.
Prev.: Intro and Basic Layout Techniques |


Sunday, 2011-04-10 19:46