SLEEVES
Raglan sleeves and sleeves cut in one with the yoke of a dress or blouse are stitched in place using the various dressmaking techniques so far described. Raglan sleeves frequently have darts on the shoulder line. These are usually curved darts, and should be stitched and pressed open, following directions for curved darts. Sleeves cut in one with a garment yoke or with the front panel of a jacket or bodice should be reinforced at the inner corner of the underarm where sleeve and yoke meet with a 2-in, bias square of fabric (see directions for strengthening inner corners on).
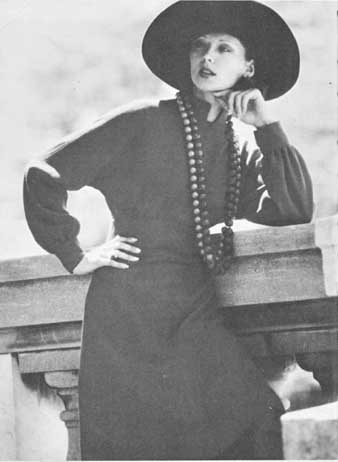
Set-in sleeves demand a different set of sewing techniques altogether. This type of sleeve can vary from the full puffed sleeve often featured on a little girl’s party dress to a full-length fitted sleeve for a winter dress or suit, to a short sleeve on a man’s sports shirt. The principle however of stitching and setting the sleeve into the armhole of the garment is the same in every case.
A set-in sleeve should be free from puckers, should curve smoothly over the shoulder and hang straight.
Always take especial care to cut your pattern accurately— well-curved armhole edges will make sewing easier.
With nearly all sleeve types the sleeve invariably has more fabric round its top shoulder section, or ‘head’ as it’s called, than the armhole of the garment. In order to fit the sleeve neatly into the armhole it’s necessary to ease-stitch the top section of the sleeve before stitching it into the armhole.
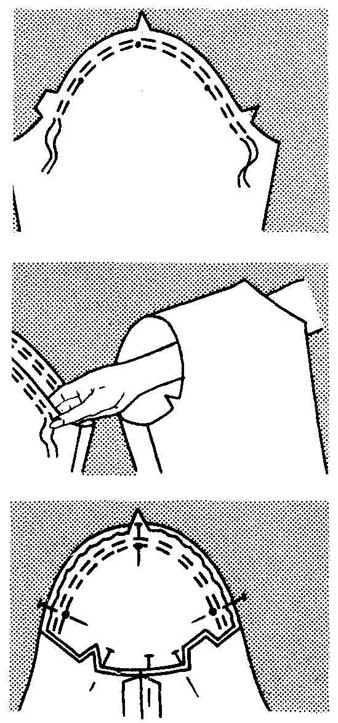
Usually a pattern will have notch markings to show where the ease-stitching should be worked. Using a long machine stitch, make two rows of stitching between the notches on the sleeve, working first row exactly on the seamline, the second row 0.25 in. from the first row within the seam allowance. Leave about 3 or 4in. of thread loose at each end of both rows of stitching so the ‘ease’ can be pulled up to fit into armhole.
Stitch underarm seam in sleeve and finish lower (cuff) edge. Now the sleeve is ready to be stitched into the armhole of garment. First, have sleeve and garment with right sides out. Then, reach through the armhole of the garment from inside and bring sleeve to garment with right sides together. Match and pin seams at underarm. Turn garment over sleeve with wrong side towards you. Continue pinning armhole edges together matching all notches and marks, and placing the, mark at the head of the sleeve to the shoulder seam of the bodice.
Ease in the fullness between notches on the sleeve by drawing up the loose threads on both rows of stitching until the edge of the sleeve matches the edge of the garment armhole.
Distribute ease evenly each side of shoulder seam, but leave about 1 in. at the top without ease.

Left; three piece holiday outfit dress, sun top and shorts, all from same pattern. Right; pretty for a tall girl—dress has a gathered skirt, sq neckline and short puff sleeves; apron is trimmed with embroidery eyelet edging.
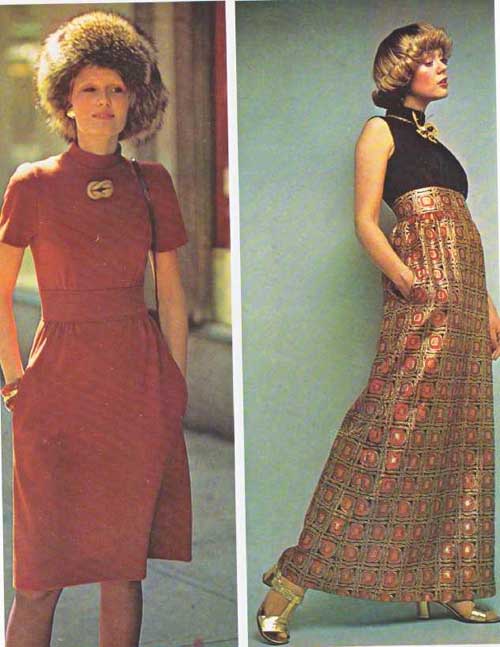
Day and evening versions of the same pattern. Left: daytime version,
with short sleeves, is made up in a soft wool. Right: long and sleeveless for
evening, in a glitter party fabric.
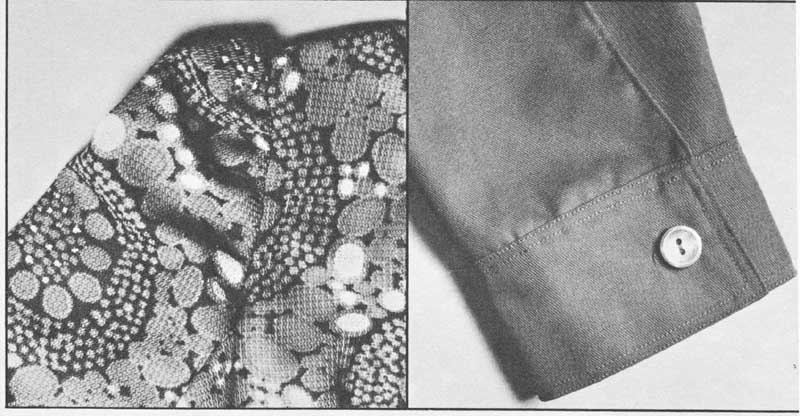
--- (b/w photo) Left: head of a gathered sleeve so smoothly into the armhole.
Right: example of a sleeve closing with cut where an opening is simply left
in the underarm seam.
Now roll top of sleeve outward, shaping eased sleeve to armhole. Continue pinning each side of shoulders towards underarm and setting pins at about 0.25-in. intervals. Make sure that raw edges are even. Ease lower part of sleeve (below ease-stitched top section) to fit into the armhole.
Baste, and remove pins.
Stitch along seamline with the sleeve side up, and starting at the underarm. In this way you can make sure that no puckers are caught in the stitching. When you have completed one row of stitching, work another row about 1/8 in. from the first row within the seam allowance.
Trim seam close to second row of stitching round lower part of armhole. Leave upper (ease-stitched) part untrimmed.
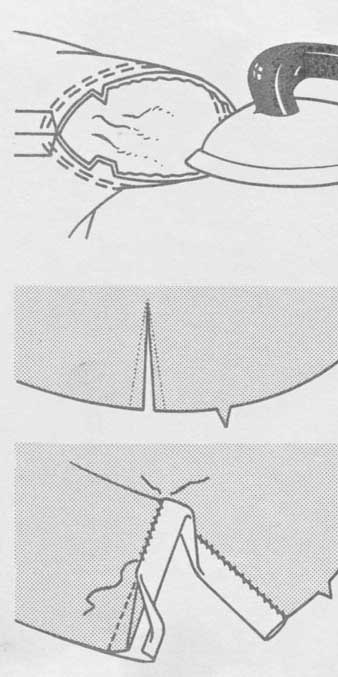
Working from the inside, lightly and gently steam press the seam round upper part of sleeve, to shrink out the ease. Then turn seam towards sleeve.
Sleeve closings:
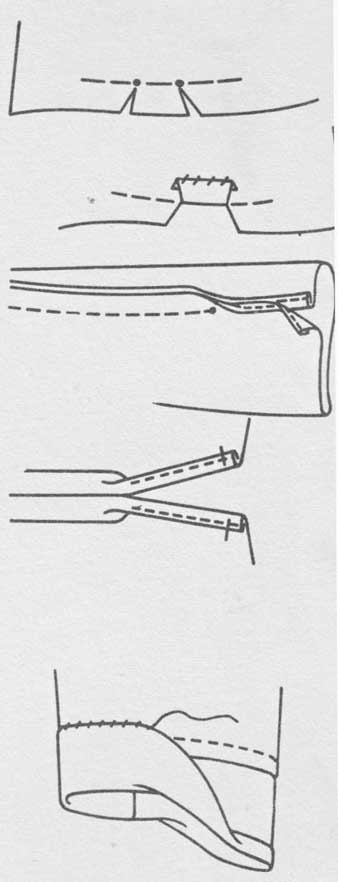
There are three basic types of sleeve openings when cuffs are used.
---
(figs)
1. Continuous lap. Stitch along marked stitching line at lower edge of sleeve, then carefully slash between the stitching. Slash right to the point but be careful not to clip the actual stitching. Open out and measure the length of the slashed edges. Cut a piece of garment fabric this measurement and 2in. wide. Press under *in. on one long edge.
With right sides together, pin strip to slashed edges of sleeve. Have bottom edges even, but pin the point of opening *in. from the raw edge of the piece. Place on machine, sleeve side up. Fold extra sleeve fabric out of the way and stitch *in. from edge of strip. Stitch again over first stitching to reinforce.
Press strip out away from stitching. On wrong side, pin pressed edge over seam and slip-stitch invisibly. Turn front lap to wrong side and baste to lower edge
---
2. Pleat construction. Reinforce the lower edge of sleeve by machine stitching along seamline, starting and ending stitching about 1 in. each side of dot markings on the pattern. Clip seam allowance to the stitching at the dot markings but don’t clip the stitching. Turn the seam allowance to the wrong side between clips. Turn under raw edge and make a narrow hem. After cuff is attached and fastened a small pleat will be formed at this point.
3. Opening in underarm seam. Stitch underarm seam of sleeve, leaving an opening at lower end of seam where indicated on the pattern. Turn 0.25 in. to the wrong side on seam allowance below the seam and stitch. Then press both edges to wrong side along seamline, and baste to lower edge. These edges will just meet after the cuff is attached and fastened.
Alternatively, press one edge to the wrong side along seam- line; baste to lower edge. The front edge remains as it is, forming an extension. When the cuff is attached and fastened, the back laps over the front edge.
CUFFS
To make a simple, turn-back cuff, seam the ends of the cuff section together first, and press seam open. Press under seam allowance on one edge of cuff to the wrong side, and trim to 0.25 in. With the raw edges even, stitch the right side of cuff to the wrong side of the sleeve, matching the seams. Fold the pressed edge to the right side, and hem by hand along the seamline; press well. Fold the cuff to the right side of sleeve, catch to the underarm seam of sleeve with a few stitches.
To make a cuff with its own facing to attach to the lower edges of a gathered sleeve with opening, first cut interfacing section, if used. On the two outside corners of the interfacing trim diagonally *in. inside the point where the seamlines will meet. This eliminates bulk and makes it easier to turn the cuff to a sharp point. Pin interfacing to wrong side of cuff and machine baste 0.5 in. from cut edges. Trim interfacing close to stitching. Baste-mark buttonhole markings, if these are required. If you are making bound buttonholes, make them now.
Take cuff facing section. One long edge will most probably have notch markings in it. Press this edge to wrong side along seamline, and trim seam allowance to 0.25 in. With right sides together, stitch facing to cuff round other three edges. Reinforce the corners, as described earlier. Layer the seams, trimming diagonally across the corners. Turn cuffs right side out, working out corners carefully to give a good point.
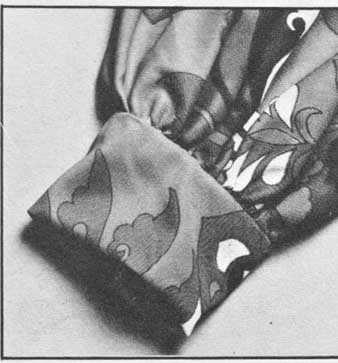
With right sides together, pin the sleeve to the cuff matching any notches and underarm seam to markings on cuff, and placing sleeve opening edges at ends of cuff. Carefully adjust gathers in the sleeve so that the edge fits the cuff exactly. Tie ends of gathered threads and baste seam. With sleeve on top, stitch in place. Trim seam allowance to 0.25 in. and press towards the cuff. Pin the turned-under edge of cuff facing over the seam and slip-stitch neatly in place.
Turn sleeve right side out, then lap the front end of cuff over the back end. Pin carefully, making sure edges are straight. Sew button in place to correspond with buttonhole.
COLLARS
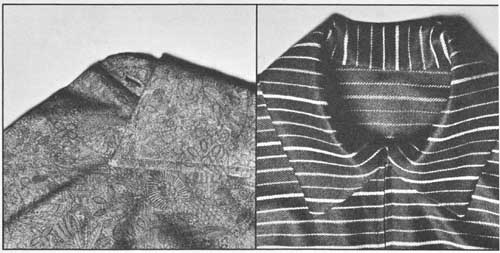 Above: two examples of the shape collar which lies flat.
Although collars vary considerably in shape and size, they do in fact fall into three basic types: the shaped collar which lies flat; the straight collar which rolls; the straight collar which stands up. The basic construction details are the same for each type. Interfacing is used with most collars because the crispness and body which it adds improves the appearance of the finished collar.
Generally a collar consists of two sections: one will appear on top on the right side of the finished garment, and is known as the ‘collar’ (or ‘top collar’); the other which will go underneath is the ‘facing’ (or ‘under collar’). The interfacing is sandwiched between these two sections. First pin interfacing to wrong side of collar and machine baste i-in. from the cut edges. Trim interfacing close to stitching. If you are making a collar with points, then before stitching interfacing to collar, trim the two outside corners of the interfacing diagonally 0.25 in. inside the point where the seamlines will meet.
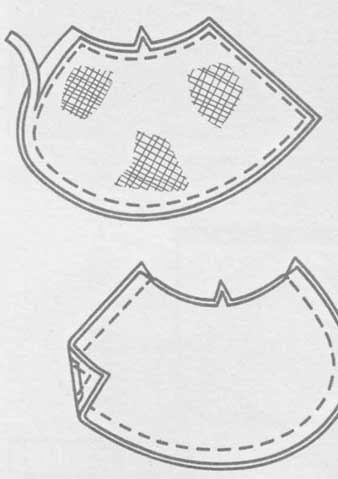
Now pin the right sides of the facing section and the interfaced collar section together, matching any markings and notches. Usually one edge of a collar and its facing only has notches in it: this will be the edge which will be stitched to the garment neckline edge. Stitch collar and facing sections together along long edge opposite to this notched edge. Layer seam, and clip into seam allowance on curved edges. On inside, press seam towards collar facing. Then on the right side under-stitch close to seamline through the facing and the seam. With right sides together, pin and stitch ends of collar and facing together. Layer and clip seams, and trim corners diagonally. Turn the collar right side out, and gently push out corners with the point of closed scissors. A pin is also helpful in pulling out the point sharply.
Pin remaining open edge of collar and facing together, then baste. Your collar is now ready to be stitched into the neckline edge of your garment.
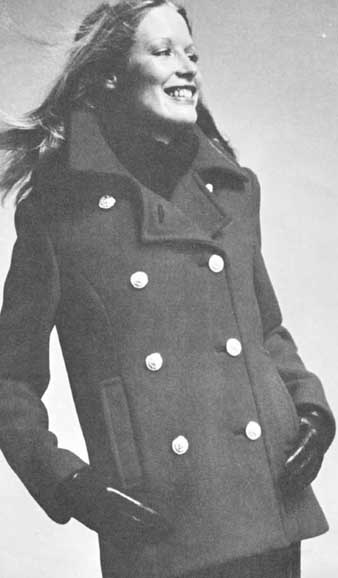
Double-breasted jacket, with shaped collar. Has princess seaming, welt pockets and top-stitching detail.
To make a successful round or curved collar which always lies flat, the secret is to roll and mould the collar into the shape it will be when worn before attaching the collar to the neck edge of the garment. After interfacing has been stitched to collar section, and interfacing has been trimmed, as for previous method, with right sides together stitch collar facing to the collar right round seamline on all edges except the neck edge. Using a tailor’s ham or sleeve board, press collar seam open. Trim seam, clip curves and turn collar right side out.
Now on facing side of collar steam press, rolling the collar seam to the facing side. When rolling the seam to the facing side, taper from seamline at ends of collar. Seam should not roll to underside more than bin. With right side up, roll the collar over your hand molding it into the shape it should be when it’s worn. The notched (neck) edges will now no longer be even, as the collar facing extends beyond the raw edge of collar.
Place the collar on a table. The collar will most probably have a slight ‘bubble’ in it—this allows your collar to roll and shape properly. Trim away excess fabric from your collar facing on the neck edge. The collar is now ready to be attached to the neckline of your garment.
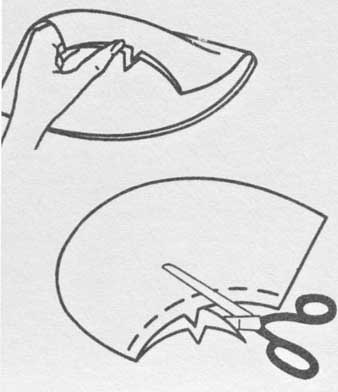
A few hints to help when fitting collars into necklines...
Always stay-stitch the neckline of the garment on the seamline. Clip the garment neckline before attaching a collar so collar seamline can be matched to neckline seamline.
Remember if you have altered the garment neckline to make it larger or smaller, you must also alter the collar.
After stitching and turning a shaped collar, fold it in half and check to make sure both ends are exactly the same length and shape.
POCKETS
There are three distinct categories of pockets: the applied or patch pocket which is stitched to the right side of garment in its appropriate position; the insert pocket which is placed in a seam of the garment; and the set-in pocket for which a slash or special opening is made in a section of the garment.
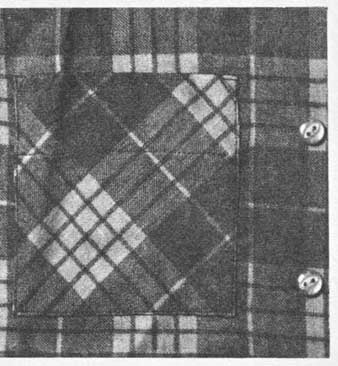
(simple, square patch pocket)
Of all these types, the patch pocket is by far the easiest to make and to position on your garment. Often a patch pocket can be added to a garment even though the pattern does not call for one.
The patch pocket:
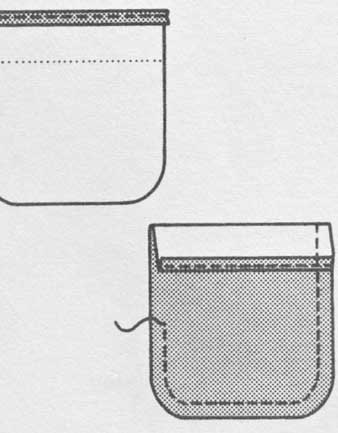
A patch pocket may be almost any size or shape—square, rectangular, curved at the lower corners, pointed at the centre of the lower edge, quite small for a child’s garment, or enormous and capacious for a winter coat. Some are lined; some are finished with flaps. But whatever kind of patch pocket is involved, the general method of making and attaching to the garment is the same.
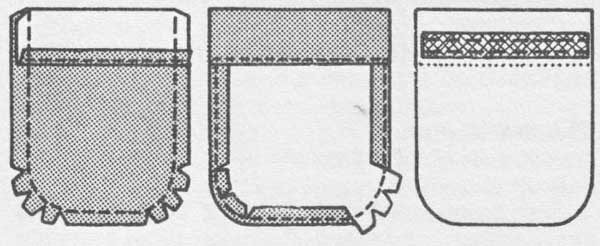
First prepare the pocket section by pressing 0.25 in. on upper edge to wrong side. Machine stitch close to edge. To form hem facing, turn upper edge to right side of pocket along fold line (do not press). Starting at top of hem facing, stitch around pocket on seamline. Trim upper corners of hem facing diagonally.
On a square pocket, fold the lower corners diagonally, exactly at the stitching and press. Turn hem facing to wrong side. Turn side and lower edges to wrong side along stitching.
Press.
On a curved pocket, clip seam allowance to the stitching, or cut out tiny ‘V’ shapes. Turn hem facing and side edges to wrong side and press.
On a bias pocket (usually without a flap) to prevent stretching stitch both edges of a piece of straight seam binding to wrong side of pocket, just above the fold line.
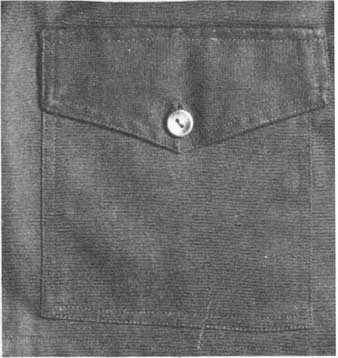
(A patch pocket with buttoned-f/a trim, stitched to garment just above
the pocket.)
If you want to line you pocket—and this does give an extra professional finish to the pocket—fold the upper edge of your pocket pattern piece along fold line; pin. Use this as a pattern for cutting lining section.
Press 0.25 in. on upper edge of lining to wrong side. Pin lining to lower part of pocket with right sides together and raw edges even. Turn upper edge of pocket down over lining along fold line, forming hem facing; pin. Stitch side and lower edges along seamline. Trim seam and corners. For curved pocket, clip curves.
Turn pocket right side out. Lap lining over facing and slip-stitch neatly.
Mark pocket line to right side of garment with hand-basting. Pin pocket• along basting. Pocket can now be stitched to garment round side and lower edges. Work machine stitching close to pocket edge. If an ‘invisible’ finish is preferred, then slip-stitch pocket to garment working on right side of garment, picking up just a few threads of fabric on underneath of pocket with each stitch.
The insert pocket:
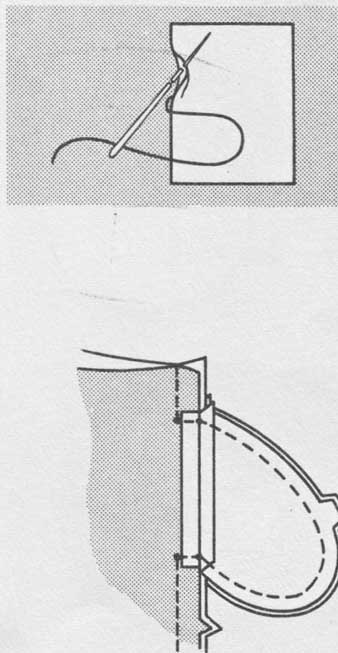
This type of pocket is slightly more difficult to construct than a patch pocket but once you have mastered the technique, you will find it a useful method, often preferable to a patch pocket for elegant suits and dresses.
There are two basic methods of making an insert pocket:
Method 1: with extensions. With this method, extensions are added to that part of the garment to which the pocket pieces are to be stitched. The extension thus acts as a facing so the pocket itself won’t be visible from the outside. It’s therefore preferable to have the pocket sections of lightweight lining fabric as this will create less bulk than if the pocket were made from the garment fabric.
With right sides together, each pocket section is stitched to each extension, and the seams are pressed open. Then the two garment pieces and pocket pieces are placed together, right sides facing, and the garment seam and pocket seam all stitched in one continuous line. Reinforce stitching at pocket corners. If garment seam is to be pressed open, clip seam above and below pocket. Press seam open, and press pocket upwards front of garment.
Method 2: without extensions. If you are setting a pocket directly into a seam allowance without extensions, then it’s best to have one lining section of the garment fabric, the other of lining fabric. Or if it’s wished to have both sections of lining fabric, then sew a straight facing piece of garment fabric to side edge of pocket. Turn under 0.25 in. on inner edge of facing. Trim outer edges even with pocket—the facings are on the inside of pocket when finished. After seam in garment has been stitched, leaving opening for the pocket, stitch pocket pieces to each seam allowance, taking 3/8 in. seam. Press seams towards garment. Sew curved edges of pocket pieces together, matching any markings.
Press garment seam open tapering seam allowance above and below pocket. Press pocket towards front.
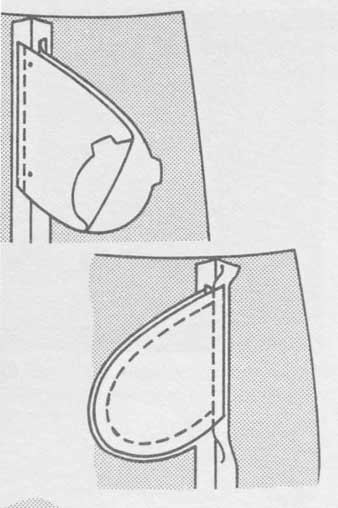
The set-in pocket:
A welt pocket is a good example of a set-in pocket, and not difficult to construct.
First baste-mark the length of the pocket opening in the desired position on right side of the garment. Next cut a straight strip of lightweight interfacing 2in. wide and 2in. longer than the opening. Baste to the wrong side of the garment under the marked slash position.
Right sides facing, stitch welt facing to welt leaving one long side open. Trim and clip seams, turn right side out and press well. Baste welt to right side of garment, with raw edges of welt just below the marked opening.
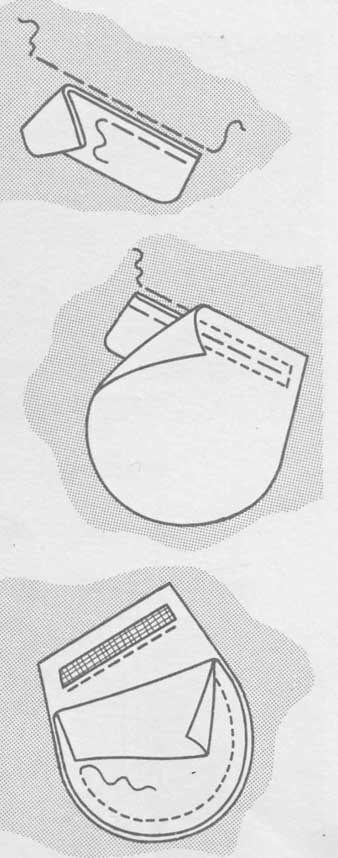
With right sides together, place one pocket section over the welt, having the top edge 7/8-in. above the mark for the opening. Baste, having the basting stitches directly over the baste-marked line for the opening.
Stitch 0.25 in. each side of this basting line, making the upper stitching line *in. shorter than the lower line at the ends. Be careful not to catch in the welt at the ends.
On the basting line, slash through the pocket piece only to within 0.5 in. of the ends, and from there clip diagonally into the corners. Then, keeping the seam allowance of the welt out of the way, make a similar slash along the marked line of opening on the garment through piece sewn under slash. Turn welt up and press. Turn the pocket piece to the inside through the opening. Turn welt up and press. On inside pin and stitch second pocket piece to the first one. On outside, stitch upper edge and ends of opening through garment and pocket. Slip stitch ends of welt in place.
