Fitting is one of the most important keys to success in dress making. It can make or mar a complete outfit. This is why it’s worth taking time and trouble first of all to check your measurements honestly and accurately, and then to make any necessary alterations to your paper patterns.
Commercially produced paper patterns—just like ready-made clothes—have to be made to fit a standard, average-sized figure. But very few of us are exactly stock size in every respect! Once you begin to analyze your figure problems, you may well discover certain facts about your shape you may not even have been aware of before. For instance, you may realize why there are certain dresses or suits in your wardrobe—bought or home made—which have never felt really comfortable. The reason probably is that they don’t fit your particular shape accurately enough.
Fitting is not an easy or quick operation. It takes time and patience for only one adjustment can be made at a time. It’s very much a trial and error affair, and each adjustment may have to be made a dozen times before you get it exactly right.
THE TOILE METHOD
By far the most successful method of fitting is to make up your own personal toile, adjusted exactly to your shape and size. A toile, in case you have never met the term before, is a French word used by professional dressmakers to describe a calico shape. This shape is cut out, made up and fitted to show the exact lines of a finished dress or suit design, before the garment itself is cut out from expensive material. It’s like a sort of master pattern which can be adjusted down to the smallest detail, until you are certain you have a perfect fit for your figure. Thereafter every paper pattern you buy is adjusted to the fitting of your toile, and no more time is wasted in fitting the actual garment. All the donkey work has been done on the calico shape.
Most paper pattern companies sell basic fitting patterns which can be used to make up your toile, but in fact any pattern for a simple classic dress would do. An A-line style of dress, with long sleeves and high round neck is best. Ideally you should make up separate toiles for a dress, a skirt, a blouse and trousers, to give a comprehensive coverage to all your fitting problems, but for a start a dress is quite sufficient.
Select the pattern size which is nearest to yours (see details for taking your own measurements.). If you are exactly halfway between two sizes, then select the larger size as it’s nearly always easier to take in rather than let out a pattern. Suitable materials for making up your toile are calico, crisp cotton or muslin.
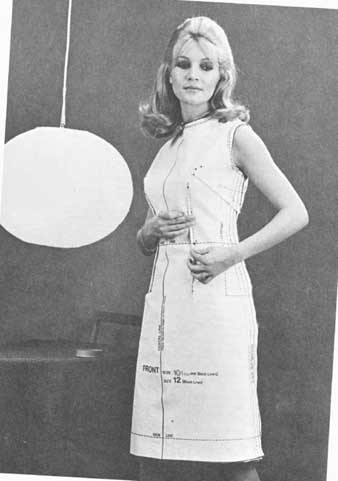
Alter the paper pattern for your toile first, then make up toile, making final adjustments on it. Your toile should then be unpicked and the various pieces used as a master pattern for future dresses.
Never attempt to fit your toile, or any other garment for that matter, skin-tight. Once you think you have achieved a perfect fit, walk about and sit down in the toile to make absolutely sure it will be comfortable to wear. When fitting one side of the toile, keep an eye on the centre front and centre back lines and be careful not to pull them out of position. Do remember too that even once you have achieved a perfectly fitting toile or master pattern, your figure without doubt is changing all the time, and you must periodically check the fitting of your master pattern to make sure it’s accurate. Only the most minor adjustment may be necessary, but this could make all the difference between a perfectly fitting finished garment and one which somehow just is not quite right, and does not justify the time and effort you have expended on making it.
ORDER OF FITTING
As with anything else, if you work to an orderly system, the whole job of fitting becomes easier. This applies whether you intend merely to alter an individual paper pattern or to make up a full-scale toile. The order of fitting in which you should work is as follows:
1. Shoulder darts and ‘hang’ of the back.
2. Shoulder seams.
3. Neckline.
4. Bust darts and ‘hang’ of the front.
5. Waistline.
6. Side seams.
7. Armholes and sleeves.
8. Hemline.
SHOULDER FITTING
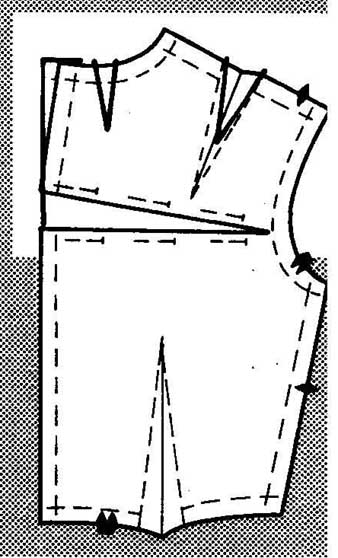
A dress—or your toile, if you are making one—should hang in a straight line from your shoulder blades without any drag lines. The shoulder seams should run along the top of your shoulders, from your neck to the bone at the top of your arm. If this is not so, then identify your figure fault from the descriptions which follow, and make the necessary adjustments.
If you are round-shouldered …your garment will pull up in the centre, and probably gape round the armholes. The shoulder seams will tend to fall to the back of your shoulder, instead of exactly along the top.
What to do: draw a straight line across pattern below the shoulder dart from the centre back to the armhole seamline. Cut pattern on this line; place tissue paper under cut edges. Separate edges the amount needed. Pin or tape to paper. Draw new cutting line from lower cut edge to the neckline. Straighten neckline curve. Make a neckline dart to take up the amount added to the outside edge, and make the shoulder dart slightly shorter.
If the pattern has a neckline dart (instead of a shoulder dart) then make neckline dart a little shorter, and add a shoulder dart to take up the amount added to shoulder seam.
If fitting adjustments can be made on a basic master pattern such as this, then you should have no trouble fitting your garments.
If you have sloping shoulders...
Your garment will drag from the neck point to the underarm on both front and back.
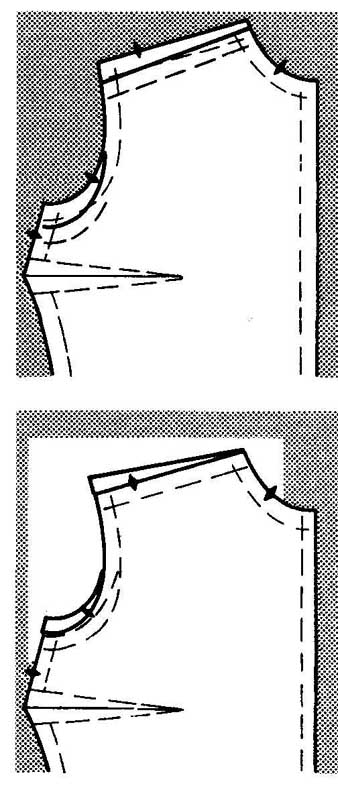
What to do: measure the excess amount down from the shoulder line at the armhole. Measure down the same amount at the lower end of the armhole, and draw a new armhole curve to link these points. Draw a new shoulder line, tapering from the neckline to the armhole edge. Treat back and front of pattern in a similar way.
If you have square shoulders...your garment will drag from the shoulder across the neck.
What to do: place tissue paper under shoulder and armhole of bodice front. Pin pattern to the tissue paper, or stick with strips of self-adhesive transparent tape. Mark the amount needed above the shoulder line at armhole end. Mark the same amount above the bottom of armhole. Draw a new shoulder line, tapering from neckline to armhole edge, and draw a new armhole curve. Treat the back in a similar manner.
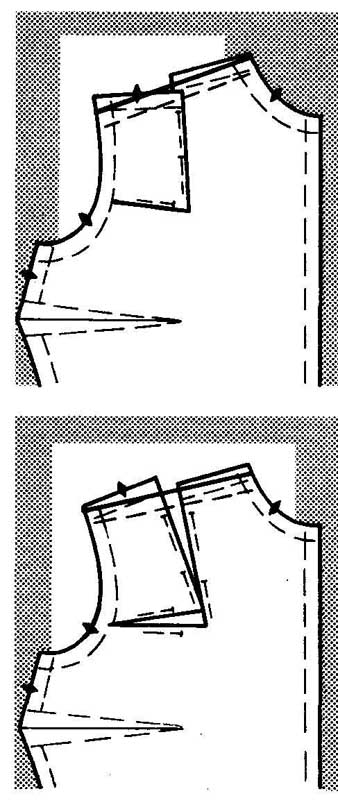
If you have lopsided shoulders...and this is a fairly common figure fault, for few figures are exactly symmetrical— you will see a drag line towards the higher shoulder and the chest line will also be tilted up. Pull this shoulder down, or lift the other one up, then the drag line should vanish and the chest line level up.
What to do: adjust one side of your pattern only, following the appropriate instructions as given for previous figure faults. For instance, if you are adjusting the higher shoulder, then this will mean sloping the shoulder seam upwards from neck into seam allowance at armhole edge: if you adjust the lower shoulder, slope seam down towards armhole edge. A word of warning about lopsided figures in general: you will probably find other occasions when one side of your figure does not exactly match the other. Try, however, to keep lopsided corrections to a minimum as these could over-emphasize the lopsidedness rather than disguise it.
If you have narrow shoulders...the seamline of the armhole will fall off at the shoulder.
What to do: on both front and back patterns, draw a line about 5in. long, starting at the centre of the shoulder line. Continue the line horizontally to the armhole seamline above. Cut the pattern on this line. Lap the cut edges the required amount at shoulder. Pin or tape to tissue paper. Draw a new shoulder line, and a new cutting line. Treat back and front in a similar manner.
If you have broad shoulders...there will be strain across the shoulders.
What to do: on both front and back pattern pieces, draw a line about 5in. long starting at the shoulder line. Continue the line horizontally to the armhole seamline. Cut the pattern on this line. Place tissue paper under the cut edges. Separate edges at shoulder line the required amount: pin or tape to the paper. Draw a new cutting line between neckline and armhole. Treat back and front in a similar manner.
NECKLINE FITTING
A neckline fits correctly when it lies at the base of the neck with no pull or wrinkles in the bodice. Very often the fault is merely in insufficient clipping of the curved neckline seam—be sure to clip the neckline seam to the stay-stitching at frequent intervals right round the seam. Wrinkles will often disappear when the neckline is properly clipped. A neckline will also fit better if the shoulder seam is stitched only to within 0.25 in. of the neckline, to the point where the neckline seam crosses the shoulder seam.
If the neckline wrinkles or strains at the front and back.
What to do: most probably the neckline needs to be lowered at front and back. Adjust by the appropriate amount, and if necessary adjust shoulder seams too—really this alteration can only be made on a toile or trial garment. Open the shoulder seams from the neckline almost to the armhole edge, and clip into and beyond the seam allowance round neckline curves. Adjust until neckline lies comfortably and flat. Draw in new neckline on front and back pieces, and starting at neckline pin shoulder seam together.
If the neckline is too loose... it probably needs raising.
What to do: chalk in a new neckline above stitching line in the seam allowance.
If the front neckline stands out...but the back lies flat, then front needs adjusting at shoulder seams.
What to do: reposition front shoulder edges so they fraction ally overlap back shoulder seam at armhole edges. Re-pin shoulder seams in new position.
If the back neckline stands out...but the front lies flat, then back needs adjusting at shoulder seams.
What to do: reposition back shoulder edges so they fraction ally overlap front shoulder seam at armhole edges. Re-pin shoulder seams in new position.
BUST FITTING
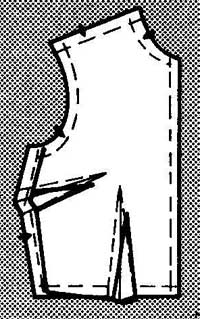
The purpose of bust darts is to take in exactly the right amount of fabric at the side seams for your size bust, and the dart should taper away to nothing to finish about 1 in. from the point of your bust. If your patterns are correctly fitted, your garments will hang smoothly down from your bust without drag lines or any surplus folds.
If you have a small bust….there will be extra fullness at the bustline because the darts are too deep and the waistline too long.
What to do: decrease the width of the underarm and waistline darts the necessary amount to fit properly. Mark a new waistline seam from the waistline dart out to the underarm seam. Draw a new underarm cutting line.
If you have a full bust …tightness will occur across the bust and at the back of the bodice. The waistline may rise at the sides.
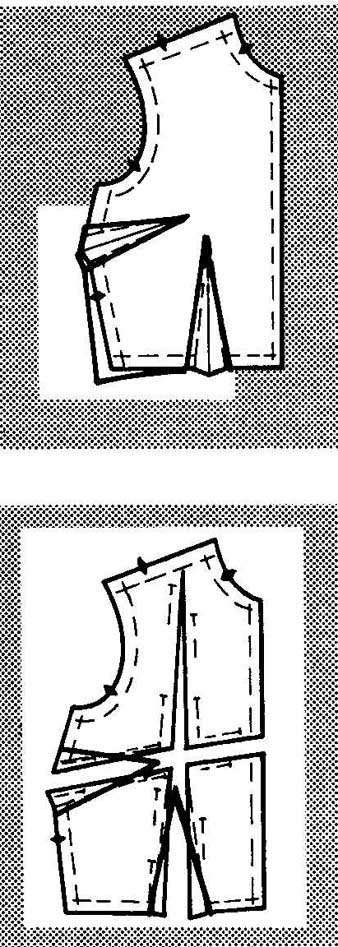
What to do: make the underarm and waistline darts deeper. Move the underarm seamline out slightly from bottom of dart to waistline. Slant the waistline seam downward from the dart to the edge of the pattern.
If you have a very full bust...the waistline of the bodice is drawn up out of line across the front. Movement is restricted across the bust and back.
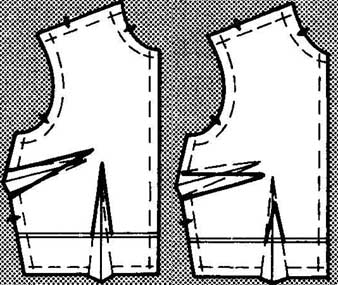
What to do: draw a vertical line through centre of waistline dart up to the shoulder line. Draw a horizontal line through centre of underarm dart straight across to the centre front. Cut on the horizontal line from centre front to the underarm seam. Place tissue paper under pattern. Separate pattern at centre front by half the total amount required to enlarge. Pin along the centre front edge. keeping the edges in a straight line. Cut on the vertical line from waistline to shoulder seam.
At bottom edge of upper side section, separate the pattern edges by half the amount needed to enlarge. Pin or tape these edges to paper. Where the vertical and horizontal slashes meet, separate the lower side from the upper section the same amount as at centre front. The vertical slash will taper. Re-draw dart lines. If amount added is great, make two darts instead of one at waistline.
If the bust dart does not point to the fullest part of bust...the dart must either be raised or lowered.
What to do: to raise the dart, on the pattern front measure up from the dart point the amount needed to be raised and mark it. Draw new dart lines from the underarm seam to the new point on the top and bottom. Extend the point of the waistline dart the same amount that the underarm dart was raised.
To lower the dart, on the pattern front measure down from the dart point the amount it should be lowered, and mark it. Draw the new dart lines on the top and bottom from the underarm seam to the new point. Lower the point of the waistline dart by the same amount that the underarm dart was lowered.
WAISTLINE FITTING
If you are long-waisted…the waistline of the garment will fall above the natural waistline. Make adjustments on the front and back pattern pieces—most commercial paper patterns have a lengthening or shortening line printed on them to make waist adjustments easier.
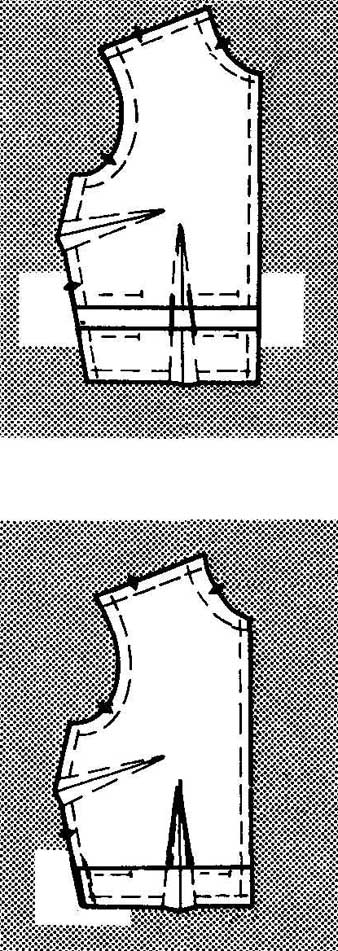
What to do: if there is no line on your pattern, draw in a line about ‘1 in. above the indicated waistline. Cut the pattern apart on the line. Place tissue paper under the two edges and spread pattern the necessary distance apart. Keep the centre front edges of the pattern straight and the cut edges parallel. Pin or tape pattern to the tissue paper. Complete the dart, seam and cutting lines.
If you are short-waisted...the bodice of your garment will be too long. This may cause wrinkles to form around the bodice.
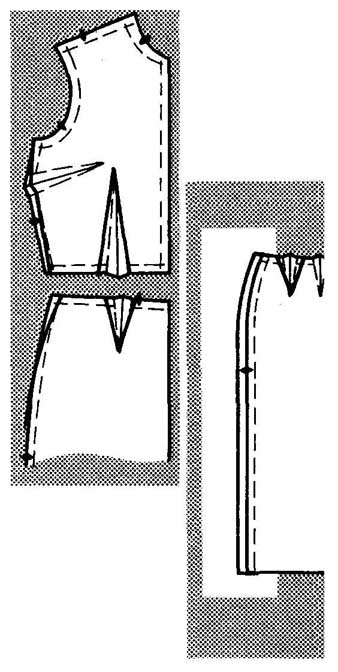
What to do: if your pattern does not have an adjustment line printed on it, then draw in a line as described for long-waisted adjustment, above. Measure up from the line the amount needed to be shortened. Draw a line across the pattern. Fold pattern on the first line and bring the fold up to meet the second line, keeping centre front edge straight. Pin or tape the fold flat. Place paper under pattern at bottom corner; pin or tape pattern to the tissue paper. Draw a new cutting line and straighten the darts as necessary.
If you have a large waistline...the extra amount needed can be added to the side seams and front and back of the bodice and skirt. If the waistline is quite bit larger than the pattern, width should be added at the darts as well as the side seams.
If you have a small waistline...divide the total amount to be decreased by four and remove from side seams of skirt and bodice, tapering seam allowance to meet original seamlines at armhole and hipline.
SIDE SEAM FITTING
Side seams are comparatively easy to adjust. If it’s necessary to increase or decrease the entire side seams, then merely draw in a new seamline to give new side seam required on entire pattern length for skirt and bodice.
If it’s necessary to increase side seams at one particular point only—at hipline for instance—then mark in extra width required at this point, then draw in new seamline keeping the extra width required even right up to waistline, and down to hemline. The waistline is then restored to its original size by increasing the width of the dart nearer the side seam by the same amount that was added to the side seams. Never try tapering the side seam back to the original waistline as this will distort the grain of the fabric, and only over-emphasize large hips.
SLEEVES AND ARMHOLE FITTING
When you are making adjustments in a sleeve pattern, it’s important to keep the original shape of the sleeve cap, if at all possible. If the original shape cannot be retained, ease the extra fabric evenly when setting the sleeve into the armhole. Many sleeve adjustments are made in conjunction with bodice adjustments.
If you have a large arm your sleeves will always be uncomfortably tight.
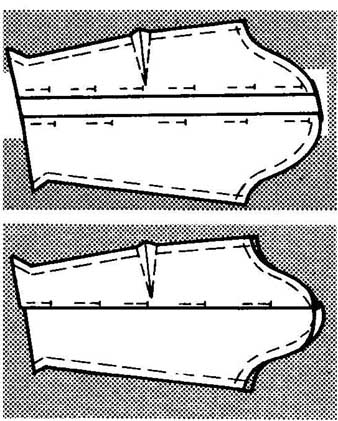
What to do: draw a line from the shoulder point on the sleeve pattern to the wrist, keeping the line parallel with the grainline indication. Cut pattern apart on this line. Pin or tape cut edge of sleeve front to tissue paper. Lay cut edge of sleeve back on paper the required distance from edge of sleeve front, keeping edges parallel. Pin or tape to paper.
On front and back bodice increase the armhole at side seam by adding half the amount added to the sleeve, then taper the cutting line to waistline.
If you have a thin arm... then your sleeves will always be loose and badly-fitting.
What to do: draw a line from shoulder to wrist on sleeve pattern, as described for large arm adjustment, above. On this line make a tuck of the required depth. Pin or tape. At the underarm seam in both the front and back, raise curve by half the amount taken up in the pleat. Draw in new cutting lines at upper edge and underarm seams. On the front and back bodice patterns, take off from the side seams at the underarm half the amount of the tuck in the sleeve, tapering to nothing at waist line. Draw a new line and raise the underarm as for the sleeve.
HEMLINE FITTING
This is the easiest fitting adjustment of all. Most commercial paper patterns have lines printed on them to indicate where to lengthen or shorten a hemline. If you are using a pattern without a printed line, then merely add to or subtract from the length at the lower edge. On some skirts, such as those having released pleats at the hemline, in order not to change the proportion, it’s better to lengthen or shorten at the hipline. If your pattern has no adjustment line marked on it, then draw one in about 7in. below the waistline and lengthen or shorten at this line, following the instructions for lengthening and shortening a bodice pattern piece.
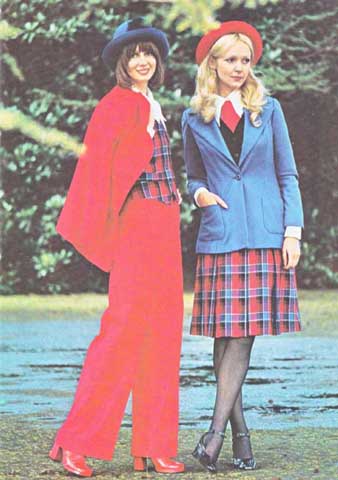
A wardrobe of separates from a single pattern. The skirt has p/eats at the front, is plain at the back.
The trousers have turn cuffs and front zip fastening. Waistcoat is lined and has a back buckled belt. The blazer is also lined and has patch pockets, back vent and long set-in sleeves.
