DARTS
Normally darts are the first construction detail you will sew when you begin to make a garment. The purpose of darts is to help mould the garment fabric over the body shape. This will give a neater and closer fit, and also help the fabric to hang nicely. Darts occur on a bodice front, to give shaping for the bust, on a back shoulder, at the waist of skirt, trousers and sometimes on the bodice as well for a close-fitting dress, on the elbow of a full sleeve, and, if there is not a dart on the back shoulder, then sometimes on the back neckline.
There are four principal types of dart: the straight dart, the curved dart, the double-pointed dart, and the dart tuck. In each case stitching may either be from the dart point to its wide end, or from the wide end to the point, whichever is easier. The point should be tapered to nothing, and there should be no ‘bubble’ at the end. After stitching is complete, tie the threads together in a neat knot at the point of the dart. Don’t tie the threads so tightly that the dart point puckers. Curved and shaped darts are most easily shaped by pressing over a rounded surface such as a tailor’s ham.
Ii. is very important that you transfer the stitching lines accurately since some darts are straight, some curve out and some curve in.
Straight dart:
This type of dart is normally used on a bodice front for bust shaping, on a back shoulder or neckline, and the elbow point of a sleeve.
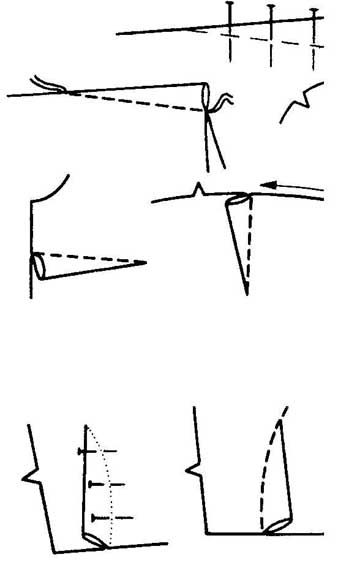
Working from wrong side of fabric, fold dart along centre marking line (usually indicated by a solid line on the pattern piece). Pin the outer marking lines (usually broken or dotted) together, matching any small dots. Pin with heads of pins towards fold of dart. Stitch along these marking lines. Continue with one or two stitches beyond the point of the dart, catching only one thread of the fabric along the fold. Press horizontal darts down, vertical darts towards centre of garment.
Curved dart:
A simple curved dart which may be curved outwards or inwards, and is used often at the waist edge of skirts, trousers and bodices, is stitched in a similar way to the straight dart. Fold on the centre line and pin, then stitch along outer curved lines, following the curve marking carefully. Usually the dart is then slashed through the centre of fold and pressed open.
A shaped bias dart however is stitched in a slightly different way. This dart is either stretched or eased or is just so curved that it must be slashed first then pinned and stitched. This type of dart occurs on an A-line dress; it starts at hip level and curves up to give a good bust fitting.
The centre line marking for this type of dart does not in this case indicate a fold; it’s a slash line, and the dart is slashed along this line before being stitched.
First of all, however, to reinforce the dart, run a line of stitching down each side, just inside the outer marking line. Then slash along centre line, taking the slash exactly along the centre line, being careful not to slash beyond the line. On the wrong side of the fabric, bring the broken outer marking lines together and pin, carefully matching any small dots.
If there is ease or stretch it will be indicated on your pattern, usually between two medium dots. Ease or stretch the fabric so one side matches the other as you pin. Then stitch your dart. Sometimes it’s necessary to clip into the seam allowance on this type of dart in order for it to lie flat.
Double-pointed dart
This type of dart normally occurs at the waistline of a fitted dress where the dress is cut in one piece for front and one piece for back, rather than separate bodice and skirt sections. Working wrong side, fold dart along centre marking line. Pin the outer marking lines together, matching any small dots. Stitch from one end of the dart to the other, following marking.
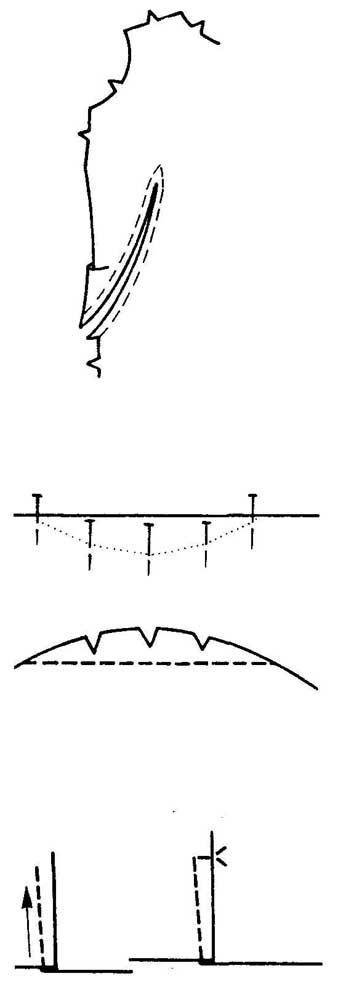
Clip into fold of dart at centre point, and then once on either of centre. Be careful not to snip stitching of the dart when you clip. Press dart towards centre of garment.
Dart tuck
This is a useful type of dart to give shaping to a bloused dress or shirt at the waist edge. It differs from other dart types in that its narrowest point is at the edge of the garment and it widens out as it’s goes inwards towards the garment.
Working on the wrong side, fold dart on centre line and pin. Stitch along outer marking lines from the narrow end towards the wide end. When the wide end is reached, turn work in your machine and stitch straight across the wide end to the fold. Press dart towards the centre of the garment.
SEAMS
Stay-stitching
Although darts have been described as the first detail you sew in the construction of a garment, in fact this is not the very first sewing you do after you unpin your paper pattern from your fabric. Immediately after removing the pattern pieces, stay- stitching should be worked on all curved or bias edges to prevent these edges stretching during the construction of the garment.
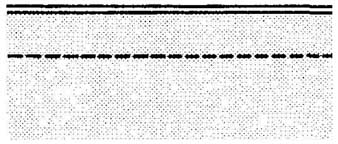
This is simply line of regular machine stitching made within the seam allowance (usually about in. from the cut edge, if the seam allowance is tin.) through single thickness fabric. On deep curves, at necklines and waistline, stay-stitching is done on the seamline itself.
Stitching a plain seam:
This is the most common of all seams, and is used for joining long straight edges together—e.g. for joining a dress front to the dress back along side edges.
Place the two edges to be joined together, with the right sides facing. Line up the edges exactly, matching any notches. Pin then baste along seam allowance. If your machine has a hinged presser foot for stitching over points of pins, then on a straight seam with an easy-to-handle fabric you need only pin-baste before doing the final stitching. Simply insert pins at right angles to the seam, with the heads towards centre of garment, and the pin points just touching seamline.
Check that your machine is at the correct tension and stitch setting for the fabric you are using, then stitch carefully along seamline. While the needle is stitching, guide the fabric only in front of the presser foot. This is usually sufficient to obtain smooth, even stitching. Sheer fabrics and fabrics with special finishes sometimes require additional support to avoid puckering. Hold the fabric gently with the right hand in the back of the presser foot without pulling while the left hand guides the fabric in front of the presser foot.
Curved seams should always be hand-basted first of all. Use a shorter machine stitch than the one used for the straight seams. If you have a seam guide on your machine, then set this at an angle for curved seams so one corner of the end is in line with the needle. Guide the fabric edges lightly against the seam guide while stitching.
With very sheer fabrics, it’s a good idea to sandwich a sheet of tissue paper between the two edges to be joined. Stitch seam, then carefully tear away the tissue. This helps to prevent puckering and ‘drawing’ in the seam.
If you are stitching a napped fabric to a plain fabric, work with napped surface up for pinning and basting, but have the plain fabric uppermost for stitching.
Seam finishes:
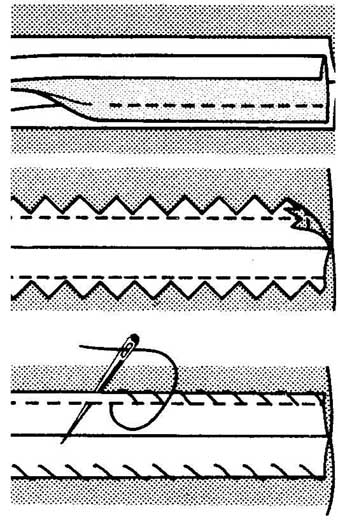
Not only is seam-neatening essential to the look of a garment and its ‘finish’, but it prevents fraying and ragged edges, and gives a longer life to the particular garment. If you are going to line the garment, the seams don’t have to be finished. There are various methods by which raw edges of seams can be neatened; choose the method to suit the fabric you are using. Pinking. This is one of the easiest and quickest methods of all and is ideal for inexpensive, closely-woven fabrics such as cotton. All you have to do is to cut along seam edges with pinking shears after the seam has been stitched.
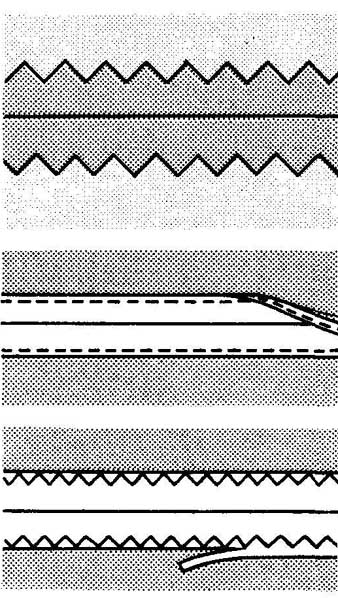
Machine stitching. This is a good strong finish for thinner fabrics like fine wool, linen, lightweight cotton and synthetics. After the seams have been stitched, turn under raw edge for about *in. and machine stitch close to fold.
Edge stitching. Good for fabrics that fray easily. After stitching the seam, make a row of stitching along each seam allowance about *in. from the edge.
Zigzag edging. If you have a swing needle or zigzag attachment on your machine, all fabrics can be neatened in this way. Just stitch along edges of turnings, adjusting the width of zigzag and length of stitch to suit the fabric. A loosely-woven material needs a deep zigzag, a finer fabric can take a smaller narrower one.
Rolling. Used chiefly on sheer fabrics. Stitch and trim a plain seam. Then roll the seam between thumb and forefinger and catch it to the seamline with small slanting stitches over the roll.
Bound edges. Excellent for loosely-woven tweeds or unlined jackets. Take a 1 in. wide bias strip of fine linen or silk to match the fabric, and stitch, right sides together, to the raw seam edges about in. from edge. Fold the strip over raw edge and machine stitch again along the seam close to the fold.
Stitched and pinked. This is suitable for a tightly-woven fabric because it adds stability to the pinked edge. Stitch 0.25 in from the edge of each seam allowance, then trim the edges with pinking shears.
Over-sewing. This is the only method of seam finishing which should be left until the garment is complete. Trim the seams neatly, cutting away any loose threads, and then work small slanting stitches by hand over the raw edges. Work from left to right or right to left. If the fabric is liable to fray then a line of machine stitching should be worked first 1/8 in., from the edge of each seam allowance. Work the over-and-over stitches along the edge, inserting the needle just under the line of machine stitching. Keep the stitches fairly slack so the edge of the fabric is not drawn up.
Layering and clipping:
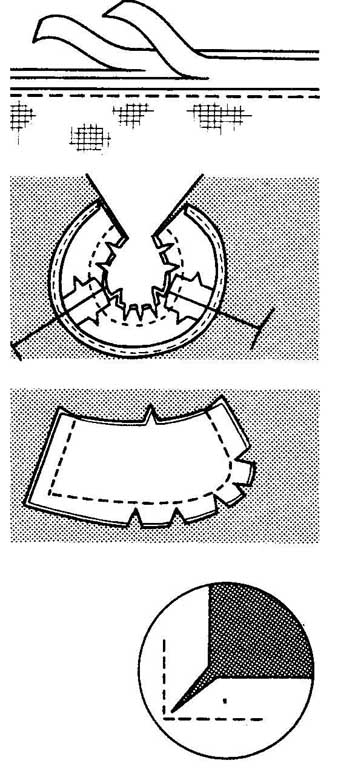
The hallmarks of a badly-finished, unprofessionally-sewn garment are neck edges which refuse to stay in place, a frayed corner edge on a collar or front fastening, and a collar with a lumpy, bumpy edge. All these problems can be avoided if time and trouble are taken to layer and clip all curved edges.
Layering. Whenever two or more layers of fabric are seamed and pressed together—round a collar edge, neckline or armhole— the turnings should be ‘layered’. This means each turning should be trimmed (after the seam has been stitched) slightly narrower than the previous one to give a series of ‘steps’. When pressed, the edges will taper off smoothly into the garment without leaving a ridge.
Clipping. Except on very loosely-woven fabrics, the turnings of curved edges should be clipped as well as layered. This will prevent unnecessary bulk or lumpiness in the finished garment, and helps seams to stretch and lie flat. In the case of an inward curving (concave) seam, such as an armhole, all you have to do is to snip at intervals with small, sharp-pointed scissors into the seam allowance at right angles to the stitching line, but being careful of course not to snip the stitches.
For outward curving (convex) seams, such as collars, small notches should be cut at intervals from seam allowance. Again, be careful not to snip stitches.
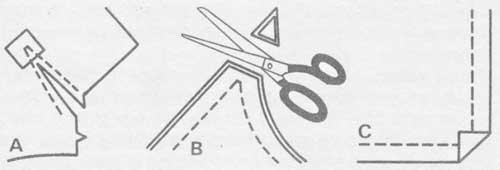
Corners. There are two methods to help you achieve a clean-looking inner corner: you may simply reinforce the inner corner with a row of machine stitching, taking stitching about 1 in. each side of corner, then just clip to the stitching at the corner. Don’t clip stitching.
Alternatively, if the corner is deeper and sharper, or if the fabric is inclined to fray easily, first machine stitch along the seamline, then cut a 2-in, bias square of matching fabric. Pin right side of this square to the right side of garment, centering it on the corner area. Stitch along seamline, including the square in the seam when you come to it. Slash garment and square evenly between stitching, just to stitching at inner corner (A). Turn the square to wrong side and press.
To achieve a sharp corner on an outer edge, such as a pocket, always trim outer corners diagonally before turning to the right side (B). This helps to eliminate bulk. With pockets and bands, when turning under edges before stitching in position to garment, turn under seam allowance diagonally just where the seamlines form corner (C). Then turn under edges on each side of corner.
Seam variations
--- (A-C)
Eased seam (D). When one edge of a seam is slightly longer than the other the long edge has to be ‘eased’ to fit shorter edge. This type of seam often occurs at a shoulder edge. Hold the longer edge towards you, pin at intervals, matching any notches and also points where seamlines cross. Adjust the extra fabric evenly between the pins, and insert further pins so the fabric is evenly distributed across the edge. Stitch with the longer edge uppermost.

Top-stitched seam (E). Stitch a plain seam, press both seam allowances to one side. Turn garment to outside and stitch near seamline through pressed seam allowance. The term top-stitch may also be used to describe the stitching often done on the outside of a garment for decoration. This occurs frequently on men’s shirts, for instance.
Double-stitched seam (F). Often used on tailored garments as a decorative finish or for reinforcement. Stitch seam and press open. On outside, stitch close to both sides of seamline.
Understitched seam. Used for attaching a facing to a garment. Stitch seam and press towards facing. On outside, stitch through facing and seam allowances. When facing is pressed to inside, the understitching also rolls to inside.
French seam (G). Used for underwear and on sheer fabrics. On outside of garment, stitch seam i-in. from edges. Trim close to stitching. Press open. On inside, crease on stitched line. Then stitch far enough from crease to cover the raw edge.
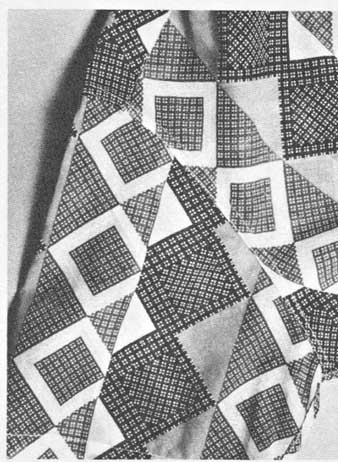
--- (photo) A flat-felled seam gives a neat fin, for shirts. On this sports
shirt, sleeve is set into the armhole with flat-felled seam.
Flat-felled seam. A useful seam for shirts and shirt blouses, and reversible garments. Stitch a plain seam either on the wrong side or on the right side, depending on which side you want the ‘fell’ to be. Press seam open; then press both seam allowances to one side. Trim the under seam allowance to bin. Turn under the raw edge of top seam allowance, and pin or hand-baste over the trimmed edge. Top-stitch close to the fold.
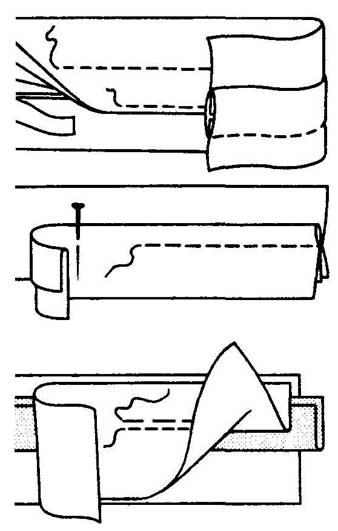
Lapped seam. Used for stitching yokes to garment, or where decorative stitching is wanted. Turn under seam allowance on top piece and press. Pin over the other piece, matching the seam edges, and top-stitch matching fold to seamline. Top- stitch close to fold, stitching through the three fabric thicknesses.
Taped seam. Used on front opening edges of coats and jackets, also on waistlines and other areas that might stretch. Unless tape is preshrunk, shrink it. Baste or pin to seam with one edge just over the seamline. Stitch tape and seam in one operation.
Piped seam. Used to give a decorative edge to collars, cuffs and faced necklines. Use a piece of ready-made bias binding or a bias strip of fabric, folding it lengthwise through the centre. Place the folded bias between seam edges with the fold over lapping the seamline, extending towards the garment. Pin, baste and stitch the seam. Press all edges to one side.
Corded seam. This is another decorative seam which can be used to edge collars, cuffs and necklines. Use ready-made covered cord, or cover a length of piping cord with a bias strip of fabric. Pin and baste the cording on the right side of fabric, matching the stitching of the cording to the seamline and with the corded edge facing towards the garment. Lay the other section right side down over cording, and pin. Stitch seam, stitching through four thicknesses of fabric, using a cording or zipper foot on your machine. Press all edges to one side.
Welt seam. Good for heavy fabrics wherever a strong flat seam is wanted. Stitch a plain seam. Trim one seam allowance and press the other over it. On outside, top-stitch about *in. from seamline. If wished, top-stitch again close to seamline.
Slot seam. This seam is used for decoration on blouses, skirts and suits of medium and heavyweight fabrics. Sometimes the fabric used under the seam edges is of a different color to the garment fabric. Cut a straight strip of fabric the length of the and about 1 in. wide. Mark lengthwise centre of the strip with basting or chalk. On the garment, press under the seam and baste turned edges to fabric strip so they meet at marked centre of strip. Top-stitch about *in. from edges, or at whatever distance is wished.
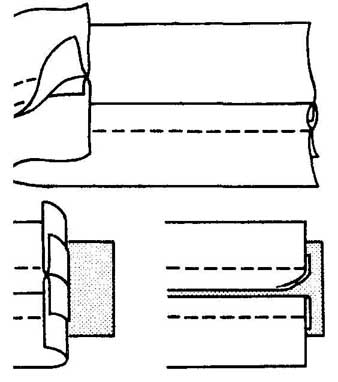
HEMS
Although it’s normal to finish and stitch hems as the last stage in a garment’s construction, the sewing of hems is in many ways related to seams and their finishing methods, so it’s appropriate to include details of hemming techniques now.
Ideally, hems should be invisible from the outside of your garment, clean-finished and even on the inside.
First prepare your hem: have hem marked to length required; turn hem to wrong side on marked line, and pin. Try on garment to make sure the hem is even all the way round. Take off garment, and mark depth of hem—usually about 2—3m, is sufficient for a lower edge hem. Trim away excess fabric, being sure to trim away any loose threads. Neaten the raw edge by any of the seam finishing methods described above (choose a method to suit the fabric you are using). Now stitch hem to garment, matching centers and seams, and using whichever of the following hem finishing methods is most suitable for your fabric and garment.
Catch-stitched hem. Press the hem well, then run the tip of iron under the neatened edge to take away any impression of stitching on the garment. Roll back *in. round neatened edge and very lightly catch the hem to the garment, using a single thread and sewing by hand. Pick up just a few threads of the hem fabric along the edge you have rolled back, and a single thread of the dress fabric. Space the stitches so they are about 0.5 in. apart, and leave thread loose between. As each stitch is worked let the hem fall back into position. This is known as catch-stitching, and is a useful stitching technique for catching facings round neck and armhole edges in place to the garment as well as for hems.
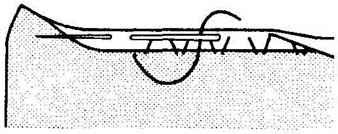
Bias seam binding hem. This is a good finish for heavier fabrics and fabrics that are inclined to fray. Lap seam binding ¼ in. over the raw hem edge. Stitch close to the edge of binding. Slip-stitch other edge of binding neatly in place to garment.
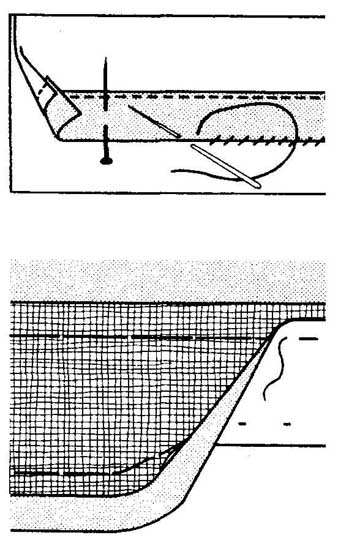
Lace edged hem. Work as for bias seam binding hem, above, but substitute a strip of lace edging instead of bias seam binding. Rolled hem. Stay-stitch about 0.25 in. from the edge, and trim close to the stitching. Roll hem twice between the thumb and forefinger, making the width of the roll less than kin. Slip-stitch hem to garment.
Interfaced hem. Cut strips of interfacing 1 in. wider than depth of finished hem required, and as long as required to go round the hemline. Place the garment wrong side up with the hem edge towards you. Pin the interfacing between the body of the garment and hem with the lower edge of interfacing ½ in. below the hem fold line. Use long stitches to sew the interfacing to the garment along the top and bottom edges. Take very short, shallow stitches in the garment, so that the stitches are invisible on the right side, and rather long stitches visible on the inter facing side. Fold hem to position and use a long running stitch to secure it to the interfacing.
Eased or circular hem. Stitch ¼ in. from raw edge of hem using a long machine stitch. Pin hem to garment, matching centers and seams. Ease in fullness by pulling up machine stitching. Press, shrinking out fullness. Finish with bias seam binding, as described for bias seam binding hem, above.
Pleat hem. A seam at the inside of a pleat is usually pressed to one side. About 1 in. from top of hem, clip seam allowance almost to seam stitching. Press seam open below clip, and finish hem by any method wished.
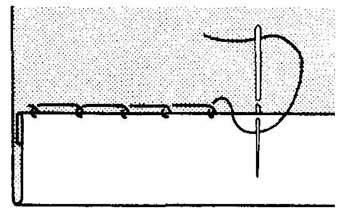
Lockstitch hem. This is a good hem for garments which have to withstand hard wear, such as children’s clothes. Work from left to right as follows: using knotted thread, on the garment side close to hem edge take a stitch through only one thread of the garment fabric. Directly opposite this stitch on the hem edge take another stitch, picking up two or three threads of the fabric. About *in. from this starting point, take a stitch through one thread on the garment side and then through the hem edge, passing the needle over the looped thread. Continue in this way.
