-------------------
Part Four--Enjoying Your Harvest Year Round
Gather the gifts of Earth with equal hand; Henceforth ye too may share the birthright soil, The corn, the wine, and all the harvest-home.
-E.C. Stedman, "The Feast of Harvest"
Once the harvest is in, the next job is to make sure it does not go to waste. Countryfolk call this process putting by: storing up today's surplus against tomorrow's shortage. Putting by is a happy skill because most of the old-time methods of preservation add delicious flavors to the food.
Nowadays, such products as cheese, yogurt, smoked meat, sauerkraut, pickles, and jams and jellies are prepared more for their taste than because they keep well on the shelf. In "Enjoying Your Harvest the Year Round" all the ways to put food by are explained along with plenty of delicious recipes that will add special tang to the preserved foods. There are instructions on maple sugaring too and detailed descriptions and recipes for making cheese, pickles, sausage, and more. Finally, directions for making homemade bread are described and illustrated along with a simple recipe for white bread that can be used as a base for all kinds of bread making adventures.
Preserving Produce
One Harvest Can Provide A Year-round Feast for Your Whole Family
In the not too distant past, drying, salting, and live storage were the only ways known for preserving produce. The Indians of North and South America depended on sun dried foods. American settlers survived bitter winters by eating salt-cured produce or vegetables stored live in root cellars. Caesar's army carried pickled food with it, and the builders of the Great Wall of China dined on salt-cured vegetables.
Nowadays we can choose among a much larger variety of processes, including canning, freezing, and jellying.
Besides being more convenient, these newer methods have helped to transform the job of preserving food from a mere necessity into a full-fledged culinary art.
A Survey of Ways to Preserve Fruits and Vegetables
Food spoils for two reasons: the action of external biological agents, such as bacteria and molds, and the digestive actions of naturally occurring enzymes. The art of "putting food by," as canning and other preserving methods were known in the old days, consists of slowing down or halting both types of spoilage while at the same time preserving nutritive values and creating food that tastes good. No system of preservation fully achieves all these goals, but no system fails to contribute something of its own--in taste, in food value, in convenience, in simplicity, in economy.
Live storage-either aboveground or belowground- preserves produce with minimum alteration in taste, color, and vitamin content. However, such storage requires certain temperature ranges: winters must be cold enough to slow down food deterioration, but food must not be allowed to freeze. In addition, only certain fruits and vegetables can be stored by this method, notably apples, pears, and root crops.

Red peppers, like mushrooms, peas, corn, and many other vegetables, can be
dried in the sun. A few long, hot days with low humidity should do the trick.
Canning involves heating to high temperatures, resulting in vitamin loss and changes in taste. Water soluble vitamins can be retained by conserving the cooking liquid, but some others are destroyed. If food is canned in jars, store it in a dark place to avoid loss of riboflavin by exposure to light. A cool area-below 65°F--also helps retain nutrients: at 80°F vitamin C will be reduced by 25 percent after one year, vitamin A by 10 percent, and thiamine by 20 percent.
Freezing, the most modern method of food preservation, has a minimum effect on flavor and food values if the food is properly prepared and carefully packaged. Only vitamin E and pyridoxine (B6) are destroyed by the freezing process. For best results, frozen foods should be stored at 0°F or below. Vitamin C is easily oxidized and as much as half can be lost if food is kept at 15°F for six months.
Length of storage time also affects nutrients. Even at 0°F, most of the vitamin C can be lost if produce is stored for a year.
Salt curing alters the taste of the food (although in the case of pickling and fermenting, the results are delicious). If salt curing is done in a strong salt solution, nutritional value is greatly reduced because the food must be thoroughly washed before it can be eaten, a process that will rinse away vitamins and minerals. A weaker salt solution will preserve more nutrients, but there will be a greater risk of spoilage. Nor is salt curing reliable for truly long-term storage: pickles, sauerkraut, and relishes must be canned if they are to be stored for more than a few weeks after the three- to five-week salt-curing process is finished.
Jellying changes the taste of the food because of the large amounts of sugar, honey, or other sweetener that are needed in order to form a gel. In addition, some vitamins are lost during the heat processing required to sterilize fruit and make an airtight seal.
Drying retains a high percentage of most vitamins. But if dried foods are stored for long periods, considerable destruction of vitamins A, C, and E can result because of oxidation, especially if food has not been properly blanched. In addition, vitamins A and E and some B complex vitamins are broken down by light; as a result, considerable food value can be lost by drying outdoors in direct sunlight.
Choosing the right storage method
Almost every fruit and vegetable can be stored by one of the common preserving methods: live storage (root cellars and in-ground storage), canning, freezing, salt curing, jellying, and drying. The table gives the methods that are considered most successful in preserving flavor, texture, appearance, and nutrients in various produce.
------------------
Produce | Recommended storage methods
Apples
Live storage, canning, jams and jellies, drying
Apricots Canning, jams and jellies, drying
Asparagus Canning, freezing
Beans (green)
Canning, freezing, salt curing
Beans ( lima)
Canning, freezing, drying
Beets Live storage, canning, salt curing
Broccoli Freezing
Cabbage Live storage, salt curing
Carrots Live storage, canning, freezing
Cauliflower Freezing, salt curing
Celery Live storage
Cherries Canning, jams and jellies
Corn Canning, freezing, salt curing
Cucumbers salt curing
Onions Live storage
Parsnips Live storage
Peaches Canning, jams and jellies, drying
Pears
Live storage, canning, salt curing, jams and jellies, drying
Peas Canning, freezing, drying
Peppers Freezing, salt curing
Plums
Canning, jams and jellies, drying (prunes)
Potatoes Live storage, canning
Pumpkin Live storage, canning
Radishes Live storage
Raspberries Jams and jellies
Rutabagas Live storage, salt curing
spinach Canning, freezing
squash (summer) Canning, freezing
squash (winter) Live storage, canning
sweet potatoes
Live storage
Tomatoes Canning, salt curing
Turnips Live storage, salt curing
--------------
Maintaining a Winter Garden
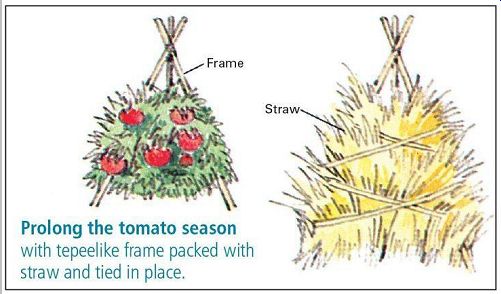
The simplest method of preserving garden produce is to leave it right where it is-in the garden. The technique is particularly suitable for root crops, such as radishes, beets, carrots, and parsnips, but even tomatoes can be kept beyond their normal season. With little more than a covering of earth and straw to help maintain a temperature of 30°F to 40°F, many vegetables can be safely left in the ground from the end of one growing season to the start of the next. The main requirement for successful in-garden preservation is wintertime temperatures that are near or just below freezing.

-------------- Bank soil around late celery (left). As temperature drops,
cover plants completely. In near-freezing weather add straw held down by boards
(center). Cover kale, collards, parsnips, and salsify with 2 in. of hay or
leaf mulch (right).

-------------- Cabbages can be stored in a long pit dug in the garden as
well as in a root cellar or conical mound. Dig storage pit about 2
ft. deep, pull cabbages out by the roots, set them upside down, and cover them
completely with soil.

-------------- Trenching preserves both cabbages and celery. Dig shallow
trench for cabbage, a deep one (2 ft.) for celery.
Place plants, roots down, in trenches; then replace soil.
Build frame high enough to cover plants, bank soil against it, and top with straw .
Keep Produce Fresh In Cold, Moist Air
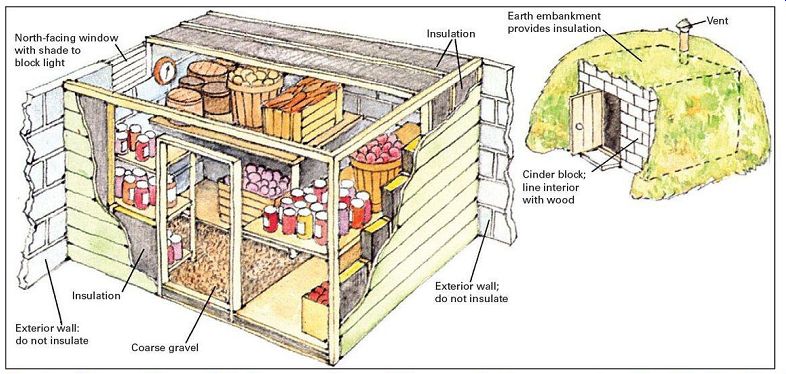
If you live in an area where fall and winter temperatures remain near freezing and fluctuate very little, you can store root vegetables, apples, and pears in a wide variety of insulated structures and containers. These range from a simple mound in the garden to a full-fledged root cellar. In each case, the storage unit must maintain temperatures in the 30°F to 40°F range with humidity between 80 and 90 percent. The high moisture content of the air prevents shriveling due to loss of water by evaporation. An old fashioned, unheated basement is an ideal spot for a root cellar, but a modern basement can be used if a northerly corner is available. Construction details are given below.
---------
Root cellars can also be built outside the house, either above the ground or embedded in earth.
Root cellars can be part of the house, as shown at left, or completely separate. A small well-insulated shed or a concrete block structure (above) with soil banked along three walls are both time-tested designs. A wood-lined excavation dug in well-drained soil with a hatch to get in is simpler yet and still quite serviceable. Air vent should be provided for circulation; humidity control is the same as for indoor root cellar.
Basement root cellar is particularly convenient, since produce is near at hand.
Different vegetables can be stored together in a single container, but fruits should never be stored with vegetables nor should different fruits be stored together. Be sure to check stored produce every week or two, and cull out any that is spoiling. The old saying "One rotten apple spoils the barrel" still holds true.
In addition to the basement, many warmer areas within the house can be utilized for preserving crops. Onions, pumpkins, and squash, for example, do best at temperatures between 50°F and 55°F with a humidity of 60 to 70 percent. An unheated attic or an upstairs room that is closed off for the winter months are excellent storage sites for these vegetables.
Onions and herbs can be strung and hung upside down above the hearth or in the kitchen for preservation.
Tomatoes that have been picked green can be stored for several weeks by letting them ripen slowly. Set the tomatoes on a rack or shelf, spacing them 6 inches apart to allow for air circulation.
Window Wells and Stairways
Basement window well can be used as a mini root cellar. Cover the well with screening and wood to keep in heat and keep out animals. When temperatures drop below freezing, open window so that heat from the house can warm the storage area. If outside temperatures rise into the 70s, open window to allow cool basement air to circulate in storage area.
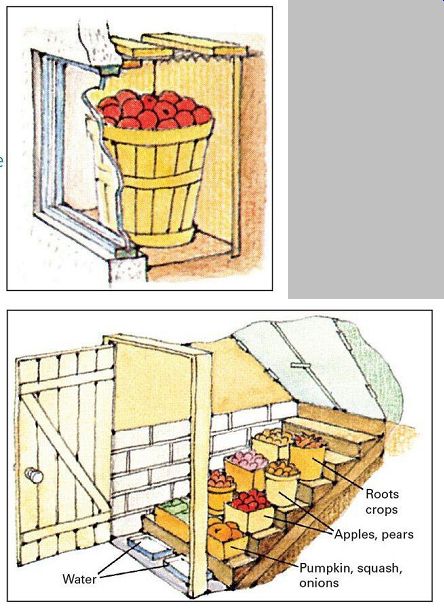
------------- Outdoor basement entrance can make an excellent root cellar. Install
a door at the bottom of the steps to block off house heat. The top steps near
the outside door are coolest, the bottom steps are warmest. store root crops,
such as potatoes, on top steps; warmth-loving pumpkins, squash, and onions
at bottom; apples and pears in between. Place pans of water at the bottom of
the stairwell to provide necessary humidity.
Setting Up a Simple Root Cellar
An 8-foot by 10-foot root cellar will accommodate 60 bushels of produce, more than enough for most families.
Indoor root cellars are the most convenient to use and easiest to build. Try to use a northeast or northwest corner of your basement that has at least one outside wall and is as far as possible from your oil burner or other heat source.
One north-facing window is desirable for ventilation. The interior walls of the root cellar should be constructed of wood, and if the basement is heated, they should be insulated. The precise amount of insulation needed depends on the average basement temperature, but standard 4-inch-thick fiberglass batting with a foil or plastic vapor barrier should be more than adequate. Install the insulation with the barrier against the wood. Add an insulated door and fit the window with shades to block out light. To keep humidity high, spread 3 inches of gravel on the floor and sprinkle it occasionally with water. You can also maintain humidity by storing the produce in a closed container, such as a metal can lined with paper.
Heap up root crops and store them right in the garden
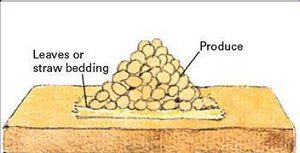
------------ 1. spread several inches of leaves or straw as bedding. stack produce
in cone shape.
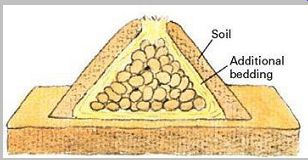
------------- 2. Cover produce with bedding and 4 in. of soil. Let bedding extend
through soil for air.
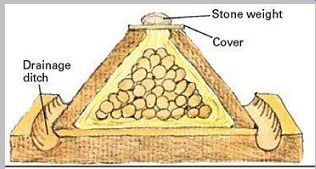
------------- 3. small drainage ditches and wood or metal covering protect cone
from rainfall and runoff.
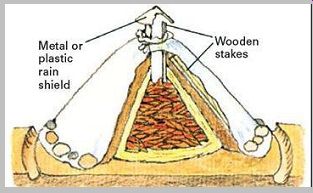
------------- 4. Cover large stacks with tarp; provide additional ventilation
with wide central opening.
Create a storage chamber out of bales of hay
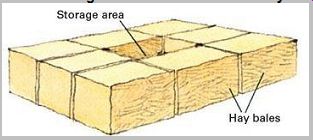
------------- 1. Form hay bales into rectangle. Central opening will be used
as storage area.
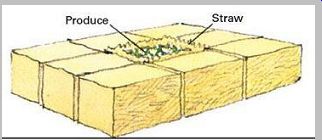
-------------2. Line opening with straw and stack produce.
spread hay over each item, then over stack.
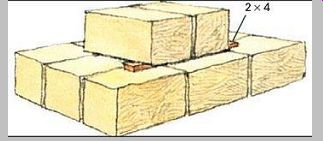
------------- 3. Use additional bales as a lid over the opening. Raise bales
on 2 × 4 for ventilation.
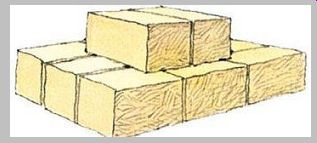
------------ 4. During periods of severe weather remove the 2 × 4 in order to
seal opening.
Store apples in an upright barrel
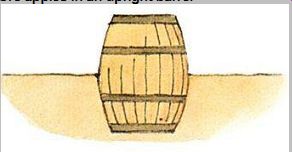
------------ 1. For apple storage, start by burying wooden barrel or metal drum
halfway in ground.
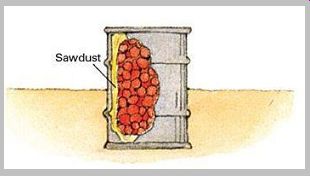
------------ 2. if metal drum is used, line it with saw dust at bottom
and between produce and sides.

------------ 3. Fill barrel or drum with apples. Cover with leaf filled
sack, then pile soil around sides.

------------- 4. Dig a 6-in. ditch around barrel for drainage; put rocks
on sack to keep it in place.
Turn the barrel on its side and store other types of produce

------------- 1. Dig space for barrel in well-drained area. Put bedding
under barrel and fill with produce.
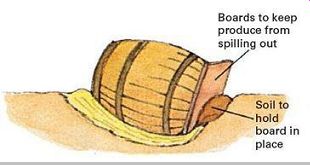
------------ 2. slant open end down so any moisture will run out, then
place board over the opening.
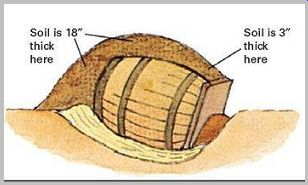
------------- 3. Cover sides and upper end of barrel with 18 in. of soil.
Cover lower end with 3 in. of soil.
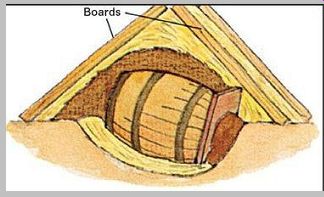
------------- 4. Cover everything with straw . Place boards on top to keep
straw from blowing away.
High-Heat Processing Eliminates Spoilage
Canning has been one of the most popular methods of preserving food since 1809, when the technique was first developed by the Frenchman Nicolas Appert. Today over 40 percent of the families living in the United States do some home canning, and the percentage is increasing. The principle behind canning is simple: decay and spoilage are caused either by enzymes in the food itself or by bacteria and other microorganisms. During the canning process, food is heated to a high temperature to stop the action of the enzymes and to kill all decay organisms. The food is then stored in sterile, airtight containers to prevent contamination.
Different foods require different processing temperatures. Low acid vegetables-and this includes every type other than tomatoes-can harbor heat-resistant bacteria and must be heated to at least 240°F, a temperature that can only be achieved by pressure canning. High acid foods, including tomatoes and most fruits, can be processed at the temperature of boiling water --212°F--since the only spoilage microorganisms present in them will be destroyed at this lower temperature. Pickled vegetables can also be processed in a boiling water bath.
Cans and jars
Home canners generally do their canning in glass jars rather than tin cans. Jars are easier to use, cost less, and allow you to see the contents. In addition, they can be reused many times and are chemically inert with respect to all types of food. The tin can's immunity to breakage is its only significant advantage. Two commonly used jar designs are shown at right, along with an old-fashioned clamp-type jar. Jars-and tins as well-come in a variety of sizes ranging from 1/2 pint (1 cup) to 1 gallon and larger.
If you plan to can in tins, you will need to purchase a sealing device. To check that the sealer is properly adjusted, seal an empty can, then immerse the can in warm water for several minutes. No bubbles should rise from the can. When canning in tins, the food should be packed while it is hot (more than 170°F) or else heated to that temperature in the can. Seal the can immediately after heating, then process it by the appropriate method shown on the next page. Processing is similar to jar canning except that steam pressure can be reduced immediately after the heating period is completed.
----------------
Specialized Canning Utensils
------------
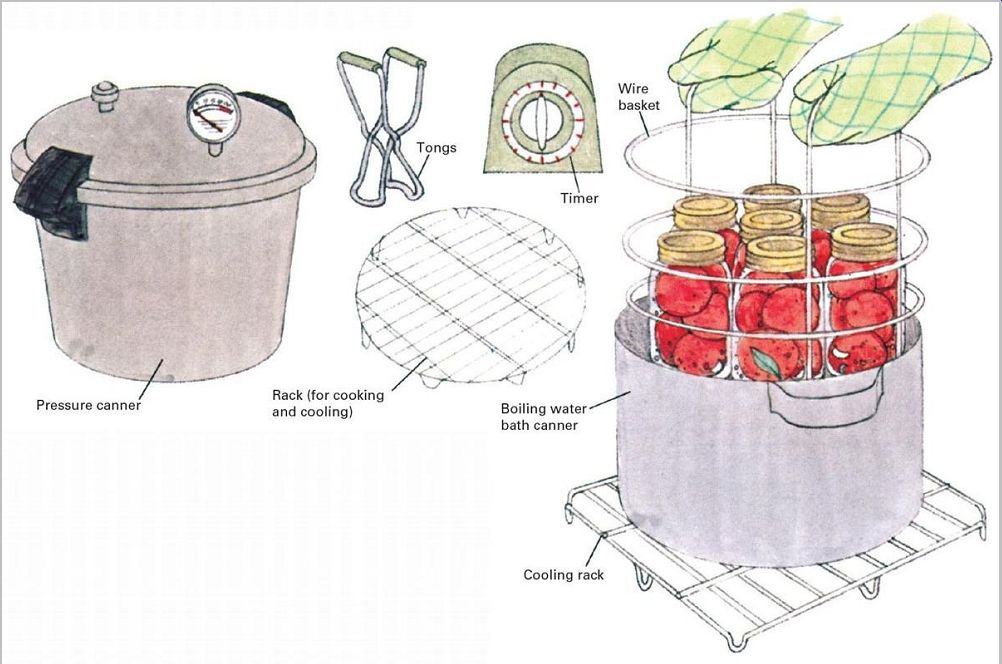
Some specialized utensils in addition to standard kitchen equipment are essential to successful canning. A water bath canner with a tight-fitting lid will be needed to process fruits, tomatoes, and pickled vegetables. Any large metal container can be used as long as it provides 4 in. or more of headroom above the jars. A pressure canner with an accurate dial or gauge is required for heat processing most vegetables. Other important accessories, in addition to the canning jars themselves, are a rack to hold the jars in the canner, tongs for lifting hot jars, a rack or several layers of towels on which to cool the jars, and an accurate timer.
---------------------
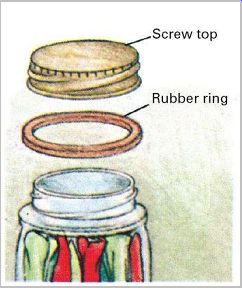
---------- Porcelain-lined cap consists of screw top and rubber ring. To seal,
fit wet ring against shoulder of jar, screw on cap firmly, then back off a
quarter turn. When jar is removed from canner, immediately screw cap tight.
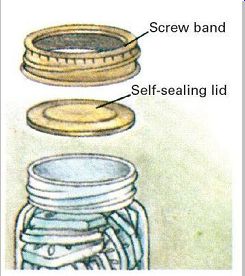
--------------- Self-sealing cap consists of lid with sealant around its rim
and a screw -on band that holds lid against lip of jar.
Tighten band firmly before processing and do not loosen again. Band can be reused but not the lid.
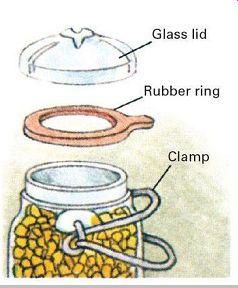
--------------- Bailed jar with glass lid and wire clamps is rarely sold now. Lid is held in place with long clamp during processing, then short clamp
is snapped down for a tight seal. Decorative replicas should not be used for
canning.
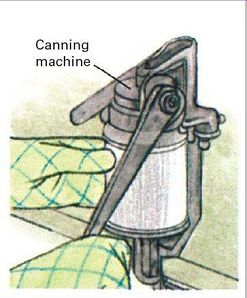
--------------- Tin cans are sealed by machine. Plain tin cans are safe for all
foods, but to avoid discoloration of produce enamel-lined tins are used for
corn, beets, berries, cherries, pumpkin, rhubarb, squash, and plums.
The ABCs of Canning
Vegetables and fruits must be pretreated before they are packed into jars for heat processing. Wash all produce, and cut vegetables into pieces. Berries and other kinds of small fruits can be left whole, but larger fruits, such as peaches, pears, and pineapples, should be pitted, if necessary, and sliced. Fruits are often dipped in ascorbic acid (vitamin C) and packed in sugar syrup to preserve their shape, color, texture, and flavor.
There are two ways to pack the produce into jars: raw (raw packed) or cooked (hot packed). To hot pack most fruits or vegetables, steam them, or heat them to boiling in juice, water, or syrup; then immediately pack them into the containers. (Tomatoes and some fruits can be cooked in their own juices.) For raw packing, load clean produce tightly into containers and pour on boiling juice, water, or syrup, leaving the proper amount of space at the top of the jar above the packed fruit or vegetables. Wipe the rim and sealing ring to remove any particles of food, then close the jar and proceed with the canning process: boiling water bath for fruits and high acid vegetables, pressure canning for low acid vegetables. After canning, store food in a dark place, since light can cause discoloration and loss of nutrients. Be sure to date and label all jars.
Boiling water bath canning
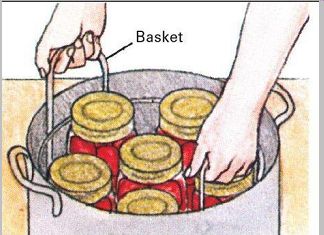
---------- 1. Fill canner halfway with hot water, load jars in basket, and
put inside.
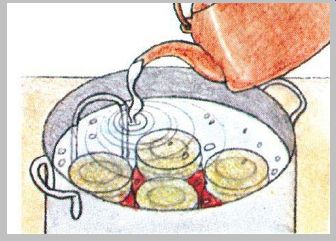
----------- 2. Add boiling water to 2 in. above jars. Do not pour directly
on jars.
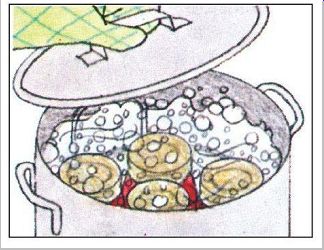
----------- 3. Cover canner. Bring water to rolling boil and start timing.
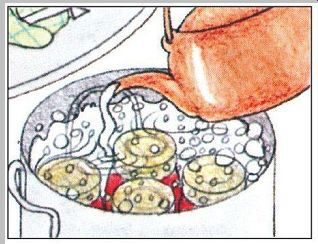
----------- 4. Reduce heat, but maintain rapid boil. Add boiling water
if needed.
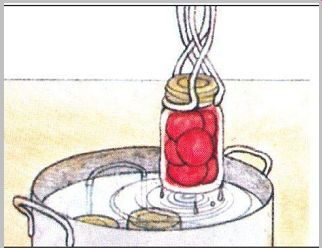
---------- 5. When processing time is up, remove jars immediately with
tongs.
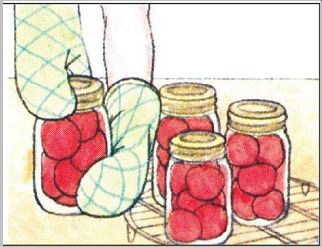
----------- 6. Tighten lids if needed. set jars on rack, leaving space
between them.
Pressure-cooker canning
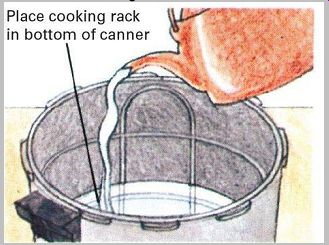
---------- 1. Pour 2 to 3 in. of boiling water into bottom of pressure
canner.
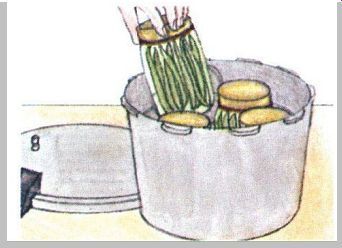
----------- 2. Place jars on rack set at bottom of canner. Jars must not
touch.

----------- 3. Fasten lid. Turn heat to maximum. Let steam exhaust 10 minutes.
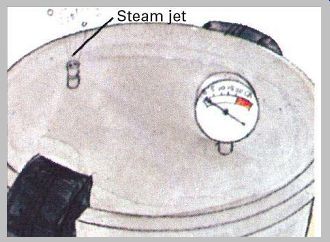
----------- 4. When the first inch of the steam jet is nearly invisible,
close the vent.
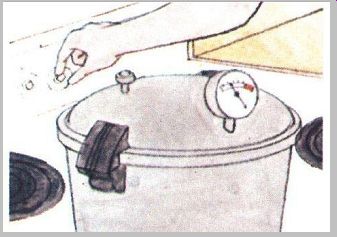
----------- 5. At 8-lb. pressure lower heat slightly. Let pressure rise
to 10 lb.
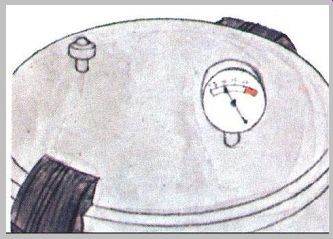
----------- 6. At 10-lb. pressure start timing. Hold pressure for full
canning period.
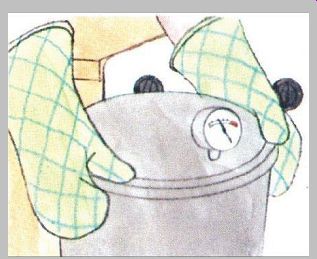
----------- 7. Remove canner from heat and let cool. Do not pour cold water
on it.
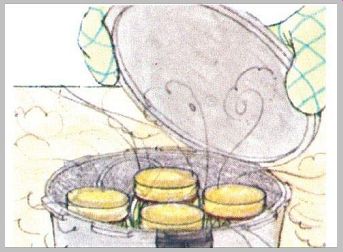
----------- 8. When pressure is zero, open vent, then lid. Tilt lid as
shown for safety.
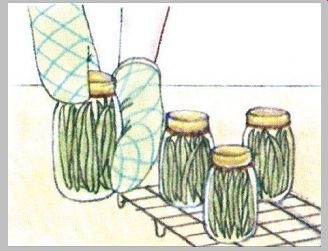
----------- 9. set jars on rack leaving spaces between jars. Tighten lids
if necessary.
It Pays to Be Careful When Canning Food
Canning must be carried out with scrupulous care if bacterial contamination and spoilage are to be avoided. Most types of spoilage cause only minor illness at worst, but one type-botulism-is extremely dangerous and often fatal. This form of food poisoning is caused by toxins produced by germs that multiply rapidly in the low-oxygen, low-acid environment of canned vegetables. To prevent botulism as well as other food poisoning, it is essential that care be taken at every step of the way.
The first rule is to can only perfect produce. Overripe or damaged fruits and vegetables are prone to spoilage. Inspect jars, lids, and sealing rings to be sure they are in perfect condition, then wash and scald them before use. Wash all produce thoroughly, and pre-treat it according to a reliable recipe and the principles described in this chapter. Be sure to use the correct time, temperature, and method of processing. (Because the spores that cause botulism are killed only at temperatures well above boiling, all vegetables except tomatoes must be pressure canned.) When canning with the boiling water bath method, use a lidded container and keep the jars totally immersed in rapidly boiling water. Before starting to pressure can, test the canner according to the manufacturer's instructions. After processing, check the seal on every jar: when you push down on a self-sealing lid, it should stay down. Test porcelain lids by turning jars upside down; if you see a steady stream of tiny air bubbles, the seal is not airtight.
There are further safety precautions to take after the processed food is on the shelf. Discard any jar whose contents appear foamy or discolored, whose lid bulges or is misshapen, or whose rim is leaking. Be sure that the canned produce is normal before you eat it; discoloration, odor, mold, and spurting liquid are all reasons to discard it. When disposing of suspect food, place it where animals or humans cannot accidentally eat it. Home-canned vegetables, except tomatoes, should be cooked before they are served. Bring the vegetables to a rolling boil, then boil an additional 20 minutes for corn or spinach, 10 minutes for other vegetables.
Store canned goods in a cool, dark place--a root cellar is ideal. Jars let you see all the produce easily, but they must still be dated either on the lid or on a label. Also list such additives as salt, sugar, and spices.
----
Choose the Proper Canning Method and Follow Procedures Exactly
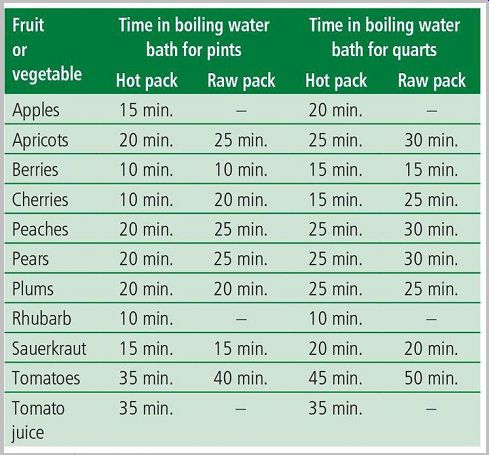
The specifics of canning vary from one fruit or vegetable to the next. For high-acid produce, use the boiling water bath method; start to time only when the bath reaches a rolling boil. For low-acid produce, use a pressure canner. Let steam vent for 10 minutes to expel all air from the canner, then close the vent to let pressure build. Start timing after pressure in the canner reaches 10 pounds. If pressure falls below 10 pounds at any time during processing, start timing over again. Processing times for both methods depend upon the size of the jar used.
Vegetable | Time to maintain pressure for pints | Time to maintain pressure for quarts
Asparagus 25 min. 30 min.
Beets 30 min. 35 min.
Carrots 25 min. 30 min.
Corn 55 min. -
Cowpeas 35 min. 40 min.
Lima beans 40 min. 50 min.
Potatoes 35 min. 40 min.
Pumpkin 55 min. 90 min.
snap beans 20 min. 25 min.
Winter squash 55 min. 90 min.
-------- Adjustments for high altitudes
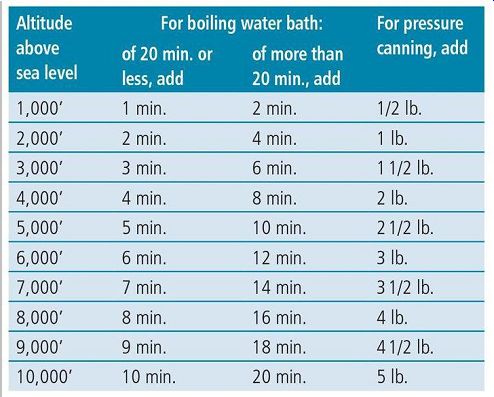
If you live in an area that is more than 1,000 feet above sea level, the reduced atmospheric pressure causes water to boil at temperatures lower than 212°F. To compensate, you must increase processing times for boiling water baths.
You must also increase pressure settings for pressure canning to attain the required 240°F temperature. Add time or pressure according to the table.
---------
Simple Recipes With a Delicious Flavor Difference
Try a variety of flavorings and combinations when canning fruits and vegetables. Sugar or salt can be added or deleted from any recipe without changing the processing requirements; so too can vinegar, lemon juice, or spices.
Tomatoes can be flavored in a number of ways to make condiments and sauces. But be careful when adding any other vegetable, such as onions, peppers, and celery, to tomatoes: the mixture will be less acid than tomatoes alone and must be pressure canned. In addition, changes in density can affect processing time, so do not try to mix a variety of vegetables unless you have a reliable recipe that includes canning instructions.
Fruit Puree
3 lb. Fruit sugar to taste
Wash and cut up fruit, remove any pits. simmer fruit pulp until soft (about 15 min.), adding water as necessary and stirring frequently to prevent sticking. Put pulp through food mill or strainer. Add sugar to pureed pulp. simmer pulp for five minutes more. Pack hot puree into jars, allowing 1/2-in. headroom. Adjust lids. Process in boiling water bath for 10 minutes for either pint or quart jars. Makes 1 quart.
Pear Honey
8 cups ripe pears, peeled and chopped 5 cups sugar 1 lemon, juice of and rind cut into pieces
Put all ingredients into large heavy pot. Bring slowly to a boil and simmer until thick (about 45 minutes). stir frequently to avoid burning. Pour boiling mixture into jars, leaving 1/2-in. headroom. Process in boiling water bath for 20 minutes for either quarts or pints. Makes 1 quart.
Applesauce
3 lb. apples, quartered and cored 1/4 tsp. cinnamon sugar to taste
Place apples in a saucepan with 1/2 cup water. Bring slowly to a boil, then reduce heat and simmer until soft (about 10 minutes). Add cinnamon and sugar and stir.
Pack hot applesauce into jars, allowing 1/2-in. headroom.
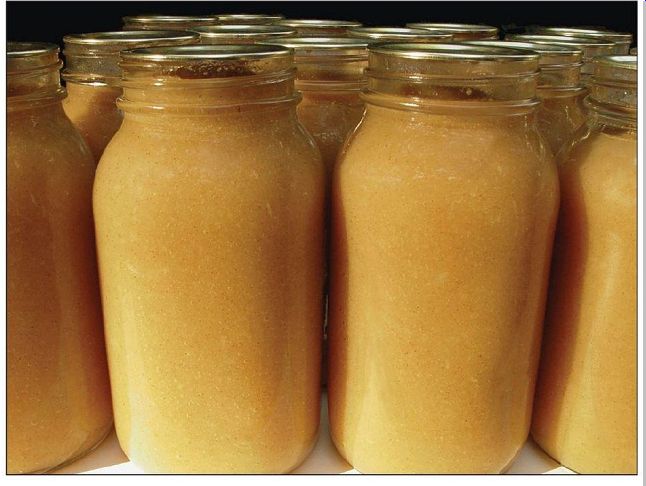
insert knife to pierce any air bubbles. Adjust lids. Process in boiling water bath for 10 minutes for either pint or quart jars. Makes 1 quart.
Tomato Preserve
2 cups red tomatoes, peeled and chopped 2 cups sugar 1 small lemon, juice of and grated rind 1 stick cinnamon 1/4 tsp. powdered ginger Cover tomatoes with sugar. Let them stand for 12 hours.
Drain juice and boil pulp until thick, stirring often to prevent scorching. Add lemon juice, grated rind, cinnamon, and ginger. Cook until thick. Pour into pint jar. Process in boiling water bath 15 minutes. Makes 1 pint.
Freezing Produce
Freezing is not only simple and reliable but also retains flavor and nutrients better than any other preservation method except live storage. It prevents deterioration by slowing enzyme action and halting bacterial growth. For best results, store foods in moisture-proof containers and cool the food quickly to 0°F or below. Rigid containers of glass, metal, and heavy plastic are impermeable to all moisture and vapor. Other products made especially for freezing are resistant enough to prevent deterioration.
These include paper cartons lined with a heavy coat of wax, freezer paper, heavy plastic wraps, and heavy plastic bags.
Waxed paper, cartons lined with only a thin layer of wax, and thin plastic containers, bags, or wraps should not be used.
For rapid freezing, pack produce that is already cool; work with small quantities, filling only a few packages at a time, and freeze the packages immediately. Place them against or as close as possible to the freezer coils, and allow ample air space around each package. Once the food is frozen, rearrange it to make the best use of freezer space. Put no more food into the freezer than will freeze within 24 hours.
Frozen produce will keep for as long as a year. Label and date all packages and make a list showing the kind of produce and the date frozen. Put the list near the freezer and cross off entries as food is used. Once frozen fruits and vegetables are thawed, they deteriorate rapidly; so use the thawed food immediately and do not try to refreeze it.
How to freeze fruits
1. To prevent discoloration, dip light-colored fruits in a solution of ascorbic acid (vitamin C) and water. Use 1 teaspoon per cup of water for peaches and apricots, 2 1/4 teaspoons per cup of water for apples.
2. For a dry pack, sprinkle fruit with 1/2 cup of sugar per pound of fruit. For a wet pack, make a light syrup by mixing 1 cup of sugar with 2 1/2 cups of water.
3. Pack fruit into rigid containers or plastic bags. In a wet pack, cover fruit with liquid; leave 1-inch headroom in glass jars, 1/2 inch in plastic containers.
4. Label and date containers, and freeze at 0°F.
How to freeze vegetables
1. Blanch vegetables in boiling water or steam to destroy enzymes that break down vitamin C and convert starch into sugar. (See page 208 for blanching instructions.)
2. Cool vegetables quickly by immersing them in cold water. Drain on absorbent toweling.
3. Pack and freeze as you would dry-pack fruit, but do not use any sugar.
Salt Enhances Flavor and Shelf Life Too
Salt was a treasured commodity in the ancient world not only for its flavor but also for its preservative properties.
When produce is impregnated with salt, moisture is drawn out and the growth of spoilage-causing bacteria inhibited.
There are four basic methods of salt curing: dry salting, brining, low-salt fermentation, and pickling.
Dry salting and brining require heavy concentrations of salt during processing. In general, the more salt used, the better the food is preserved, but the greater the loss in food value, particularly since heavily salted food must be soaked and rinsed to make it palatable-a process that further depletes vitamins.
Modern cooks are more likely to choose a salt-curing method for its distinctive flavor than for its preservative properties. As a consequence, low-salt fermentation (the process used to make sauerkraut) and pickling remain popular today in spite of drawbacks as means of preservation. In both methods bacteria convert natural sugars in the produce into lactic acid, a substance that enhances flavor, improves preservation, and is said to promote health. The chief difference between low-salt fermentation and pickling is the use of vinegar, herbs, and spices in the pickling process. In either method salinity is low enough for the produce to be eaten without first being freshened (rinsed in water).
Almost any vegetable or fruit can be preserved by one or more of the salt-curing methods. Once cured, the produce will remain fit for consumption for periods of up to three weeks, provided it is kept at a temperature of about 38°F. If you want to keep the produce for longer periods or if the 38°F storage temperature is impossible to maintain, can the food by the boiling water bath method as soon as possible after it is thoroughly cured. For salt curing, choose vegetables and fruits that are firm, tender, and garden fresh without any trace of bruises or mold. Store-bought produce can be employed, but avoid vegetables that have been waxed (cucumbers and rutabagas are frequently coated with paraffin), because the curing solution will not penetrate.
Wash the produce thoroughly under running water, and scrub each fruit or vegetable individually.
Curing containers should be enamelware, stoneware, or glass (avoid metal, since it may react with the brining solution). Do not cure with table salt-it contains additives that will discolor the food. Instead, use pickling or canning salt.
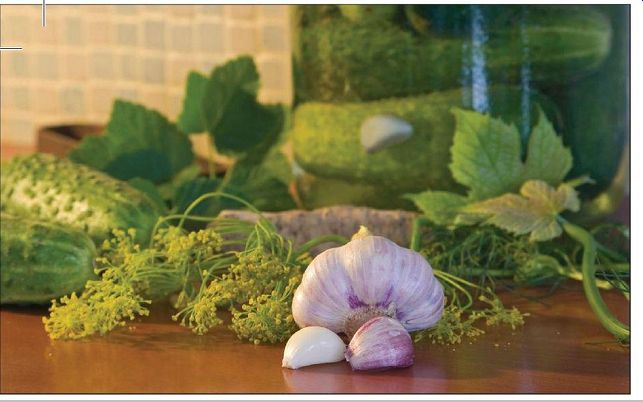
Pickling is an excellent way to preserve a small bumper crop and make it last for the first few months of the fall. If you want sharp, spicy pickles all winter, can them. Pickled foods are relatively easy to can because their acidity eliminates any chance of botulism growth. As a result, they can be processed by the boiling water bath method rather than the more complicated steam canning method required for unpickled vegetables.
For Unbeatable Taste Add Vinegar and Spice
Pickling serves two purposes: it preserves and it adds delicious flavor. Choose firm, fresh vegetables and fruit for pickling-green tomatoes and underripe fruit can be used for greater firmness-but avoid vegetables that have been waxed. (Wax prevents the pickling solution from penetrating.) Use only pickling-type cucumbers.
There are two methods of pickling-fresh-pack pickling and fermentation pickling. Both rely on brine and vinegar as the primary preservatives; sugar, herbs, and spices are often added for additional flavor. The vinegar should have an acid content of 4 to 6 percent. Either cider vinegar or distilled white vinegar is acceptable; the latter has a sharper, more acid taste. Do not use homemade vinegar unless you are sure of its strength. For sweeteners, honey or granulated white or brown sugar is generally specified.
Salt should be the pure granulated variety (often sold as "pickling salt") with no additives. Herbs and spices should be fresh and the water soft if possible. If the tap water in your area is hard, you can use rainwater or bottled soft water.
Dry Salting
Severest method of salt curing is dry salting. Corn, beans, green vegetables, cabbage, and root crops are the foods most frequently dry salted. Use additive-free, finely granulated salt (coarse salt takes too long to dissolve) in the proportion of one part salt to four parts vegetables by weight. Produce must be "freshened" (thoroughly rinsed of salt) before it is eaten. To freshen, soak food for 10 to 12 hours in fresh water, changing the water every few hours.
----------------
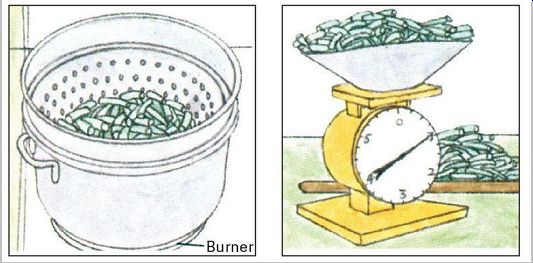
1. Blanch vegetables in steam over rapidly boiling water (see Blanching, p.207). Cool by plunging into cold water.
2. Weigh produce and divide into batches that will make 1-in. layers. Weigh out 1 lb. salt per 4 lb. produce.
3. Fill crock with alternate layers of salt and 1-in.-thick layers of produce. First and last layers should be salt.
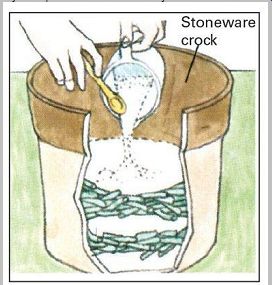
----------------- 4. Leave 4-in. headroom above final salt layer. Cover with
cheesecloth weighted down with a plate or board.
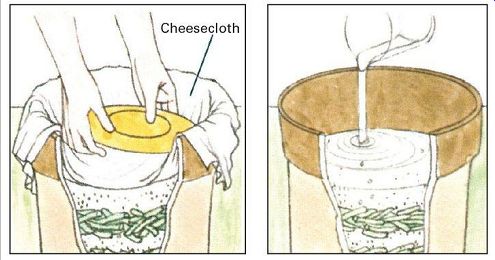
----------------- 5. After 24 hours juice should cover produce. if it does
not, add a solution of 3 tbsp. salt mixed into 1 cup of water.
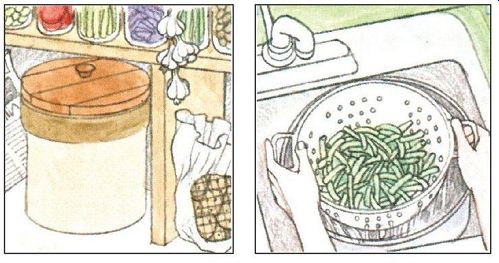
6. store container in cool area (38°F). Change cloth when soiled. Use glass or china cup to dip out food.
7. Before eating salted produce, soak and drain it in several changes of fresh water until saltiness is gone.
----------------
Brining
Salt solution is used to cure food by the brining method. Prepare the brine in advance by mixing 1 lb. salt per gallon of water. You will need 1 gal. of brine for each 2 gal. of produce. While the food is being brined, a process that will take four to eight weeks, keep it at room temperature (65°F to 70°F). Rinse food in several changes of cold water before eating it.
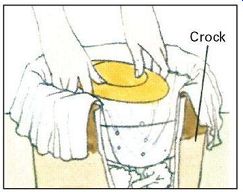
----------------- 1. Weigh and blanch food, then place in crock and add brine
to 4 in. of top.
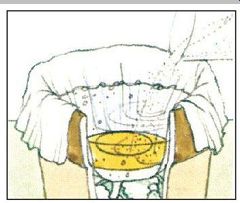
----------------- 2. Cover produce with cheesecloth; weight with plate
to keep submerged.
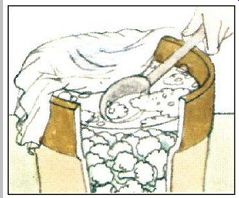
----------------- 3. The next day, add salt on top of cloth-1/2 lb. for
each 5 lb. of produce.
----------------- 4. After one week add 1/8 lb. salt for every 5 lb. of
produce. Repeat each week.
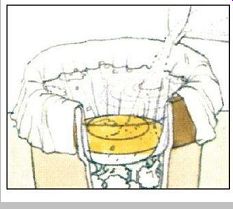
----------------- 5. Check container every few days and remove any scum
that appears on the surface.
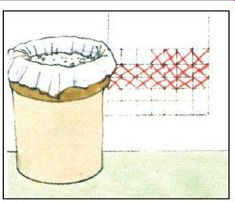
----------------- 6. Maintain at room temperature until no bubbles rise
(four to eight weeks).
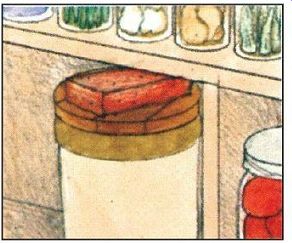
----------------- 7. store brined food in cool area (38°F) in container
covered with tight lid.
Low-Salt Fermentation
Do not blanch food when using the low-salt method, since fermentation organisms would be destroyed. Let the produce ferment at about 70°F, then store at 38°F in a tightly lidded container. For long-term storage, can by boiling water bath method. Low-salt fermentation is particularly suitable for such vegetables as turnips and cabbage.
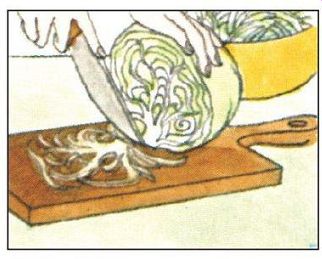
----------------- 1. Wash and dry cabbage, then shred into small pieces so
salt can penetrate.
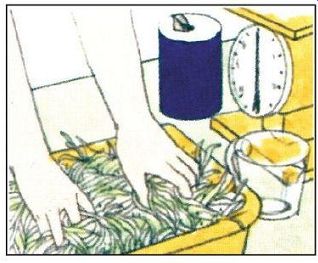
---------------- 2. Weight out 1 oz. salt per 2 1/2 lb. of cabbage. Thoroughly
mix salt into cabbage.
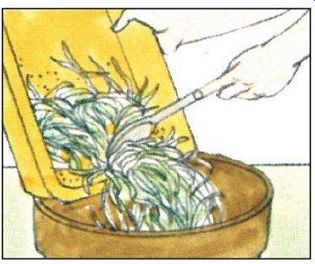
----------------- 3. Pack salted cabbage into container. Press down firmly
to help extract juices.
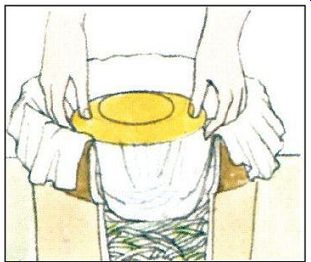
---------------- 4. Cover with cheesecloth weighted down with plate. Check
after 24 hours.
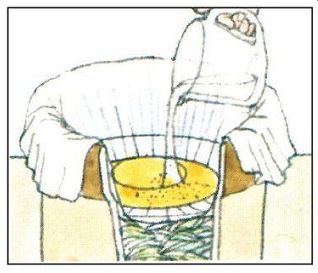
----------------- 5. if brine does not cover cabbage, and solution of 1
tsp. salt per cup of water.
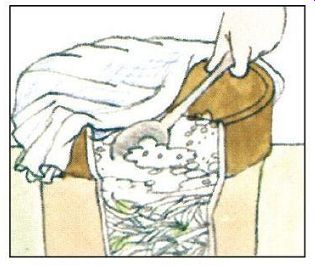
----------------- 6. Check fermentation regularly. Remove scum and change
cloth if dirty.
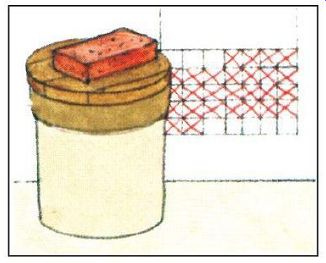
---------------- 7. Keep at room temperature until no bubbles rise to
surface (one to four weeks).
Making Dills by Fermentation Pickling
Cucumbers and green tomatoes are the vegetables most frequently treated by fermentation pickling. The method is similar to low-salt fermentation, but a stronger salt solution is employed, and vinegar and spices are generally added. After pickling is completed (a matter of one to three weeks), the pickles can be stored for up to three weeks in a refrigerator or cool (38°F) location. For long-term storage, can the pickles with the boiling water bath method (p.194). If the pickling brine is cloudy, make a fresh one to use in canning. You will need the following ingredients:
1/2 gal. water
1/2 cup vinegar
15 sprigs dill
15 cloves garlic (optional)
1/3 cup salt
4 lb. pickling cucumbers (4 to 5 in. each)
30 peppercorns
Prepare the brine by mixing water, salt, and vinegar. Clean and scrub cucumbers (especially the flower end) thoroughly, and be sure the crock and all other utensils are clean.
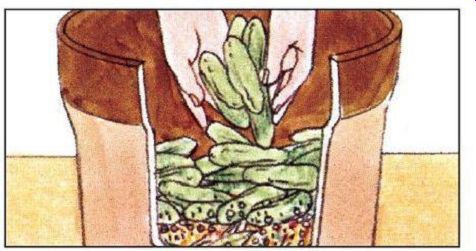
--------------- 1. Line bottom of 1-gal. crock with half of dill and other spices, then add cucumbers.
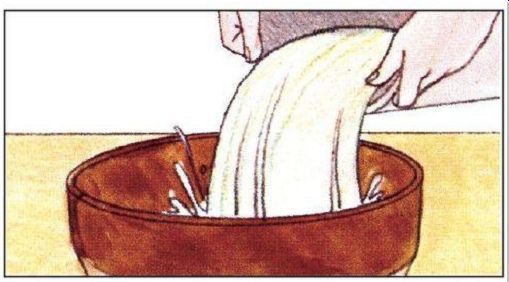
---------------- 2. Top cucumbers with the remaining dill and spices. Add brine
to cover all ingredients.
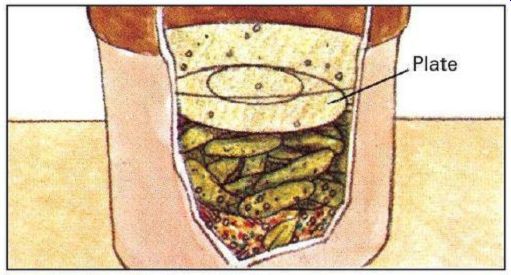
---------------- 3. Keep produce submerged with a heavy plate so that it
is under at least 2 in. of brine.
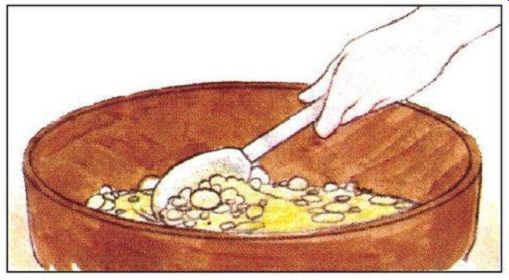
----------- 4. Remove scum daily. When bubbles and scum stop forming,
fermentation is completed.
Pickled products should be heat treated (canned) unless they are to be consumed soon after pickling. The boiling water bath canning procedure described on page 194 can be used for all pickled products; processing times vary from recipe to recipe. The usual precautions should be followed during canning and afterward: the jars of pickles should be labeled, dated, and stored in a cool, dry location.
If there is any sign of spoilage-a bulging lid, bad smell, poor pickle consistency, sliminess, discoloration-do not eat any of the food in the jar.
Pickling Recipes
There are pickling recipes to suit every taste. All kinds of fruits and vegetables can be combined, and vinegar, salt, sugar, and spices can be adjusted in an almost endless variety of ways. The results are piquant relishes, chutneys, and sauces-as well as pickles with sweet, sour, or sweet and-sour taste combinations. Although pickling is of limited use as a means of preserving fruits and vegetables-it prolongs shelf life only a few weeks-it does simplify long term storage, since pickled produce has a high enough acid content to be processed by the boiling water bath method (see pp.194-195). The recipes given below include processing times.
Tomato-Apple Chutney
6 lb. tomatoes, peeled and chopped
1 qt. white vinegar 4 tsp. salt
2 cups seedless white raisins
5 lb. apples, peeled, cored, and chopped
2 lb. brown sugar tsp. ground ginger
1/4 cup mixed whole pickling spices
2 medium green peppers, 1 seeded and chopped
4-5 medium onions, peeled and chopped
Combine all ingredients except the mixed whole pickling spices. Put the spices in a spice bag and add to the mixture. Bring to boil and cook slowly, stirring frequently until mixture thickens (about one hour). Remove spice bag.
Pack boiling mixture into sterile pint jars, leaving 1/2-in. headroom. Process in boiling water bath for 10 minutes.
Makes 7 pints.
Sour Pickles
3 tbsp. mixed whole pickling spices
3 tbsp. pickling dill
40 well-scrubbed cucumbers
9 peppercorns, or to taste
3 gal. hot water
9 horseradish roots and leaves, or to taste
9 garlic cloves, or to taste
2 1/4 cups salt
3 cups white cider vinegar.
Put half the mixed whole pickling spices in the bottom of a large stone crock and cover with half the dill. Add cucumbers. Put remaining pickling spices and dill on top of the cucumbers. Make a pickling brine by dissolving 1 1/2 cups salt in mixture of 2 cups vinegar and 2 gal. hot water.
Cool brine and pour it over the cucumbers. Cover with a plate weighted down to hold it beneath the brine. Keep crock at room temperature (68°F to 72°F) for two to four weeks. Remove scum daily.
When pickles are an even olive color without any white spots, they are ready for packing. Make a new brine of 1 gal. hot water, 3/4 cup salt, 1 cup white cider vinegar, horseradish roots, and peeled garlic; bring to boil. Pierce each pickle on the ends and once in the middle with a sterilized ice pick or knitting needle. Divide pickles among quart jars and add at least one peppercorn and one horseradish leaf to each jar. Pour hot brine over pickles, cover, and process by the boiling water bath method (p.194) for 15 minutes. Makes 8 to 9 quarts.
Making Dills by Fresh-Pack Pickling
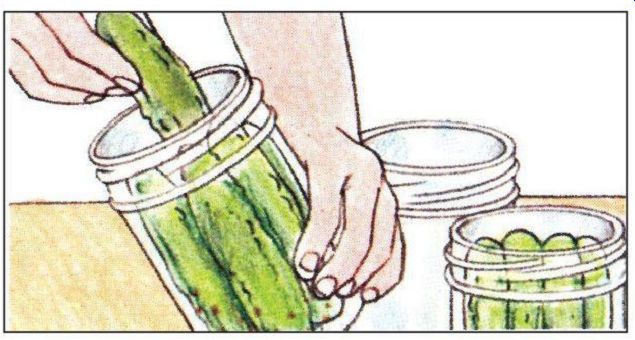
------------ 1. soak cucumbers overnight in brine solution; then drain and
pack into 1-qt. jars.
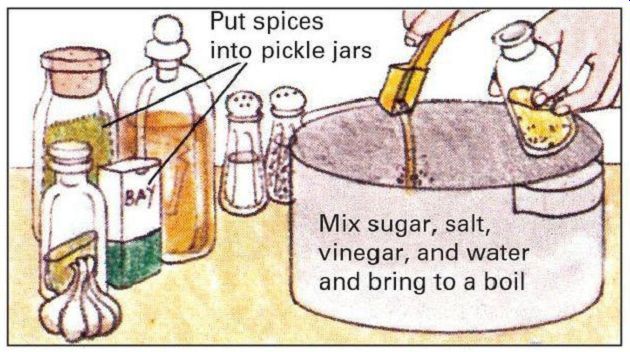
------------ 2. Divide spices among jars. Mix together vinegar, salt, sugar,
and water, and bring to a boil.
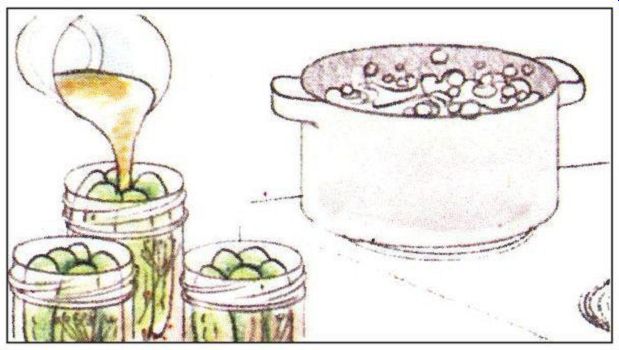
----------- 3. Pour boiling mixture over cucumbers to 1/2 in. from top
of jars. Put lids on jars.
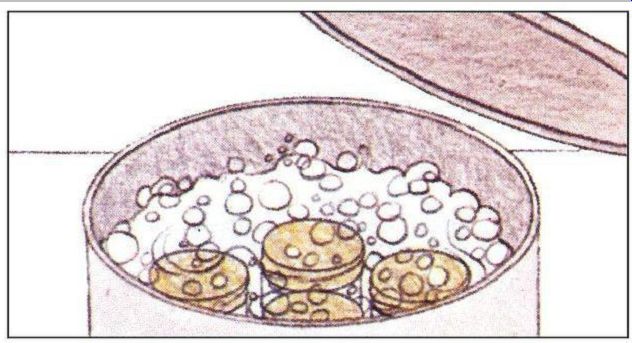
------------ 4. Process jars in boiling water for 20 minutes. Set jars
several inches apart on rack to cool.
Watermelon Pickles
6 lb. watermelon rind with green rind and pink meat removed
3/4 cup salt
3 3/4 qt. water
2 trays ice cubes
9 cups sugar
3 cups white vinegar
1 tbsp. whole cloves
6 1-in. cinnamon sticks
1 lemon, sliced thin
Cut rind into 1-in. squares (it makes about 3 qt.). Dissolve salt in 3 qt. water, add ice cubes, and pour over watermelon rind. Allow to stand five to six hours. Drain rind and rinse in cold water. Cover with cold water and cook until fork tender (about 10 minutes). Drain. Combine sugar, vinegar, and remaining 3 cups water; then add a spice bag filled with cloves and cinnamon sticks. Boil five minutes and pour over rind. Add lemon slices and marinate overnight.
Boil rind in syrup until rind is translucent (about 10 minutes).
Pack boiling pickles into hot, sterilized pint jars. Remove cinnamon sticks from bag and divide among jars. Cover with boiling syrup, leaving 1/2-in. headroom. Process in boiling water bath for 10 minutes. Makes 6 pints.
Sauerkraut 5 lb. tender young cabbage, washed and thinly shredded 3 tbsp. salt Mix cabbage and salt in a large pan and let stand 15 minutes. Pack mixture into clean nonmetal container, pressing it down firmly Not only cucumbers but beets, cauliflower, green beans, pears, peaches, tomatoes, and watermelon rind are suitable for fresh-pack pickling. Each type of fruit or vegetable can be processed individually, or several can be combined to make a relish or chutney. Details of processing vary from recipe to recipe depending on the ingredients used. Vegetables are frequently marinated overnight in brine before being heat processed; fruits and relishes are often simmered in a syrup of sugar, vinegar, and spices before processing. The procedure shown here for making fresh-pack dills is typical. As for any pickle recipe, use only ripe, perfect produce, and wash it thoroughly. You will need the following ingredients:
4 lb. pickling cucumbers 4 cloves garlic (2 per qt.) 4 tsp. mustard seed (2 per qt.) 3 tbsp. salt 3 cups water 1/2 gal. brine (1/3 cup salt in 1/2 gal. water)
8 heads dill (4 per qt.) 11/2 cups vinegar 1 tbsp. sugar with wooden spoon. Juices must cover cabbage. Allow 4 to 6 in. of headroom above cabbage. Cover cabbage with clean white cheesecloth tucked down inside container.
Weight down the cloth with a flat, tight-fitting lid that is heavy enough for the juice to rise up to but not over it. The cabbage should not be exposed to any air. Ferment at room temperature (68°F to 72°F) for five to six weeks. Skim off any scum that forms, and replace cloth and lid if they are scummy. When fermentation stops (bubbles will no longer rise to the surface), cover container with clean cloth and sterile lid, and move sauerkraut to a cold area (38°F), or process it in boiling water bath. To process, bring sauerkraut to a simmer (do not boil), and pack it into hot, sterile jars, leaving 1/2-in. headroom. Process in boiling water bath 15 minutes for pints, 20 minutes for quarts.
Makes 1 to 2 quarts.
Homemade Horseradish Sauce
2-4 horseradish roots, washed peeled, and grated 1/2 cup white vinegar 1/2 tsp. salt Mix ingredients, pack into a clean jar, and seal tightly. The horseradish sauce can be used immediately, or it can be stored in refrigerator for up to four weeks. (Heat processing destroys the sharp bite of homemade horseradish.) Makes 1 cup.
Combine water, 2 cups sugar, and vinegar. Put spices into a spice bag, add to liquid, and bring to boil. Cook peaches a few at a time until barely tender (about 5 minutes). When the last batch has been removed, add 2 more cups sugar to syrup, and return to boil. Pour syrup over peaches and let stand 12 hours. Reheat peaches and syrup, then pack peaches into quart jars. Add final cup of sugar to syrup, bring to boil, and pour over peaches. Process in boiling water bath for 20 minutes. Makes 6 quarts.
Spiced Pears
8 cups sugar 4 cups white vinegar 2 cups water 8 2-in. cinnamon sticks 2 tbsp. whole cloves 2 tbsp. whole allspice 8 lb. pears, peeled Mix sugar, vinegar, water, cinnamon sticks, spice bag filled with cloves and allspice. Simmer 30 minutes. Add pears.
Simmer 20 minutes more. Divide pears and cinnamon sticks among pint jars, and cover with boiling liquid, leaving 1/2-in. headroom. Process in boiling water bath for 20 minutes. Makes 8 pints.
Sweet and Savory Ways to Store Your Fruits
Just as salt and vinegar preserve vegetables and fruits through pickling, so sugar acts as the preserving agent in jellies, jams, conserves, marmalades, preserves, and fruit butters. Since most fruits are high in sugar to begin with, they are natural candidates for preservation in one of these forms.
In order to achieve proper gelling of a sugar-preserved product, three key ingredients must be present in correct proportion: sugar, pectin (the gelling agent), and acid. The best way to ensure good results is to follow a recipe and measure all ingredients carefully. All fruits need added refined white sugar or other mild-tasting sweetener, such as light corn syrup or honey. Very few recipes use brown sugar, molasses, or maple syrup because the flavors of these sweeteners are too strong and will overpower the taste of the fruit.
Many fruits contain sufficient natural pectin and acid for gelling, but others require extra amounts of one or the other.
Some fruits have enough pectin or acid if they are sour or just barely ripe but not when they are fully ripe or overripe.
To test for pectin, mix 1 teaspoon of cooked fruit with 1 tablespoon of rubbing alcohol. If the mixture coagulates into a single clump, there is sufficient pectin. (Do not taste the mixture, since rubbing alcohol is poisonous.) To check a fruit for acid, compare its taste to that of a mixture consisting of 3 tablespoons of water, 1 teaspoon of lemon juice, and 1/2 teaspoon of sugar. If the fruit is less tart than the lemon juice mixture, it needs more acid.
Pectin can be purchased in either liquid or powdered form, or you can make your own from apples (below right).
A pectin substitute, low-methoxyl pectin, forms a gel when combined with calcium salts or bonemeal and lemon juice.
It can be used to make jelly without any added sweeteners.
If fruits lack sufficient acid, add lemon juice or citric acid when you add sugar.
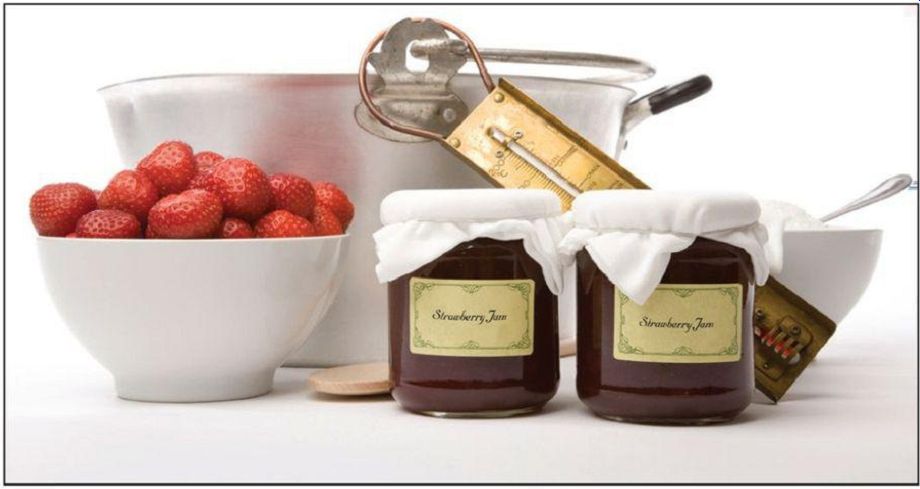
Making Jelly Without Added Pectin--While any sugar-preserved product needs a good recipe, accurate measuring, and precise timing, nowhere is care more important than in the preparation of jelly without added pectin. The first requirement is that the fruit has enough natural pectin for gelling; either select a high-pectin fruit from the list on page 203 or test for pectin content as described on the same page.
To collect juice for jelly-making, cook the fruit, then hang it in a jelly bag made of muslin or several layers of cheesecloth. Squeezing the bag or pressing it with a spoon hastens the flow of juice but can cause cloudy jelly-it is better to let the juice drip naturally. If you do squeeze the jelly bag to collect extra juice, strain the juice a second time through a clean cloth.
Prolonged cooking turns the sweetened fruit juice into jelly by boiling away water until the sugar reaches just the right concentration. Timing is critical: overcooking leads to jelly that is stiff or full of sugary crystals; undercooking will produce thin, runny jelly. Because of the precision required in the process, work with the exact amounts specified in recipes: do not double a batch for extra jelly, make two separate batches instead.
An accurate thermometer provides the simplest and safest way to tell when the sugar has reached the proper concentration. Start by measuring the exact temperature at which the mixture first boils (it will vary depending on weather as well as altitude, so take a new reading each time you make a batch of jelly). As cooking progresses and water boils away, the sugar concentration will rise and the temperature go up. When the thermometer registers 8°F to 10°F above the initial boiling point, the jelly is done. As an additional test, dip a cold metal spoon into the mixture and hold the spoon away from the heat. If the jelly runs off in a sheet rather than individual drops, it is ready. A third test is to put a spoonful of jelly on a plate and put it in a freezer. If the sample becomes firm after one or two minutes, the jelly is ready. The freezer test can also be used for jams and preserves, the sheet test cannot.
The traditional way to seal jelly is with paraffin. Melt clean paraffin in a double boiler or small pan set in a larger wide bottomed pan filled with water. (Do not melt paraffin directly over a flame or it may catch fire.) Prepare the paraffin in advance so that you can use it as soon as the jelly is done.
Once the sealed jars are cool, put on lids to protect the paraffin from being accidently broken. For surer long-term storage, use canning jars and lids, and process the jars of jelly for 5 to 10 minutes in a boiling water bath.
For best retention of color and consistency, store the sealed jelly in a cool, dark place and use it within three months.
--------------
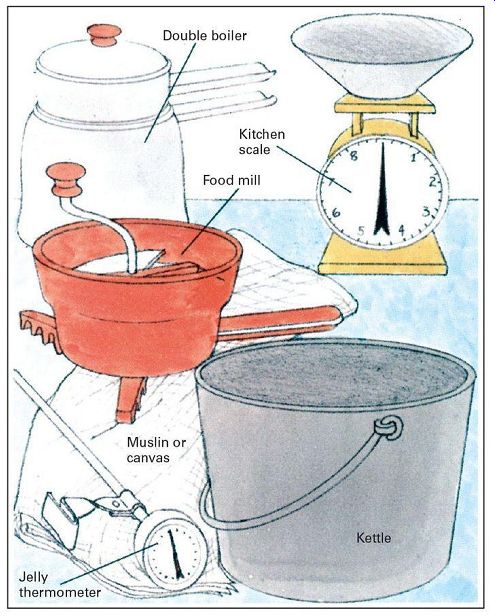
---------------- Equipment required for making jams and jellies includes all the standard canning supplies plus a few others. Buy a jelly thermometer, double boiler, and strainer. You will also need 1/2 yd. of a strong fabric, such as unbleached muslin or canvas, to make into a bag for straining jelly. A heavy kettle (less likely to let fruit scorch than a thin one), a food mill for pureeing, and a kitchen scale for precise measurement are also helpful.
Gelling properties of common fruits
Fruits with sufficient acid and pectin to gel:
Apples (sour) Gooseberries
Blackberries (sour) Grapes
Lemons
Crabapples Loganberries
Cranberries Plums
Currants Quinces
Fruits that may need added acid or pectin:
Apples (ripe) Grapefruit
Blackberries (ripe) Grapes ( California)
Cherries (sour) Loquats
Chokecherries Oranges
Elderberries
Fruits that always need additional acid or pectin:
Apricots, Pears
Figs, Prunes
Grapes ( Western Concord)
Raspberries, strawberries
Guavas , Peaches
A Variety of Confections To Please Every Taste
Unlike jelly, which is made from fruit juice, other sugar preserved foods contain parts of the whole fruit. Fruit butter is mashed pulp simmered with sugar until the pulp is thick; in the other fruit products pieces of fruit float in a light gel.
Jam consists of gelled, mashed pulp; preserves are made of fruit pieces in a thin gel; and marmalade contains bits of fruit and citrus rind in a stiff, clear gel. Conserves contain a high proportion of mixed, chopped fruits in a small amount of gelled juice; nuts are often stirred into the gel just before it starts to set.
In all these products, with the exception of the fruit butters, the concentration of pectin, acid, and sugar are critical to proper setting, particularly if extra pectin is not being added. As in making jelly, best results are achieved by following a recipe carefully--do not double or triple ingredient measures to make a bigger batch. Instead, make several small batches. Be sure pectin and acid content are high enough by using plenty of underripe high pectin fruit or by testing for pectin and acid as described. You can tell if the sugar concentration is correct by measuring the temperature of the sugar-fruit mixture as it cooks. First, find the temperature at which water boils. Then cook the fruit and sugar until it reaches 8°F to 10°F above the boiling point of water. If you do not have a thermometer, use the freezer test described on page 202. When making jams or other fruit products with added pectin, you need not cook down the fruit mixture to make it gel, but precise measurements and accurate timing are still important.
Making and using pectin To manufacture your own pectin, wash 10 lb. of tart apples, remove stems quarter the fruits (but do not core), and place in a kettle. Cover apples with cold water and bring to a boil over moderate flame. Then cover kettle and simmer until the fruit is soft (about 30 minutes). Drain fruit in jelly bag overnight and collect juice (there should be about 3 qt.). Boil down juice to make 1 1/2 to 2 cups pectin.
Adding liquid pectin to fruit. Cook fruit until it is soft, add sugar, bring to a full boil, then boil fruit and sugar together for one full minute. Add the pectin. No additional cooking is required.
Adding powdered pectin to fruit. Stir pectin into softened, cooked fruit, bring fruit and pectin mixture to a boil, and add sugar. Return mixture to a boil, then boil one minute. Jelly will then be ready.
Blackberry Jelly Step-by-step

----------- 1. You will need 5 qt. of berries (about one-fourth should be underripe) to make 2 qt. of juice. Remove stems, wash fruit, and place in heavy kettle.
2. Crush berries with potato masher, add 1 ½ cups water, cover, and bring to boil. Reduce heat and simmer, stirring occasionally, until tender (five minutes).
3. Pour mixture into dampened jelly bag, suspend bag over bowl or pan, and let juice strain overnight.
Cover bag and bowl with cloth to protect from dust.
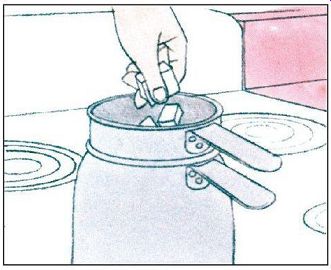
-------------4. if you are going to seal with paraffin, cut fresh paraffin
into chunks, and add a few at a time to double boiler until all are melted.
Hold until jelly is done.
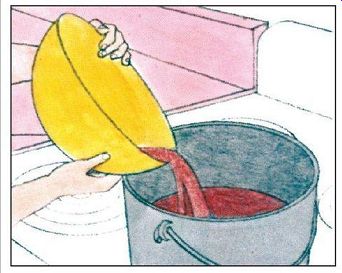
------------ 5. Pour 2 qt. of juice into heavy kettle and add 6 cups of sugar.
Place kettle over a high flame and heat the liquid to a full rolling boil
that cannot be stirred down.
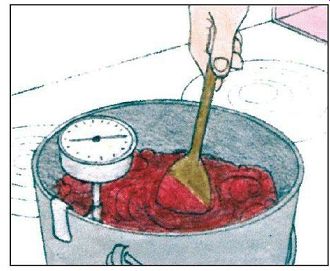
------------- 6. stir juice, insert thermometer so that bulb is covered but
does not touch pan, and note temperature at which juice reaches full rolling
boil.

------------- 7. Continue heating until temperature reaches 8°F to 10°F above
initial boiling point. At this temperature sugar is concentrated enough for
product to gel.
8. Pour jelly into hot, sterile jars, leaving 1/2-in. headroom. Process by boiling water bath method (p.194), or cover with 1/8 in. of paraffin, using pin to break bubbles.
9. Let jars stand undisturbed on rack overnight. Then put on lids over paraffin seal; label with name, date, and batch number; and store in a cool, dark place.
Jams, marmalades, preserves, conserves, and butters must undergo further processing to eliminate spoilage causing organisms if the product is to be stored for more than two or three weeks. Certain recipes specify freezing; all others require canning by the boiling water bath technique described. Use hot, sterile canning jars, and leave a 1/2-inch space above the fruit.
Jams, Marmalades, Preserves, and Conserves Without Added Pectin
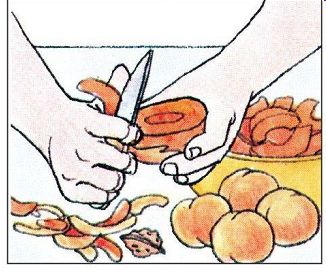
------------- 1. Wash fruit, remove pits, and peel if called for in recipe.
Cut up large fruits, such as peaches. Measure exact boiling point of water.
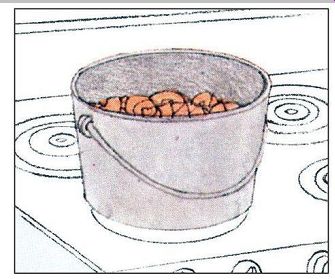
------------- 2. Put fruit into kettle, first crushing bottom layer. (Add
water if fruit has a recipe instructions.
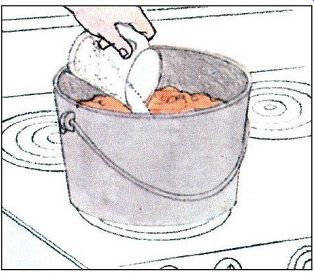
------------- 3. Add sugar (and lemon juice if acid content is low ).
Insert thermometer. Return mixture to boiling, stirring constantly to prevent scorching.
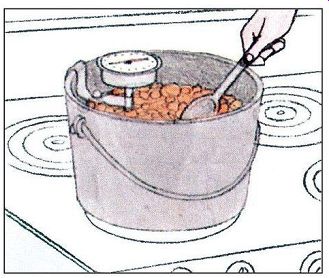
------------- 4. Boil rapidly, stirring constantly, until temperature reaches
8°F to 10°F above boiling point of water. Remove from heat immediately.
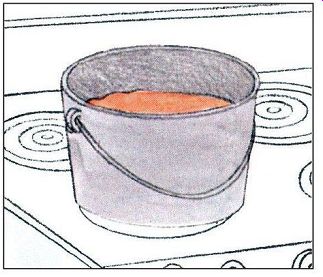
5. To prevent fruit from floating in finished product, let mixture cool for about five minutes and stir several times during cooling.
------------- Apple Jelly
2 1/4 lb. just-ripe tart apples
2 tbsp. lemon juice (if apples are not sufficiently tart)
3/4 lb. underripe tart apples 3 cups sugar
Wash apples and cut into small pieces without paring or coring. Put apples and water into heavy kettle, cover, bring quickly to a boil. Reduce heat and simmer until apples are soft (about 20 minutes). Pour cooked apples into jelly bag and collect juice as it drips. Return 4 cups juice to heavy kettle, add sugar and lemon juice. Place over high heat, and boil rapidly until temperature rises to 8°F to 10°F above boiling point of water. Remove from heat immediately, skim, and pour into hot, sterile jelly jars. Seal.
Makes four to five 1/2-pt. jars.
Grape Jelly
3 1/2 lb. underripe
Concord grapes
1 tart apple, cut into eighths but not peeled or cored
1/2 cup water
3 cups sugar
Wash grapes and remove stems. Put grapes into heavy kettle and crush. Add apple sections and water, cover, and bring quickly to a boil. Reduce heat and simmer until grapes are soft (about 10 minutes). Pour grapes into a jelly bag and collect juice as it drips. Let collected juice stand in a refrigerator or other cool place for 8 to 10 hours, then strain juice through two layers of cheesecloth to remove any crystals.
Return 4 cups juice to heavy kettle, and add sugar. Place over high heat, bring to a full boil, and continue rapid boiling until temperature rises to 8°F to 10°F above boiling point of water. Remove from heat immediately, skim, and pour into hot, sterile jelly jars. Seal. Makes three to four 1/2-pt. jars.
Mint Jelly
1 cup tightly packed mint leaves 5 drops green food coloring 3 oz. liquid pectin 3 1/2 cups sugar 1 cup water 1/2 cup cider vinegar Wash mint, remove stems, and coarsely chop leaves. Put mint leaves, water, vinegar, and sugar into heavy kettle, and bring quickly to a full boil, stirring constantly. Remove kettle from heat, add food coloring and pectin, return liquid to a full boil, then boil 30 seconds. Remove immediately from heat, skim, strain through two layers of damp cheesecloth, and pour into hot, sterile jelly jars. Seal. Makes three to four 1/2-pt. jars.
Apple Butter
8 cups applesauce 1/2 tsp. cloves 1/2 tsp. allspice 2 cups brown sugar 1/2 tsp. cinnamon Grated rind of one lemon Mix all ingredients and spread in shallow baking pan. Bake at 275°F, stirring occasionally, until thick (about four hours).
Pack into hot, sterile canning jars. For long-term storage, process in boiling water bath for 10 minutes. Makes two 1/2-pt. jars.
Peach Jam With Powdered Pectin--3 lb. peaches 1/4 cup lemon juice 1 3/4 oz. powdered pectin 5 cups sugar Making Fruit Butters
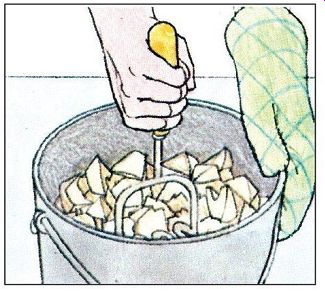
------- 1. Wash and cut up fruit, remove pits, and crush fruit into a pulp with potato masher. Measure pulp and put into a heavy kettle.
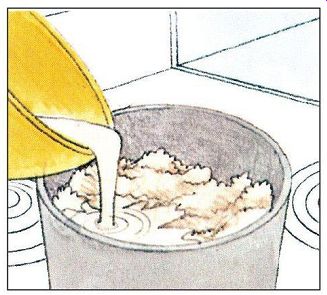
------- 2. Add half as much water by volume as there is fruit pulp. Cook over
low heat, stirring almost constantly to prevent scorching, until pulp is
soft.
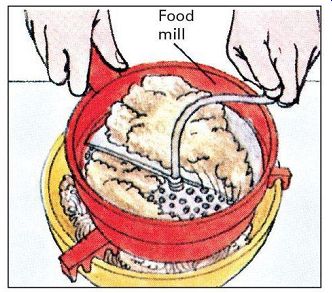
------ 3. Press fruit pulp through a colander or strainer to get rid of
all pits and skin. Then put it through a food mill or blender to make a smooth
puree.
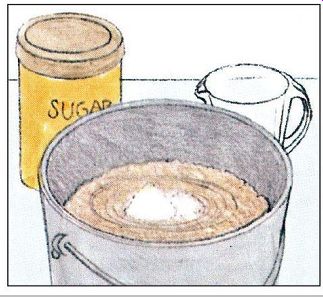
------- 4. With kettle removed from heat, pour pureed pulp back in, and
stir in 1/2 cup of sugar per cup of fruit pulp. Return kettle to low heat.
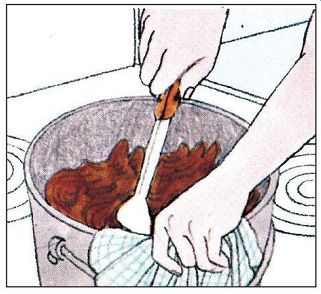
--- 5. Cook mixture over low heat, stirring constantly and watching carefully to prevent scorching. Simmer until fruit is thick and glossy.
-------
Wash, peel, pit, and crush peaches; there should be 3 3/4 cups. In a heavy kettle mix fruit, lemon juice, and pectin. Bring quickly to a full boil, stirring constantly. Add sugar. Return mixture to boil, then boil rapidly, stirring constantly, for one minute. Remove immediately from heat, skim, and pour into hot, sterile canning jars. For long-term storage, process 10 minutes in boiling water bath. Makes six 1/2-pt. jars.
Blueberry Peach Jam
4 lb. fully ripe peaches 1 qt. firm blueberries 2 tbsp. lemon juice 1/2 cup water 1 stick cinnamon 1/2 tbsp. whole cloves 1/4 tsp. whole allspice 5 1/2 cups sugar 1/2 tsp. salt
Wash, peel, pit, and chop peaches; there should be 1 qt. Wash and sort blueberries. In a heavy kettle mix fruit, lemon juice, and water; then simmer, covered, until fruit is soft (about 10 minutes). Tie cinnamon, cloves, and allspice in a cheesecloth bag, and add bag, along with sugar and salt, to fruit. Bring mixture quickly to a full boil, and boil rapidly, stirring constantly, until mixture reaches 8°F to 10°F above the boiling point of water. Remove immediately from heat, skim, and remove spices. Pour jam into hot, sterile canning jars. For long-term storage, process in boiling water bath for 10 minutes. Makes six 1/2-pt. jars.
Uncooked Berry Jam
1 qt. fully ripe berries 4 cups sugar 1 3/4 oz. powdered pectin 1 cup water Wash berries and remove stems. Place fruit in bowl and crush; there should be 2 cups. Add sugar, and let stand for 20 minutes, stirring occasionally. Meanwhile, mix pectin and water, bring to a full boil, then boil one minute. Pour pectin solution into berries, and stir for two minutes. Pour into sterile jars or freezer containers. Store in refrigerator for up to three weeks or in freezer for up to one year. Makes five 1/2-pt. jars.
Strawberry Preserves
2 qt. firm, tart strawberries 4 1/2 cups sugar Wash berries and remove stems and leaves. Arrange alternate layers of whole berries and sugar in a large bowl, and let stand in refrigerator or other cool place for 8 to 10 hours to bring out juice. When juice has accumulated, place fruit-sugar mixture in heavy kettle over medium-high heat.
Bring quickly to a boil, stirring gently so as not to break berries. Boil mixture rapidly; stir frequently to prevent scorching until temperature reaches 8°F to 10°F above the boiling point of water. Remove fruit mixture immediately from heat, skim, and pour into hot, sterile canning jars. For long-term storage, process 10 minutes in boiling water bath. Makes four 1/2-pt. jars.
Orange Marmalade
1 1/2 cups orange peel, cut into 6 oranges thin strips 1/3 cup lemon peel, cut into thin strips 3 cups sugar 1/3 cup lemon juice Cover orange and lemon peel with 1 qt. cold water and simmer, covered, until tender (30 minutes). Drain. Section oranges, remove filaments and seeds, and cut into small pieces. In a heavy kettle mix oranges, lemon juice, drained peel, sugar, and 2 cups boiling water. Bring quickly to a full boil, then boil rapidly, stirring often, until temperature reaches 8°F to 10°F above the boiling point of water.
Remove immediately from heat, skim, and pour into hot, sterile jars. For long-term storage, process in boiling water bath for 10 minutes. Makes three 1/2-pt. jars.
Let Sun and Air Preserve for You
When 80 to 90 percent of the moisture in food is removed, the growth of spoilage bacteria is halted and the food can be stored for long periods of time. By exposing your produce to a flow of hot, dry air, you will not only remove moisture quickly but also concentrate natural sugars for a delicious, sweet flavor while reducing volume for easy storage. In addition, proper drying can preserve many of the natural nutrients in foods.
Careful preliminary treatment is an important contributor to high vitamin retention, good flavor, and attractive appearance. To fix the natural color in sliced fruits, dip the pieces of fruit in pure lemon juice or a solution of ascorbic acid (vitamin C) as soon as they are cut. You will need about a cup of lemon juice to process 5 quarts of cut fruit; or mix 3 teaspoons of pure ascorbic acid with 1 cup of water. Vitamin C tablets in the proportion of 9,000 milligrams per cup of water can also be used to prepare the dipping solution, but the tablets are expensive and difficult to dissolve.
Sulfuring and blanching are the most common ways of preserving vitamin content and preventing loss of flavor in produce that is to be dried. Of the two techniques blanching is preferable, since sulfuring destroys thiamine (vitamin B1).
In addition, sulfuring may impart a sour taste to food. In general, the sulfur method is best for fruits, where the tartness may be an asset to flavor.
High vitamin retention also depends upon striking the right balance between the relatively fast drying made possible by exposure to heat and slower drying at lower temperatures. Generally, the faster the food is dried, the higher will be its vitamin content and the less its chance of contamination by mold and bacteria. Excessively high temperatures, however, break down many vitamins. Most experts recommend drying temperatures in the range between 95°F and 145°F; 140°F is the optimum suggested by the U.S. Department of Agriculture. Exposure to bright sun also speeds up drying, but sunlight is known to destroy some vitamins.
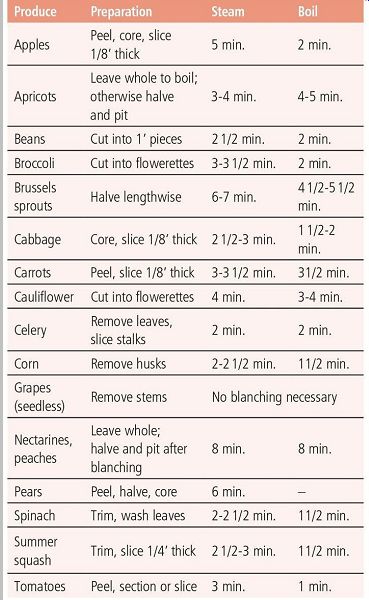
Blanching
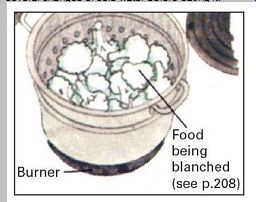
Blanching--brief heat treatment in either steam or boiling water--helps preserve both color and vitamin content by deactivating plant enzymes. It also speeds the drying process by removing any wax or other surface coating on the produce and makes peeling easier by loosening the skins. Blanching in boiling water is recommended for fruits whose skins are to be peeled. Steam blanching is recommended for most other fruits and vegetables. Onions, garlic, leeks, and mushrooms should be dried without blanching.
Boiling water blanching. Immerse produce in boiling water for the time listed on the chart. Use your largest pot and add fruit a little at a time so that the water will return to a boil quickly. After blanching, immediately dip the produce in cold water to cool it, then either peel the skin or crack it by nicking with a knife in order to aid in evaporation during drying.
Steam blanching. Place a 2 1/2-inch layer of cut vegetables in a strainer or colander. Bring 2 inches of water to a boil in a large kettle. Set the strainer on a rack above the water, cover the kettle tightly, and process for the time specified on the chart.
Sulfuring Protects Vitamins and Bright Colors
Sulfuring should be done outdoors-the fumes are not only unpleasant but also dangerous. You will need a heavy cardboard box large enough to allow 6 to 12 in. of space on all sides of a stack of drying trays. Cut a flap at the bottom of one side of the box to aid in air circulation.
To prepare fruit for sulfuring, cut it up, weigh it, and spread it in single layers-with cut sides up and no pieces touching-in nonmetal trays (sulfur fumes will corrode most metals). Stack the trays 11/2 in. apart (set pieces of wood at the corners to keep trays separated), and support the stack on cinder blocks or bricks.
You will need about 2 tsp. of sulfur per pound of fresh fruit. sulfur is sold at most pharmacies; a standard 2-oz. box contains about 16 tsp. Heap the sulfur about 2 in. deep in a clean, disposable container, such as a tuna fish can, and set it next to the stack of trays. Place the cardboard box over the trays and sulfur, then pile dirt around the box's edges to seal them. Light the sulfur through the flap and check frequently to make sure that it keeps burning. (if the sulfur will not stay lit, poke a vent hole in the box at the top of the side opposite the flap.) When the sulfur is entirely consumed, seal both the flap and the vent and let the fruit sit in the fumes until it is bright and shiny. Dry the fruit immediately after sulfuring is completed.

--------
Sulfuring times
Fruit Time
Apples 45 min.
Apricots 2 hr.
Nectarines 8 min.
Peaches 8 min.
Pears 5 hr.
Prunes 1 hr.
Outdoor Drying
If you live in an area with clean air, a dry climate, and consistently sunny weather, the simplest way to dry produce is to do it right in the garden. Peas and beans can be left to dry on the vine if the growing season is long enough. Store vine-dried peas in mesh bags in an airy spot. When you are ready to eat them, whack the bag with a stick to remove the shells. Vine-dried green and wax beans must be blanched and then oven cured by baking them for 10 to 15 minutes at 175°F before storing. Oven curing will kill any insect eggs and ensure thorough drying. For long-term storage, string the beans together and hang them in a dry place, such as the attic. Onions can also be allowed to dry in the garden.
Pull them up and let them lie on the ground in the sun for four to six days. When the tops turn stiff and straw-like, braid them together with a length of strong twine.
Blanching: preparation and timing While outdoor drying is convenient, there are some drawbacks. The longer the fruits and vegetables are exposed to air and sunlight, the more vitamins they lose.
Moreover, even mild air pollution can contaminate food-in rural areas the fumes from trucks and automobiles can be a serious problem.
-------------
Drying on trays
Produce that is not suited to garden drying can still be dried outdoors on trays made from parallel wooden slats or from nonmetallic screening. (Metal screening should not be used, since some metals are poisonous while others destroy vitamins.) The mesh should be tacked or stapled to wooden frames. Old metal window screens covered with brown paper are sometimes used for drying, but they are not recommended because the metal may still contaminate despite the paper.
When your food is ready for drying, spread it on trays in single layers so that the pieces do not touch one another.
Choose a warm drying spot, such as a heat-reflecting driveway or a rooftop, and set the trays out, raising them on blocks to 6 inches above the ground for better air circulation. For even more heat tilt the trays so that they face the sun. To protect against insects, shield the food with cheesecloth placed above the tray. Drape the cloth over wooden blocks to keep it from touching the food, and weight its edges down with stones. Put out the trays as soon as the morning dew has evaporated. At dusk either bring the trays indoors or cover them with canvas or plastic.
Drying Indoors Is Most Efficient
In many parts of the country indoor drying is the most convenient and practical way to remove moisture from food. Not only is indoor drying independent of the weather, but it is faster than open-air drying because it continues day and night. As a result, vitamins are conserved and there is less chance of spoilage.
The simplest way to dry food indoors is in an oven. Start by preparing the food as described, including blanching or sulfuring. Next, preheat the oven to 145°F.
(Buy an accurate thermometer to check the oven temperature.) Spread the pieces of fruit and vegetable in single layers on cookie sheets, making sure that the pieces do not touch one another. Place the sheets on racks inside the oven, leaving at least 4 inches above and below the trays for air circulation. With the oven door slightly ajar for ventilation, turn the temperature down to 120°F, then gradually increase it to 140°F. Be sure that the food is exposed to 140°F temperatures for at least half the full drying time. From time to time rearrange the trays and shift the food to ensure even drying. A number of commercial devices are available for drying food in the home, or you can make one of the simple driers shown on these pages.
Such driers generally do the job more slowly than an oven but have the advantage of using less energy. In addition, they free the oven for more routine tasks, such as cooking dinner or baking bread.
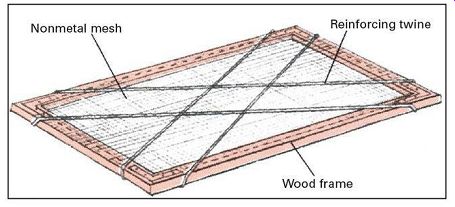
---------------- Make a drying tray from wooden slats or by stretching nonmetal mesh on a wooden frame. Reinforce bottom with twine.
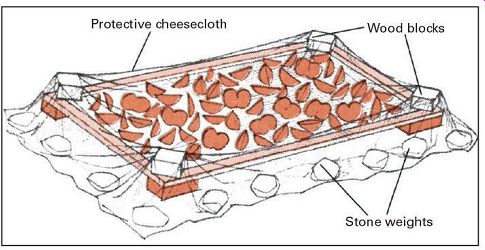
---------------- Cover trays with cheesecloth to allow maximum air and heat
circulation while protecting against insects and birds.
Drying on top of the stove
Stove-top driers designed for wood-burning stoves can be used on gas and electric stoves as well. in this type of drier the drying tray is separated from the direct heat of the burner by a 3-in-deep reservoir of water. All burners are lit, but they are turned very low. As in other drying techniques, food must be spread in a single layer with space between pieces.
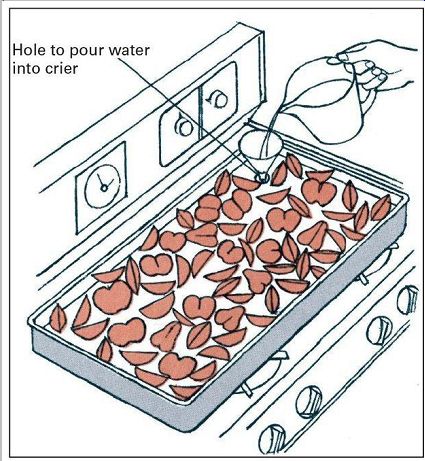
---------------- Keep a watchful eye and add water to the reservoir as needed
to prevent burning of food.
Tests for dryness
Drying times vary considerably depending on weather as well as size and moisture content of produce. Fruit is dry if it appears leathery and tough and no moisture can be squeezed from it. Vegetables should be so brittle and crisp that they rattle on the tray. Check weight too. if food has lost half its weight, it is two-thirds dry. The table gives approximate drying times.
Produce | Time in drier
Apples 6-12 hr.
Apricots 24-36 hr.
Beans 8-18 hr.
Broccoli 12-15 hr.
Brussel sprouts 12-18 hr.
Cabbage 10-12 hr.
Easy-to-make indoor driers
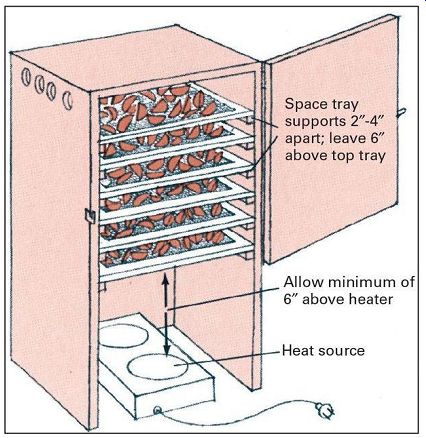
-------------- Home dehydrator (above) holds trays 2 to 4 in. apart and leaves
6 in. above top tray for circulation of heated air.
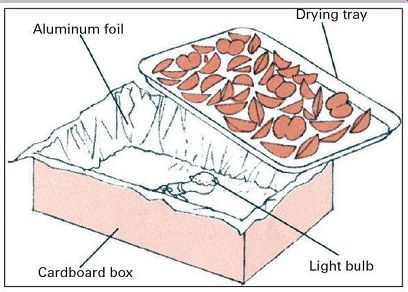
-------------- For simple drier (above) line box with foil and place light
bulb inside box, but not touching the box. Blacken bottom of tray and set
on top of box. Spread food on tray.
Carrots 10-12 hr.
Cauliflower 12-15 hr.
Celery 10-16 hr.
Corn 12-15 hr.
Grapes (seedless) 12-20 hr.
Nectarines 36-38 hr.
Peaches 36-48 hr.
Pears 25-36 hr.
spinach 8-10 hr.
summer squash 10-12 hr.
Tomatoes 10-18 hr.
Storage and Rehydration
After food has been dried it should be pasteurized in an oven to be sure no insect eggs or spoilage microorganisms are present. Final pasteurization also helps ensure thorough drying. To pasteurize, preheat the oven to 175°F. Spread food 1 inch deep on trays, and put the trays in the oven for 10 to 15 minutes.
Even though a batch of fruit or vegetables may have been meticulously dried and pasteurized, small pockets of residual moisture always remain trapped. Additional conditioning helps spread this moisture evenly throughout the produce. The conditioning is accomplished by placing the cooled, dried produce in open enamel, glass, or ceramic containers, such as mason jars. The food is then stirred thoroughly twice a day to distribute any remaining moisture. If the food seems moist at the end of five days, return it to the drier.
Solar driers
Solar driers collect heat from the sun and use it to speed up air circulation and reduce the moisture content of the air. They are especially useful in areas, such as the southeast, where there is plenty of sunlight but the humidity is relatively high. The simplest design has glass or plastic panels that trap sunlight to warm a box. A more elaborate drier, made from an oil drum, circulates sun-heated air around stacks of drying trays.
The key to successful solar drying is to check the apparatus frequently. If sunlight is blocked even partially, the air inside the drier will cool, fail to circulate, and become damp. The result is increased risk of deterioration of food.
Ingenious drier designed by New Hampshire sun enthusiast Leandre Poisson uses curved layers of plastic as solar collectors. Heated air travels by natural convection into the oil drum, where food is spread on trays. Electric light bulb and small fan increase reliability by maintaining the temperature and a balanced flow of air if sun dims.
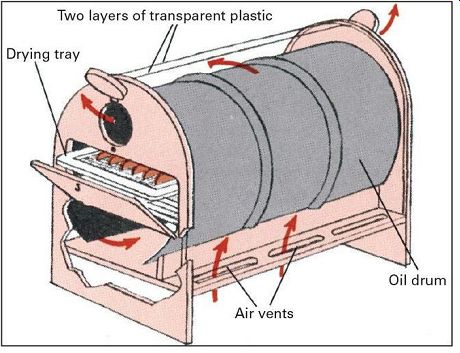
------------ Simplest solar drier is like a cold frame with glass panels tilted
toward sun. Specially placed vents maximize air circulation.
After the fruits and vegetables have been conditioned, they are ready for long-term storage. Dried food is best kept in sterilized glass jars or plastic bags. Metal containers can be used, provided they are lined with brown paper-dried food should never be allowed to come in direct contact with metal. A perfect seal of the sort required in canning is not necessary, but the containers should have secure, tight-fitting lids to keep out dirt, dust, and insects.
For best results, store dried food in a dark place where the temperature is below 60°F. Produce will sweat if stored in a warmer area, so refrigerate it during warm periods.
Check periodically for condensation (it encourages mold), and return the food to the drier if any moisture is present.
Dried fruits may be eaten without reconstitution for snacks or in cereals, desserts, and salads. Vegetables, however, should be rehydrated by infusing them with enough water to replace the moisture removed during the drying process. Most fruits and vegetables can be rehydrated by pouring boiling water over them in the ratio of 1 1/2 cups of water to 1 cup of dried food and letting the food soak until all the water has been absorbed.
Vegetables generally rehydrate in about two hours, but dried beans and fruits require overnight soaking. If all the water is absorbed but the food still appears shriveled, add more water a little at a time. Avoid adding excess liquid, however, since it will dissolve nutrients and waste them.
Rehydrated fruits need not be cooked, but vegetables must be. Cover the vegetables with any water left over from soaking and add fresh water if necessary to prevent scorching. Bring the water to a boil, reduce the heat, and simmer until the vegetables are tender. Reconstituted fruits and vegetables can be eaten plain or combined with other foods and flavorings.
Recipes
Substitute reconstituted dried food for fresh in almost any recipe (generally the volume of soaked food will be four times that of dried), or take advantage of the concentrated flavor of tomato paste and vegetable powder to enrich soups and stews.
Apple Leather
4 qt. apples, peeled, cored, and cut in pieces 1-1 1/2 cups apple cider Cornstarch or arrowroot powder Cinnamon, cloves, and nutmeg to taste Honey to taste Crush apples in a blender or food mill. Catch the juice and return it to mixture. Put ground apple mixture in a heavy kettle and add enough apple cider to prevent scorching.
Bring mixture to a boil over low flame. Add honey and spices to taste. When mixture is as thick as apple butter, spread it in a 1/4-in.-thick layer on oiled cookie sheets or cookie sheets covered with freezer paper. Cover sheets with cheesecloth and place in a warm, dry area until dry (one to two weeks) or in a 120°F oven or a food drier.
When fruit leather is dry enough to be lifted from sheets, lay it on cake rack so both sides can be dried at once. When leather is no longer sticky, dust with cornstarch or arrowroot. Wrap each sheet in freezer paper, wax paper, or aluminum foil, stack sheets, and cover with more paper.
Store in a cool, dark place.
Sun-Cooked Preserves
4 cups mixed fruit, such as peaches, pears, and berries 1 cup honey Wash fruit and cut large types into 1/2-in. chunks. Place fruit in saucepan, add honey, and bring to a boil, stirring in saucepan, add honey, and bring to a boil, stirring constantly. Spread boiled mixture 1/2 in. deep in cookie sheets, making sure fruit is spread in a single layer. Cover trays with cheesecloth stretched taut, and put them in direct sun or drier for two to seven days to dry. When preserves are thick, pack into sterilized jars and refrigerate or freeze.
Vegetable Powder
Use any thoroughly dried vegetable for this recipe. Grind vegetables in blender and store. Add dried powder to boiling water to make instant vegetable soup, or add to stews and casseroles to enhance flavor.
Tomato Paste
Italian plum type tomatoes, which have less juice, are best for this recipe, but any type of tomato may be used. Put tomatoes into heavy kettle and crush to bring out juice.
Cook until very soft (about one hour), then put through blender or food mill to puree. Return puree to kettle and simmer, stirring often, over very low heat until reduced by half (two to four hours). Spread puree 1/2 in. thick on cookie sheets and place in sun or drier until no longer sticky (about two days). Roll dried paste into 1-in. balls and let dry at room temperature for another one to two days. Store in airtight jars. Add balls of tomato paste to soups, stews, sauces, and gravies to enhance flavor, or add to cooked tomatoes to make tomato sauce. For variety add such herbs as basil and parsley when making tomato paste.
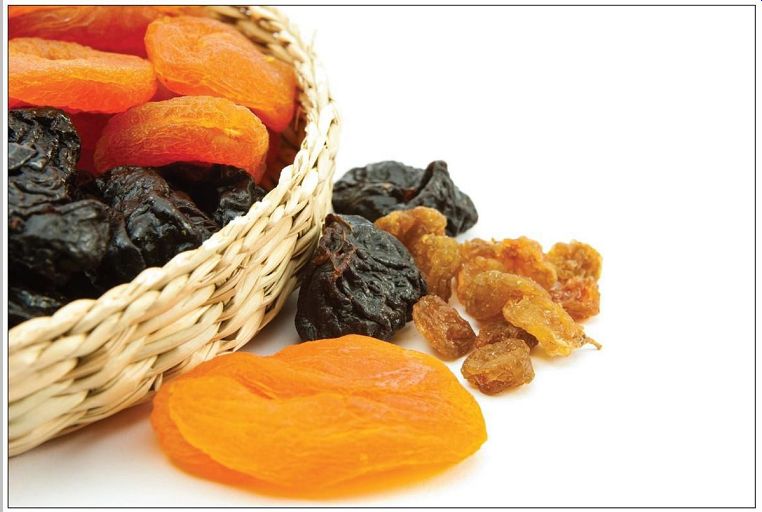
Sources and resources
Books and pamphlets:
Bailey, Janet. Keeping Food Fresh. New York: Harper Collins, 1993.
Brennan, Georganne, and Kleinman, Katherine. The Glass Pantry: Preserving Seasonal Flavors. San Francisco: Chronicle Books, 1994.
Chesman, Andrea. Summer in a Jar: Making Pickles, Jams and More. Charlotte, Vt.: Williamson Publishing, 1985.
Chioffi, Nanci, and Gretchen Mead. Keeping the Harvest. Pownal, Vt.: Storey Communications, 1991.
Holm, Don, and Holm, Myrtle. Don Holm's Book of Food Drying, Pickling and Smoke Curing. Caldwell, Ind.: Caxton, 1978.
Home Canning of Fruits and Vegetables. Home and Garden Bulletin No. 8. Washington, D.C.: U.S. Department of Agriculture, 1983.
Home Freezing of Fruits and Vegetables. Home and Garden Bulletin No. 10. Washington, D.C.: U.S. Department of Agriculture, 1971.
Humphrey, Richard. Saving the Plenty: Pickling and Preserving. Kingston, Mass.: Teaparty Books, 1986.
Hupping, Carol. Stocking Up. New York: Simon and Schuster Trade, 1990.
Innes, Jacosta. The Country Preserves Companion. San Francisco: Collins Publishers, 1995.
Kinard, Malvina. Well Preserved. New Canaan, Conn.: Keats Publishing, 1994.
Lesem, Jeanne. Preserving Today. New York: Knopf, 1992.
Nichols, Naomi. Food Drying at Home. New York: Van Nostrand Reinhold, 1978.
Pyron, Cherry, and Clarissa M. Silitch, eds. The Forgotten Arts: Making Old-Fashioned Pickles, Relishes, Chutneys, Sauces and Catsups, Mincemeats, Beverages and Syrups. Dublin, N.H.: Yankee Books, 1986.
Stoner, Carol Hupping, ed. Stocking Up III. New York: Fine Communications, 1995.
U.S. Department of Agriculture. Complete Guide to Home Canning, Preserving and Freezing. New York: Dover, 1994.
===