---
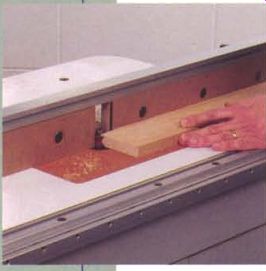
No other shop tool is as versatile as the router. It can cut complex joints and create an endless variety of moldings. Once it is mounted beneath a table, the router is transformed into a stationary tool of even greater capabilities. Like a table saw or a bandsaw, however, a router table will only produce the best work when its components are flat, straight, and square to each other.
-
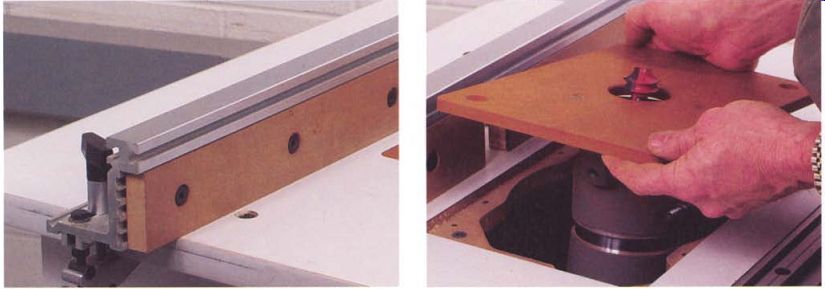
------------- Nearly all full-sized router tables have settled into one
standard design: a top made from MDF faced with a plastic laminate.
--------- Mounted on a drop-in panel, the router is easy to remove from the table to change the bit.
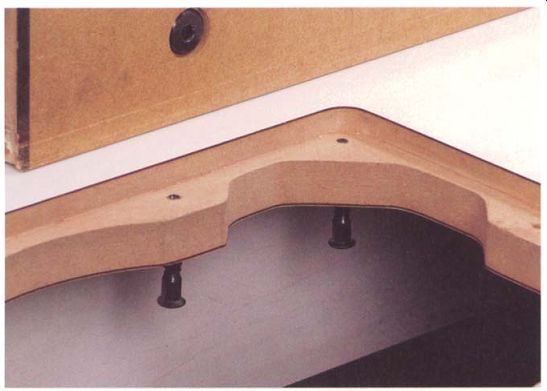
-------------- Most tables have height-adjusting screws at each corner
of the drop-in panel to bring it flush with the table's surface. This table
has extra screws to prevent the panel from flexing.
Anatomy
Although a few metal router tables are available, they are generally small with fences that are difficult to use. They are a poor choice for furniture making. Much more practical are larger tables, typically 24 in. wide and 32 in. to 36 in. long, made with a core of MDF and faced on both sides with plastic laminate. A dozen or more companies make router tables with this basic design.
These tables all share a similar system for mounting the router. The tool's base is screwed to a panel that drops into a recess in the table's surface (see the photo at top right on the facing page). Most commercially made tables have adjustment screws to bring the panel flush with the table, as shown in the bottom photo on the facing page. Depending on the manufacturer, the panels may be transparent plastic, metal, or phenolic plastic. Transparent plastic panels will occasionally become distorted or sag under the weight of the router, whereas metal and phenolic panels rarely have this problem.
Fences on commercially made tables also are similar. The backbone is an L-shaped aluminum extrusion with a face of wood, MDF, or plastic (see the photo at left on p. 166). On most fences the face is made in two sections that can be adjusted for a close fit around the router bit. Although this is an occasional advantage, fences with one continuous face are simpler to use and are less likely to catch the workpiece. Plastic-faced fences have a low-friction surface, but they often warp.
Unless the aluminum extrusions are fairly thick--1\4 in. or more--the fence will be flimsy, and it can bow as it is being used. The best fences are machined by the manufacturer to an accurate 90 degrees; raw aluminum extrusions are never reliably square or straight.
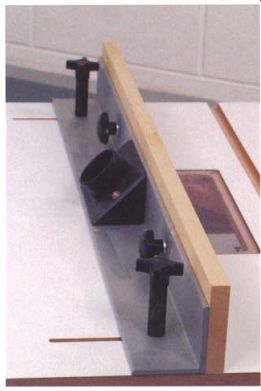
------ Almost all commercially made tables use an L-shaped aluminum extrusion
for a fence; on the best-made fences, the metal is at least X in. thick.
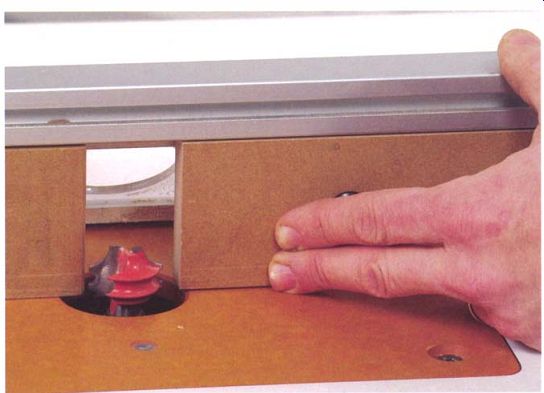
-------- Many tables have a split fence that can be adjusted for a
close fit around the router bit.
The Value of Inserts -------- Some drop-in panels have interchangeable inserts that can be switched to match the diameter of different bits. Most of these inserts, however, weaken support right where it is most critical. Moreover, inserts often are slightly higher or lower than the panel, and they may catch the workpiece as it passes. Unless you expect to use very large bits, a simple panel with no inserts and a 1 in. to 2-in. hole is a better design.
Troubleshooting
For precision joint making and smooth molding runs, a router table needs to be reasonably flat and the fence must be straight and square to the table.
Flatness is surprisingly hard to achieve in any surface, but the typical router table has several strikes against it, starting with the material the table is made from. Although it appears rigid, MDF is really just high-tech cardboard. Because MDF has little strength, the center of a poorly supported table will inevitably sag. In addition to dishing in the top, most tables have a sharp kink at the miter-gauge slot because the laminate, which reinforces the top, is interrupted on the upper face of the table.
Unless carefully adjusted, drop-in panels and inserts often will be slightly higher or lower than the adjoining surface, causing stock to catch on the edge or drop into the recess. A few manufacturers intentionally crown their tables to ensure the stock is supported close to the bit. For most operations, a crowned table is better than one that is low in the center, but a table that is high in the center still creates problems because the workpiece rocks as it moves from the infeed to the outfeed side of the table.
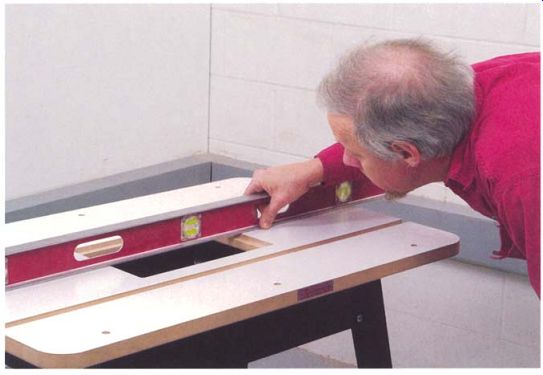
------------ Few commercially made tables stay flat in use, so the first
step in tuning up a router table is to check the table for flatness. A builder's
level is accurate enough.
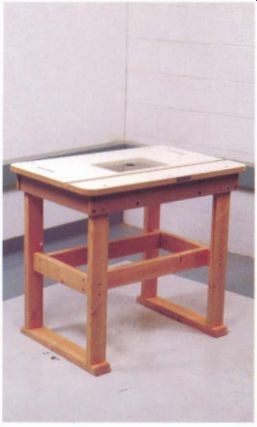
------------- Originally mounted on a sheet-metal base, this rebuilt table
is flatter and more stable now that it is attached to a wooden frame and leg
assembly.
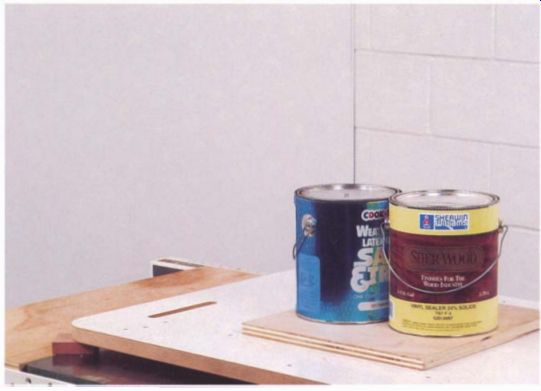
--------------- Before reinforcing a warped tabletop with metal or wood,
you should flatten it by flipping it over, blocking it up, and applying weight
to the high side.
Tuning Up a Router Table
Setting up and adjusting a router table is fairly simple and straightforward no more than an afternoon's work. The only complex job is to flatten and reinforce the table, but not all tables will need this repair.
CHECKING THE TABLE FOR FLATNESS
A good carpenter's level is adequate for checking a router table for flatness; you won't need a precision straightedge. Begin by removing the drop-in panel, then check the table lengthwise and across its width, placing the level along the table's edges and over the center (see the photo above). Typically, you'll find a sag of 1/16 in. at the edge of the panel opening. If the table has a miter-gauge groove, the table will probably have a sharp kink along the length of the slot.
Use the level to check the table diagonally. If you turn up a bow along one diagonal but the other is flat or bowed in the opposite direction, the table is twisted-often the result of an uneven floor. You may be able to correct the problem by shimming the legs or readjusting the levelers.
FLATTENING A WARPED TABLE
Flattening a sagging table is a two-step process. First the sag has to be removed, then the top should be firmly attached to a reinforcing frame to prevent the sag from recurring. Begin by removing the table's top from its base and inverting it on a sturdy, flat benchtop or the top of your table saw. Support the corners on four blocks of even thickness. Next, place a rectangle of plywood a few inches larger than the panel cutout over the center opening and stack some weight on it -a few gallons of paint or its equivalent. In a few hours to a few days, the top will be flat again. Check it regularly.
If you overcompensate, flip the top over and push it back the other way. Flatten out any more localized kinks by shifting the blocks and weight to concentrate the force where it is needed. Once the top is flat, remove the weights and blocks and store the top on a flat surface until it is reinforced.
REINFORCING A TABLETOP
A wood or metal frame will strengthen the top and prevent it from warping again. One advantage to using angle iron for the frame is that a shallow frame is less likely to interfere with access to the router, and the frame will typically fit within an existing base cabinet. Another advantage is that a metal frame can be attached to the underside of the table with sheet-metal screws, leaving the top surface unmarred. There is no need to weld the frame; you simply screw lengths of angle iron to the underside of the table.
A wood frame made from X-in. plywood or MDF has the advantage of being inexpensive and easy to make. If braces are located carefully, a wood frame usually won't interfere with a router. Alternatively, you can use your existing base, if it is well made, to stabilize the top. Just add cross braces and attach the top with better hardware (see the photo at left).
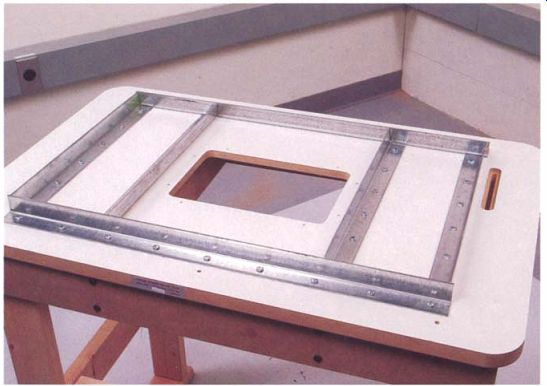
----------------- Angle iron reinforces a tabletop without taking up much
room beneath the table and usually without interfering with a mounted router.
MDF Needs Lots of Screws --------- MDF is a relatively soft material that has no grain to hold screws. The secret to solidly attaching an angle iron is to use a lot of screws-several dozen for a full-sized table.
Making a Metal Table Frame
If you would like to make your own metal table frame, use angle iron (available at most hardware stores) with each leg 1.5 in. to 2 in. wide.
When buying the angle iron, check it by eye or with a straightedge to make sure it is straight. The metal will cut, drill, and file easily if your tools are sharp, so use a fresh hacksaw blade and drill bit.
For most tables, the layout of the angle iron shown in the photo above will work well. The four pieces making up the perimeter of the frame should be set back no more than 3 in. from the edge of the table. The top, however, won't stay flat without additional reinforcement on each side of the panel cutout. To add as much support as possible where the table is weakened by the miter slot, run the pieces framing the panel opening perpendicular to the miter-gauge groove.
Drill screw holes every 3 in. or so along the length of the angle iron.
When laying out the holes, avoid placing a screw directly under the miter groove. Be sure to locate a few screws as close to the miter-gauge slot as possible to reinforce this inherently weak area.
To attach the top to the frame, use #10 or #12 sheet-metal screws that are long enough to penetrate the table by 0.25 in. (almost all commercial tops are 1 in. to 1 1/8 in. thick). Drill pilot holes the size of the inner diameter of the screw into the underside of the table, making sure you use a stop on the drill to avoid drilling all the way through the tabletop. When tightening down the screws, go easy or they'll strip. The point of using a lot of screws and starting out with a flat table is to avoid placing a lot of stress on any one screw.
Bevel Edges --- Even a slight rise with a sharp edge can stop a workpiece. Although you can't level everything to dead-on accuracy, you can soften the edges.
Beveling the laminate where it meets the insert will make stock transit much smoother.
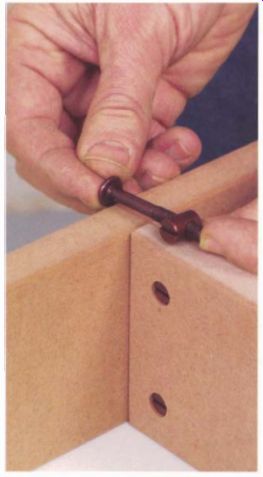
---------- Bolts and barrel nuts designed for knock down furniture make
a reliable joint in MDF, but drilling must be precise so the hardware will
line up during assembly.
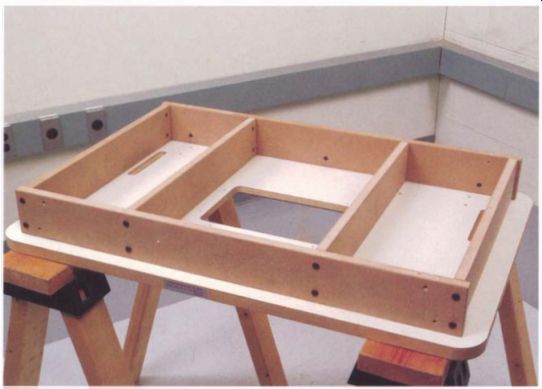
------------ A wood frame needs to be deeper than a metal frame to hold
the top flat, but it is easier and less expensive to make.
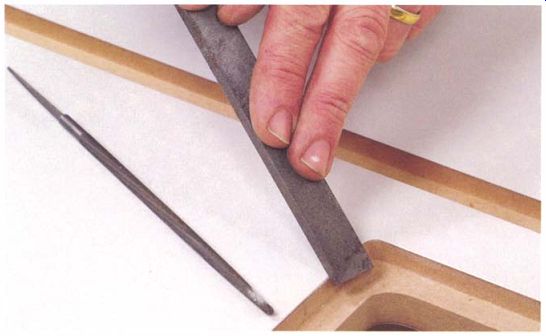
--------- Beveling the edge of the panel cutout with a file will help stock
slide smoothly without catching.
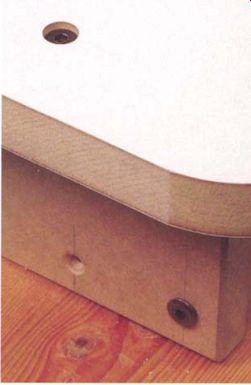
------------ The same type of bolts used to assemble the frame can be countersunk
and used to attach the tabletop to wood framework.
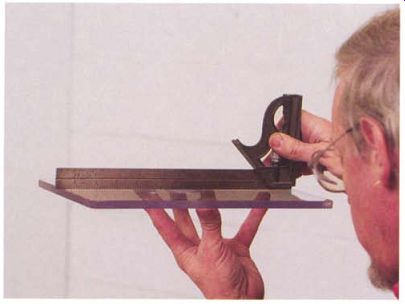
-------------- You should check the drop-in panel that supports the router
with a straightedge. Panels made from transparent plastic often are bowed or
twisted.
A variety of plastics are used for making drop-in panels; the dark colored phenolics are generally the sturdiest and flattest.
Making a Wood Table Frame
To hold the table flat, you must make your wood or MDF frame at least 4 in. deep. Start by laying it out as shown in the photo below, butt-joining the corners of the frame with bolts and barrel nuts to make a simple but very strong structure. Wide-head bolts and barrel nuts (also called cross dowels) are commonly used for knockdown furniture and are available at woodworking stores and through catalogs.
To attach the wood frame to the top, use either flat-headed bolts or knockdown furniture bolts countersunk into the table's surface (see the top right photo on the facing page). Run the bolts into barrel nuts set into the frame members. Because through bolts hold with far greater force than screws, you'll need only a few bolts to attach the top to the frame: one bolt at each corner of the table and one in the middle of the longer frame members.
With the table flattened and reinforced, remount it on its base. Before replacing the drop-in panel, use a fine file to bevel the edge of the laminate around the perimeter of the cutout. The bevel will help to prevent a workpiece from catching on the edge of the opening if the table and drop-in panel aren't quite even with each other (see the top left photo on the facing page).
CHECKING THE DROP-IN PANEL
Next, check the drop-in panel by laying a straightedge across it to see if it is flat (see the bottom left photo on the facing page). If the panel has been pulled down by the weight of the router, you can flatten it as described on pp. 167-168. To prevent the sag from returning, it's a good idea to remove the router and panel from the table between jobs.
The alternative fix for a warped panel is to replace it with one made from a stiffer material. Before making a new panel from scratch, it is worth checking with the table's manufacturer; if there have been a number of similar complaints, a better replacement may already be available.
If you can't buy a precut replacement panel made for your table, several woodworking catalogs sell blank sheets of high-strength plastic for this purpose. Plastics are fairly easy to shape using woodworking tools but they dull steel blades quickly, so use carbide-edged tools as much as possible.
The easiest way to make a new insert is to attach the slightly oversize blank replacement panel to the original panel with double-sided tape and then trim the new one to size using a bearing-guided straight router bit.
Using a file, slightly bevel the edges of the panel and the router bit opening (see the photo at left). In addition to making it less likely that stock will catch, a bevel also cuts down on burrs forming on the panel's edge that can score the workpiece. If the panel has inserts to give a close fit around the router bit, check that they fit flush with the panel's surface.
If the insert is too high, try setting it lower by deepening the rabbet it sits in or by sanding the insert until it is thinner. If the insert is low, use tape shims to raise it. As with the panel and table opening, use a file to bevel the inner and outer edges of the insert.
Insert Materials -------- Many woodworking-tool suppliers offer standard inserts for popular router brands, but if you have a less-popular brand, you'll have to make your own. Your choice of materials includes acrylic, polycarbonate, and phenolic.
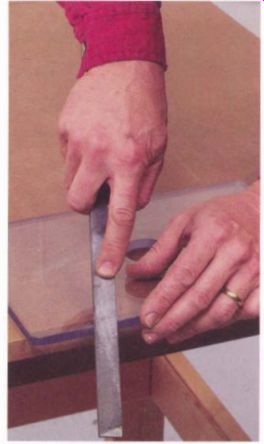
------------- To allow the workpiece to slide smoothly, file a bevel on
the edges of the drop- in panel and at the bit opening.
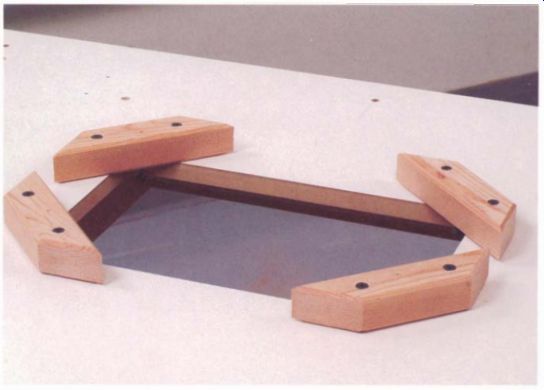
------------- Adding corner blocks with height-adjusting screws on the underside
of the table will make it easy to bring the drop-in panel flush with the top.
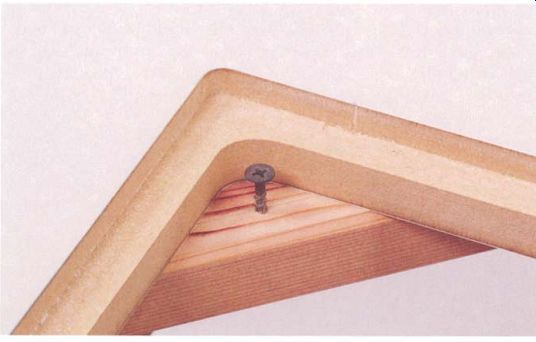
-------------- Height-adjustment screws are simply fine-thread drywall screws.
Screw heads support the drop-in panel.
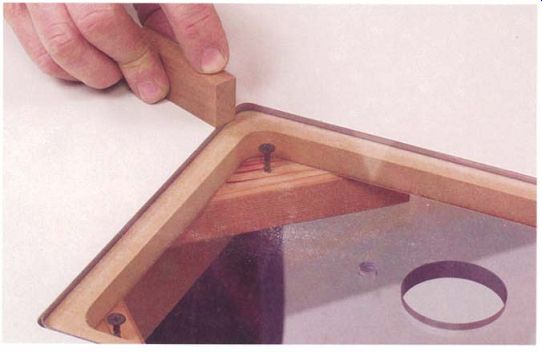
----------------- A hardwood test block with sharp edges makes it easy to
test whether the drop-in panel and table are even with each other.
LEVELING THE PANEL
Most commercially made tables have leveling screws to bring the panel flush with the table surface. If your table doesn't have them, they're easy to add by screwing four wood blocks to the underside of the table at the corners of the cutout (see the photo below). Run fine-thread drywall screws into the blocks from the top; the screw heads will hold the panel at the right height. If the panel sits higher than the table surface, use a router or a chisel to deepen the rabbet.
To check that the panel and table are flush, cut a small hardwood block as shown in the bottom photo. By leaving the short edges on the end of the block sharp, the block will snag on even a slightly raised edge as it slides over the joint where the panel meets the top.
To bring the panel flush with the tabletop, back off all four screws and drop the panel below the table. Next, using the two screws on either corner of the infeed side of the panel, raise the panel until the block barely catches on the edge of the panel. With the height of the infeed side roughly set, move to the outfeed edge. The block should catch as you try to slide the block from the panel onto the table. Using the two corner screws on the outfeed side, raise the panel until the block can just slide onto the table without catching.
Now go back to the infeed side of the panel and fine-tune the height.
Raise the panel with the infeed side screws in small increments until the block just catches on the panel's edge nearest the screw you're adjusting, then back off the screw slightly so the block slides smoothly from the table onto the panel. Fine-tune both screws on the infeed side of the panel until the block slides smoothly from the table onto the panel all along the infeed edge.
The final step is to adjust the height of the outfeed side of the panel.
Working again in small increments, lower the panel height until the block just begins to catch on the table's edge, then raise the panel slightly until the block slides smoothly. Adjust both screws until the block slides without catching.
If the table has additional adjustment screws along the edges of the panel in between the corner screws, adjust these only after you have set the four corner screws to the correct height. Raise the first intermediate screw until the panel starts to rock on that screw, then back it off until the rocking disappears. When the panel no longer rocks, the screw is properly adjusted and you can move on to the next one.
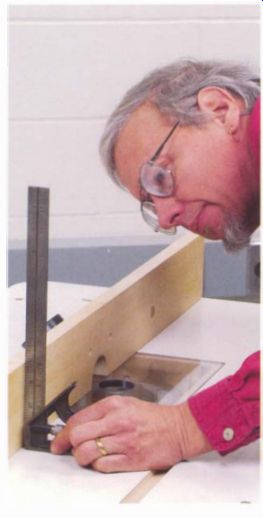
------------ Use a reliable square to check that the fence is square to
the table along its entire length.
Adjusting the Fence
To work properly, the fence must be straight and square to the table, but unless the tabletop is flat, there will be no reliable reference surface to use in checking it. A warped table also will cause a lightweight fence to twist out of shape each time it is clamped down, making a tune-up pointless.
Check and correct any problems with your table, as outlined in the previous section, before checking the table's fence.
Start by clamping the fence over the centerline of the table, with the fence over the bit opening. Using a level as a straightedge, check to see whether the fence is straight along both top and bottom edges (see the photo on the facing page). If the face of the fence is split, look for a step between the two halves where they meet in the middle.
Next, check the fence every 3 in. to 4 in. using a square. It's fairly typical for a fence to be square to the table over half its length and then start to run out over the second half.
The best fix for a fence that is out of line will depend on its facing material. You can run solid wood faces over a jointer to true it. Plastic, plywood, and MDF can't be jointed; you'll have to true them by placing shims between the face and the aluminum angle.
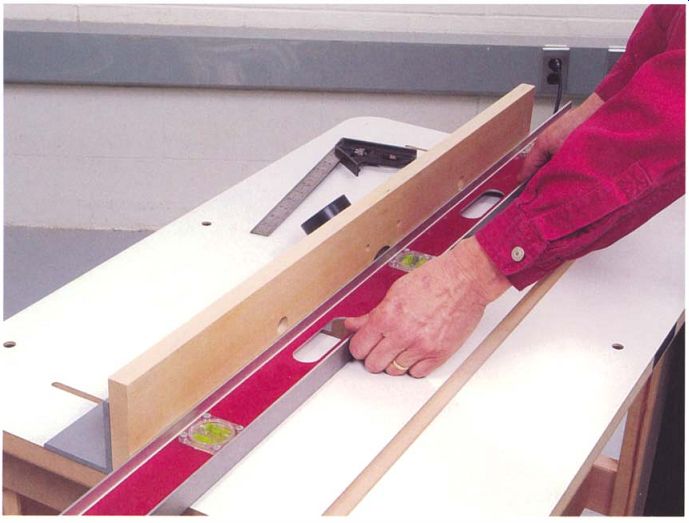
--------------- Using a level as a straightedge, check both the top and
bottom of the fence for straightness.
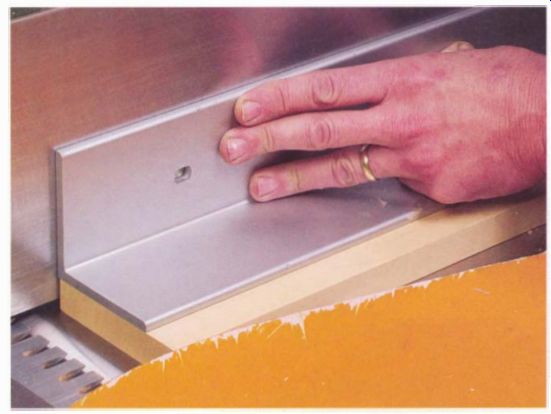
-------------- One advantage of a wood fence is that it can be flattened
on a jointer, but make sure the jointer knives will not strike any metal fasteners
or hardware.
TRUING UP A WOOD-FACED FENCE
To true up a fence with a wood face, start by removing the face and checking if it's warped. If the back surface isn't flat, true it up on a jointer. If the face is badly warped, the best approach is to make a new face using a seasoned, stable hardwood, preferably straight grained and quartersawn. If the original fence had a split face, you can replace it with a simpler one-piece face with an opening for the bit.
Try the fit between the trued-up back of the face and the aluminum extrusion while the fence is clamped to the table. If the face doesn't fit well against the frame over its entire length, the frame either has a permanent twist in it or the mounting clamps are bending the frame, possibly because the table isn't flat. If the frame straightens out when the clamps are released, you need to correct a problem with the clamps or the table to eliminate the twist.
If the twist in the aluminum is permanent, either handplane the back of the face to fit, or use shims to achieve a good fit between the face and the frame when they are screwed together. You don't want to twist either the wood or the frame once the fence is assembled.
The final step in truing up a wood-faced fence is to pass the assembled fence over a jointer to flatten and square the front face (see the photo above). Make absolutely sure the hardware used to attach the face is countersunk to prevent damage to the jointer's knives and possible injury to you.
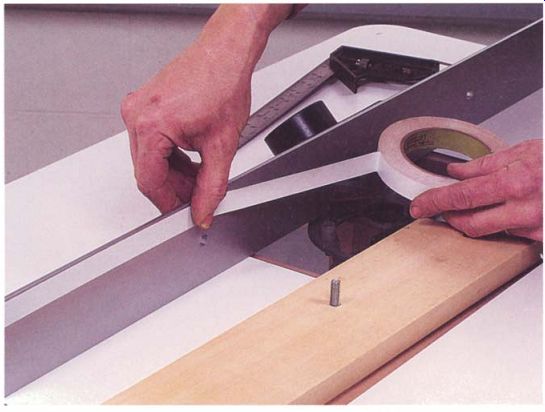
--------------- Because plywood, MDF, or plastic faces can't be planed,
shim them true with layers of tape applied to the aluminum frame of the fence.
TRUING UP A PLASTIC-, PLYWOOD-, OR MDF-FACED FENCE
Because plastic, plywood, and MDF fences can't be planed flat, you must square them up by using shims. The most convenient material to use to shim the faces is ordinary masking tape or a slightly heavier version, the white artist's mounting tape shown in the photo on the facing page. Duct tape doesn't work very well because it's too soft, creeps under pressure, and is difficult to peel off.
To get the face square to the table, start with the fence clamped down over the middle of the table. If it has a split face design, separate the two halves by an inch or so and tighten up the face attachment bolts. Use a square to determine if the face needs to be shimmed at the top or bottom.
If the face is out over its full length, remove it and apply a continuous line of tape along the top or bottom edge of the aluminum to correct the problem. Then reattach the face and check it again with a square; a second or third layer of tape may be needed. If the facing is out of square over only part of its length, just apply tape behind the section that is out. On a split fence, adjust the infeed and outfeed sides separately.
Once the face is squared up, use a level to check that it is still straight.
If the face needs straightening, add tape. Apply the tape to straighten the face lengthwise on top of any shim layer you added earlier to make the face square to the table.
Straightening a Split Fence -------- The shorter halves of a split fence rarely need to be straightened, but one side may need to be shimmed out to eliminate a step between the two halves.
Prev. | Next | Article Index | Home