---
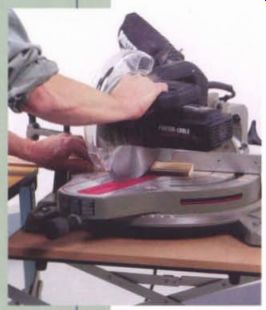
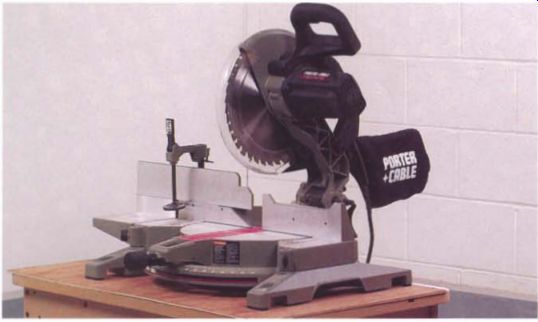
----------- Today's miter saws (top) are precise enough for furniture
making. Principal elements of a miter saw (above) include a base with a revolving
turntable to control the cutting angle, a fence, and a power head. On compound
miter saws, the power head pivots to make bevel cuts.
Miter saws were originally designed for carpenters, not cabinetmakers. Early models were not reliably accurate, and they developed a poor reputation among the cabinetmakers who tried to use them for crosscutting. The saws were often relegated to a spot near the lumber rack, where they were used only for cutting stock roughly to length.
The miter saw, however, has since evolved into a tool capable of furniture-grade precision. It is now used for joinery, not just rough work.
Its primary advantage is in crosscutting wide or long stock that would be very difficult to handle on a table saw with a miter gauge.
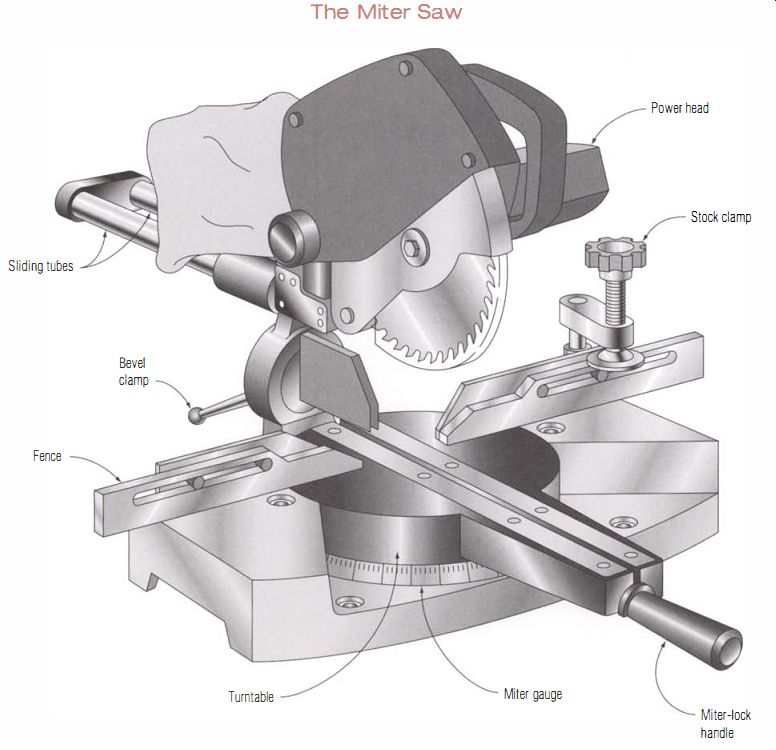
------- The Miter Saw ---- A sliding power head that pivots for bevel cuts
and turns for miter cuts makes the sliding compound saw a versatile cabinet-shop
companion. On simpler saws, the power head does not slide or pivot, limiting
the saw to simple miter cuts.
-----------------
Sliding VS. Non-sliding Miter Saws
The sliding compound miter saw is a tempting investment. The slide gives extra crosscutting and mitering capacity, but sliding saws are much less accurate and difficult to keep accurate if adjusted. Unless you really need the extra cutting capacity, choose a 10-in. or 12-in. non-sliding saw for cabinet work and invest the money you save in a top-quality blade.
----------------
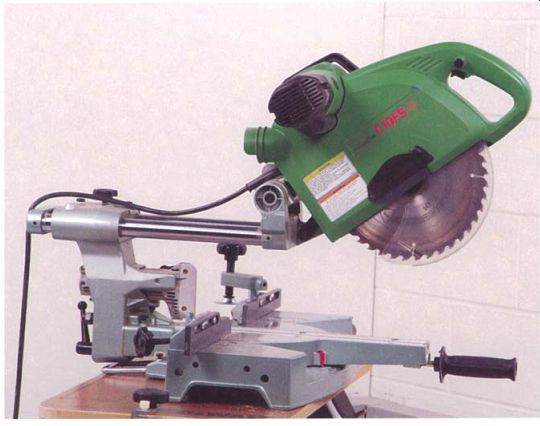
------------ With the power head mounted on tubes, this compound miter
saw has a crosscut capacity of 12 in.
Anatomy
In its most basic form, the miter saw has a table, a fence, and a power head that pivots downward to make a cut. It is this downward cutting motion that gives the miter saw its common nickname: the chopsaw.
The base of the saw is primarily a large turntable flanked by a small fixed table on each side. In the middle of the turntable is a slot that allows the blade to cut all the way through the workpiece without striking any part of the tool. As the turntable is pivoted to adjust the miter angle, the power-head assembly swings with it. The fence is attached to the side tables and stays in a fixed position when the turntable is rotated. On even the simplest saws, the turntable can be swung up to 45 degrees, left or right, to make basic miter cuts. In addition to stops at the 45-degree position, most saws also have stops, or detents, at 22 1/2 degrees and 30 degrees that are used for mitering six- and eight-sided frames.
On some saws, the power head also pivots-up to 45 degrees to the left and occasionally also to the right-to make bevel cuts. Saws with both miter and bevel capacity are called compound miter saws. A saw that can bevel both left and right is called a dual or double compound saw. The ability to cut compound angles is very useful for some jobs-when installing crown molding, for example-but it has limited applications in cabinet work.
The maximum width of stock that can be cut is limited in simple saws by the blade diameter. At 90 degrees, a 10-in. blade can cut stock up to 6 in. wide, whereas a 12-in. saw can handle 8-in. -wide stock. With the turntable rotated to a 45-degree miter, a 10-in. saw is limited to cutting 4-in.-wide stock; a 12-in. saw will typically cut just under 6-in. -wide stock at this angle.
By mounting the power head on a pair of tubes that allow the head to slide forward, the capacity of the saw can be increased, typically to a full 12 in. Almost all sliding saws also have the capability of cutting compound angles. To work smoothly and accurately, the sliding tubes and their bearings must be carefully machined and aligned. Because of their design, sliding saws, no matter how well made, are less accurate and more expensive than a simple miter saw.
Troubleshooting
Problems with miter saws fall into two broad categories: inaccurate cuts that cause out-of-square or gapping joints, and rough surfaces on the cut face of the stock. Inaccurate cuts can usually be traced to an adjustment that's out of whack, but occasionally the problem is caused by worn or loose-fitting parts. To get the saw to cut well, tune it up as outlined in the next section. I've included procedures for checking wear and for making quick adjustments to eliminate excess play in the saw's pivots and slides.
Rough cuts are almost always due to the sawblade. When miter saws come from the factory, they are typically equipped with mediocre-quality 36- or 40-tooth blades meant for trim carpentry. For accurate, glass-smooth cuts, you need to invest in a top-of-the-line 80-tooth blade designed specifically for miter saws.
Use a Miter-Saw Blade ---------- Table-saw blades should never be used on a miter saw. The sharply angled teeth will grab and lift the stock off the miter saw's table and cause uncontrollable kickback.
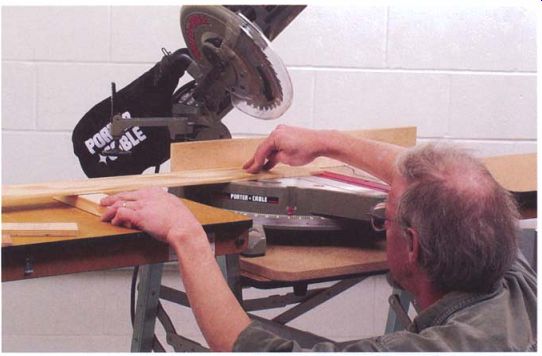
----------- For a precision cut, the stock must sit squarely on the saw's
table. Always check that there's a good fit before sawing.

------------ A selection of blocks used to elevate the stock to different
heights can be useful. By adjusting the end of a bowed board, the other end
can be held flat on the table for the cut.
Setting Up a Miter Saw
To deliver the accuracy required in cabinetmaking, a miter saw should be mounted on a solid stand with stock support tables extending several feet to either side of the blade. Both commercial and shop made stands come in two basic designs. In one, the side tables come up flush with the table of the miter saw. This type of stand requires leveling screws at the ends of the tables so the surfaces can be aligned.
In the second most common design, the one I prefer, side tables are below the level of the miter saw's turntable. A simple, sturdy version is a one-piece table, long and narrow, with the saw mounted at its midpoint.
The table surface should be parallel to the miter saw's table, but it doesn't need to be flush with it. Stock is supported by blocks of wood that make up the height difference between the table and the saw.
The primary advantage of this design is that it allows you to make adjustments easily for bowed stock. For accurate joinery, the workpiece must lie perfectly flat against the miter saw's table and fence. If you are trying to cut a longer piece of stock that has even a slight bow in it, you can use a block to keep the cut end in contact with the table. I keep blocks of different thicknesses on hand for just this situation (see the bottom photo on p. 182).
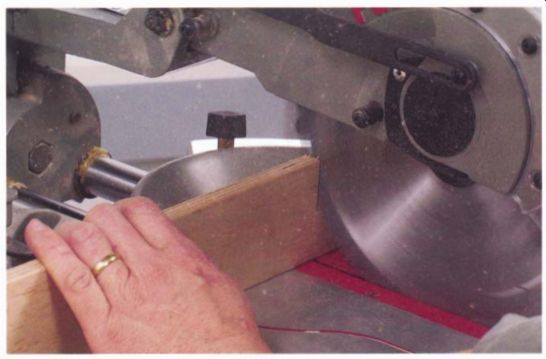
------------ An auxiliary fence is attached as a single piece and then
sawn in half. The narrow gap reduces tear-out on the back of the workpiece.
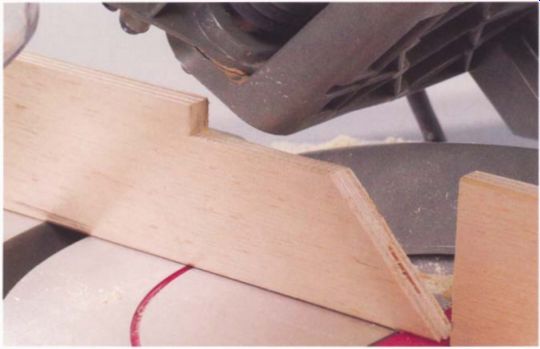
---------- To provide clearance for the pivoting power head on compound
miter saws, the top of the auxiliary fence must be notched.
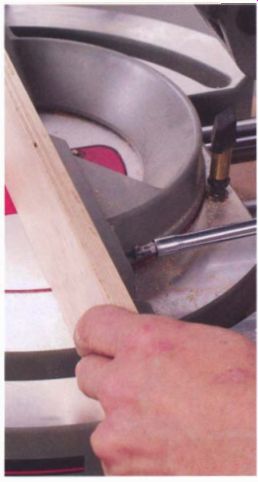
------------- Adding a wider and longer plywood facing to a miter saw's
original metal fence will improve the saw's performance.
INSTALLING AN AUXILIARY FENCE
For no obvious reason, the fences on most compound miter saws are very low, sometimes just more than an inch high with a very large gap between the left and right halves. For cabinet work, these fences don't support the stock adequately, since they allow the board to shift or wobble, which can ruin a cut. On most saws it is possible to add a plywood facing to the metal fence to correct the problem. Many saws have screw holes already drilled in the metal fence to make attaching the auxiliary fence a simple job.
Because the thickness of the facing reduces the cutting capacity of the saw, use 1/2-in. -thick plywood to minimize the loss. The ideal material is a nine-ply Finnish or Baltic birch plywood that should be free of warp. Make the add-on fence from a single piece of plywood, 3 in. to 4 in. tall and a couple of inches longer than the miter saw's fence. Attach the facing to the metal fence with sheet-metal screws from behind or countersunk flathead machine screws and nuts that go through the plywood.
Once the facing is attached, cut through it with the saw set for a square cut and then left and right 45-degree miters. If you don't use a compound saw's bevel function, there is no need to cut away the facing with the power head tipped over. By not cutting away a large wedge of the facing for bevel cuts, the facing will better support the stock for regular mitering. If you do use the saw for bevel cutting, it will be necessary to notch the facing's top edge to clear the saw's frame when it is tipped over.
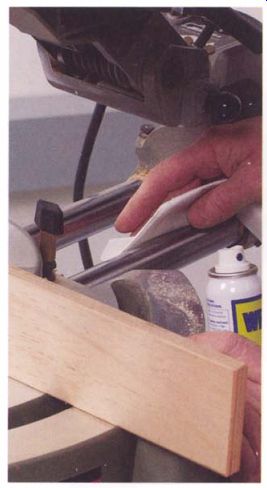
--------- For smooth operation, the tubes on a sliding saw must be kept
clean. Penetrating oil is an effective solvent for gum and pitch.
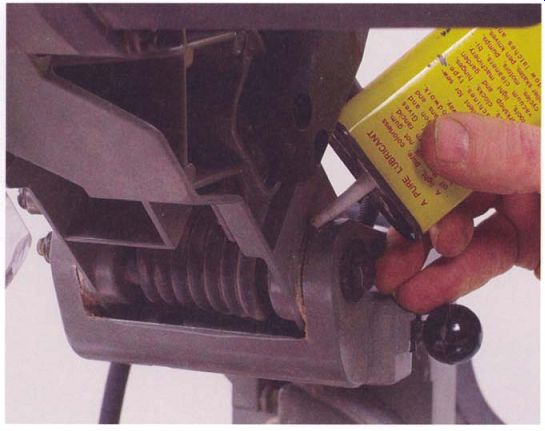
---------- You should occasionally use light machine oil to lubricate the
moving parts of the saw.
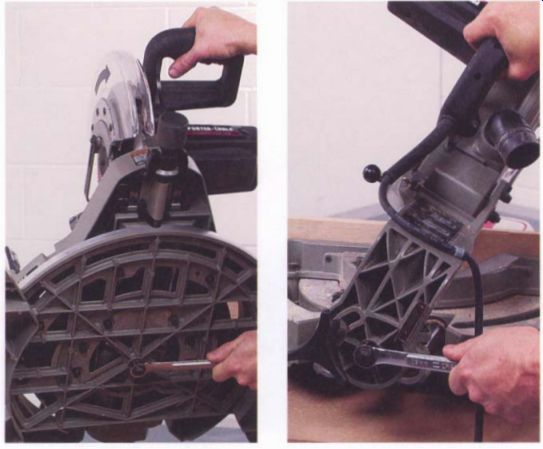
--------- The pivot bolt for the saw's turntable must be tightened carefully
to eliminate any free play while still allowing the turntable to rotate smoothly.
------------- If the saw has an adjustable power head tilt bolt, you should check and tighten it to eliminate any excess motion.
Tuning Up a Miter Saw
To tune up your saw, start by removing dust and chips from the base. You can safely use compressed air to blow out the crevices under the saw's table, but don't use high-pressure air to clean off the tubes of sliding saws because the blast of air can force dust past seals that protect the bearings.
Remove the blade and clean out the inside of the blade housing and the guard because pitch often builds up in these areas.
Dust, especially if it contains pitch, also may accumulate on the sliding tubes and interfere with the smooth motion of the saw. To remove it, spray some penetrating oil, which is an efficient pitch solvent, on a clean towel and use it to wipe down the tubes (see the photo at left on the facing page). Don't leave oil on the tubes; wipe them down with a dry towel once they are clean.
Using a light machine oil, lubricate the plunge pivot bolt that the head rotates on when the saw is pulled downward. On many saws, most of the remaining pivots and lock components cannot be reached for lubrication, but it is worth lubricating those that are accessible. Components that are difficult to move or grate when they're turned should be disassembled, if needed, for lubrication.
CHECKING FOR EXCESSIVE PLAY
If there is play in the saw, you should track it down and eliminate it before adjusting the fence and stops for squareness. Start by making sure the pivot bolts for the turntable and head tilt are as snug as possible while still allowing the parts to rotate smoothly. Beginning with the turntable, gradually tighten the pivot bolt on the underside of the table until the table starts to drag when you turn it, then back off the bolt until the drag just disappears (see the photo at left above). Repeat the procedure with the head tilt bolt on the back of the saw.
Tighten Slide Bolts Equally ------- Some machines can have four or more adjustment bolts on each tube. Keeping the slide tube parallel depends on all of these being tightened equally.
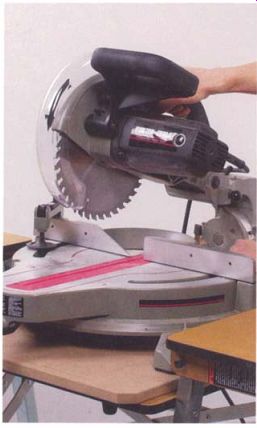
---------- Once you've tightened the saw's bearings and pivot bolts, there
should be no play when side pressure is applied to the power head .
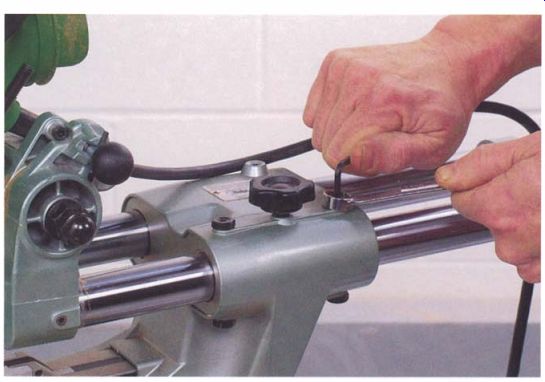
-------------- Loose bearings on a saw's sliding tubes can cause inaccurate
cuts. You should check and tighten bearings as part of a tune-up.
On sliding saws, there may be one or more bolts that can be adjusted to take up play in the bushings of the sliding tubes. Adjusting these screws properly can be tricky, so it's a good idea to follow the instructions in the saw's manual. Lacking specific instructions, gradually and evenly tighten all the screws for one bar until they all drag slightly. Back the screws off to eliminate the drag, then lock the screws and repeat the procedure for the second tube. On some saws, the plunge pivot bolt can be adjusted. If so, tighten the bolt until you can feel resistance when you pivot the saw downward and then back off and lock the bolt.
With all the slack taken out of the pivot bolts and the sliding tubes, it is time to check the saw for any other sources of play. Clamp or bolt the miter saw onto a sturdy benchtop if it is not already attached to a stand.
For the first check, lock the saw for a square cut and grasp the power head from the side with the saw in the raised position. On sliding saws, position the head at either the beginning or the end of the stroke, choosing the position that minimizes the projection of the tubes. Try to flex the saw by pushing and pulling against the head (see the photo at left). Any play here is probably due to a worn plunge pivot bolt or its bushings. Worn bushings on the sliding tubes also are a possible cause.
Next, check the detent mechanism on the turntable by rotating the turntable away from and then back to 90 degrees. The detent should engage the notch crisply at the 90-degree position. Using the handle on the turntable, try to shift it left and right. The detent should hold the table solidly without having to engage the backup lock. If the turntable doesn't hold solidly, check the detent mechanism because sawdust or wear may prevent the locating pin from seating fully. A worn or loose center pivot bolt on the turntable also can allow play. Repeat this test at the left and right 45-degree miter positions.
With the turntable lock engaged, pull the saw down to the cutting position and try to push it to the left and right with moderate force.
Except for some flexing on sliding saws, the power head should not shift.
Play here is most likely due to a worn plunge pivot bolt or worn bushings on the sliding tubes, but a worn or loose center bolt on the turntable is another possible source of trouble.
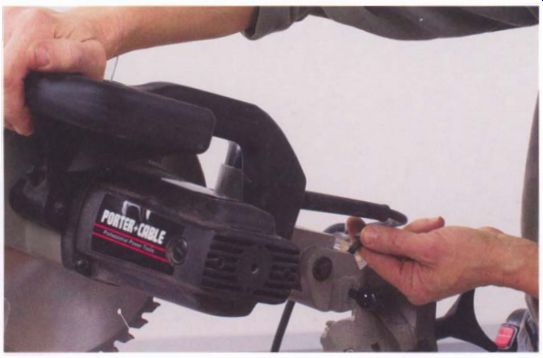
---------- The depth of cut should be adjusted so the blade enters the
slot to the bottom edge of the gullets between teeth. After making this adjustment,
check that the sawblade won't strike the bottom or ends of the slot.
ADJUSTING THE BLADE DEPTH STOP
Press down on the power head until it rests against the depth stop.
Holding the saw down, look at the side of the blade to check the depth setting. On most saws, the blade should enter the table slot to the bottom of the gullets on the blade's teeth. If the depth needs adjusting, you'll find the stop bolt on the saw frame close to the plunge pivot bolt (see the photo above). If you increase the depth of cut, make sure the blade can't come into contact with the turntable or the pivot assembly.
CHECKING AND ADJUSTING THE BLADE GUARD
You should check the linkage of the blade guard frequently to make sure it operates smoothly. The guard should fully enclose the blade when the power head is raised. Some saws come with poorly designed mechanisms hidden inside the blade housing that gum up and are hard to service. You should clean and lubricate the guard's linkage and check that it does not stick as it pivots . Bending the linkage's main arm slightly may help to eliminate jamming or sticking. On most saws, the pin that engages the linkage can be adjusted to make the guard pivot back just as it reaches the stock (see the bottom photo).
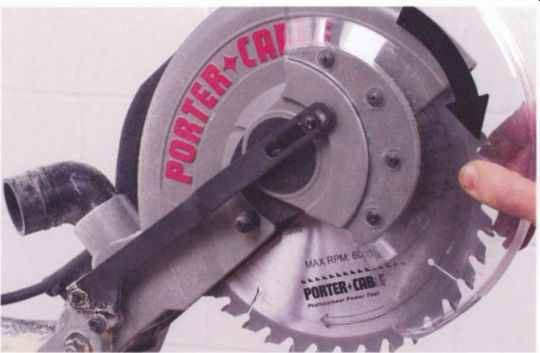
---------- A sticking guard that doesn't close fully is very dangerous.
It should be free to move and fully enclose the blade when the power head is
raised after a cut.

------------ The position of the pin that retracts the blade guard should
be adjusted so it lifts the guard just as it reaches the stock.
CHECKING THE FENCE
The fence on a miter saw is typically an aluminum casting with a large, semicircular segment connecting the left and right halves. The looped part of the casting is a weak spot that can get bent, throwing the two faces of the fence out of line. A straightedge placed across the fence should line up perfectly with each side. If not, you have two options: Try to straighten the casting, or add facings to the fence and shim them until they are aligned.
To straighten the casting, remove the fence from the saw and set it up across two blocks on the benchtop. Press down on the high side of the fence with moderate pressure for just a moment, then recheck it for straightness. Don't use a lot of pressure, at least not for the first try. Most fences are not very stiff and you can easily overdo it.
The basic procedure for adding facings is explained on pp. 182-184. You can add shims after separating the two halves of the fence with a saw cut.
Shimming Facing Material ---- Masking tape makes a convenient shim material. It is thin enough for making small adjustments, and it will stay in place as you screw the facing onto the original fence.
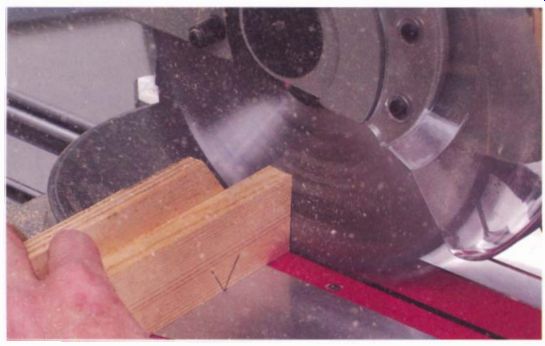
----------- Make a test cut to check the vertical alignment of the blade.
The mark on the board's face designates the good edge of the board, which should
be placed against the table.
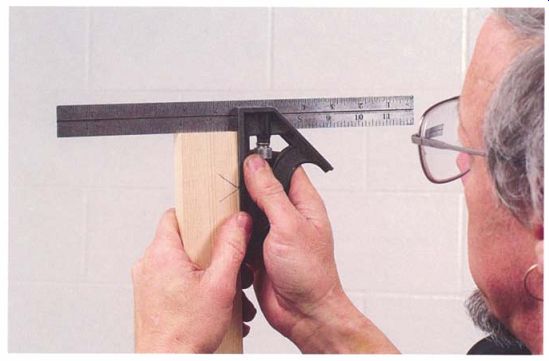
------------ To check the accuracy of the cut, place the head of the square
against the designated good edge of the test piece.
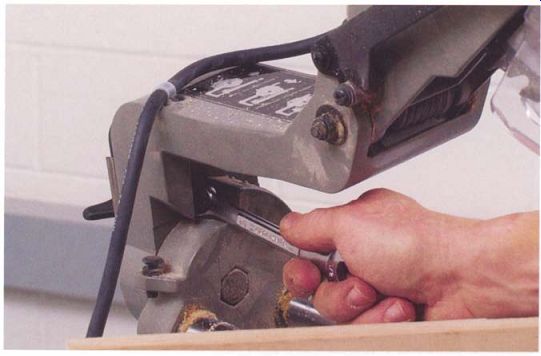
-------------- You can bring an out-of-square saw into alignment by adjusting
a stop bolt on the back of the tool.
SQUARING UP THE VERTICAL ALIGNMENT
The most accurate way to adjust the various settings on a miter saw is to make test cuts and then check the end of the test board with an accurate square. An alternate method is to use a square to check the alignment of the sawblade to the table or fence. This technique, frequently recommended in manuals, is invariably less accurate. The critical point is to get a square end on the board, so you might as well measure that directly.
On a compound-angle saw, start by checking the saw for square vertically. You will need two test boards 0.25 in. thick, 2 in. to 3 in. wide, and 2 ft. long. One board is required for the vertical test and the second one will be needed later for setting the 45-degree miter stop. Using a jointer and a planer, flatten and square the edges of the boards. For accuracy, it is especially critical that one edge of each board be dead straight. This edge, which goes against the miter saw's table or fence when making a test cut, should be designated with a V mark placed on an adjoining wide face of the board.
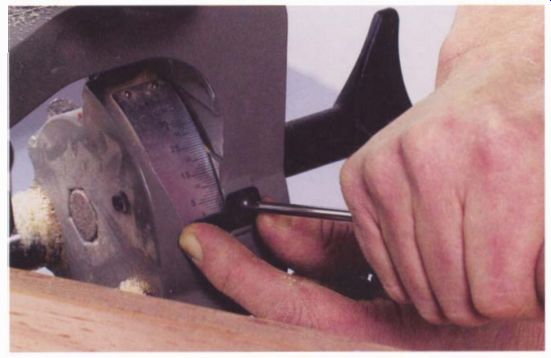
---------- Once the saw is squared up vertically, set the pointer on the
tilt scale to 0 degrees. You can bend the pointer to bring it closer to the
scale.
To test the saw's vertical adjustment, set and lock the saw at both the vertical and horizontal 90-degree stops. Stand one of the test boards on edge against the fence, with the designated good edge down, and make a test cut (see the photo on p. 189). Next, using a reliable square and holding the board upright in front of a bright background, check for an exact 90-degree cut. If the saw is set properly, the blade of the square will fit tightly against the board's end (see the top photo on the facing page). For a true reading when using the square, be sure to place the tool's stock against the designated edge, the edge that was against the saw's table when you made the test cut.
If the cut end isn't square, adjusting the stop is usually simple. Ordinarily, the stop is an easily reached bolt and locknut in the tilt assembly on the back of the saw. Some saws come with a special wrench to loosen the locknut because clearances can be tight. To make the adjustment, tilt the power head to take pressure off the stop bolt and then loosen its locknut (see the bottom photo on the facing page). Turn the bolt to correct the misalignment, lock it down again, and take another test cut. It may take a couple of tries to get a perfectly square cut on the test piece.
Once you have the saw cutting a square corner, set the pointer on the bevel angle scale to line up precisely with the scale's O-degree mark (see the photo above). On many saws, the angle will be easier to read and the positioning more precise if the pointer is bent to sit as close as possible to the scale without actually touching it.
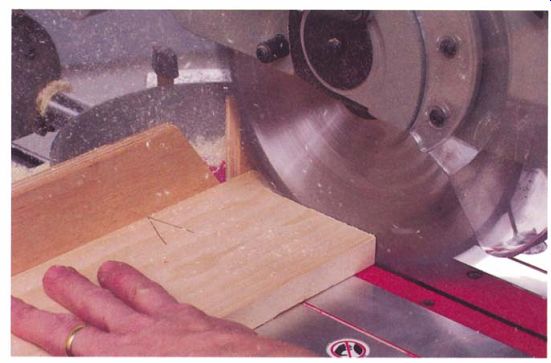
----------- Make a test cut to check the saw's miter accuracy, placing
the designated good edge of the board against the fence.
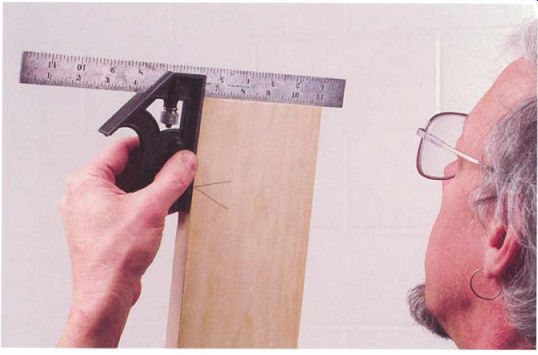
--------------- No light should shine beneath the blade of the square when
checking the test cut. The 90-degree crosscut is the single most critical adjustment
on the saw.
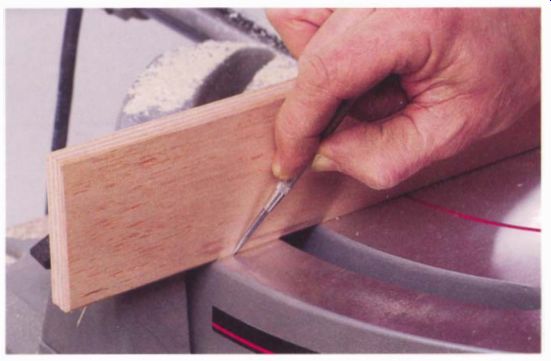
------------- Before shifting the fence to square up the saw, mark its
starting position on the table with a scribe or pencil line.
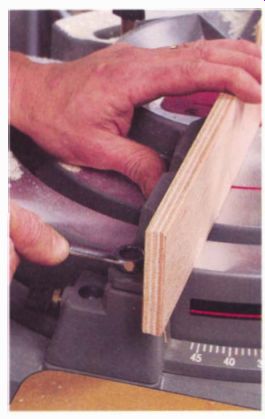
--------------- Square up the fence horizontally by loosening the mounting
bolts and shifting it slightly. Scribe marks on the table make it easy to judge
how far you have shifted the fence.
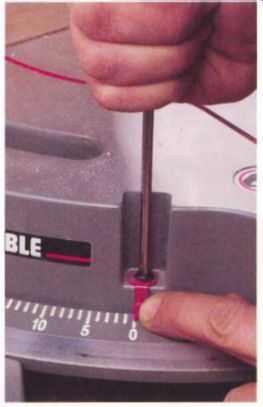
----------- Once the saw is adjusted, make sure the pointer is aligned
with the 0-degree setting on the turntable.
SQUARING UP THE HORIZONTAL ALIGNMENT
To check a saw's horizontal, or miter, alignment, make a test board 1.1 in. thick, 3 in. to 4 in. wide, and a couple of feet long. If you also plan to check the saw's 45-degree miter detents, make up two boards of this size. The boards should be jointed and planed square and have a good edge marked.
Begin by locking the saw against both the vertical and horizontal 90-degree stops. Place the board on the table with its designated edge against the fence and take a test cut, then hold the board in front of a bright background and check the cut end with a good square (see the bottom photo on the facing page). Remember to place the head of the square against the designated edge of the board. If the horizontal alignment is off, it is corrected by shifting the fence. Before loosening the bolts that clamp the fence to the table, make a short scribe or pencil line at each end of the fence to mark its starting position as shown in the photo above. The marks will make it easier to see how much you have shifted the fence as you square it up.
Loosen all the bolts holding the fence and check that no sawdust is trapped between the bottom flange of the fence and the saw's table. Shift the fence to correct the alignment, using the scribe marks to guide you, and retighten the bolts (see the top photo at right). Continue to make test cuts and adjustments until the setting is correct. If the saw is properly aligned, it should give a square cut with the stock against either the left or right-hand fences. If this is not the case, the fence must be bent out of alignment and should be rechecked.
Once the saw is cutting a square corner, set the pointer on the miter angle scale to line up precisely with the scale's 0-degree mark. The pointer should be bent so it just clears the scale.
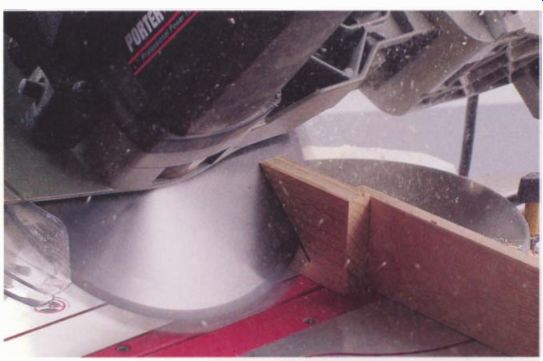
------------ Cutting the ends of two carefully prepared test boards will
help determine whether the 45-degree bevel angle setting is correct.
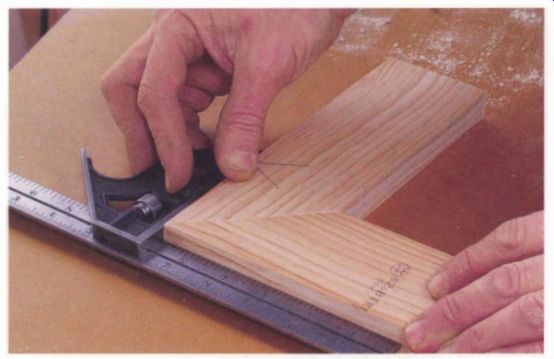
---------------- The most accurate test of the saw's bevel adjustment is
to assemble a joint made from two test boards and check whether the corner
is square.
ADJUSTING 45-DEGREE VERTICAL ALIGNMENT
With the vertical and horizontal square stops set, you can now set the stop for tilting the head 45 degrees to the left. For this test, you will need two boards, both 2 in. to 3 in. wide and a couple of feet long. Square up the boards and mark the best edge on each board with a V on the adjacent face.
Rotate the saw against the 45-degree vertical stop, lock it there, then take a miter cut off the ends of both boards, keeping the designated edges against the table. Assemble the joint on a flat bench top and check that the corner is square (see the bottom photo on the facing page). If the joint isn't square, adjust the stop bolt and make another test cut. It probably will take several attempts to get a perfectly square corner.
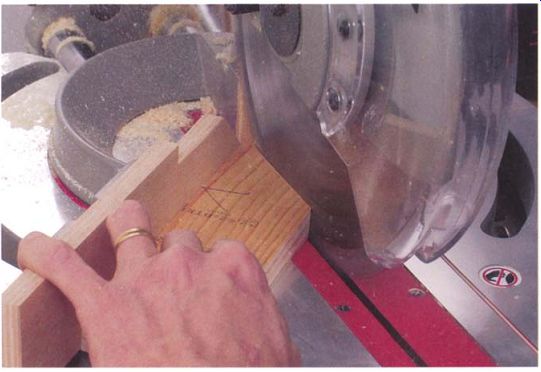
------------- Make a test cut to check the turntable's 45-degree setting
with the designated edge of the test piece against the saw's fence.
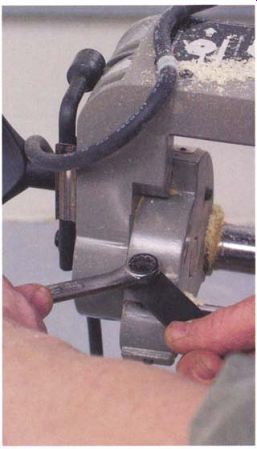
-------------- Adjust the stop bolt for the vertical 45-degree setting.
Because of tight clearances around the bolt, use the wrench supplied with the
saw to loosen the locknut.
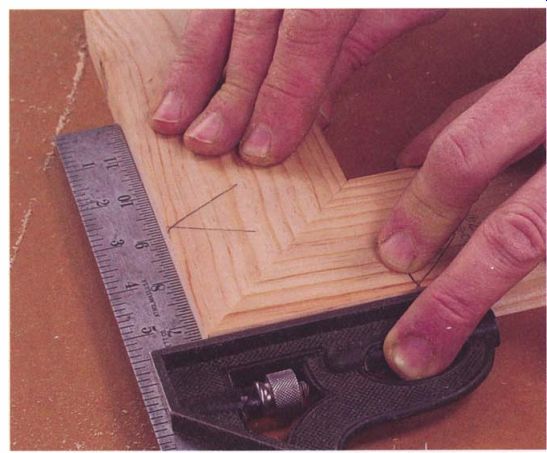
---------------- After sawing both boards, assemble the test joint and
check it for square.
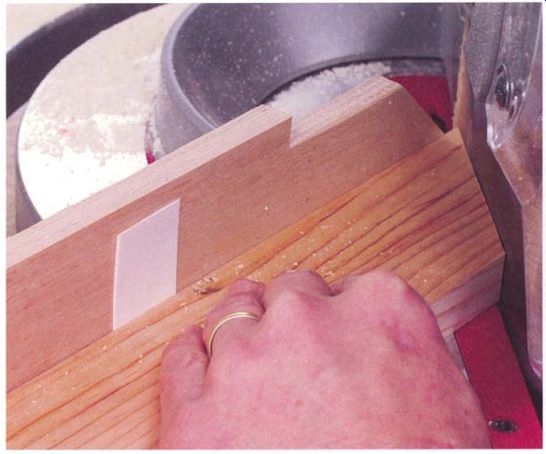
-------------- If a saw can't be adjusted to cut correctly in both
the straight and 45-degree positions, use a shim to compensate when making
the miter cuts.
Realigning the Fence -------- If a 45-degree stop is off, you could realign the fence to correct the problem, but the square cut would then be thrown off. If your primary use of the saw is for cutting 45-degree miters, realigning the fence may be a sensible option, but there is still no guarantee that both the left and right 45-degree positions will be correct at the same time.
CHECKING 45-DEGREE HORIZONTAL ALIGNMENT
To run this check, you will again need two boards that are X in. thick, 3 in. to 4 in. wide, and a couple of feet long prepared in the same way as the other test pieces. This is only a check of the saw's 45-degree left and right stops; the stops can't be adjusted. The saw's turntable is positioned by a pin that engages a series of notches machined into a large casting under the table. The notches can't be repositioned. If they weren't manufactured correctly, you are out of luck.
The overall alignment of the turntable was set when you adjusted the position of the fence for cutting a square end on a test board. For this reason, the straightness of the fence and the precision of a square cut should always be checked and adjusted before checking the 45-degree stops.
There are three steps involved in this test: a cut of both boards with the saw swung to the left, a cut of both with the saw to the right, and finally one cut on the left and one cut on the right to make a square corner. This last test is the most critical because that's the way most miter joints are made in the shop.
Other than the position of the turntable, all three tests are run the same way. Cut the boards after placing them flat on the table, with the best edge against the fence as shown in the bottom photo on p. 195. After sawing, butt the cut ends together on a flat surface and check the resulting corner with a good square (see the top photo on the facing page). Ideally, you'll find that all three combinations work, each producing 90-degree corners. If the joint made with one board cut on each side is good but the joints made with both boards cut on either the left or the right are off, chances are good that the fence is out of alignment. You should go back and recheck the setting for the horizontal square cut.
If the saw can't produce good miter joints in all combinations of left and right cuts, you should remove the saw's turntable and examine the alignment notches. With luck, you will find sawdust packed in one or more of the notches and the problem will be solved with a simple cleaning. If that doesn't solve the problem and the machine is still under warranty, contact the manufacturer. Another option, as I explained earlier, is to align the fence to create a good joint on one side of the blade at the loss of accuracy in other turntable positions.
A final fix, and one I have used often when all else has failed, is to find by trial and error a shim size that when slipped between the fence and the stock corrects the problem and creates a square corner (see the bottom photo on the facing page). You would use the shim when making miter cuts but remove it when making square cuts.
Prev. | Next | Article Index | Home