Most houses contain a surprising amount of space that can be altered or adapted to fit your family’s needs. This section shows how you can use pre-fabricated items for the purpose. A large accordion door—or another type of door in an opening between rooms — can create two private spaces or conceal a work area. You can even expand living space outward with ready-mades, adding a patio cover to make an outdoor area far more useful.
An Accordion Door to Divide a Room
Accordion folding doors, named for the bellows of the instrument they resemble, can be purchased large enough to span the entire width of a room. Riding easily on rollers in a ceiling track, an accordion door can be closed to make two rooms from one, yet it folds compactly to one side when open. Accordion doors are available at most home centers, but one large enough to partition a room may need to be custom-ordered.
A Suspended Header: At 6 feet 8 inches, most accordion doors are too short for the typical 8-foot ceiling. Installation, therefore, usually involves adding a header to lower the ceiling at the door location.
The header is constructed as shown on the below. Hanging procedures vary depending on whether the ceiling covering (wallboard, for example) is attached directly to overhead joists or suspended be low them. Many floors have a slight slope; to avoid having the door bind, the header should be in stalled parallel to the floor, rather than perfectly level.
Header Dimensions: Measure from floor to ceiling at several points along the proposed line of the door. Sub tract from the shortest of these measurements the height .of the door, as well as the thickness of its track and the wallboard to be applied to the header. The re suit is the height of the header frame. Its length is the distance from wall to wall.
TOOLS:
- Electronic stud finder
- Chalk line
- Hammer
- Plumb bob
- Circular saw
- Carpenter’s level
- Electric drill with wood bit (9/16”) and spade bit (1”)
- Utility knife
MATERIALS:
- 2 x 4s
- Common nails (3½”)
- Screws (1½”)
- Perforated metal strapping
- Cedar shims
- Lag screws (1/2” x 3½”) and washers
- Threaded metal rods (4”), nuts, and washers
- Wood screws or hollow-wall anchors
SAFETY FIRST: Earplugs provide important protection when you are hammering for long periods or operating a circular saw. Wear goggles when hammering overhead or operating a circular saw.
Positioning the Door
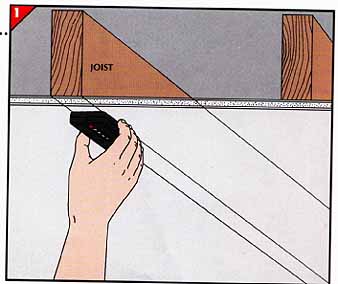
1. Locating the joists.
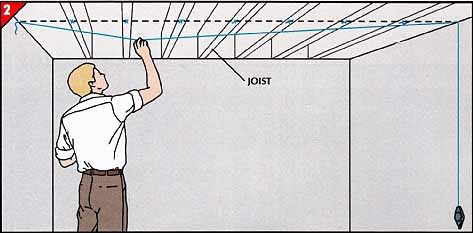
Use an electronic stud finder to pinpoint joists behind the ceiling where you plan to install your accordion door. If the door will cross the room perpendicular to the joists, pencil a mark at the center of each one.
For a door running the other direction, you will need to in stall blocking between two ceiling joists as shown for a suspended ceiling below. Find the two joists nearest the door location and mark their centers near both ends. (For a door directly below a joist, plan to install the header flush with one side o the joist.)
Where practical, plan to install the header so that it aligns with studs in the walls. Otherwise you must install nailer blocks between the studs.
• Snap a chalk line across the ceiling to mark the location for the centerline of the header. In the illustration at right, the chalk line has been wrapped around nails hammered partway into the corners formed by the walls and ceiling.
• On the wall to which you plan to anchor the accordion door, suspend the chalk line from the nail and snap a vertical line all the way to the floor. On the opposite wall, extend a similar line from the nail to a point just below where the base of the header will be; this avoids marring the wall finish. The wall lines serve as guides for installing the door’s overhead track and wall panel.
Hanging a Header
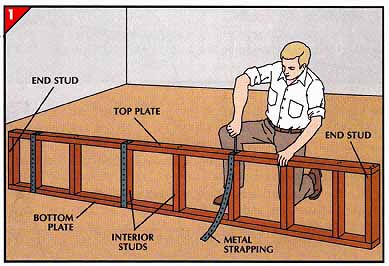
• From 2-by-4s, cut a top plate and a bottom plate the width of the room. Also cut two end studs to the height of the frame minus 3 inches.
• Fasten the two studs to the ends of the top and bottom plates with 3k-inch nails, forming a rectangle.
• Fill in the rectangle with additional studs spaced 16 inches apart and nailed in place through the plates. If the header is to run across the joists, set the first of these interior studs 8 inches from one of the end studs and 16 inches apart there after. Doing so offsets them from the joists, to which you will later nail the header.
• Reinforce the frame at every other stud with perforated metal strapping fastened with 1½” screws. Cut the straps to fit over the top plate, down the stud, and across the bottom plate as shown here.
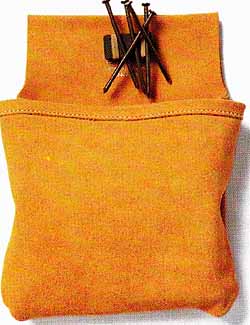
A Convenient Nail-Pouch Accessory
A pouch that attaches to your belt is a handy place to keep nails or screws as you build wood framing. Reaching into the supply of fasteners can be painful, however, because of their sharp points. One alternative is to slit the belt loop of the pouch for rubber bands to hold a magnet (photograph). You can then pull fasteners off the magnet as needed; because they are visible and also somewhat more separated, you are less likely to be annoyed by small cuts.
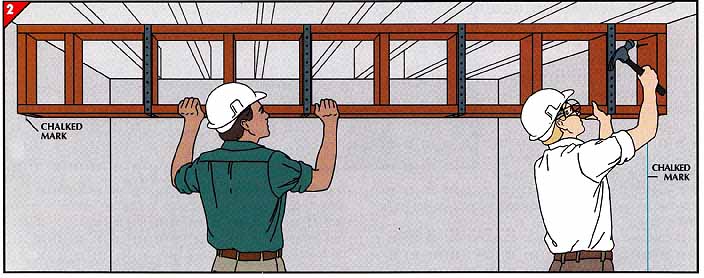
With a helper, hold the frame against the ceiling, centered on the lines chalked on the walls in Step 2 on ref. 9, and fasten the end studs to the walls with nails hammered partway into studs or nailer blocks you’ve in stalled.
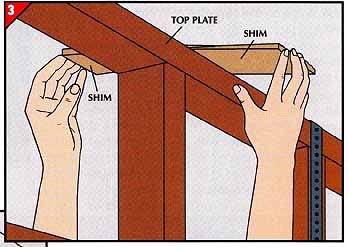
3. Shimming the frame.
• At several points along the header, measure from the header to the floor.
• To make these distances uniform, insert wood shims as needed between top plate and ceiling. A good technique to push in shims from opposite sides of the top plate to form a tight rectangular block.
• Seat the end-stud nails into the wall.
• Nail the top plate of the frame to the joists or nailer blocks.
• For extra security, fasten the frame to every other joist or nailer block with ½- by 3½-inch lag screws and washers.
• Score protruding shims flush with the top plate, then snap off the ends.
• Finish the frame with wallboard.
Adapting to a Suspended Ceiling
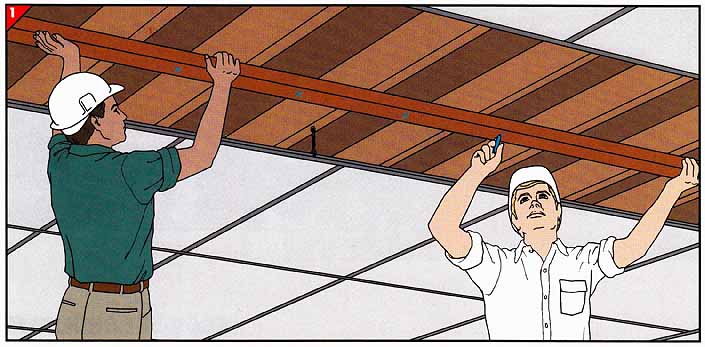
1. Preparing the support and header.
• Remove ceiling panels and cross Ts from the ceiling framework along the line proposed for the door, then cut three 2-by-4s long enough to span the room—two for the header frame and one for a support above the ceiling.
• Hold one of the boards in position against the joists and mark it every 2 feet or so, but only where you can insert a 1/2-inch-diameter threaded rod without en countering joists, pipes, ducts, or the ceiling framework.
• Stack the marked 2-by-4 on one of the others and drill a-inch holes for the rods through both.
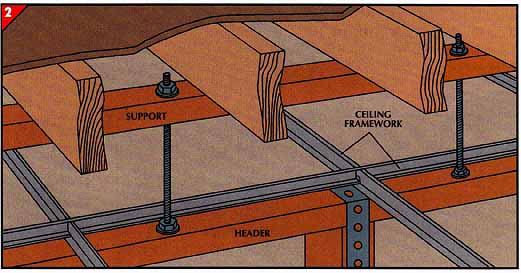
2. Installing the support and header.
• With 3.5-inch nails, attach one of the drilled 2-by-4s to the joists as a header support. Secure the support to every other joist with a ½- by 3½-inch lag screw and washer.
• For each hole in the sup port, cut a ½-inch threaded rod 3 inches longer than the distance from the top of the sup port to the ceiling framework.
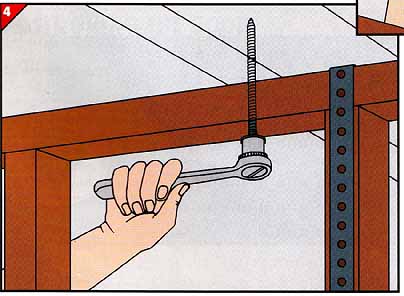
• Insert a rod through each hole, sandwiching it between two nuts and washers. Let the rods protrude about 2 inches below the ceiling framework.
• Use the other drilled board as the top plate of a header that's constructed as shown above.
• Connect the header to the rods with a nut and washer above and below the top plate. Set the header at a uniform distance from the floor by adjusting the nuts at the support.
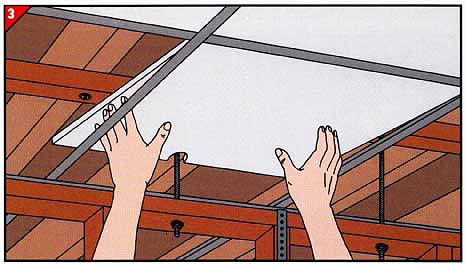
3. Trimming and replacing ceiling panels.
• As you reinstall the ceiling panels re moved earlier, mark the edge of each one where it meets a supporting rod.
• For rods near panel edges, simply notch the panel with a utility knife, then fit the panel around the rod.
• If the supporting rods meet ceiling panels nearer the center, cut each panel in two where the edge meets the rod.
• Notch both sides of the cut to accommodate the rods and fit the two ceiling-panel pieces into position.
= = =
A Suspended-Ceiling Header Parallel to Joists
1. Installing supports.
Proceed as follows to hang a header between joists above a suspended ceiling. If the header is directly below a joist, place the blocking between that joist and a neighbor.
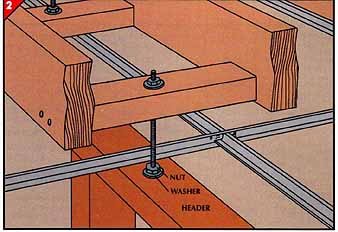
• Cut lengths of 2-by-4 to fit between adjacent joists at intervals of about 2 feet.
• For joists made of ordinary lumber as shown in the large illustration at right, se cure the 2-by-4 support blocks with 3.5-inch nails, flush with the bottoms of the joists.
• Snap a chalk line across the supports between the wall lines marked in Step 2. With a 9/16-inch bit, drill a hole on the chalked mark through each support, centering the hole between the edges of the support.
• Cut threaded rods and in stall them in the supports (Step 2).
For I-beam joists, nail wood backer blocks in place beside the webbing, flush with the flange edges; angle the nails slightly so they reach the flanges. Then turn the blocking supports on edge; toenail the top of the support to the block and the bottom to the lower flange. Drill the holes for threaded rods with an extra-long bit.
Truss joists require a bridge constructed as shown in the right inset. After setting the bridge in place, toenail it to the joist flanges.
2. Attaching the header.
• Cut two 2-by-4s long enough to span the room at the door’s planned location.
• With a helper, hold one of the boards against the rods and tap it gently to mark their locations.
• Drill 9/16-inch holes at the marks.
• Construct a header (Step 1), using this board as the top plate and the other 2-by-4 as the bottom plate.
• Connect the header to the rods and adjust it so that it parallels the slope of the floor (Step 2).
ATTACHING THE DOOR
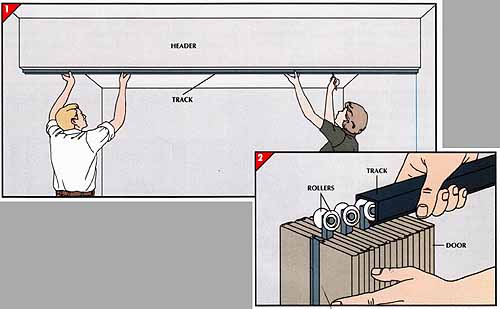
1. Positioning the track.
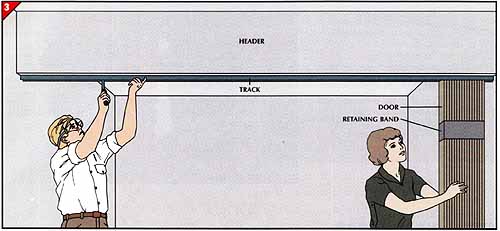
• After covering the header with wall board and painting it, snap a chalk line across the base of the header from one of the wall lines to the other.
• Hold the track against the new line and mark the screw holes.
• Take down the track and drill pilot holes for the screws provided by the door manufacturer.
2. Attaching the door.
Without removing the tape or cardboard retaining bands that compress the folds of the door, slip the rollers at the top of the door into the track.
3. Mounting the door.
• Stand the entire assembly beneath the header with the door at one end of the track. Make sure to raise the assembly with the wall panel facing the wall with the floor-to-ceiling chalked line.
• Screw the other end of the track to the header.
• Slide the door to the fastened end of the track and screw the rest of the track to the header.
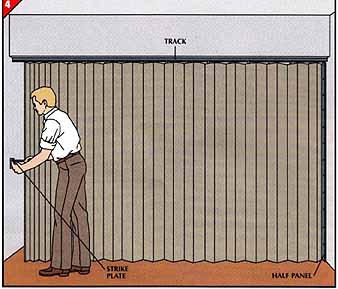
4. Positioning the strike plate.
• Along the vertical line on the wall, attach the door’s wall panel, which is usually a hinged half panel with holes predrilled for mounting. Use wood screws unless there is no stud behind the wall panel; in that case substitute hollow- wall anchors.
• Extend the door to the opposite wall.
• Position the strike plate to accept the latch on the door—in several models, both strike plate and door latch are magnetized—and fasten it to the wall.
• Attach the door handles according to the manufacturer instructions.
