| HOME | FAQ | Books |
Links |
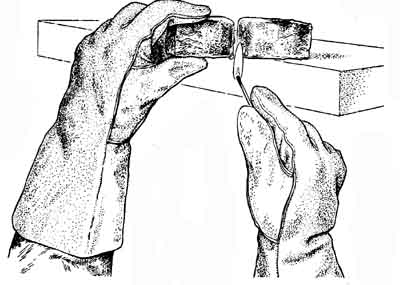
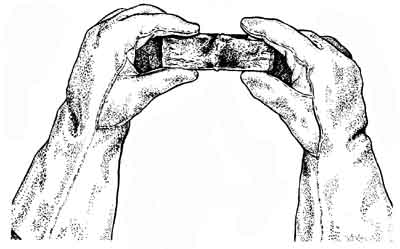
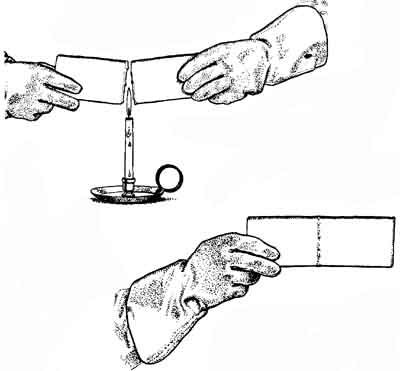
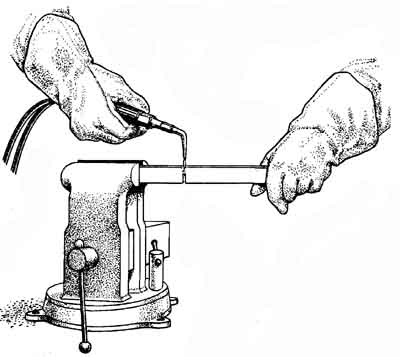
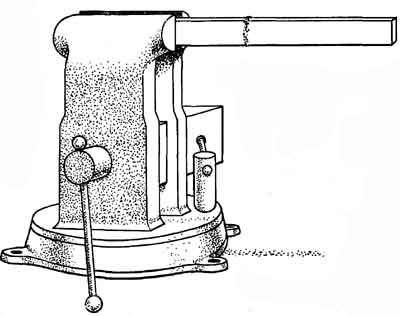
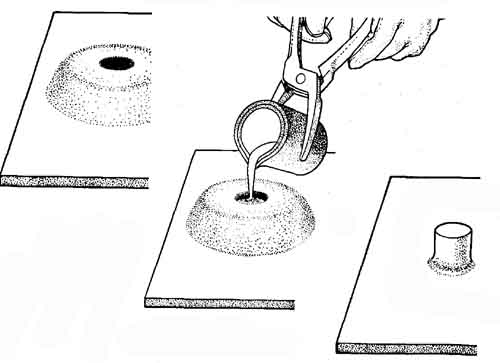
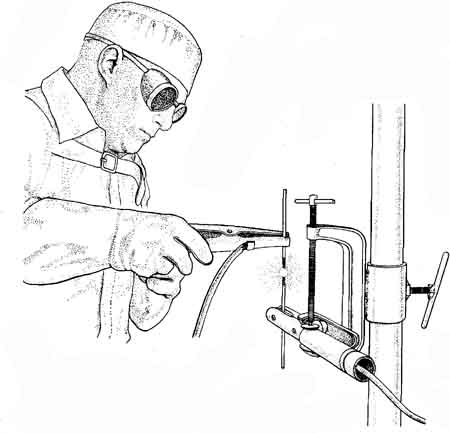
AMAZON multi-meters discounts AMAZON oscilloscope discounts Through the accumulation of a vast amount of information over the years, welding has become a recognized science. However, the application of welding—the actual use of hand-operated equipment—is largely an art, or in other words, a matter of skill. In order to develop skill at his art a welder must: (1) Understand what is happening in the weld puddle and in the area immediately around it, (2) Recognize the time and place to apply more heat and more filler metal, and (3) Be able to manipulate the welding equipment so as to apply the heat and the filler metal in the right place, in the right amounts, and at the right time. Maybe all this sounds difficult to you, as a beginner, but the over-all knowledge and skill necessary to be come a good welder can be learned in a series of easy steps. By mastering these steps one at a time, mastering them all will be a relatively easy matter. This guide and practice-guide starts with a simple explanation of the basic principles of welding, then sets forth a series of simple practice operations. When you understand the basic principles involved, you will be ready to begin the step-by-step practice operations, and in a surprisingly short time you will be doing things you thought at the start would be extremely difficult. AMAZON multi-meters discounts AMAZON oscilloscope discounts Basic PrinciplesWe want to emphasize, first of all, how important it’s that you thoroughly understand the basic principles involved. A welder who understands why things happen the way they do, and why certain procedures give better results than others, is bound to be a better welder. So don’t be in a hurry to get to the equipment. First take the time and make the effort to fully understand the why’s of what you’re going to do. It will pay off in the long run. To begin with, let’s look at welding in terms of simple everyday words. Welding can be defined simply as the melting, flowing together and “freezing” of metals under controlled conditions. You are probably familiar with soldering and brazing. With these processes, the metals to be joined are not melted themselves. Only the filler metal is melted. With welding, however, the metals to be joined as well as the filler metal, are melted. While in a molten condition, the metals flow together, then on cooling, are “frozen” (fused and frozen are not the same) back to their original hard, solid state. To repeat, in order to be welded, the metals must be melted, flow together, then allowed to “freeze” back to their solid state. And if the welding is to have any practical value, the work must be done under controlled conditions—controlled to get the particular results you want. FreezingYou may have some difficulty thinking about a metal such as steel as being “frozen.” But actually, “freezing” is only a matter of relative temperature. Let us compare steel with water, For example, above 32 F, water is a liquid. Reduce the temperature below 32 F and water solidifies, or freezes. In the case of steel the critical temperature is about 2800 F. Above that figure, steel is a liquid. Reduce the temperature below 2800 F and steel solidifies, or freezes. Since our normal temperatures are well below 2800 F, we usually see steel—and we practically always think of steel—in its frozen or solid state. Welding IceFrozen water and solid steel are similar in a number of ways. You can weld together two pieces of either sub stance by briefly melting their surfaces. ill. 1 and ill. 2 show how you can weld together two pieces of ice. Put two pieces of ice close together, almost touching each other. Apply some source of heat—like a match, For example—to the surfaces you want to join. The temperature of these surfaces will quickly go above 32 F and the surfaces will melt. They will become fluid, molten liquid. Now remove the heat and at the same time push the two pieces tightly together. The ice quickly draws the heat out of the liquid surfaces, drop ping their temperature below 32 F again. The surfaces that were liquid freeze, joining the two cubes into one piece. You have welded together two pieces of ice! Welding ParaffinWe can further demonstrate this simple basic principle of welding by conducting a similar experiment using a different material—paraffin. Paraffin melts and freezes at about 175 F. This experiment is shown in ill. 3. Use two small paraffin blocks of about 2 x 4 x 1/2 inch in size ( you can get such blocks in a grocery or hardware store). Heat the edges until they begin to melt. You can do this with a flat hot surface such as a pan or a piece of heated steel plate. With the edges in a molten condition, press the two pieces of paraffin together and hold them there until they cool. The solid paraffin and the air will draw heat out of the liquid paraffin. As the temperature of the liquid paraffin quickly drops below 175 F the parts that were melted become solid again, and you have one piece instead of two. The blocks have been welded. Remember, as we said earlier, “freezing” is a matter of relative temperature. For ice, room temperature is warm; but for paraffin, room temperature is pretty cold —well below freezing. For steel, room temperature is pretty cold—well below freezing. For steel, room temperature is very, very cold indeed—for steel, room temperature is several thousand degrees below freezing. Welding SteelHaving learned how ice can be welded and paraffin can be welded, you now understand the basic principle of all welding. The same experiment done with ice and paraffin can be done with steel, as shown in ill. 4 and 5. Take two small pieces of steel about 3/16 in. thick. Put one piece in a vise and hold the other piece against it. Hold the edges together and heat the edges to the melting point with some source of heat such as a torch or a carbon arc or a tungsten arc. Let the edges fuse, or run together, then quickly re move the source of heat and let the melted portions freeze. They will freeze very fast, almost instantly, because the solid unmelted “room temperature” cold steel rapidly chills the molten steel. Remember, our world is extremely “cold” for pieces of steel. Filler Metal in WeldingIn hand welding, we usually add filler metal. This is simply extra metal which is added to the two pieces to be joined. The purpose of filler metal is to fill the gap between the two pieces or to add extra reinforcement metal. Filler metal melts, flows into the weld puddle and freezes just as the base metal does to become a part of the completed weld. Ancient WeldingThe principles of welding were undoubtedly discovered by man during ancient times. We know that the principles of metal working and iron hardening were known at least 3000 years ago—they were mentioned in the writings of Homer, the great Greek poet. The first welding was probably done in the form of “casting on,” when early artisans wanted to enlarge a piece of cast metal or add to its shape. They probably accomplished this by a simple process. First the metal would be positioned so the area to be added to was on top, then this area would be heated to an almost molten state and a mold placed over it. This mold would then be poured full of molten metal. The heat of the poured metal completed the melting of the original casting immediately under the mold. At the same time, the heat absorbed by the entire original casting helped to chill the poured metal. As a result, the whole unit froze quickly. Thus the new pour was “welded” to the original metal. See ill. 6 for a representation. You will want to remember this process, because it’s so much like what happens in the weld puddle when you make an electric arc weld today. The next important step in the history of welding was probably forge welding, where two pieces of metal were heated to the plastic stage (that is almost melted, but not quite), then hammered together on an anvil. The heat from the hammering and the force of the blows combined to produce a fairly good weld. Modern Arc WeldingModern welding dates from about 1895 when men were beginning to do a lot of interesting things with electricity. When experimenters made a light by forming an arc between two carbon electrodes, they found that the arc was hot enough to melt most metals. This suggested the possibility of welding two pieces of metal together. So they struck an arc between a car bon electrode and the metal to be welded, and heated it to the melting point. When they then moved the arc away from the metal, they “broke the arc” and allowed the metal to freeze. In this way, the science and art of welding was started. ill. 7 suggests the technique. A whole new concept of joining metals came into being with arc welding. When you begin to fully appreciate the value of welding and see its growth all around us, you will see how much that simple concept of an electric arc struck between a carbon electrode and a piece of metal—has tremendously contributed to the industrial progress of the world. Oxy-Acetylene Welding ElectrodesAbout 1900 a commercially economical method of producing pure oxygen was developed. By combining pure oxygen with acetylene gas, the heat-creating capacity of acetylene could be used for the first time to its full potential, and this made available a gas flame hot enough to melt most metals. This development gave welding a big boost. For several years thereafter most high-quality welds and most welds in other than flat positions were made with the oxy-acetylene torch. One of the great factors in the development of oxy acetylene welding was the “shielding” it provided to prevent the gases in the air from affecting the weld. Gases in the air—such as oxygen and nitrogen—were a big problem in the early days of welding. These gases would combine with the molten metal and the result would be a weak and brittle weld. The oxy-acetylene flame shielded the weld area from the air at the same time that it was melting the metal. Thus the gases in the air were kept away, resulting in welding of a considerably higher quality. However, it didn’t take long for the arc welding manufacturers to develop an acceptable shield of gases for their process. They accomplished this by coating the electrodes with various chemical compounds. These coatings burn in the intense heat of the arc and form a blanket of smoke and gas that completely shields the weld puddle from the air. By 1930 good-quality, coated electrodes were available at low cost. This made it possible to weld almost all metals, of any size or thickness, in any position. During the past 25 years still other methods of shielding the arc during welding have been developed, and these are also now widely used: inert gases such as helium or argon, carbon dioxide, granular compositions which are much like sand, and even vacuums. However, most of this guide is concerned with the use of the coated electrode, which is the most frequently used method of welding today. It should be noted that coated electrodes not only provide a shield for the weld but they also contain certain chemicals to serve other important purposes. For example, these chemicals help to remove impurities in weld metal in the form of slag, affect the depth of penetration of the arc, determine the shape of the bead, etc. A wide variety of electrodes are manufactured for commercial use. These electrodes have been classified by the American Welding Society and assigned an identifying code number based on their operating characteristics and the physical properties of the weld metal deposited. The objective of this guide is the training of beginner welders in the basic arc welding skills. Knowledge of the performance characteristics and application of the various types of electrodes is not essential to reaching this objective and only tends to confuse and over- complicate the subject: For these reasons, a thorough discussion of electrodes is omitted in this book. To become a master in the field of welding, however, you must eventually learn about the various electrode types. You will find yourself better able to understand and appreciate the need for many different electrodes after you have acquired the ability to weld in all positions. To help you understand the need to practice and master the techniques described in the following sections. However, it will prove helpful to note a few important points concerning the different electrode types. 1. Mild steel electrodes have different coatings, but the steel core is the same. 2. Coating thickness usually varies with type of electrode. 3. Electrodes can generally be grouped as light coated, medium coated and heavy coated. 4. Coating thickness affects the amount of slag produced, size of weld puddle produced and rate of melting and freezing. 5. The size of weld puddle produced by an electrode influences where and how that type of electrode can be used. It also influences the techniques a welder must use. 6. The manipulative techniques used for one light coated electrode can be used for all light coated electrodes. The same is true for medium and heavy coated electrodes. ReviewingTo review: welding is not difficult. When looked at from the common sense approach of a good mechanic, welding is actually simple and easy. It’s a matter of melting and freezing metal under controlled conditions. The equipment and machines, shown in detail later in this book, are devices for supplying heat. The welder manipulates the equipment to get the right amount of heat in the right place at the right time. He also controls, the amount of filler metal added to the weld. In short, the equipment supplies the energy and the welder makes the weld. The two combined are the greatest fabricating team on earth.Prev: Intro |