AMAZON multi-meters discounts AMAZON oscilloscope discounts
One of the easiest ways to ruin just about anything is to leave it out in the weather. UV rays from the sun, rain, freeze-thaw cycles, and wear from wind-blown dirt all contribute to the failure of anything left outdoors. Of course, buildings are subject to those damaging elements all the time. We can't bring buildings indoors to protect them from the weather. To minimize damage caused by being out in the elements, we put rubber, asphalt, or tar on the roof, and then cover the rest of the building with a protective coating of paint.
Paint makes a significant impact on the long-term condition of our buildings. Left exposed to the weather buildings quickly become dam aged. Something as simple as applying a protective coating of paint can prevent almost all of this damage.
However, applying a protective layer of paint is not quite as simple as it seems. Proper selection and application of paint is necessary or the paint will fail. Failed paint can trap water, salt, corrosive pollutants, or other damaging substances in or against the building and can make problems worse than if paint had never been applied. Even if the paint itself does not fail, the wrong coating can allow contaminants and moisture to migrate through the paint causing damage.
A regular schedule of painting interior surfaces should be included as part of a successful PM program. Interior painting is more of an aesthetic issue than a matter of protecting the surfaces. For this reason, we will be limiting the scope of this Section to exterior coatings which work to protect and extend the life of buildings.
TYPES OF PAINT
The science and chemistry of paint has changed dramatically in the past several decades. Changing environmental regulations since the 1970s and the development of new paint materials including epoxies and, urethane paints, have given the facilities manager new choices in architectural coatings. The vast majority of exterior architectural coatings still fall into the same two general categories which have been available for half a century: latex-based paint and oil-based paint. Since these two classes of paint make up the majority of paint used on facilities and have been protecting buildings successfully for so long, most of our discussion in this Section will be limited to these two power houses of protective coatings.
These types of paint are made of three distinct components: The vehicle or solvent, the binder, and the coloring pigments. The pigments or coloring agents for both classes of paint can be the same but the solvents and binders differ significantly.
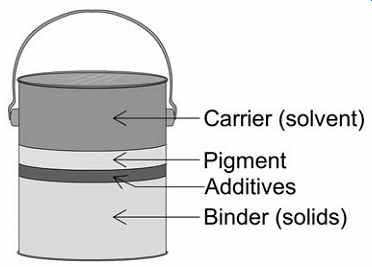
FIG. 1 Components of paint
The paint vehicle, carrier, or solvent is the part of the paint which evaporates away as the paint dries. In latex paints, the carrier is water with some additives such as glycols or glycol esters. Oil-based paints use petroleum-based solvents, most often mineral spirits. The purpose of the solvent is to keep the binder and pigment suspended in solution in a state that can be brushed or sprayed onto the surface.
The second component of paint is the binder, sometimes referred to as the "solids" of the paint. This is the part of the paint that remains after the paint has dried. The binder, as the name implies, binds the paint to the surface and binds the paint to itself. More solids in a paint results in a thicker film, a more durable finish, and better hiding of undercoats.
The binders used in oil-based paints may be synthetic resins, specifically: alkyds, silicones, and polyurethanes. They can also be vegetable oils including cottonseed, linseed, soybean, safflower, or tung oils. The most common binder in oil-based paints are alkyds, which is why the terms "oil-based" and "alkyd-based" paints are used interchangeably.
Alkyds are synthetic resins made by reacting an alcohol with an acid, hence the term "alkyd." Water-soluble binders in latex paint include plastics and polymers such as acrylic resins, polyvinyl acetate, and styrene butadiene. On hundred percent acrylic paints are the most durable latex paints followed by vinyl acrylics and poly vinyl acetates.
The binders in paint go through a chemical bonding process as the paint dries. As alkyd or latex-based paints dry, the small molecules of binder material link together to form large polymer structures. This process makes a very strong final coat of paint because the entire film is one contiguous structure of cross linked molecules.
The third component of paint is the color pigments. There are many organic and inorganic pigments that can be used in both oil and latex paints. When the solvent component of paint evaporates away, the remaining finish film is a combination of the polymerized binders and the entrapped pigments. The higher the concentration pigments, the flatter the paint appears. The lower the concentration of pigments, the glossier the final paint appears. Titanium dioxide, also called titanium white, is a natural inorganic pigment found in most paint formulations.
Inorganic pigments tend to have better color retention than organic pigments. Other pigments and small amounts of pigment extenders or other additives are added to alter the color, sheen and wearability as desired for a particular paint.
Oil-based Paint
Oil-based paints are named for the petroleum derived solvents used as the carrier. These paints are also referred to as alkyd paints, a reference to the most common type of binder used in oil-based paint.
Oil-based paints make up less than 30% of the architectural paints used today. Oil-based paints were once the most common type of paint, but environmental regulations and advances in water-based paint technology have pushed oil paints into the number two position.
Oil base paints have some advantages compared to latex paints and one type of paint will not be right for every application. Oil-based paints can be applied at lower temperatures than latex paints and still provide a strong, durable coat. Oil-based paints tend to form a harder film than latex paints. This hard film is the reason oil-based paints are sometimes called "enamels," an allusion to the extremely hard vitreous enamel used in plumbing fixtures.
Oil-based paint forms a film that is impervious to moisture migration. This can be a good feature if you wish to keep moisture from migrating into a structure or keep stains from migrating up to the surface of the paint. It can also be a bad feature if moisture from inside a building gets trapped and lifts the paint film causing paint blisters.
Oil-based paint adheres better than latex paint to dirty, glossy, or weathered surfaces and is well suited for application over old oil-based paint with a chalky surface.
Oil-based paints also have several disadvantages over latex paint.
Oil-based paints need 6 to 8 hours to dry and need 24 hours between re-coating. The paint will continue to dry indefinitely until, after several years, the paint crystallizes and cracks. Oil-based paint can also only be applied over other oil-based paint, and cannot be applied over latex paint.
Old containers of oil-based paint are considered hazardous waste under federal regulations with considerable disposal costs. Clean up requires solvents such as turpentine, paint thinner, or mineral spirits.
Latex Paint
Latex paint has its own advantages over oil-based coatings and is considered to be a superior product in most, but not all, applications.
One hundred percent acrylic latex paints are the best of the latex paints.
The most notable difference between oil and latex-based paint is the minimal odor of latex paints compared to oil-based paint. The use of water as the carrier has eliminated most of the indoor air quality (IAQ) and environmental concerns associated with oil-based paint. Latex paint can be disposed of with regular waste (once dried) and does not present any special environmental disposal concerns.
Oil-based paints must be applied to surfaces that are completely free of any moisture. Latex paints can be applied to damp surfaces and surfaces can even be dampened before painting to retard drying in hot weather or when painting in the sun. Latex paints allow moisture to migrate through the paint to prevent most problems with paint blistering. However, allowing water to migrate into the building may not be a desired result in all applications.
Latex paint dries in minutes and can be recoated in only four hours.
Latex paint also retains its color better than oil-based paint and resists yellowing better than oil-based paints. With proper surface preparation, latex paint can be applied over oil-based paint but not the other way around. Latex paint is also easier to apply as it is less sticky than oil based paint and flows and spreads easier and is easily cleaned up with soap and water.
Latex paints have a few disadvantages over oil-based paints that make oil-based paints more suitable for some applications. Because La tex paints allow moisture to migrate through the paint, they are more vulnerable to bleed through of stains. Latex paints provide excellent adhesion to most surfaces but cannot compare to the adhesion of oil based paints on dirty or chalky surfaces. Latex paints also have a finish coat that is somewhat softer than oil-based paints making oil-based paint a good choice for heavy traffic areas subject to abrasive wear such as hand rails.
Elastomeric Wall Coatings
Usually referred to as EWCs, elastomeric wall coatings are flexible acrylic latex paints developed to be applied in very thick films to masonry surfaces such as concrete, stucco, or concrete block. Typical film thickness is roughly ten times the thickness of regular paint making these paints considerably more expensive than other types of paint due to the amount of paint required. Typical EWC application rates are 50 to 60 square feet per gallon with two coats recommended. Elastomeric wall coatings form a strong flexible membrane that can bridge gaps and flex as the surface below moves and cracks expand and contract.
Surface preparation for EWCs require caulking all cracks larger than 1/16 inch with an acrylic or siliconized (not silicone) caulk. If the surface is particularly porous, a latex primer or masonry sealer should be applied first. Elastomeric coatings cannot be applied where there is surface moisture since this moisture will be permanently trapped and will cause blistering of the paint. Water cannot be allowed to get behind EWCs so window caulking, chimney caps, and roof membranes must be maintained in good condition. EWCs should not be used in locations where water can get behind the masonry such as retaining walls.
Elastomeric coatings provide excellent protection of masonry surfaces in areas subject to significant amounts of wind driven rain as long as water is prevented from getting behind the finish.
The special formulation of these paints is prone to excessive chalking as weathering causes paint pigments to form on the surface.
Therefore, these paints are usually only available in light colors which require less color pigment than darker colors. If dark colors are desired, a coat of regular acrylic latex paint can be applied over EWC coatings.
Epoxy Paints
Epoxies, or polyepoxides, are formed when an epoxy resin is mixed with a catalyzing agent. The resulting material is hard, durable, and plastic-like. Epoxy paints usually consist of two components, the resin and the hardener, which are site mixed just before they are applied. Less common are water-based, two-part epoxy paints and one component epoxies that cure with exposure to the air. Epoxy paints and coatings are commonly used as a finish floor material over bare concrete, for use underwater, or used to repair rust or corrosion damage to water tanks, cooling towers, or condensate trays.
Epoxy paints are generally limited to indoor use because they maintain color fastness and weather poorly when exposed to the elements.
Urethane Paints
Urethane paints and finishes are a class of materials more similar to epoxies than traditional paints. Two component urethane paints offer superior hardness and strength in certain applications and are more suited to outdoor use than epoxy paints. The terms urethane or polyurethane refer to the binders used in some coatings or clear finishes. Urethanes are created by the chemical reaction of polyisocyanate molecules with another molecule, often a hydroxyl group molecule.
Paints that are marketed as urethane paint are usually a blend of acrylic resin and water-based urethane. The addition of urethane binders makes these paints exceptionally sticky, provides superior adhesion, and creates a truly high performance paint. Six different classes of urethane coatings are manufactured but storage, mixing, and application requirements are difficult enough to limit most of them to industrial use in manufacturing. These industrial urethanes can be heat cure, moisture cure, or can cure by the addition of a catalyst.
The two types of true urethane coatings that are available for architectural use are Type I and Type VI urethanes. Type I is the familiar clear polyurethane varnish available at any hardware store for finishing bare wood. This finish consists of an alkyd binder reacted with poly isocyanate (urethane) to improve the toughness and abrasive resistance beyond that of regular alkyd paints. Type VI urethane paint is a one part coating in which the polyisocyanate is unreacted and suspended in a solvent. A polyisocyanate film is deposited on the surface when the solvent evaporates.
Rust Inhibitive Paints
These specialty paints include pigments that prevent corrosion of iron and steel. Metal pigments, such as zinc, chromate, and lead work by combining with oxygen to make the oxygen unavailable to oxidize the iron in the protected metal. Oil-based rust inhibitive primers do a better job than latex primers unless the paint is being applied over an oil-based prime coat. For rust inhibitive paints to work, they cannot be applied over other paints. The rust inhibiting pigments must be in direct contact with the metal.
In coastal areas, dissolved salt can become trapped under layers of paint where it will quickly cause significant amounts of rust. The same is true in areas that use salt to melt ice in parking lots and sidewalks.
In the Snow Belt, it's common to see bubbling and flaking paint on the bottom few inches of doors and door frames caused by road salt corrosion under the paint. Salt resistant paints are available for these special applications. If painting over existing rust, consider using a rust converter discussed later in this Section prior to repainting.
Mildew-resistant Paints
Mildew-resistant paints come in many different forms. Some mildew resistant paints have a mildewcide added to the formulation.
Packets of powdered mildewcide are available from paint suppliers for field mixing with most latex or oil-based paints. Other mildew-resistant paints use zinc oxide as one of the pigments instead of or in addition to the more common titanium dioxide (also called titanium white). Zinc oxide offers some mildew resistance when added to paints.
Latex paints or oil base paints with vegetable oil carriers such as linseed are the most susceptible to mildew with petroleum-based paints offering the best resistance. Gloss finishes are also less likely than flat finishes to support mildew growth.
Cold Galvanizing Compounds
Cold galvanizing compounds are zinc paints used to protect iron and steel from rust. These coatings are available is a brushable compound or in aerosol spray cans for protecting welds, abrasive wear area, or other small items from rusting. Cold galvanizing compounds consists of fine zinc dust mixed with small amounts of epoxy binders in petroleum or organic solvents. When the solvent evaporates, it leaves a film deposit of up to 95% zinc metal on the surface similar to hot dip galvanized protective coatings. Many manufacturers of cold galvanizing compounds claim coating durability and corrosion protection as good or better than true hot dip galvanizing.
PRIMERS AND SEALERS
Primers and sealers are specially formulated paints used as an under coat to improve adhesion, prevent bleed through, protect the final coat of paint against moisture or alkalinity, or to ensure an even appearance of the top coat. Sealers and primers are similar in composition with the primary difference being the amount of pigment added to the container. Sealers are often clear with few or no pigments added while primers have pigments included and produce an opaque undercoat.
Sealers are most commonly used on masonry surfaces such as block, concrete, or stucco, to increase adhesion of the topcoat and to protect a top coat of paint from efflorescence and alkalinity. Clear sealers can also be used alone to prevent moisture from entering masonry surfaces.
One of the functions of a primer is to improve adhesion between the top coat and the substrate or between the top coat and older layers of paint. Primers are especially good at bonding to glossy or dirty surfaces. Lightly sanding of shiny surfaces will help primers to bond more readily. Primer-sealers also protect a top coat from bleed through of stains from below.
Primers are engineered with different goals than the engineering of finish paints. Finish paints are formulated to be hard, durable, and to resist dirt and environmental contaminants. Primers are formulated to adhere and seal well. Primers do not have the weatherability of paints and must be protected with a quality paint topcoat.
Primers are not required in all cases. If you are painting over a layer of existing paint in good condition that has been lightly sanded or de-glossed, and is free of dirt and chalking, you will probably not need a primer. If the surface is porous, previously unpainted, dirty, chalky, or noticeably worn, a primer will help to seal the imperfections and help the new paint to bond. While surface preparation is important for any paint job, using a primer can greatly reduce the time spent on surface prep.
Water- and Oil-based Primers
Like paints, there are two broad classes of primers, oil- (or alkyd-) based primers and water- (or latex-) based. Shellac-based primer-sealers that use alcohol as the carrier or solvent are also common.
Water-based primers can perform as well as the more traditional oil-based primers in most applications. Water-based primers offer the same advantages as water-based paints, notably: low odor and easy cleanup. Oil-based primers offer better adhesion to chalking surfaces and are better at preventing stains from migrating through the new layer of paint. If the surface is free of oil or other stains that will bleed readily, latex primers should be adequate.
Shellac Primers
Usually marked as stain-blocking sealers or "stain killers," shellac based primers are excellent performers on most surfaces. Shellacs bond well to glossy surfaces and do an excellent job of sealing many of the most difficult stains such as, wood tannins, cigarette smoke, water stains, creosote, crayon, and oils. Stain blocking primers are also available in aerosol cans for spot treating small stains prior to painting.
Shellac-based primers are often used to seal interior surfaces to eliminate pet, smoke, or other odors from migrating through walls and ceilings and are a normal part of fire restoration work. These primers are thinner than other types of paints or primers and do an excellent job of penetrating into bare wood, or other porous surfaces.
As good as shellac primers are at creating a bond to difficult surfaces and at sealing difficult stains, they are not well suited to exterior painting. Their use out doors is generally limited to spot sealing of difficult stains prior to application of a suitable exterior oil or latex primer.
Rust-inhibitive Primers
Like rust-inhibitive paints, rust-inhibitive primers rely on metal pigments such as zinc, chromate, and lead to inhibit the oxidation of steel. Oil-based primers perform better in this application because oil-based primers form a barrier to moisture while latex-based primers allow moisture to migrate through the primer.
Bonding Primers
Bonding primers are engineered to bond to very shiny surfaces such as ceramic tile, glass, and laminate. Bonding primers aren't flexible enough to be used outdoors where substrates are constantly expanding, contracting, and flexing.
THE RIGHT PAINT OR PRIMER FOR THE JOB
The information above should help you in deciding which paint or primer is best for your painting projects. Knowledgeable paint sales people will also be able to offer valuable advice at your local paint sup plier. A quick guide to paint selection follows:
New Unpainted Wood--Prime with a quality latex or oil-based exterior wood primer. Oil-based primers are better for staining woods like cedar or wood with dark knots.
Weathered Unpainted Wood--Sand the surface to remove all loose and weathered fibers, treat as with new unpainted wood.
Previously Painted Wood--Primer is not necessary if existing paint is in tact and free of chalking. If bare wood or chalking is present, use an oil- or latex-based primer. Chalking surfaces should be painted with oil base materials.
Stucco and Other Masonry--Apply a masonry primer or sealer. Masonry primers are formulated to protect the finish coat of paint from efflorescence and alkalinity in the masonry. If repainting over exiting paint, apply a primer if the undercoat is chalky or in poor condition. An oil-based primer is best over old chalky paint.
Ferrous Metals--Remove as much old rust as possible by wire brushing, rinse or wipe off all dust and allow the material to dry. Apply oil based rust-inhibitive primer before painting. Consider using a rust converter to rusted material followed by an oil-based primer. Rust converters are discussed later in this Section.
Aluminum, Galvanized Iron--Clean the surface of any oils, white powdery oxides should be removed with a wire brush or steel wool. Apply metal primer to all bare metal. Aluminum is especially difficult to paint. Bare aluminum quickly forms a layer of aluminum oxide on its surface when exposed to the air. This thin layer does an excellent job of protecting the aluminum from corrosion. However, this layer of aluminum oxide also resists the adhesion of paint. Because paint on aluminum is likely to fail so quickly, the best course of action is to leave aluminum bare.
Slick, Glossy Surfaces--Use a specialty bonding primer on glass, ceramic tile, and plastic laminates. For maximum adhesion, sand the surface first with fine sandpaper.
Leaching Stains--Stains of oil, grease, crayon, ink, water stains, and smoke should be spot sealed with a shellac-based stain sealer. An oil-based primer should be applied over the shellac in exterior applications.
PREPARING THE SURFACE
No part of the paint job is as important as getting the surface ready for paint. Preparing the surface can be time consuming, often requiring more work and time than spent applying paint. Doing a good job of surface prep is fairly straightforward.
For all types of surfaces, preparing the surface involves removing any loose, flaking, or corroded material, cleaning to remove dust and dirt, and de-glossing shiny surfaces areas if necessary. If the surface has bare spots, is porous, or can't be thoroughly cleaned, a primer should be applied to help the finish coat bond properly. Once completed, the prepared surface should be clean, and free of loose material including dirt, dust, or chalking.
The following six steps should be followed when preparing a surface for paint. Depending on the condition and material, not all six steps will be required for every paint job but this list will be a useful tool to ensure that no step is missed.
NOTE ABOUT LEAD PAINT: Lead was a common pigment used in paint prior to 1978. Any buildings built prior to this date may contain lead paint. Sanding, scraping, or wire brushing lead paint can release toxic lead dust. The concerns with lead paint are discussed in more detail later in this Section.
Six Steps to Proper Surface Preparation
Step One -- Kill any mildew. Mildew will be found in areas where sunlight rarely reaches such as the north side of a building, under trim, or in areas with dense cover of vegetation. If you apply a coat of paint over a mildewed surface, the mildew will grow through the new layer of paint. Mildew can't be washed from the surface because it would be impossible to remove every microscopic fungal spore and any spores left on the surface would grow a new outbreak.
Mildew must be killed to prevent regrowth into a new coat of paint. Mildew can be killed with a 25% solution of household bleach sprayed or sponged onto the old paint and left to sit for at least twenty minutes. If the solution dries in this time, it should be reapplied. After the twenty minutes (or longer) rinse the surface with clean water.
Step Two -- Remove all loose paint. Scraping, pressure washing, or brushing with a steel brush will remove most loose paint. If you need to remove paint completely, heat guns or chemical strippers can be used. When using chemical strippers, be sure to follow the manufacturer's directions for surface clean up and disposal of the old paint. After stripping, the surface should be sanded to smooth out any rough edges or paint chips.
Use wire brushes or steel wool carefully, any metal pieces left on the surface can oxidize creating brown spots in the new paint.
Step Three -- Lightly sand any glossy surfaces. A quick sanding with a fine 180 to 220 grit sand paper will roughen shiny surfaces enough to allow the new coat of paint to adhere well. Remove any dust with a damp rag and allow the surface to dry.
Step Four -- Caulk. Any cracks, gaps, or penetrations should be caulked. When it's time to repaint, it's probably also time to caulk. Use a quality acrylic or siliconized acrylic caulk. 100% silicone caulks have exceptional adhesion and durability and will last a long time outdoors but will not take paint so avoid silicone caulks in any areas that will be painted.
Step Five -- Wash the surface. Wash the surface with a mild detergent and water or if extremely dirty, by pressure washing. A film of dust and dirt on the surface will prevent paint from making a good bond with the surface being painted. Pressure washing can drive water deep into wood or masonry surfaces and ample time, up to several days, should be given for through drying before applying paint.
Step Six -- Coat with a good quality primer. Primers are necessary for bare wood, porous surfaces, whenever the old layer of paint is in poor condition, and for difficult to paint surfaces. See the section on primer selection earlier in this Section for guidance in choosing the right primer for your paint job.
Rust Converters
Rusting iron and steel can present a difficult painting problem. Once rust starts, it can be difficult to stop. Even if you sand or wire brush rusty surfaces to remove loose rust, paint can have a difficult time adhering well. Or worse, a layer of paint over a rusty spot can trap moisture accelerating the corrosion below.
There are products that can work wonders on rusty areas to convert rust to a stronger, more durable compound and to prevent further rust damage to the area. These products are rust converters. Available as a liquid, thicker than most paints, rust converters are applied directly to the rust after scraping or brushing to remove any loose material. When using rust converters, you do not need to remove all of the rust to ex pose the bare metal, in fact, rust converters do nothing to bare metal and only work if rust is present.
Rust converters contain tannic acid, a naturally occurring weak acid found in plants. The tannic acid reacts with iron oxide (rust) and converts it to iron tannate, a stable black material. When rust forms, it flakes away from the original metal exposing more metal surface to the environment allowing more rust to occur. By contrast, iron tannate bonds tightly to the surface metal preventing any further corrosion.
Rust spots can be treated with a rust converter prior to priming and painting. Loose rust should be removed to ensure that the chemical converter can reach the rust right at the metal surface. If rusting is extensive, a second application will assure complete coverage of any rusted areas. Rust converters dry to the touch in a few hours but should be left alone for 24 hours to allow the conversion process to take place.
The surface must be rinsed thoroughly before priming to remove any acid residue. Only oil-based primers should be used over metal treated with a rust converter.
ENVIRONMENTAL CONCERNS
Volatile Organic Compounds (VOCs)
Possibly the biggest driving force today causing changes in the painting and coatings industry is concerns over the release of volatile organic compounds. VOCs are organic chemicals such as the solvents found in paints that vaporize at normal temperatures. VOCs can cause several health problems such as allergic reactions, nausea, headaches, kidney, liver, and central nervous system damage, and many are believed to be carcinogens. Volatile Organic Compounds are one of the most common pollutants contributing to problems with indoor air quality (IAQ). When painting indoors, adequate ventilation and careful selection of paints will help to alleviate most IAQ problems. See Section 9 for more information on VOCs and IAQ.
Many VOCs also contribute to environmental problems. Some VOCs react with other chemicals in the air to create ground level ozone and the related respiratory problems for some people. Some VOCs are also greenhouse gasses. The concentration of these compounds was first regulated by the US EPA in 1970 with the passing of the Clean Air Act. Federal Regulation 40 CFR 59.400-413 is National Volatile Organic Compound Emission Standards for Architectural Coatings which covers paints, stains, concrete sealers and other architectural coatings. This regulation and many diverse state regulations and voluntary standards adopted around the country limit the types and amounts of Volatile Organic Compounds that can be included in paints.
It was this regulation on the amounts of VOC solvents in paints that lead to the increased use of water-based latex paint from less than 30% of paint used in the 1970s to more than 80% of paint used today.
The formulation of paints have changed considerably since the 1970s giving the consumer many more choices and making selecting the right paint more complex than ever before.
Lead Paint
Prior to 1978, lead was used as a pigment in many formulations of paint. Lead pigments offered corrosion resistant properties to ferrous materials and had excellent adhesive properties. Lead is also toxic, especially to children. Lead exposure can cause developmental problems, hearing loss, kidney damage, and nervous system damage in children and adults. In 1978, the US Consumer Product Safety Commission banned paint containing anything more than trace amounts of lead for use in residential buildings or buildings occupied by children. Essentially all facilities residential or otherwise stopped using lead paint from that time forward.
Any building built before 1978 may have been painted with lead paint and could still have layers of paint containing lead. Unless you are fortunate enough to be able to apply a new coat of paint without disturbing the existing paint, any sanding, wire brushing, scraping, or washing could release lead dust. Many states require any disturbance of lead paint to be done by accredited lead abatement contractors and require any material removed to be handled as hazardous waste.
Your environmental services contractor will be able to test the paint on your facility and tell you if lead is present before you accidentally cause a hazardous condition for your employees and the public using your facilities.
Paint Disposal
Unused paint presents a different disposal problem. The best solution to disposal of unused paint is to minimize the amount of paint left over after a project. Careful measurement and careful ordering of paint will help to minimize both the cost of the project and the amount of wasted paint requiring disposal. As a commercial customer, you probably have some buying power with your paint supplier and may be able to negotiate taking back unopened cans prior to your purchase, especially if you are using primers, whites, or stock colors.
Unused paint can also be stored for later use. Some paint should be saved for paint touch up later since companies are constantly changing paint formulations, you may have a hard time matching a particular finish later. However, some paints contain chemicals, mostly solvents, which can cause health problems or need to be handled as flammable liquids. Excessive storage of these paints is not a good idea.
Unused latex paint can be disposed of with regular waste as long as the paint is dried. A half inch of latex paint in the bottom of a can will dry quickly and can be disposed of with the paint can. A large amount of left over paint can be dried quickly by mixing in a cardboard box with sawdust or shredded newspaper. Maintenance shops often have sawdust that needs disposal and your organizations business office will probably have bags of shredded paper to contribute. Powdered paint hardeners are available from your paint supplier and when added to left over paint, causes it to solidify.
Unused oil-based paint needs to be disposed of as hazardous waste. Pigments can include heavy metals or other toxins and the solvents include VOCs and are flammable. Your regular waste hauler can probably handle this disposal for you at a cost. If you have large quantities that need disposal, there are companies that specialize in FIG. 2. Storing excessive amounts of old paint can be hazardous, inventorying, packaging, disposal, and recycling of hazardous materials. Most localities have "home hazardous waste days" when residents can bring their hazardous household waste to town hall or the public works department for free disposal. A few locations open these days up to commercial enterprises if they are only bringing small quantities.
PAINT FAILURES
Many things can contribute to paint failures. Failures are caused by poor surface preparation, poor selection of materials, poor application methods, or allowing moisture to get behind the paint. The most common causes of paint failure are outlined here with their respective causes.
Application Temperature
We know that most paint failures can be prevented by proper surface preparation and by choosing the right primer and paint for the particular application. Another factor affecting the success of a paint job is the temperature of the air and substrate during and soon after application.
Paint should not be applied when the temperature is too cold or too hot. The manufacturer's label instructions should be followed and will typically recommend not applying paint at temperatures below 50ºF or above 90ºF.
Latex paint is more prone to problems from cold applications than oil-based or alkyd paints. As latex paints cure at low temperatures, the binder material molecules cannot link together as readily to form the strong polymer structure desired in the finish coat of paint. The resulting film of paint is easily cracked. At very low temperatures, the paint can dry with tiny surface cracks that effect the paint luster making the paint appear flat or dull.
At low temperatures, paint also takes longer to dry. One of the other common problems encountered with slow drying paint is that wind blown dirt and debris often end up damaging the paint job. There is always the possibility of this happening to fresh paint but the risk is increased with a longer drying time. Paint that has remained wet for a long period of time can have a dull appearance from dust embedded into the finish coat.
Painting at high temperatures can also be damaging to the paint being applied. The polymerization process that alkyd- and latex-based paints go through as the paint cures takes time. If the paint dries too quickly due to high temperature, polymerization may not occur resulting in the same weak topcoat encountered with cold weather painting.
Applying paint in direct sunlight or on windy days can have the same drying effect as painting when temperatures are too high. Pre-dampening the surface when applying latex paint can minimize both the surface temperature and the tendency of latex paint to dry too quickly.
Keep in mind the application temperature applies to both the temperature of the air and the temperature of the substrate. The proper application temperature needs to be maintained not only during paint application but until the paint has substantially dried, usually 36 to 48 hours after the paint application.
Common Modes of Paint Failure Alligatoring: caused when finish coats are applied over undercoats or primers before they are dry. The resulting shrinkage of both the top and under coats causes a pattern of cracks in the top coat with an appearance similar to the skin of an alligator.
Bleed through: Knots in wood, asphalts, grease and oils, creosote, crayon, water stains, or any oil soluble stains or inks can bleed through a new coat of paint. The surface should be cleaned before painting to remove as much of the offending stain as possible and apply a seal coat of shellac-based primer, or oil-based primer sealer.
Shellac-based primers are some of the best stain killers but do not survive well on the exterior of a building and should only be used for spot sealing stains and must be over-coated with an appropriate primer.
Blistering: Blistering paint is caused by moisture under the paint lifting the paint from the substrate. Moisture can come from leaks in the building roof or walls, can enter through failing paint, or can be present in wood or masonry before painting. Humidity inside a building can also migrate through the building envelope causing paint to blister Chalking: Caused by a loose, powdery coating of paint pigment left on the surface of paint as the paint weathers. A normal condition that occurs as paint ages. Chalking surfaces must be sealed with a primer prior to application of a finish coat. Oil primers offer superior adhesion to old chalking paint.
Chipping (Flaking): happens when the paint completely separates from the surface. Usually caused by poor surface preparation. Cleaning and sanding glossy surfaces will prevent this condition Creeping: Creeping happens when paint beads up on the surface. This is more likely to occur on dry days when painting over a glossy finish. Most paints adhere poorly to glossy undercoats. Lightly sanding the surface to remove the shine will prevent creeping.
Creeping can also be caused by applying paint that is incompatible with the paint used in the undercoat.
Efflorescence: Efflorescence is a white salt-like deposit that forms on the surface of masonry. As water migrates through masonry, it carries with it soluble salts which are deposited on the surface when the water evaporates. Efflorescence must be removed before painting or poor adhesion will result. Wire brushing, pressure washing, sand blasting, or washing with a solution of 25% muriatic acid (hydrochloric acid) will remove efflorescence. Muriatic acid is extremely caustic and protective gear must be worn when using it.
Holidays: Areas where paint coverage is poor leaving the undercoat visible through the new paint is often referred to as holidays in the paint. Holidays can be caused by choosing a low quality paint with few paint solids or by not mixing paint thoroughly.
Loss of Gloss: Loss of sheen or "flattening" can have several causes. Poor surface preparation, painting in cold weather (under 50ºF), or too much thinning of paint can cause flattening.
Mildew: If not properly treated before painting, mildew on old paint will continue to grow on the surface of new paint. To properly treat mildew, first the source of moisture must be corrected. If mildew is growing on the exterior surfaces, consider cutting vegetation to al low sunlight to reach the area. Mildewed surfaces should be treated with a 25% solution of sodium hypochlorite household bleach left on for twenty minutes before rinsing. Mildew resistant paints offer some protection against new mildew growth. However, if moisture issues are not addressed, mildew will eventually return.
Spalling: Spalling happens when chips or flakes of masonry surfaces break away. Spalling happens when tiny cracks and pores in the masonry surface are not completely encapsulated by the layer of paint. Moisture gets into these small cracks and expands when it freezes making the small cracks larger. After several freeze-thaw cycles, the masonry has cracked enough that chips begin to break free.
Tackiness or Slow Drying: Slow drying can be caused by low drying temperatures, applying too thick a paint coat (drips will be evident), by improper ventilation, or drying in areas with high humidity.
In some cases, "salamander" type direct vent heaters are used to warm a space in an attempt to dry paint faster. However, the combustion products are primarily made up of water vapor which increases humidity and drying time. Oils, solvents, or soaps on the surface prior to painting can leach into a new coat of paint causing permanent tackiness.
Wrinkling: If paint is applied too heavy, the top surface of the paint layer will dry and shrink while the bottom surface remains wet. This causes the surface to become wrinkled. Applying paint at the appropriate rate will prevent this from happening. If it has happened, the only solution is to sand the surface smooth and paint again.
Yellowing: Yellowing is caused by sunlight, heat, dirt, or chemical fumes.
The only solution is choosing paint appropriate for the particular environmental conditions.
INSPECTING AND RECOATING
In addition to the poor protection a bad coat of paint provides to a building, cracked, pealing, or dirty paint give a facility a run down and unkempt appearance.
Like all aspects of a good PM program, paint needs regular inspections to find small problems before damage occurs to the material below. When inspecting paint, look for cracking, weathering, chalking, rust spots or bleed-though from nail heads. Flaking, cracked, or peeling paint is an obvious sign that repainting is necessary. If the apparent color of paint changes when dampened with a sponge or damp rag, this is evidence that the protective finish of the paint is gone.
It is important to schedule repainting as soon as the existing paint is starting to show signs of deterioration. By recoating a building with a new layer of paint before the old layer completely fails, damage to the substrate can be prevented and an enormous amount of time can be saved preparing the surface for a new coat of paint. Typically, exterior painting needs to be recoated every three to five years.
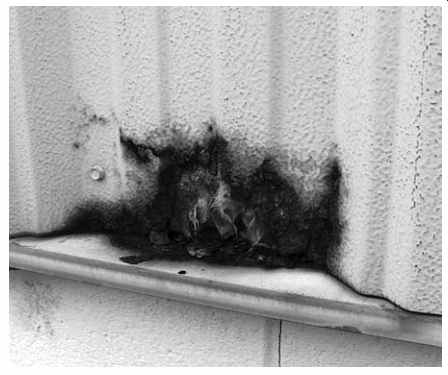
FIG. 3. Failing to inspect paint allowed rust to eat through the metal
skin of this building. A few dollars spent on paint would have pre vented the
expense of installing new siding.
SUMMARY
• Although there are several specialty paints available, water-based latex paint and oil-based paints are the two paints used in almost all cases in architectural coatings.
• Paints are made of three components. The binder, which is the solid part of paint that becomes the hardened film, the pigments which give paint its color, and the solvent which evaporates away leaving a film of binder and pigment.
• Neither oil base nor latex paints are the correct choice for all applications. Careful consideration of the characteristics of each must be considered when choosing a paint.
• Specialty paints used on facilities include elastomeric wall coatings (EWCs), epoxy paints, urethane paints, rust inhibitive paints, mildew resistant paints, and cold galvanizing compounds.
• Primers and sealers are applied under paint to increase adhesion of the paint, prevent bleed through of stains, improve the appearance of the top coat, and protect paint from moisture and alkalinity.
• Oil-based, latex, and shellac primers are commonly used and, like paints, must be chosen based on the application surface.
• Surface preparation is necessary for a successful paint job. Removing loose paint, cleaning dirt, and lightly sanding glossy surfaces will ensure a good bond between the surface and the paint.
• Environmental and public health concerns have driven significant advances in paint technology over the past few decades.
• Volatile organic compounds (VOCs) are solvents that readily vaporize and can cause health problems for some individuals and may contribute to greenhouse gasses. These compounds are regulated by the US EPA and many states.
• Lead, a toxic substance, was a common component of paint prior to 1978. Older buildings may still have layers of lead paint. Strip ping, sanding, scraping, or brushing lead paint can release toxic lead dust. Special precautions are required when working with lead paint.
• As with any part of a PM program, a regular program of inspections to paint will prevent unseen failures from causing damage to your building.