Required tools and test equipment (Ultimate Guide to Troubleshooting & Repairing Microwave Ovens)
| HOME | Troubleshooting | DIY Tips |
|
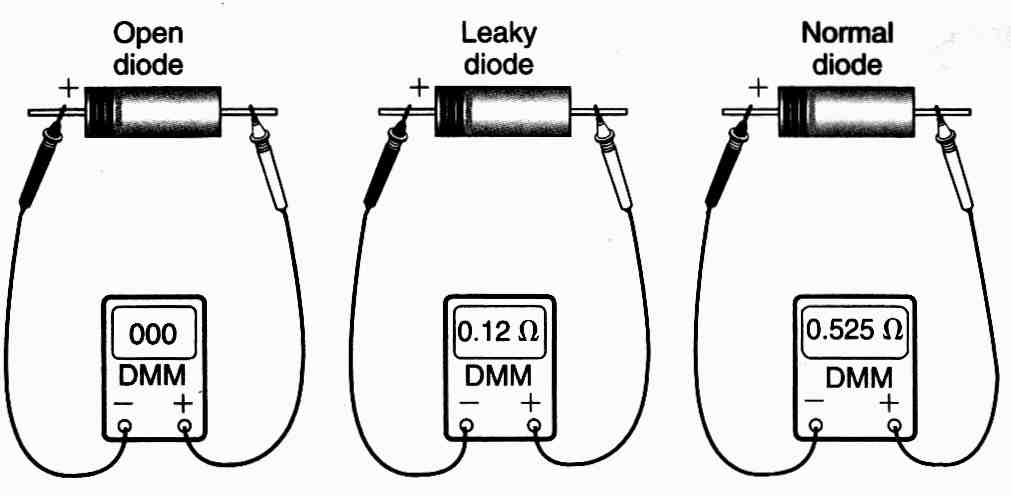
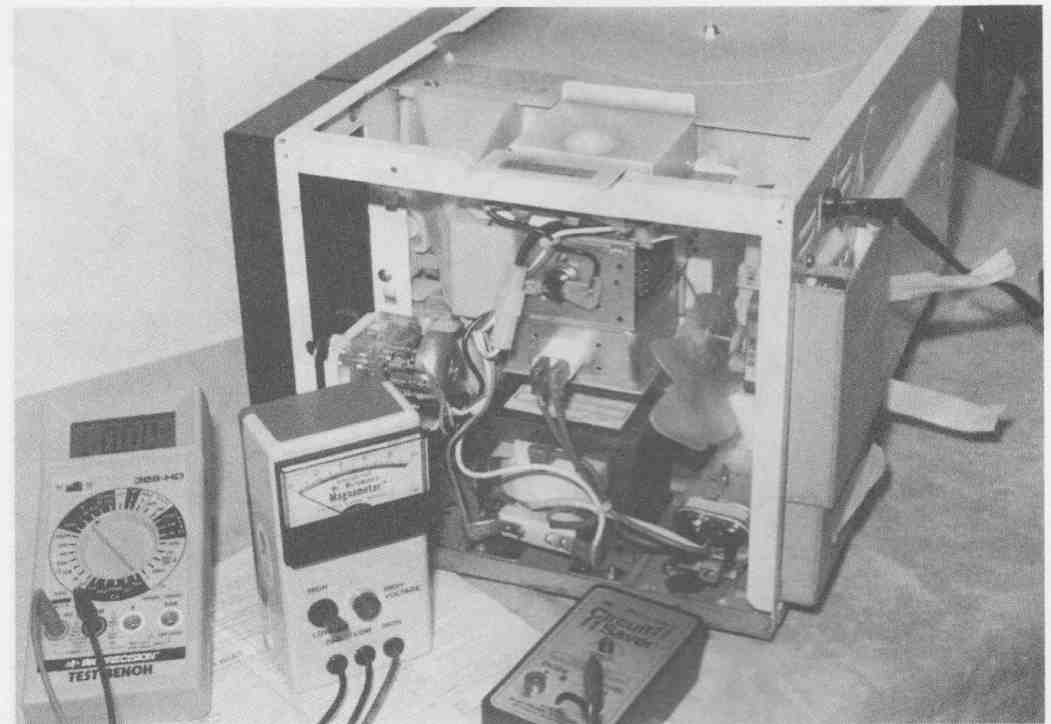
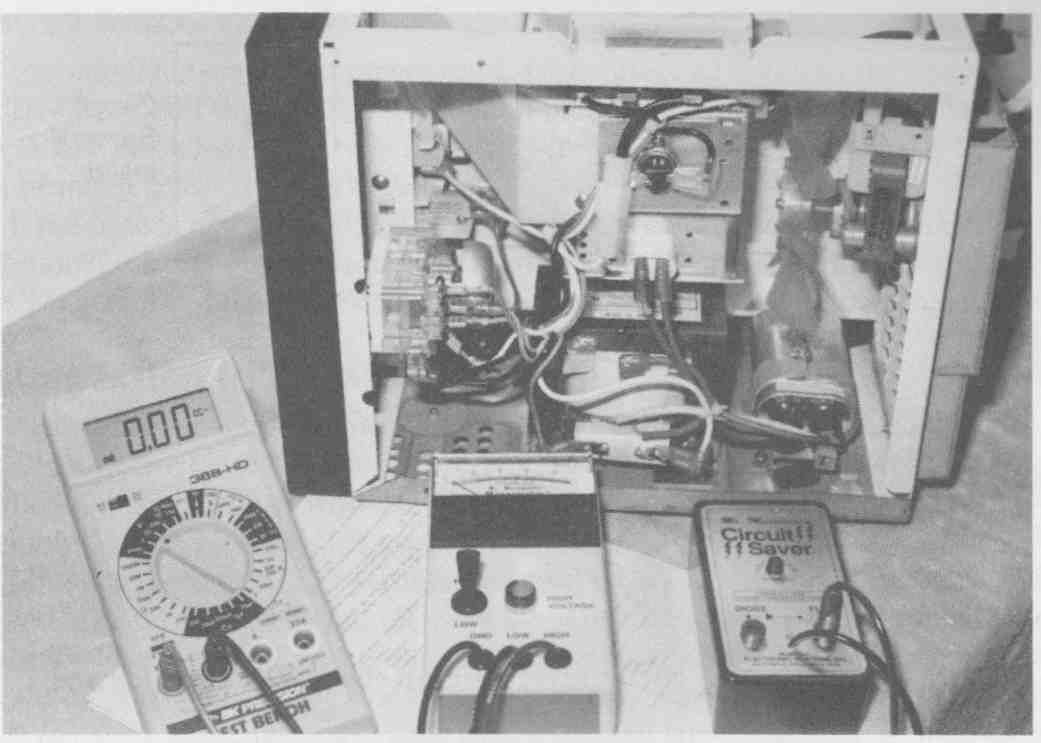
← → You need only a few basic tools to service minor problems with microwave ovens. Most are found around the house or in the average garage. A VOM and vacuum-tube voltmeter (VTVM) are needed to check continuity and voltage in the various components. For accurate high-voltage (HV) and current readings, a commercial meter is handy. Most of the test equipment you’ll need can be found on eBay. Some additional test equipment and tools are described later in this section. After an oven has been repaired or tested, a microwave leakage test must be made with a survey instrument. These tests are made to ensure that no oven leakage is present to cause possible injury to the owner. Several leakage testers recommended by the industry are the Narda 8100, Narda 8200, Holaday 1500, and Simpson Model 380m (figure 2). They can be obtained through many electronics distributors. List of tools and test equipment Many of the basic tools you’ll need are found in the shop or on a TV repair bench. Only a few test instruments are required. 1. Basic hand tools 2. York and star screwdrivers 3. VOM and DMM 4. Microwave leakage tester 5. Triac and SCR tester 6. Magnameter 7. Capacitor tester 8. Fuse saver 9. Test bulb
The microwave oven can be repaired with only a few basic hand tools and a DMM. For quick and efficient service, add a Magnameter, triac tester, and fuse saver. After making repairs, make a microwave leakage test with a certified leakage tester. Panasonic’s microwave exposure warnings Do not operate a microwave oven with the door open. Before activating the magnetron or other microwave source, make the following safety checks on all ovens to be serviced and make repairs as necessary: 1. Interlock operation. 2. Proper door closing. 3. Seal and sealing surfaces (arcing, wean, and other damage). 4. Damage to or loosening of hinges and latches. 5. Evidence of dropping or abuse. Before turning on microwave power for any service test or inspection within the microwave generating compartments, check the magnetron, waveguide, and cavity for proper alignment, integrity, and connections. Before releasing the oven to the owner, any defective or misadjusted components in the interlock, monitor, door seal, and transmission systems should be repaired, replaced, or adjusted according to the procedures described in the service manual. A microwave leakage check to verify compliance with the federal performance standard should be performed on each oven prior to release to the owner. Do not attempt to test the oven if the door glass is broken. Attaching test equipment Most microwave oven manufacturers warn service technicians not to use ordinary voltmeters to take voltage tests in the ovens. The Magnameter is the only meter you should use for voltage arid current tests. Do not use a voltmeter unless it will test more than 4000 Vdc. Do not try to measure the filament voltage with a small voltmeter, as the filament winding has the highest dc voltage potential ( Fig. 2). When making voltage tests, clip all meter test leads into the circuit. If temporary parts are to be added or substituted, do not hold them in your hands. Clip parts into the circuit with clip-on test leads. Keep your hands out of the oven when operating. Before opening up the microwave oven, remove your wrist watch whenever you are working close to or replacing the magnetron. People wearing pacemakers must consult their physicians before attempting to service microwave ovens. It’s wise to place an 8-ounce paper cup of water in the oven during testing operations. Basic hand tools Although the average service technician probably has the basic hand tools necessary for microwave oven repair, a list and description are given ( Fig. 3). A set of screwdrivers, socket wrenches, pliers, test lamp, and homemade cables are required. The VOM and DMM help to locate open or shorted components. The Magnameter can quickly locate a defective L diode, capacitor, magnetron, and no high voltage in the high-voltage oven circuits. Another gadget, the Circuit Saver, replaces the fuse and services overloaded circuits in the oven.
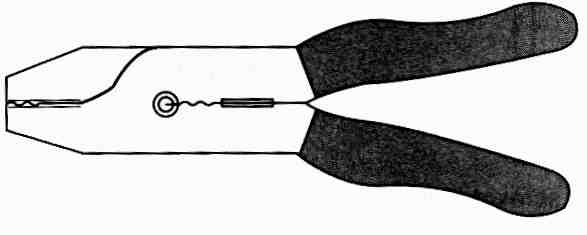
Screwdrivers Every home and shop has a lot of screwdrivers. You will need two Phillips screw drivers, one large and one small. The larger Phillips screwdriver is needed to remove those stubborn screws that hold on the back cover. The nickel-plated metal screws are often tightened with a power screwdriver and are sometimes difficult to remove. Two regular-size screwdrivers will come in handy to remove the various components and pry up a stubborn component from the metal chassis. Select two long, insulated screwdrivers for discharging the HV capacitor. The two screwdriver blades are jammed against the capacitor terminals and sandwiched together to discharge it. A couple of small, short screwdrivers come in handy when working in tight corners to remove or tighten those difficult-to-get-at metal screws. Some ovens require a special Torx or LHSTix screwdriver for removing power cords and other components. A nut driver set can speed up the removal and replacement of the various components in the oven. A set of socket wrenches also can come in handy to remove those large power transformers and the turntable motor assembly. A small crescent wrench will do if a set of sockets are not available. To remove front knobs and shafts, keep a set of Allen wrenches handy. A pair of regular pliers can be used in many ways for servicing a microwave oven. Long-nose pliers are handy when soldering cables or wires to the various parts. Select a good pair of long-nose and side-cutter pliers to make connections and remove wiring and cables from the replaced components. Choose a regular 100-watt soldering iron or 150-watt soldering gun for most terminal connections. The larger cables and wires require more heat than those found in the TV chassis. You might find most connecting wires are crimped in ovens, but many have to be soldered. A small, low-wattage iron is handy when working around the control boards. Special screw or nut drivers You might find a few finished screws that hold components or attach the top cover to the microwave oven. In new ovens, torx and star nut and screwdrivers are required to remove the finished screws. Often these screws were installed with a power nut or screwdriver and are difficult to remove. Make sure that you obtain the correct size of star or torx screwdrivers so you won’t rough up or destroy the head on the screw. Most manufacturers list the correct sizes for their ovens in the service literature. Eyelet crimp tool A multipurpose hand tool is comfortable to use. It cuts, strips, crimps, and serves as a small bolt cutter. The heavy-duty crimp tool crimps insulated/noninsulated and ignition-type eyelets ( Fig. 4). These tools are handy to crimp on a bro ken connected wire and make good solid connections. These soldered connections can be fastened to number 22-10 copper wire. The crimped-on connector can be bolted or screwed to make electronic or electrical connections.
Homemade tools Select three or four sets of alligator clip leads. They can be purchased at electronic supply houses. You can also make alligator clip leads yourself. Simply solder an alligator clip to a 12-inch flexible cable lead. The alligator clip ends should be of the rubber insulated type so they will not short out components when used in tight places. These cables come in handy to short around interlock switches or to temporarily clip components in the circuit ( Fig. 5). Take a long-bladed screwdriver (preferably a discarded Phillips) and solder a 2-foot cable with a large alligator clip at one end. A technician can use this tool to short the HV capacitor to chassis ground ( Fig. 6). Clip the alligator clip to a good ground and place the blade of the screwdriver against both capacitor terminals. The grounding tool is also used to ground out any voltage at the filament terminals of the magnetron tube before the defective tube is removed.
Another useful homemade tool is a fuse puller. Take a discarded screwdriver with a long stem and bend a curl—a u-shaped end—so the tool will slip under the fuse ( Fig. 7). Apply pressure against the fuse holder or pull up on the fuse at one end. Now the fuse can be removed. Sometimes chemical fuses are located inside the oven wall or are mounted on the monitor switch assembly. They can sometimes be difficult to remove. Take a TV cheater cord and cut off the interlock portion to make a temporary ac connecting cable. Solder two regular insulated alligator clips to each end for easy attachment. This cable can be used to check the ac cable or to apply power directly to the power transformer leads to isolate the control circuit from the transformer circuits. Pick up a pigtail light bulb socket for continuity and fuse blowing tests. These can be located in electronics departments or at your local electrical store ( Fig. 8). Screw in a 100-watt bulb. Instead of blowing a chemical fuse each time a short in the oven or an interlock switch hangs up, the light will become bright with the full power line voltage across the pigtail test light. This troubleshooting method can save a lot of blown 15-amp fuses.
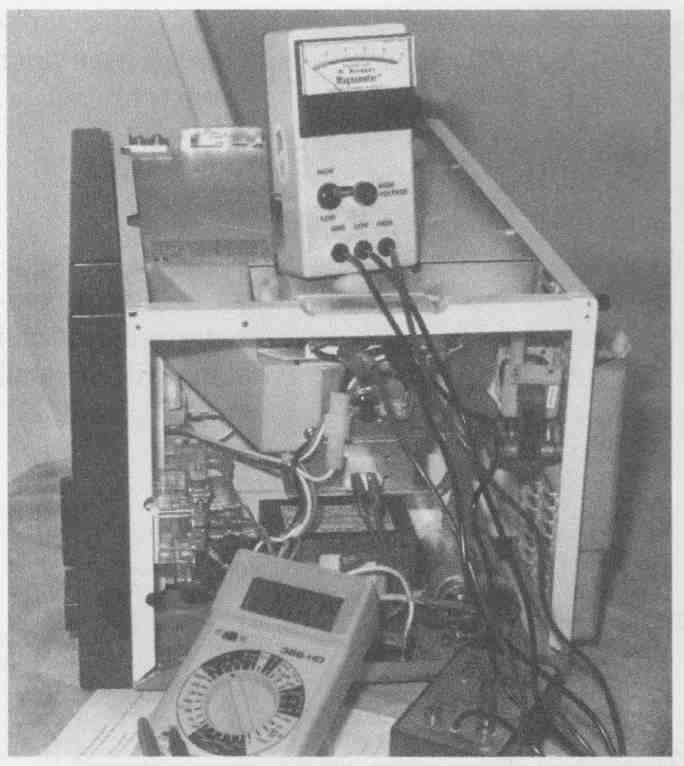
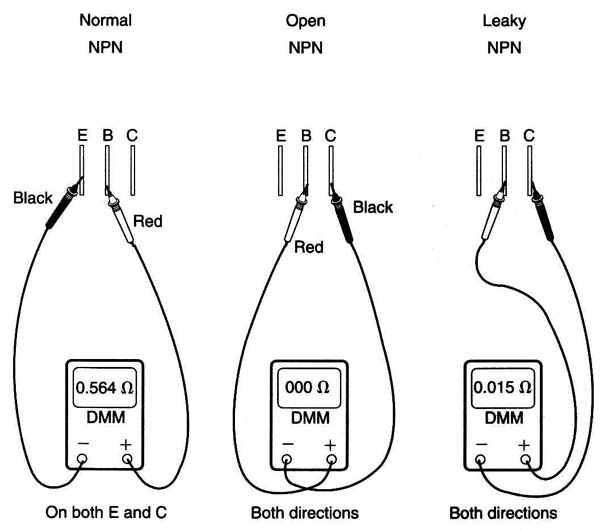
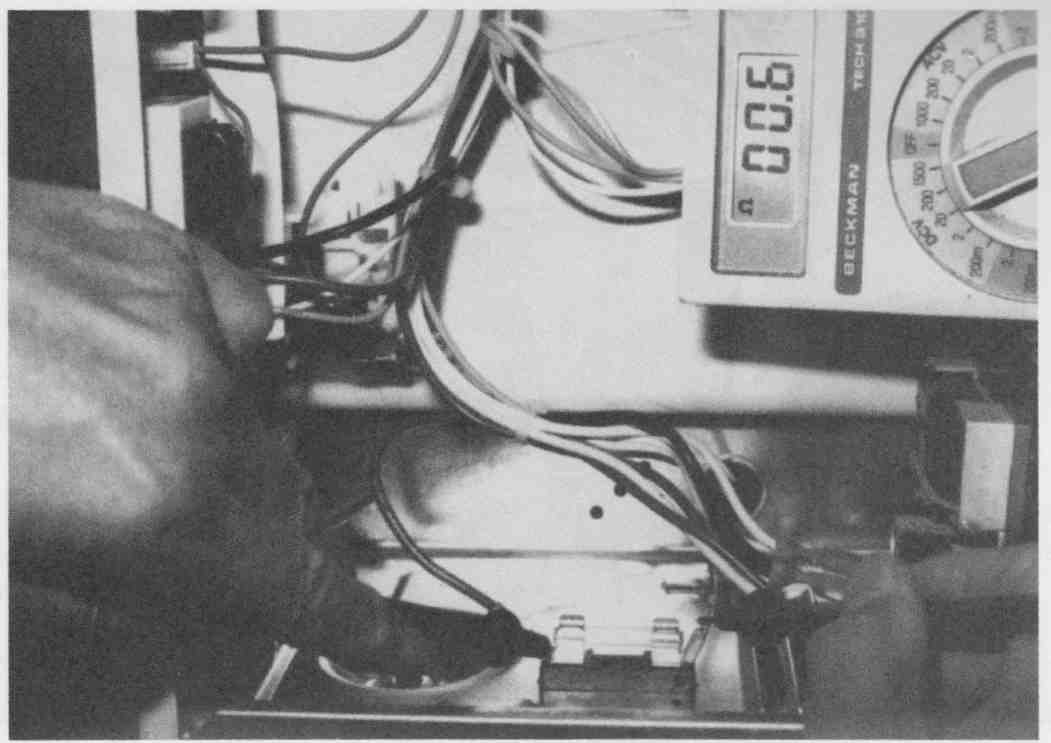
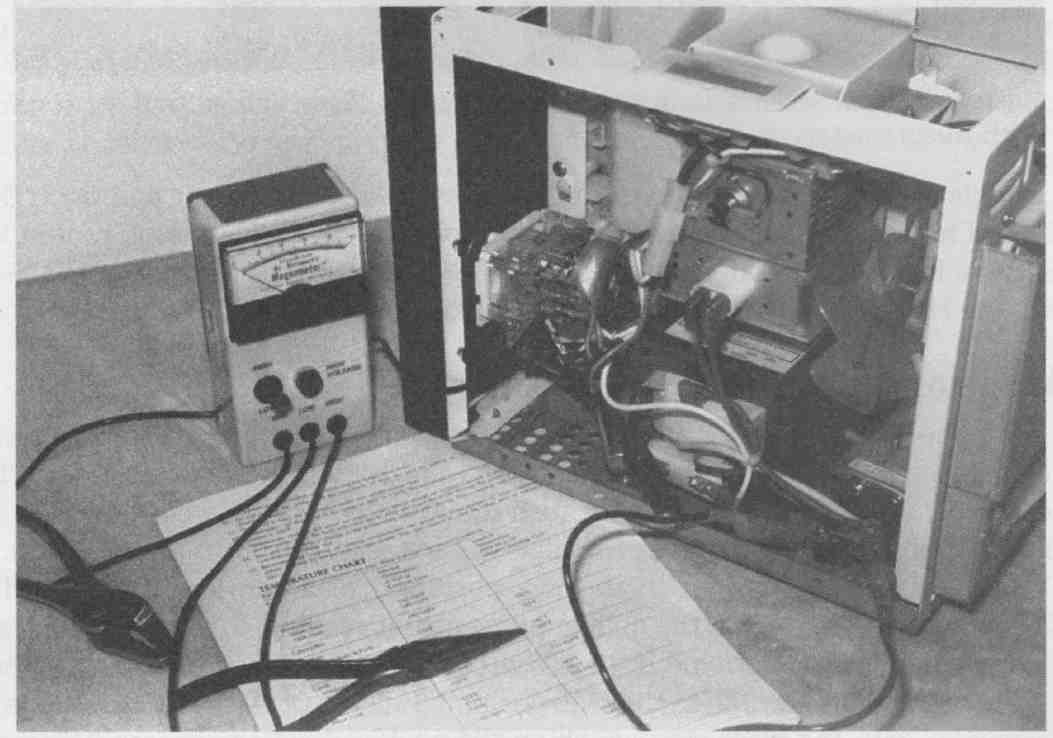
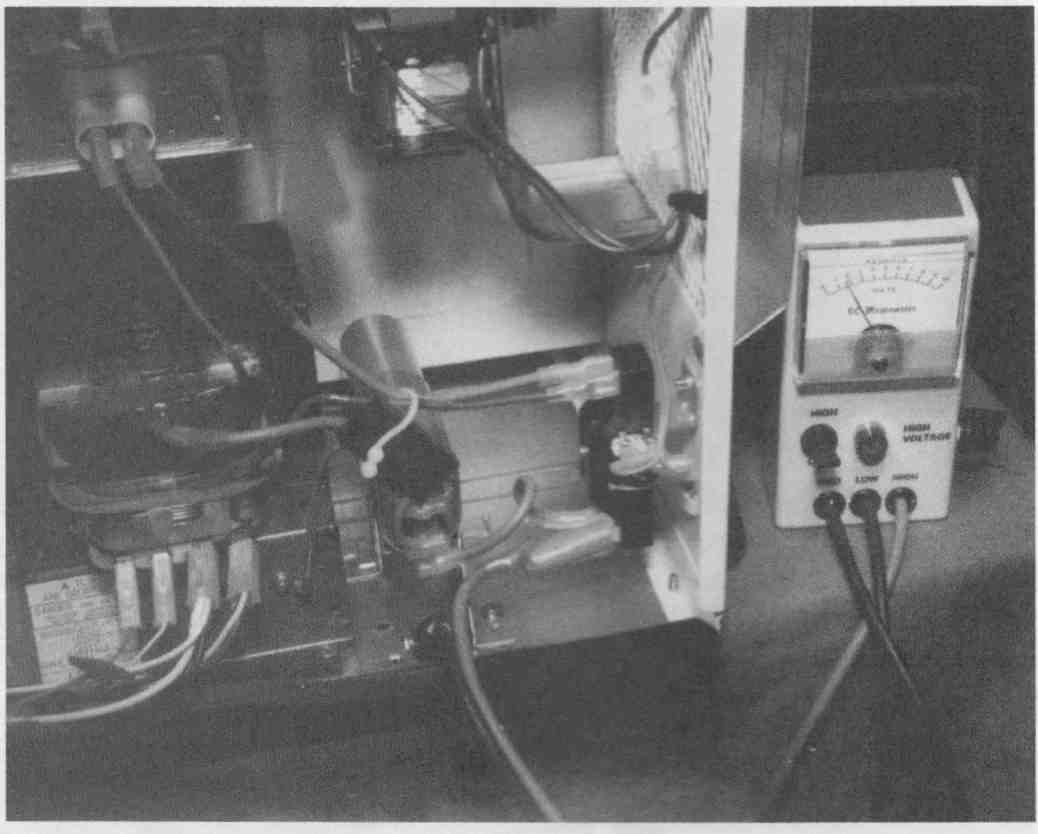
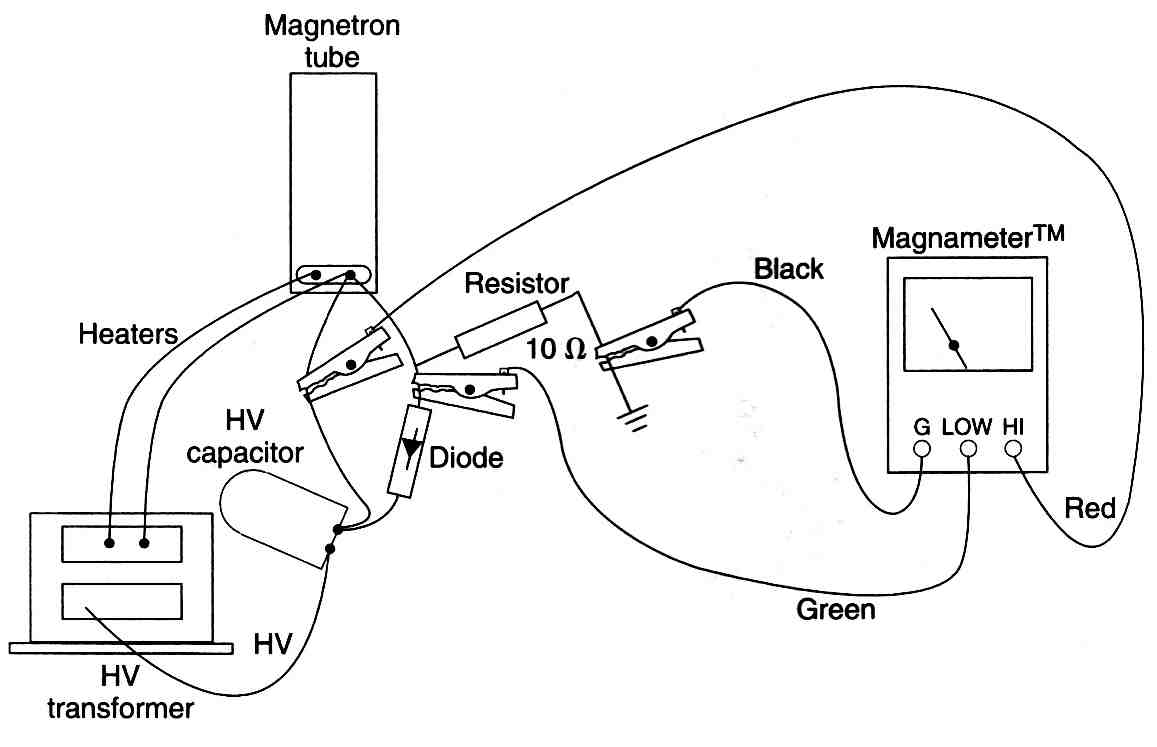
The small, pocket-type VOM is a handy tester in checking continuity of a suspected fuse, solenoid winding, interlock switch contacts, and also for tracing wiring cables. You should have one of these VOMs in the toolbox when checking ovens in the home. A low ohm range from Rx1 or Rx1k is sufficient. All continuity measurements should be made after the power cord is pulled and the HV capacitor is discharged. Only use the ac voltage range to check the ac power line voltage around the microwave oven. Do not use the dc range in the high-voltage circuits. These voltages are more than 2000 volts and will quickly damage or ruin the meter. Only use the small VOM for low-ohm and power line ac voltage measurements. Digital VOM The small digital VOM comes in handy when taking very low ohm measurements of transformer windings and filament continuity of the magnetron tube. Although the digital VOM is not a required test instrument, accurate low-ohm resistance tests (less than 1 ohm) might save a lot of valuable service time ( Fig. 9). A low-ohm measurement is necessary because the primary winding of the power transformer might be less than 1 ohm and the secondary filament winding from 0 to 1 ohm. The resistance measurement of the filament or heaters of the magnetron tube might be from 0 to 1 ohm. If a diode check is provided by the digital meter, this measurement can be used in checking diodes and transistors on the control board. Some technicians and oven manufacturers prefer to replace the control board instead of servicing it. The diode check is not accurate when testing the HV diode in the magnetron tube circuit. The milliampere scale can be used when the meter reads over 300 milliamps and a grounding test resistor is located in the HV diode circuit. Primarily, you should use the digital VOM for continuity and low ohmmeter measurements. DMM diode tests The digital multimeter (DMM) is ideal for taking low ohm-continuity tests on resistors, diodes, transistors, and IC components on the control board. A good diode shows a measurement in one direction only ( Fig. 10). A low resistance measurement in both directions indicates a leaky diode. Some technicians and oven manufacturers prefer to replace the control board instead of servicing it. The diode check is not accurate if you test the HY diode in the magnetron circuit with a low-voltage powered DMM. Use a DMM with a 6- or 9-volt battery to provide any type of indication with the HV diode/rectifier. DMM transistor tests Transistor junction tests can be made with a DMM that has a diode test. Always place the red probes to the base terminal of an npn transistor and the black probe to the base with a pnp type ( Fig. 11). You might find one or two elements of the transistor open or leaky. A normal transistor can show a measurement from base to emitter and base to the collector terminals. A low measurement in both directions indicates a leaky transistor. Check for improper voltages and low ohm measurements to ground on each IC terminal to locate leaky or shorted IC components. VTVM Most TV shops have a VTVM for radio and TV servicing. The VTVM can be used to check for continuity and make voltage measurements in the microwave oven. The various resistance and voltage ranges are ideal for checking the HY transformer, re lays, magnetron tube, and to make voltage measurements on the control board. The VTVM can also be used to check the HV circuits of the magnetron tube. A special TV HV probe must be used with the VTVM for these measurements. Do not try to make HV measurements without the probe. If the VTVM has a polarity switch for voltage measurements, it makes an ideal HV instrument. Remember: the high voltage around the magnetron is negative in respect to the oven chassis. Use the negative dc voltage range. When taking Fly measurements with the VTVM, keep the instrument off the oven, unless insulated from the metal cabinet. A piece of masonite, a book, or a piece of plastic will do. Keep small meters out of the oven The small VOM or DMM test meters should never be used to check voltages within the oven. This applies to meters that might be able to measure up to 3.5 kV The VOM or digital multimeter (DMM) can be used to make continuity, resistance, and diode tests inside the oven when the ac plug is pulled from the wall outlet. Al ways discharge the high-voltage capacitor before taking continuity or resistance measurements within the oven. The VOM or DMM is ideal when taking continuity and resistance measurements of the HV transformer windings, filament windings, and small transformers found in the panel control circuits. Continuity tests of the chemical fuse, cavity thermal cutout, magnetron thermal cutout, oven cutout, and interlock switch contacts can be made with the VOM or DMM ( Fig. 12). The diode test of the DMM will not check out the HV diode. The higher resistors above 9—10 megohms can be checked by either meter, if the resistance goes that high. Do not attempt to check the HV capacitor or for HV on the magnetron filaments with either the VOM or DMM. You might damage it beyond repair. Damaged small meters Small VOM or DMM meters that will not measure up to 3.5 kV can be severely dam aged while trying to measure the high voltage in the microwave oven. Do not attempt to use an analog meter (VOM), even if it measures up to 3500 volts. Use the Magnameter. It’s safe and is designed to measure the high voltage in the microwave oven. Remember that oven voltage varies from 1.5 kV to 4.8 kV. Most VOM or DMM test meters will not go that high in voltage tests. When checking the H diode, you might accidentally leave off the ground wire or fail to reconnect it. Even a small tester that might measure up to 3.5 kV can be damaged when taking high-voltage tests. An analog meter is damaged when a large amount of raw ac voltage is applied to the meter. These meters are damaged beyond repair and they might explode in your face. Even factory repair does not help to restore it. Be safe. Use only a VTVM with an HV probe or a Magnameter for HV tests within the microwave oven. The Magnameter One of the latest voltage and current meters, called the Magnameter (model 20-226), is available from Electronic Systems, of Rockford, Illinois. The Magnameter is a specialized instrument used to speed up and simplify microwave oven testing. With the Magnameter, you can quickly take voltage and current measurements with out possible danger of HV shock and injury to the magnetron circuits ( Fig. 13). The meter enables the technician to make both M and plate current measurements of the magnetron and HV circuit with one setup. You don’t have to handle or change test leads during the voltage and current checks. The meter hookup is identical with positive and negative ground ovens. Most domestic ovens have a positive ground in the HIT circuit. The meter is also well insulated with 10 kV rated test lead wires. A high impact plastic meter case prevents shock to the operator. No metal knobs or switches are exposed, preventing possible shock. The meter can be held in your hands or set on top of the metal oven while taking critical voltage and current readings. The meter case is constructed of extremely tough thermoplastic material that resists breakage from all but the most severe abuse. Besides the meter indication, a neon warning light flashes when high voltage is present—whether the switch is in the high (BY) or in low (current) position. Both readings can be obtained with just flipping the high/low toggle switch. First, take the HV reading, then make a current measurement. The meter hand is rated from 0 to 10 k-V. You can consult the oven manufacturer’s service information for acceptable HV limits. Most domestic ovens operate between 1.5 and 3 kV, while commercial ovens operate from 2 to 4 kV applied to the magnetron tube. The toggle switch must be flipped to high to measure the high volt age in kilowatts. Flip the toggle switch to low for direct magnetron plate current measurement. In some microwave ovens (especially the early ones), a 10-ohm plate resistor is found between the HV diode and chassis ground ( Fig. 14). Using this 10-ohm resistor is a quick method of taking current readings without possible shock to the technician. When no test resistor is found in the magnetron circuits, simply remove the ground side of the silicon diode (+) and connect the 10-ohm test resistor, provided with the meter, between diode and chassis ground. Actually, you are inserting the test resistor in series with the HV diode and common ground terminal. Connect the green meter lead to the 10-ohm resistor for current measurement. Then you simply multi ply the meter reading 100 to get the actual current reading of the magnetron tube. For instance, if the meter hand was at 2, then 100 equals 200 mils of current. The cur rent of most domestic microwave ovens ranges between 160 to 400 milliamperes, while the commercial ovens can have a plate current from 200 to 750 milliamperes.
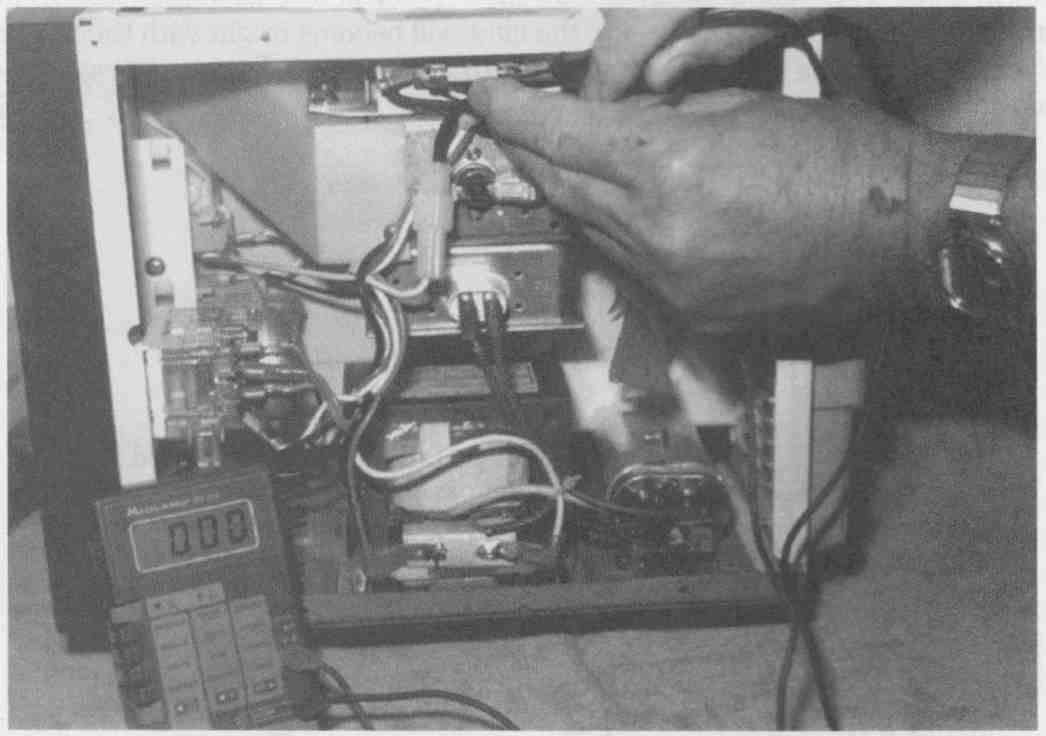
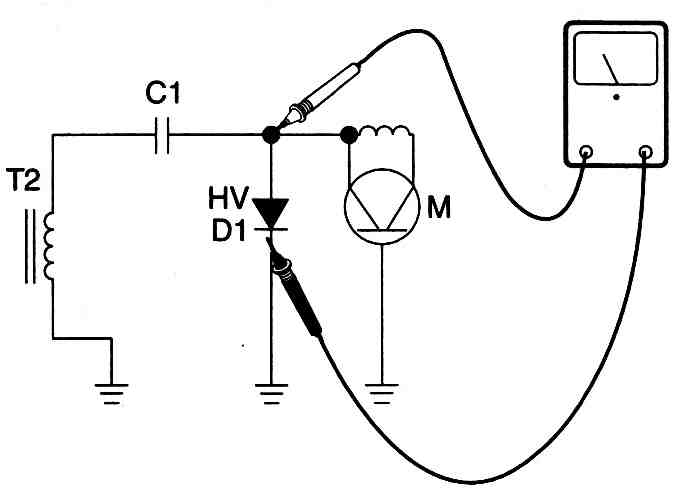
Very seldom does the manufacturer include the operating current of the microwave oven in the service literature. It’s wise to take a voltage and current reading on every oven and mark them on the service literature for future reference. Connecting the meter After removing the back cover of the microwave oven, discharge the HV capacitor. Double check. Make sure the power plug is disconnected. Connect the black lead of the meter to the common chassis ground. These insulated alligator clips are strong and will stay in place. Clip the red lead to the HV capacitor or HV diode of the HV side ( Fig. 15). If in doubt, trace the E capacitor lead going to the filament circuit of the magnetron tube.
Check for a 10-ohm, 10-watt test resistor. If the HV silicon rectifier goes directly to chassis ground, remove the positive end of the diode. Usually, this lead is grounded with a metal screw or nut. Next, insert the insulated 10-ohm test resistor provided and clip between the positive end of diode (end just removed) and common ground ( Fig. 16). Most new ovens do not have a test resistor mounted in the HY circuit. Double check the meter connection. Make sure each clip is snug and tight. Each cable end has a colored rubber alligator clip for easy identification. (The red lead goes to the high-voltage side, the black lead to ground, and the green lead to the top side of the HV diode.) The meter should be connected as shown in Fig. 17. Taking voltage and current measurements After the cables from the meter have been attached to the oven circuits, start the cooking cycle. Set the meter toggle switch to high. Plug in the power cord. Place a liter of cool water in the oven cavity, turn the oven to maximum cook or heat, and push the cook button. Then check the high-voltage reading shown on the meter. Change the toggle switch to the low position. Read the low voltage (which is 100), and this will give you the milliampere current reading. From these two readings, you can quickly determine if the HV circuits or the magnetron tube are defective. Return the toggle switch to the high position. Pull the power cord. Discharge the HV capacitor with the discharge switch on the side of the Magnameter. The meter hand should return to zero and the warning light should be out, indicating that the HV capacitor is discharged. To make sure, you might want to discharge the capacitor with two screwdrivers.
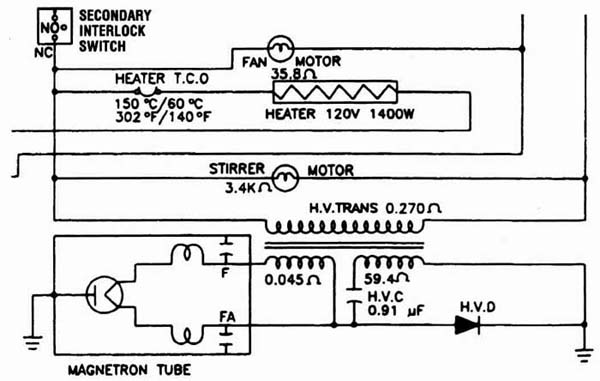
Disconnect the meter and proceed to service the oven. If no high voltage is seen on the meter in the high position, suspect a leaky diode, HV capacitor, transformer, or no ac voltage supplied to the transformer primary winding ( Fig. 18). You might find a grounded magnetron tube with no high voltage and no current reading. A shorted transformer and leaky diode can produce a low high-voltage reading (often below 1 kV).
An excessive high-voltage reading could be caused by a defective magnetron, open filament, open filament winding, or a high-voltage wire. You might have a low- or no-current reading with an excessive high-voltage reading from 3 to 5 kV. A leaky or shorted magnetron tube can produce a high-current measurement from 350 to 600 mils ( Fig. 19).
The Magnameter can quickly indicate problems in the HV circuit as well as out side the magnetron tube circuit. Erratic meter readings indicate an intermittent magnetron tube or poor filament connections. Low current readings might indicate a weak magnetron tube that can cause the problem of taking too long for foods to cook in the oven. A meter of this type would be a great addition to your present VOM or VTVM. The Magnameter The original Magnameter was invented by Nick Parnello of Rockford, Illinois. This first meter was distributed and sold through General Cement Company. Now the Magnameter is manufactured and sold through distributors by Electronic Systems, Inc. Remember, the Magnameter is a specialized test instrument used to speed up and simplify microwave oven repair ( Fig. 20). The new meter has a yellow area up to 2 kV, a green area from 2 kV to 4.5 kV, and a red area from 4.5 kV to 10 kV. The new meter does not have an HV capacitor discharge switch on the side; the original model does. The Magnameter enables both high-voltage and plate-current (voltage across the plate resistor) measurements to be made with one setup. There is no handling or changing of test leads during voltage and current tests. The hookup is identical with reversed polarity (negative ground) ovens. The new meter has superior insulation with special high-voltage test leads. The meter case is 18 inches thick and is made of high-impact plastic, with no metal knobs or switch actuators on the exterior of the unit. A red warning light comes on when high voltage is present, whether the switch is in high or low position. Before you use the meter to check out the oven circuits, disconnect the oven from the wall outlet. Remove the outside cover of the microwave oven. Discharge the high-voltage capacitor. Double check the discharge tests. Connect the black lead to chassis ground. Connect the red lead to the high-voltage capacitor or rectifier (diode) on the high-voltage side ( Fig. 21). Now you are ready to make high-voltage tests. To make a current test (voltage across resistor), connect the green lead between plate resistor and magnetron tube plate lead wire. If the oven does not have a plate resistor in the circuit, disconnect the high-voltage diode ground wire. It is usually held in position with a metal screw to the oven chassis. Insert the 10-ohm resistor, which is included with the meter. High voltage test Now connect the oven to the ac outlet, and set the meter toggle switch to the high position. Insert water in a paper cup or container (6 oz.) to load the oven down. Turn the microwave oven on a high wattage setting. Now read the meter.
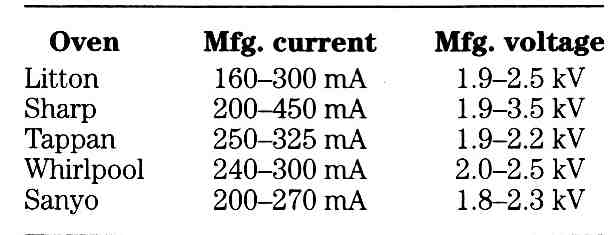
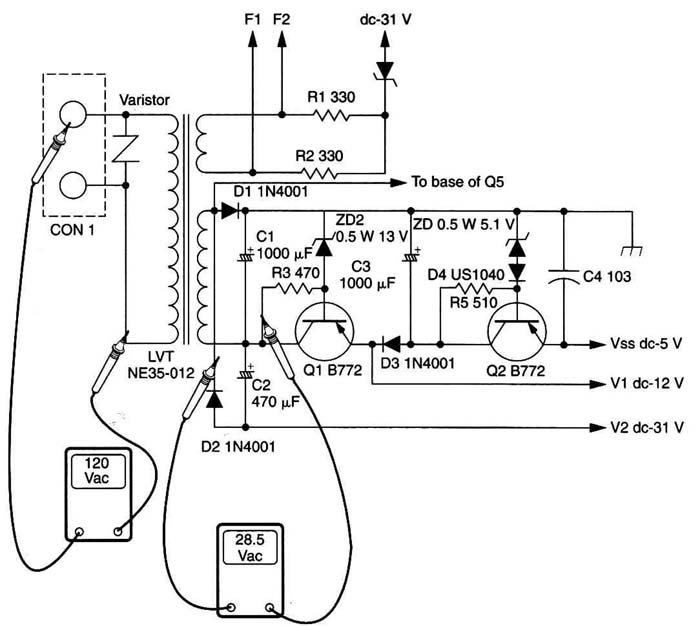
If the meter hand appears in the yellow area, suspect a shorted magnetron, diode, high-voltage capacitor, shorted or open HV transformer, or an open HV fuse. When the reading is in the green area, the oven should be operating normally. If the meter reads in the red area, suspect an open magnetron, open filament, bad filament transformer, poor connections on the filament leads of magnetron, or an open HV wire. Oven current tests Rotate the switch to low position. Now read the low voltage, which represents current. A home oven should have a reading between 1.6 kV and 4.5 kV (equals 160-450 mA), while commercial ovens have a higher measurement. The voltage might vary from 2.0 kV to 7.0 kV (200-700 mA) of current. Any oven that reads above these figures indicates a leaky or shorted magnetron tube ( Table 1). To avoid possible shock, discharge the Fly capacitor or wait at least 10 seconds after the warming lamp goes off to assure full discharge of capacitor. Periodically, check bra good ground (black) clip attached to a chassis bolt during all tests. Keep clear of meter and leads while the oven is operating. Each time it is connected to the oven, inspect the meter leads, which might show damage. Always discharge the high-voltage capacitor before connecting and removing the Magnameter. Voltage tests (ac) Regular ac voltage tests can be made throughout the oven to check the various components. Check the ac voltage at the fan blower to determine if defective fan has an open winding or connection. Take a voltage test across the lamp with no light ( Fig. 22). Test the browner heater element with a voltage test and no heat with ac voltage test across heater terminals. Check ac voltage across stirrer or turntable motor with no rotation. Measure the ac voltage across the primary winding of power transformer to determine if all interlocks, relays, and triac assemblies are functioning.
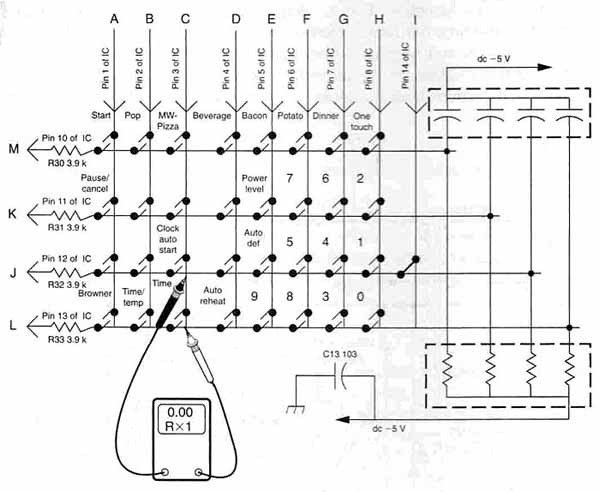
Resistance tests Take low ohm resistance measurements with the ohmmeter set on the Rx1 scale for most components in the microwave oven. Check for burned or corroded relay points with a low resistance measurement. Measure the resistance of the main or oven relay for open winding. Take a quick resistance measurement to see if an inter lock is open or closed. Check the continuity of a fan, stirrer, flame, door, and turntable motor to see if motor winding is open. Test the transformer primary and secondary windings for open or shorted windings. Remove the filament leads from transformer to magnetron heater or filament connections on magnetron for open filament. Check for open key buttons when a button is pushed and erratic or no operation is noted ( Fig. 23).
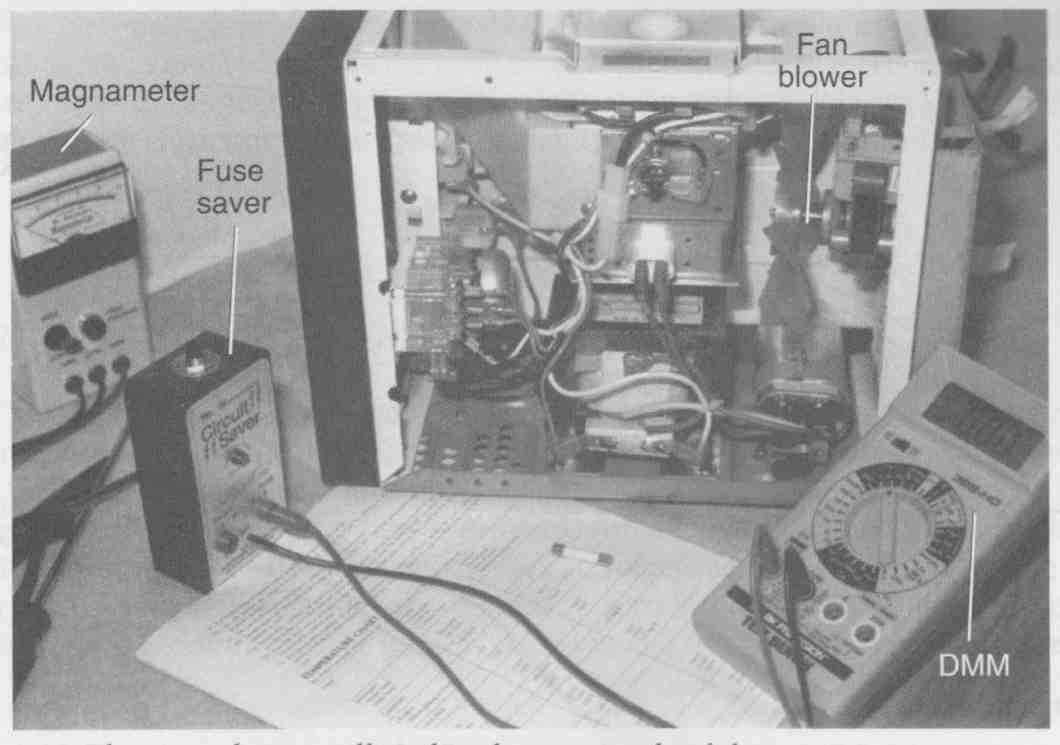
The Circuit Saver The Circuit Saver is manufactured by the same firm that makes the Magnameter (Electronic Systems, Inc.). The Circuit Saver is designed to take the place of the blown oven fuse while testing and servicing the oven. Chemical fuses are quite ex pensive to use when you are testing an oven that is overloaded or has a leaky component. The Circuit Saver is ideal to use when the oven intermittently blows the main oven fuse ( Fig. 24).
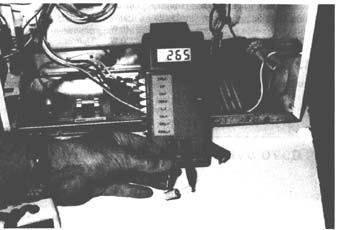
This small tester can also be used to substitute an HV diode within the oven. A red high-voltage warning light is found on the front side of the meter. When using the Circuit Saver for diode substitution, if the high-voltage light does not appear after approximately 10 seconds, shut down the oven. Check for other shorted or over loaded conditions in the oven. Caution: Make sure that the high-voltage capacitor is discharged before connecting the circuit tester as a fuse. Remove the blown fuse from the fuse holder in the microwave oven. Place the load (black lead) corning from point G of the Circuit Saver across one lead or clip of the fuse holder. Take the lead from point F (red) of the tester and place across the other end of the fuse holder. Then if the oven blows a fuse, just reset the circuit breaker of the tester. Before substituting a diode, discharge the high-voltage capacitor. Remove the high-voltage wire from the old diode (at anode) of the magnetron. Connect lead D (red) wire from Circuit Saver to the high-voltage wire removed from the old diode in the microwave. Connect wire lead C (black) from the tester to the chassis of the microwave ( Fig. 25). Diode substitution is now finished. Check all leads of the tester before connecting to the oven. Make sure that no bare or broken wire areas are found. Always discharge the HV capacitor before and after each test. The Circuit Saver can save a lot of valuable service time when troubleshooting intermittent ovens. Triac/SCR diode tester The Tri-Check 11 is a new test instrument designed by Electronic Systems, Inc. It can be used to test triacs, SCRs, and diodes in the microwave oven. This little test instrument is ideal to check out suspected triacs and high-voltage diodes ( Fig. 26). Testing triacs Disconnect the ac oven power cord. Disconnect all wires to the triac. Turn on the Tri-Check and the middle light should blink. Now connect the Tri-Check to the triac. Place black lead (T1) to MT1, clear wire (T2) to MT2, and red (G) lead to the gate terminal. Press the test button. If the triac is normal, both lights should light when the test button is pressed and they should turn off when button is released. Both lights will always light with a shorted triac. No lights are on with an open triac. Always turn the tester off when not in use. Testing Litton triac assemblies Again, disconnect the ac power cord. Remove all wires and leads to the triac. You should mark the color code leads so they can be replaced with correct wires. The middle light should blink with Tri-Check turned on. Connect the tester to the triac assembly. Plug in optional test lead. Connect the black (T1) terminal to marked MT1, and the clear cable (T2) to marked MT2 terminal. The red (G) lead is not used. Connect black terminal of tester to terminal marked blue and green to terminal marked green. Press the tester but ton. Both lights should light when the test button is pressed and turn off when but ton is released. Both lights will light with a shorted triac. The triac is open when no lights are on ( Fig. 27). Testing microwave diodes Disconnect the ac power cord. Discharge HV capacitor. Disconnect all wires to IV diode. Turn on Tri-Check and middle light should blink. Connect tester to black (T1) lead to the anode and clear (T2) to the cathode element of diode. Do not use the test button for diode tests. The diode light should light with a normal diode. Both lights will light with a shorted diode and no lights are on with an open HV diode. Testing SCRs Disconnect the ac power cord. Disconnect all wires to the SCR. Turn on Tri-Check and middle light will blink. Connect black lead (T1) to the cathode terminal, clear (T2) to anode, and red (G) to the gate terminal. Press the test button. The SCR light should light when the test button is pressed and turn off when button is re leased. Both lights will light with a shorted SCR. No lights are on with an open SCR. Cooking test equipment The power output of the magnetron can be measured by performing a water temperature rise test. A cooking-water test should be made after all repairs are finished. The cooking test might indicate a defective magnetron or HV component. When the oven takes too long to cook, suspect a faulty magnetron or related components and make the cooking test. For making the cooking test, you’ll need a 600-cc glass beaker or equivalent, a glass thermometer 100°C or 212°F and two 1-liter beakers or equivalent. You might find that each oven manufacturer has a somewhat different water test (each oven test procedure uses water, a container to hold the water, a thermometer, and a stopwatch). To ensure accurate water tests, the power line voltage should be 115 to 120 Vac. Here are several manufacturers’ water test procedures. Panasonic NN-9807 and MQSS97BW cooking tests The power output of the magnetron can be determined by performing a simple water heating test as described in the following. Necessary equipment: two i-liter beakers, a glass thermometer, and a wristwatch or stopwatch. Check the line voltage under a load. Low voltage will lower the magnetron output. Take the temperature readings and heating time as accurately as possible. 1. Fill each beaker with exactly one liter of tap water. Stir the water using the thermometer and record each beaker’s temperature (recorded as T1A and T1B). 2. Place both beakers on the center of the cook plate. Set the oven for high power and heat it for exactly two minutes. 3. Stir the water again and read the temperature of each beaker (recorded as T2A and T2B). 4. Obtain the temperature rise by using the following formula: Average temperature rise = [T2A + T2B — (T1A + T1B)] / 2 The normal temperature rise for these models should be 16 to 20°F (8.9 to 10°C) at the high power selection with the oven operating at the specified line voltage. 5. To obtain the power output, multiply the avenge temperature rise by 39 (or 70 if thermometer is in Celsius). Example: If you find average temperature rise of 18°F, the oven output is 18x39 = 702 watts. Oven A 1. Pour 1000 ml of cool tap water into a large beaker and stir with the thermometer to measure the water temperature. Make a note of the initial temperature (TI). This temperature should be somewhere between 17°C and 27°C. 2. Place the beaker of water in the center of the oven and heat for 62 seconds at high power. Use the watch second hand instead of the oven timer. 3. When the time is up, stir the water with the thermometer and again measure the temperature. Record the final temperature (T2). 4. The output can be calculated with the following formula: wattage output (W) = (T2 - T1) 70 (Celsius). 5. The maximum temperature rise is 10°C; a minimum temperature rise is 8°C. Oven B 1. Fill the measuring cup with 16 ounces (453 cc) of tap water. Measure the temperature of the water with the thermometer. Stir the temperature probe through the water until the temperature stabilizes. Record the water temperature. 2. Place the cup of water in the oven and set the cooking mode to full power. Allow the water to cook for 60 seconds while checking with a stopwatch, the second hand of a watch, or the digital readout countdown. 3. Remove the cup and measure the temperature. Stir the temperature probe through the water until the maximum temperature is recorded. 4. Subtract the cold water temperature from the hot water temperature. The normal result should be a 10 to 36°F (10.6 to 20°C) rise in temperature. Oven C 1. Select a 1-pint (2-cup) Pyrex measuring cup and a thermometer with a range of more than 180°F. 2. Fill the Pyrex container with one pint of tap water. Use the thermometer and record the water temperature. 3. Place the filled container in the center of the oven cavity and set the timer at 2 to 3 minutes. 4. Time the oven at exactly two minutes with a watch or clock that has a second hand. 5. Remove the Pyrex container and stir the water with the thermometer to check the rise in temperature. If the oven is operating successfully, the temperature rise should be approximately 55°C. You should follow each manufacturer’s cooking water test when working on a particular type of oven. All water tests indicate how the magnetron is functioning. If the water temperatures are accurately measured and tested for the required time period, the test results will indicate if the magnetron tube has low power output (a low rise in water temperature), which would extend the cooking time, or high power output (a high rise in water temperature), which would reduce cooking time. One microwave oven technician I know has devised his own cooking water tests. Three new and different microwave ovens were used in the test. Each oven was checked against a beaker filled to a certain level and marked at the boiling point ( Fig. 28). The time of each oven was recorded at 3 minutes. When the water began to boil, the time was recorded for each oven. A high and low line were drawn on the beaker. Most ovens with the same water level had very close water boiling times (2 1/2 to 3 minutes). When an oven takes longer than three minutes for water to start to boil, the technician knows trouble exists in the magnetron and H section. In case the boiling point is more than 4 or 5 minutes, a voltage and current test of the magnetron tube will indicate a defective tube ( Fig. 29). Of course, water boils at different temperatures in different parts of the country (depending on altitude), and this must be taken into account with this type of method. If the water boils in less than two minutes, the technician knows that the magnetron tube is defective and usually is running red hot. If by chance you are on a house call to check a microwave oven and you forget to take a beaker or Pyrex cup along, try a Styrofoam cup. Today most kitchens have such cups available. These cups do not melt down, although they do run warm when the water begins to boil. Fill the cup with tap water arid take the three minute boiling test. You should know how full to fill the foam cup. After several house calls or cooking tests, you know whether the oven is cooking accurately or if it is defective. If in doubt, bring the oven in and apply the manufacturer’s water cooking test. In case the cooking test takes a longer cooking time or the customer complains of burning up the food, check the magnetron tube. A magnetron tube pulling heavy current (400 to 600 mils) indicates a leaky or shorted tube. When the oven takes too long to cook, check for very low current readings and suspect a weak magnetron. Re place the magnetron if the correct HV voltage is present but there is an improper current measurement. Leakage tests Every microwave oven must have a leakage test taken after servicing the unit. All oven manufacturers require leakage procedures. Besides, most customers demand a leakage test. You might be asked to come to the home and only make a leakage test, since most people are scared to death of radiation. It’s better to be safe than sorry, so take a leakage test for your own safety too. There are several leakage test instruments recommended by the industry — Narda 8100, Narda 8200, Holaday 1500, and Simpson Model 380m (shown in Fig. 30). The price of a leakage tester can run close to $500. Two low-priced leakage testers are discussed at the end of this section The purpose of any radiation instrument is to check the radiation leakage around the microwave oven door, outer panels, vents, and door viewing window. After re placing a magnetron tube, check for leakage around the magnetron and waveguide assembly. Be careful. Avoid contacting any HV component with the radiation meter ( Fig. 31).
The U.S. government has established a maximum of 5 mW/cm^2 leakage while in the customer’s home. Many oven manufacturers request that the leakage never be more than 2 mW/cm^2 (1 mW/cm^2 for Canada). The power density of the microwave radiation emitted by a microwave oven shall not exceed 1 milliwatt per square centimeter at any point, 5 centimeters or more from the external surface of the oven, measured prior to acquisition by a purchase, and thereafter, 5 milliwatts per square centimeter at any point 5 centimeters or more from the extreme surface of the oven. Low-priced leakage meters The low-priced microwave oven leak detector is an economical leak detector used to check leakage around latches, gaskets, and around the control panels ( Fig. 32). These testers instantly detect microwave leakage. They are intended to check for leakage by the operator and not used for certification of oven leakage. Just point the meter against the door gap area and watch the meter hand move. Some low-priced testers have a regulator meter hand, while others might have a red or green mark for the meter indication. If the oven shows any sign of leakage movement on the low-priced meter, have the oven checked with a certified leakage tester.
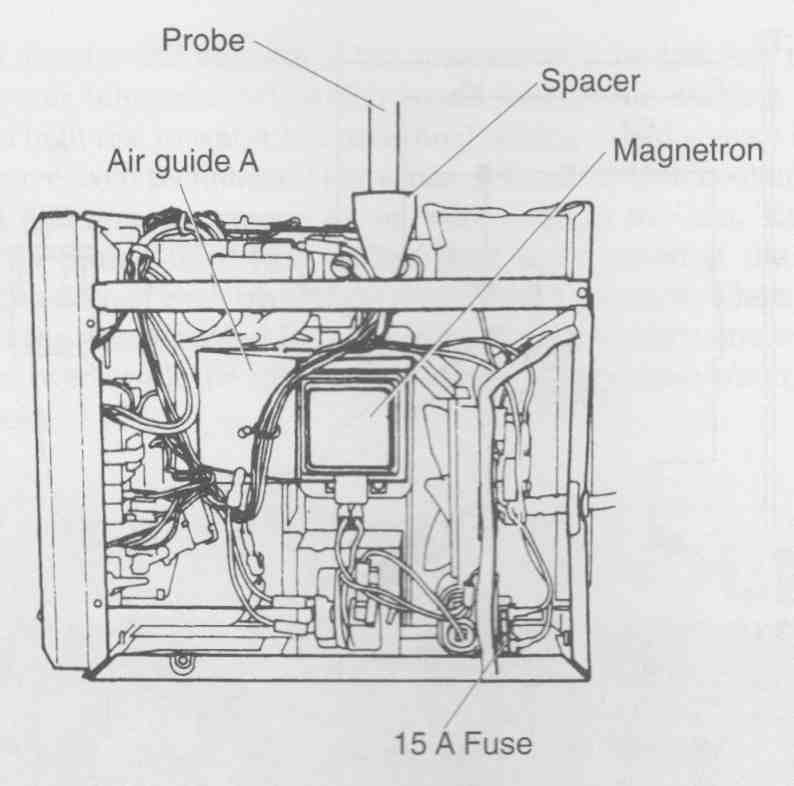
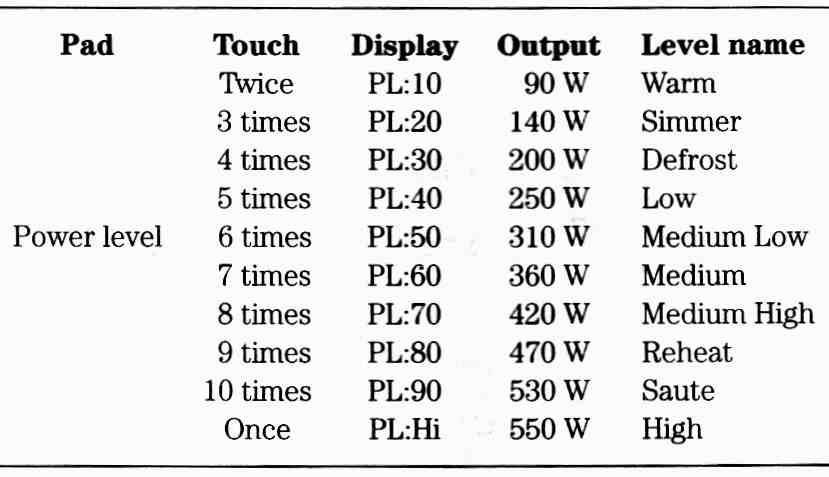
The Narda 8100 radiation monitor The Narda instrument measures radiation leakage in milliwatts per square centimeter (mW/cm^2) A water load of 275 cc (approximately 1 1/3 cups of water) is placed in the oven and used as a load during leakage tests. The measuring probe should be used with a 2-inch cone spacer. This tester can be operated on the internal rechargeable battery or from the power line. The battery can be charged from the power line. Switch the instrument to the 2450-MHz position. The fast and slow meter response switch should be set in the fast position. Tins tester has an available alarm system that warns the operator when high amounts of radiation might damage the meter. Set the alarm control to 50, which sounds the alarm when the meter reads 50% of full-scale deflection. On ovens with an unknown leakage, use the high scale first and then switch to the low scale for low leakage. A test switch is used to check the battery and probe. The meter needle will not read above the minimum test mark on the meter if either scale is faulty. Set the meter to 0 with the 0 control. Always check the battery and probe with the test switch before attempting to measure radiation leakage. Check both the battery and the probe test switch. Plug in the ac cord if the battery reading does not come up to the minimum test setting. Do not use the probe if the probe tests fail. The audio alarm will come on during operation if the probe becomes inoperative or disconnected. The Simpson 380 series microwave leakage tester The Simpson 380m is a portable, direct reading instrument designed for accurately measuring the amount of microwave leakage radiated by ovens, heaters, chargers, and other industrial equipment generating high power at microwave frequencies of 2450 MHz. The non-polarized, hand-held, wide-range probe permits selection of five distinct ranges for power density measurements. This instrument has a slide switch, enabling the technician or operator to select the correct response time. The Simpson 380m comes with a thermocouple probe, cone spacer, two 9-volt batteries, a carrying case, and an operating manual. When a new probe is required, the complete instrument must be returned to the factory for calibration. Probes are not interchangeable. Most radiation test equipment should be returned to the factory or factory authorized service centers once a year for overall check and calibration. A six-position rotary-range switch is used to activate the tester, as well as to select the range for the radiation to be measured. The range selected is indicated by the marker. With the range switch set to either the 2.5 or 2 mW/cm^2 position, the lower (0 to 2.5) dial arc is read. The (0 to 10) dial arc is read when the range switch is set to the 10 or 100 mW/cm^2 position. Switch the range switch to the battery test position to check the condition of the batteries. If the fast/slow switch (normally set to the fast position) that selects the response time of the meter remains at the set point (does not move toward zero), the probe is defective. Carefully read the manufacturer’s operating manual and make sure the batteries are good before making any leakage tests. You will quickly get the hang of things after three or four leakage tests. You can contact the companies for more information about their microwave leakage detectors. Holaday Industries, Inc. 14825 Martin Drive Eden Prairie, MN 55344 Narda Microwave, Inc. Plainview, NY 11803 Simpson Electric Co. Elgin, IL 60120 The capacitor tester The capacitor tester comes in handy to check capacitors in the control panel and HV capacitor ( Fig. 33). Before making any capacitor tests, discharge the high- voltage capacitor. This capacity tester can check bypass and electrolytic capacitors for open, leaky, and correct capacity. Although the smaller capacity tester built into the DMM might not correctly check the large electrolytic capacitor, many do. Before checking any capacitors, discharge them. Set the function switch to the correct capacity range or position. If the value of the capacitor is not known, start at the highest range and reduce until a satisfactory reading is obtained. The open capacitor will have no measurement, and the leaky capacitor will have a low measurement. A capacitor that has lost its capacity or dried up will not have the same capacity as shown on its body. Panasonic’s confirm after repair guidelines After repair or replacement of parts, make sure that the screws of the oven, etc., are neither loose nor missing. Microwaves might leak if screws are not properly tightened. Also make sure that all electrical connections are tight before inserting the plug into the wall outlet, and check for microwave energy leakage. Samsung’s operation guide It is wise to know the cooking power output and level names in the microwave oven. The power level pad in the Samsung oven has ten levels in cooking operation ( Table 2). Ten power levels can be obtained by touching or pressing the power level pad one or more times. For instance, if you wanted to reheat food, press the power level button nine times, producing 470 watts of power. Touch the power level button once to operate the oven on high at 550 watts of power. Prev. --- Next Home Guide/index top of page |

