When an Electric Range Fails to Heat
| HOME | Troubleshooting | DIY Tips |
|
.. You can often locate the source of trouble on an electric range just by looking. Visible burns, pits, or cracks make it easy to identi1 faulty parts. If no damage is noticeable, continue your diagnosis with a multitester as shown. Checking the Voltage: The heating elements on an electric range run on a 240-volt circuit. High-rise buildings, however, often have three-phase 208-volt current, in which case normal readings on the multitester will be in the range of 197 to 210 volts. Holding the Right Temperature: One common complaint about electric ranges is that the oven tempera ture does not match the reading on the control. A frayed or torn door gasket could be the cause, and the thermostat is also a likely culprit. To test the thermostat, place an oven thermometer in the center of the oven and set the thermostat to 350°. Let the oven heat up, then check the thermometer every 10 to 15 minutes for the next half-hour. If the temperature is within 50° of 350°, calibrate the thermostat; for digital ranges, adjust the temperature at the control panel. if the temperature is more than 50° off, replace the thermostat. CAUTION---Before starting repairs, unplug the range or cut the power at the main service pane!, then test the terminal block for incoming voltage. Anatomy of an electric range. 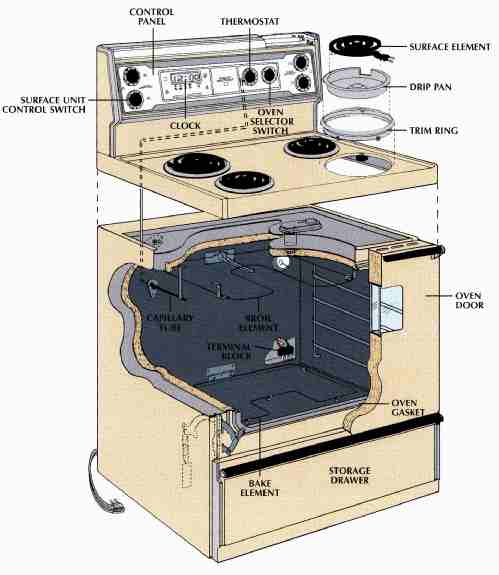
When you turn on a surface unit or the oven, current flows through a calibrated control to a heating element. The element provides resistance to the current, and the energy created radiates outward as heat. In the oven, a rod-like capillary tube attached to the wall senses the temperature and relays the information to the thermostat, which cycles the current on or off to keep the temperature even. Digital ranges have an electronic temperature sensor. SURFACE UNIT CONTROL SWITCH; OVEN DOOR Troubleshooting Guide
- - - - RESTORING THE INCOMING POWER 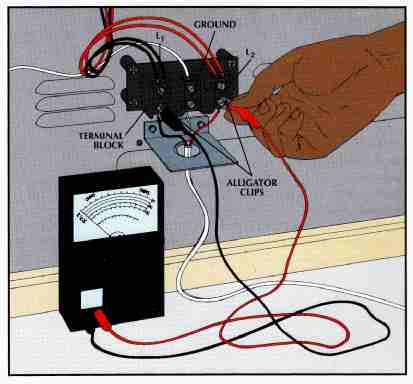
Testing the terminal block. • With the power off, pull the range out and remove the back panel. • Set a multitester (31) for 250 volts and clip the leads to the block’s line terminals—marked L and L --. Restore power. If the meter doesn’t show 230 to 240 volts, check for a blown fuse or tripped circuit breaker at the main service panel. • Shut off the power and move a probe to the ground-wire terminal on the lower center screw. Restore power; the meter should now read 120 volts. If it does not, there may be something wrong with the house wiring; call an electrician. • If the block appears burned, replace it by removing the wires and unscrewing it from the range. REPLACING A FAULTY BURNER 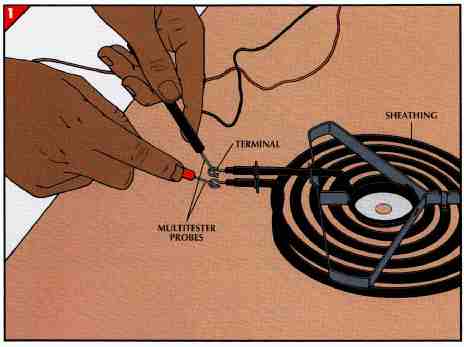
1. Testing the element. • Detach the faulty element from its receptacle and inspect the coil terminals. If they are burned or pitted, replace the element and the receptacle. • To test the element for resistance, set a multitester to RX1 and touch the probes to the terminals --. The meter should read below 60 ohms. If it doesn’t, the element should be replaced. • If the element shows the correct resistance, check for a short circuit by leaving one probe on a terminal and placing the other probe on the sheathing. A reading of 0 ohms indicates a short; replace the element. 2. Inspecting the receptacle. 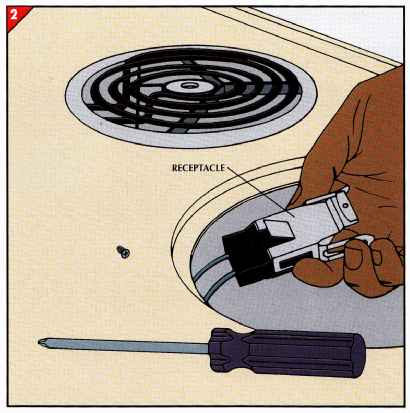
• Unscrew the receptacle and pull it out. Check for visible damage to the terminal blades inside the slots and for loose or damaged wires leading into the receptacle. If you find any of these, replace the receptacle. • Cut the wire leading into the old receptacle as close as possible to the back of the receptacle. Strip 4 inch of bare lead with wire strippers and splice it to the short length of wire attached to the new receptacle. Twist a wire cap over the bare ends. 3. Checking the voltage at the receptacle. 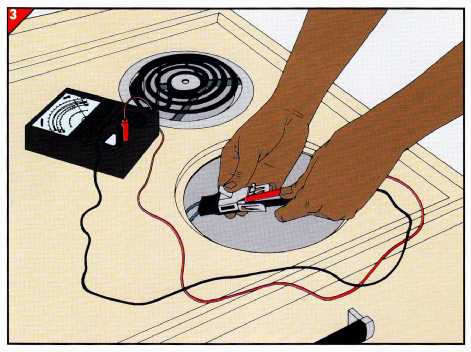
• With the power off, insert a multi- tester probe into each receptacle slot so that the probe touches the terminal blade. • Set the multitester for 250 volts, re store power to the range, and turn the control knob to HIGH. If the meter does not read 230 to 240 volts, check the control switch (Step 4). If the control switch is fine, replace the receptacle (Step 2). 4. Testing the control switch. 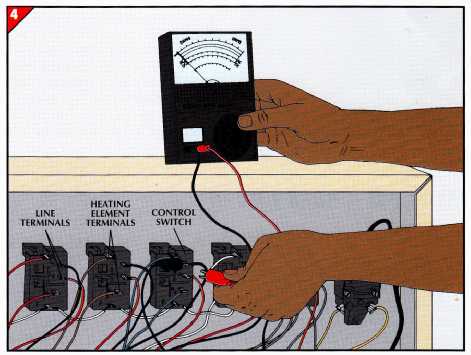
• Locate the switch behind the rear top panel. Cut the power and put multitester clips on the switch’s line terminals, marked L and L (above). Set the multitester for 250 volts and restore power; you should get 230 to 240 volts. Turn off the power and move the clips to the heating element terminals, marked H and H Restore power and turn the knob to HIGH. The meter should again read 230 to 240 volts. • If you only get power at L and L or any terminals appear burned, replace the switch. No power at L and L indicates loose or burned terminal block connections; tighten the wires, or replace the block. If H and H have power but the receptacle does not, splice new range wire— available at appliance-repair shops or electronics stores—between them. ADJUSTING AN OVEN TEMPERATURE CONTROL Calibrating the thermostat. 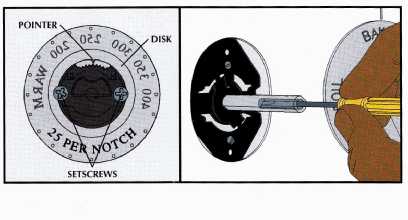
• Pull off the thermostat knob and loosen the setscrews on the back. Turn the disk slightly to recalibrate the thermostat—here, moving the disk pointer one notch for each 25°. Retighten the setscrews. • Some ranges have a calibration screw instead. Pull off the thermostat knob and locate the screw inside or beside the shaft. Adjustments vary; consult your owner’s manual for which way and how far to turn the screw. Testing digital oven controls. 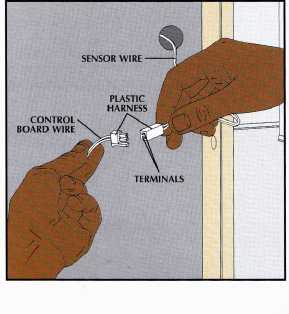
• To test the temperature sensor—a rod inside the over on the rear wall—for resistance, pull out the range and remove the back panel. Unclip the plastic harness --, and touch multitester probes to the terminals inside the harness. Check the owner’s manual for the proper resistance reading. • To replace a faulty sensor, unscrew the retaining plate, and pull out the sensor; then insert the new one and re-attach the plate. Connect the harness and replace the back panel. • If you get the proper reading, the electronic control board is defective; call for service. GETTING HEAT FROM A BALKY OVEN 1. Examining the bake or broil element. 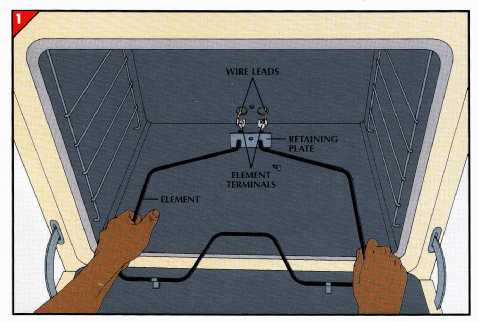
• Unscrew the element’s retaining plate from the rear wall. Pull the element out and unplug the leads from their terminals or loosen the screws and disconnect the wires. • Replace the element if it has burns and cracks. Cut off a burned or pitted terminal, strip about inch of its wire lead, and attach a new one. • Touch multitester probes to the element terminals to check resistance. You should get 10 to 60 ohms; if you do not, replace the element. • Leave one probe on a terminal and touch one to the element. A 0-ohms reading means the element is shorted; replace it. 2. Testing for power to the element. 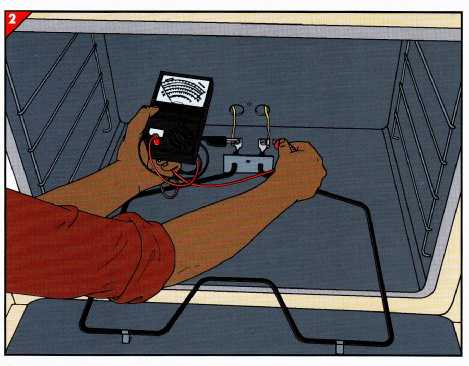
• Reconnect the leads and attach the multitester clips to the terminals or, if your range has them, to the screws in the element terminals (above). • Set the multitester for 250 volts, then restore power to the range and turn the oven to 300°. If the meter registers 230 to 240 volts after about a minute, power is reaching the element, so the element must be faulty. Turn off the power and replace the element. • If the multitester does not show the proper voltage, turn off the power and check for loose wires at the oven se lector switch and thermostat behind the back panel of the range. 3. Checking the thermostat. 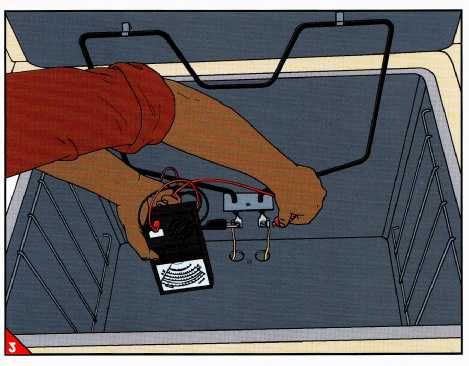
• Turn off the power, remove the leads from the back of the thermostat, and attach multitester clips to the terminals to test for resistance. With the knob turned to 300° and the power off, the meter should read 0 ohms; if it does not, re place the thermostat. • Examine the capillary tube; if it’s damaged, replace the whole thermostat. • To replace a thermostat, shut off the power, remove the leads, and unscrew the thermostat from the back panel. Unclip the capillary tube from the oven wall and pull it out from the back. Push a new tube into the oven, clip it on, and screw on the new thermostat. Reattach the leads. Prev: Servicing a Microwave Oven Next: Safe Repairs for a Gas Range Home Similar articles top of page |