AMAZON multi-meters discounts AMAZON oscilloscope discounts
Although you can just run a hose directly from your compressor to an air tool or device, installing an air-piping system in your shop will make using compressed air a lot more convenient.
If installed correctly, a pipe system will also help overcome one of compressed air’s biggest problems: condensed moisture collecting in the lines. Such moisture can be a nuisance, such as when blowing off dry wood surfaces, or an absolute nightmare, such as when it contaminates a sprayed finish. If your compressor isn’t the oil-less variety, the risks of contamination run even higher, since most spray finishes are ruined by fine oil droplets that come through the air lines.
Dealing with condensation As you can see in the illustration on the facing page, a shop air system starts with a short section of flexible hose that connects the compressor’s air tank to the rigid pipe. The first section of pipe should be at least 25 ft. long to act as a condenser that helps remove moisture from the plumbing. This is needed because air heats up as it is com pressed (if you don’t believe me, just hold your hand close to the compressor pump’s outlet pipe). As the heated air cools, it loses moisture, the lion’s share of which accumulates in the bottom of the compressor’s air tank. This moisture should be drained off by opening the petcock at he bottom of the tank at least once every weekend more often in humid weather.
The air carries some moisture with it into the pipe or hose that leaves the air tank, which is why a condenser pipe should be installed. If you lack room for a long pipe, you can simply run shorter lengths back and forth in a zigzag.
A drain valve at the condenser pipe’s lowest point allows any collected liquid to be purged. it’s especially important to run a condenser section of pipe if your compressor is located outdoors because the temperature difference inside and outside the shop will create even greater condensation in your compressed-air piping.
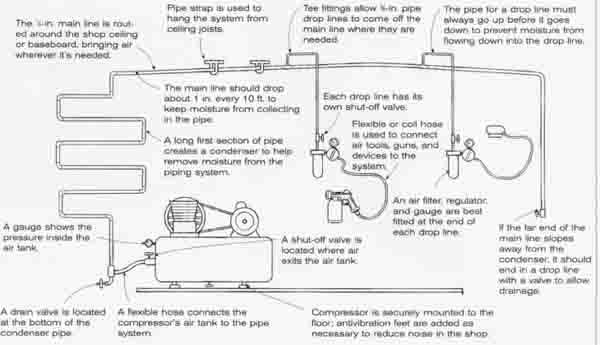
Parts of a Compressed-Air System
The 1/2-in. main line is routed around the shop ceiling or baseboard, bringing air wherever it’s needed.
Pipe strap is used to hang the system from ceiling joists.
Tee fittings allow l-in. pipe drop lines to come off the main line where they are needed.
The pipe for a drop line must always go up before it goes down to prevent moisture from flowing down into the drop line.
Each drop line has its own shut-off valve.
A long first section of pipe creates a condenser to help remove moisture from the piping system.
Flexible or coil hose is used to connect air tools, guns, and devices to the system.
An air filter, regulator, and gauge are best fitted at the end of each drop line.
If the far end of the main line slopes away from the condenser, it should end in a drop line with a valve to allow drainage.
A shut-off valve is located where air exits the air tank.
A drain valve is located at the bottom of the condenser pipe.
A flexible hose connects the compressor’s air tank to the pipe system.
Compressor is securely mounted to the floor; anti-vibration feet are added as necessary to reduce noise in the shop.
Configuring the system: The main pipe that runs from the condenser to the various points where air is used around the shop is typically 1/2-inch galvanized pipe, which is adequate for runs of up to 100 ft. in a system with a compressor of up to 5 hp. (Larger systems with longer runs require larger pipe; consult a compressed-air systems supplier for more information.)
One practical configuration for small, one- man shops is to run the pipe around the perimeter of the shop either high along the ceiling or low along the baseboards with short drop lines sprouting off wherever compressed air is needed.
A good design for the main line for a larger, multi-person shop is a loop; the line starting and ending at the condenser pipe. This keeps air pressure more constant at all the drop lines. Otherwise, the guy working off the drop line located at the end of the main line will have poor pressure if others are using air farther upstream.
To help drain any residual moisture that may accumulate in the piping, the horizontally run main line should have a slight slope: a 1-in, drop every 10 ft. One or both ends of the run should have a drop pipe with a valve or petcock for draining condensed moisture. All pipes should be secured to wall studs and ceiling joists with U-brackets or perforated metal pipe tape.
For a ½-inch main line, use 3 pipe for the drop lines. Just above where each drop line terminates, a shut-off valve should be fitted so that line can be turned off for filter cleaning or replacement or in case there’s a leak or other problem with the system.
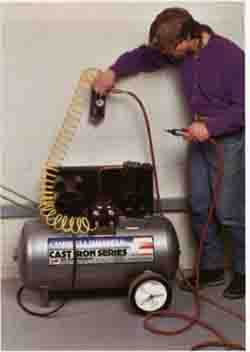
Even a portable compressor should have an air
filter and moisture and oil trap fitted to keep its air output clean and
dry. Here the author uses flexible coil hose to connect the compressor to
a filter/regulator unit temporarily hung on the wall.
For Air Tools Only
If you use air tools, dedicate one or more hoses just for this purpose. Mark them as “for air tools only” and do not use them for spray finishing because lubricating oil in the hose can contaminate and ruin most finishes.
Prev.: Choosing
a compressor
Next: Filtrating and
regulating air