AMAZON multi-meters discounts AMAZON oscilloscope discounts
When most woodworkers think of dust collection, they think of a central system. A well designed, properly-installed central system can keep your shop amazingly free of wood chips and shavings, as well as significantly reduce the amount of fine dust in the air. The only catch is at there’s a lot that goes into a good system—it is about the most complicated infrastructure system that a woodshop is likely to have.

A two-stage dust collector, such as this drum-style
portable, deposits most chips and dust in a separation chamber, here
the drum, where they are easy to dump out. The unit’s fine-dust-filtering bag
only needs occasional emptying.
In this section, we will give an overview of just what’s involved, so that you can figure out if a central system is right for your shop and if so, what you’ll be getting into if you decide to put in a system yourself. Here are the 10 most important steps to follow when creating a decent system.
Taming Vacuum Noise
Because shop vacuums use the same kinds of universal motors found in routers and other portable power tools, they are noisy at best. If you don’t mind losing a little of their portability, you can house them in a sound-deadening enclosure. A shop vacuum that we use exclusively for collecting from portable power tools lives in an enclosure underneath my table saw’s outfeed table.
System anatomy: Fundamentally, a central system uses a vacuum-like fan (blower) to pull air through a system of pipes (ductwork) that collects chips from machines and other sources (sanding tables, floor sweeps, etc.) around the shop and deposits them in a bin or bag, where they can be disposed of. Two-stage units, which are recommended for central collection, remove the majority of chips and particles in a pre-separator, such as a cyclone or drop box, before the chip-laden air reaches the blower. The air that passes through the blower carries very fine dust that either goes into a filter bag (or a series of bags, called a “bag house”) or is expelled outside the shop. When clean, filtered air goes back into the shop, it’s known as a “return-air” system.
Designing a central system: Central collector units vary considerably in design. Some have components (blower, cyclone, filters) that mount separately and connect with hose or pipe. Other systems integrate some or all of the components into a compact unit. The power and air-moving capacity of these units also varies considerably, with motors in the 1 ‘is-hp to 5-hp range being most appropriate for small- to medium-sized shops.
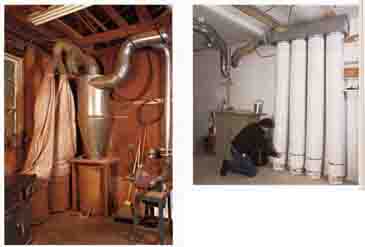
(left) The essential components of a return-air central
dust-collection system – pre-separator cyclone, blower, and filter bags
-- are mounted inside the shop in a corner where ductwork brings chip-laden
air from machines all around the shop.
(right) To save space, one may locate a central dust collector outside the shop and mount the filter bag-house inside to maintain a return-air system that doesn’t waste heated or cooled air by blowing it outside.
Before selecting a unit, add up the air requirements of all the machines that you want to collect from at once, using this table (187-0) to determine their individual cubic feet per minute (cfm) requirements. For best system performance, choose a collector that’s rated to handle 30% to 50% more cfm than your calculated maximum. Why? When a collector is hooked up to ductwork, it typically moves less air (lower cfm) than it’s rated for (this is especially true of single-stage models).
In a return-air system, mounting the collector and filters inside the shop reduces the length of ductwork needed to connect it to machines. Alternatively, you can save space by mounting the collector’s blower and pre-separator in a closet or adjacent shed and by putting only the filters inside the shop.
A downside of having filter bags inside the shop is that static electricity tends to attract fine dust, which settles on the bags, then starting up the system sends clouds of dust around the shop. To overcome this, mount the entire sys tem, filters and all, in an enclosed shed attached to the shop, and cut an opening in the wall for filtered air to return through (see this illustration).
Installing a Central Dust-Collection System
1. Plan the layout of pipes, being sure to lay out the main duct so as to keep the branches reasonably short.
2. Using this table, calculate the cfm requirements and branch-duct diameters to each machine. Then obtain the main-duct diameter from this table, based on the total cfm needs of the system.
3. Buy a central dust-collector unit that has a cfm rating one-third to one-half higher than the highest cfm needs of your system. A 1 1/2-hp to 3-hp collector that delivers at least 600 cfm to 800 cfm should be adequate to handle a system with a single machine running at a time, with the largest air requirement being for a thickness planer or shaper.
4. If you’re planning a return-air system, fit the collector with filter bags made of 12-oz. or 16-oz. felted-polyester filter fabric. The bags should have 1 sq. ft. of surface area for every 10 cfm (based on the system’s highest cfm needs).
5. Decide where to put the collector, keeping it close to the machines with the highest cfm requirements if possible. Install the unit, making sure the frame and motor of the collector are grounded.
6. Cut and fit sections of metal pipe for the main duct, assembling them on the ground using pop rivets and working out from the collector. Next, assemble and install the branch ducts. Use large-radius elbows to turn corners and 45-degree lateral tee fittings to join the branches to the main duct. Use metal pipe tape to hang ductwork as necessary.
7. Connect the branches to machines with short lengths (2 ½ ft. or less) of flexible hose, fitting a blast gate at each branch end. Use each flex hose’s spiral wire to complete the ground connection between the branch pipe and the frame/motor of each machine.
8. For best results, make sure the hood around the blade, bit, or sanding belt contains chips being thrown during machining. But the hood shouldn’t restrict air flow excessively. A good volume of air flow is necessary to catch sawdust and transport it through the ductwork for collection.
9. Seal all pipe joints with silicone caulk or duct tape.
10. Wire remote switches for turning the collector on and off.
Planning the ductwork: Your central collector will do the best job of capturing dust and chips if you use the right sized pipe and configuration of ductwork to connect them to the machines and devices they service. Like a tree, branch ducts from each source converge with the “trunk,” a main duct that carries chips in a stream of air back to the collector.
Before deciding on the design of the duct work, carefully consider the layout of the machines in your shop. The system will perform best if machines that produce the largest chips (planers, shapers) and machines with high cfm requirements are placed closer to the collector than machines that have low cfm needs. Bench- top machines and stationary sanders can be on branches that connect farther out on the main duct. Try to keep branch ducts from being excessively long by running the main duct straight across the shop, diagonally across, or around the perimeter of the shop as necessary.
Don’t Air-Condition the Backyard!
The choice of having filters or blowing air outside depends in part on your local climate. A filtered return-air system is desirable in a climate where you must heat or cool and dehumidify your shop’s air every season. Otherwise, conditioned air is sucked out of the shop along with chips and dust, resulting in much higher heating and cooling bills.
Determining the Main-Duct Diameter

Return-Air vs. Air-Exhaust Collection Systems: Air-Return Dust-Collection System vs. Air-Exhaust Dust-Collection System:
Air-Return Dust-Collection System: The advantage of locating a central collector inside the shop is that heated or cooled air remains indoors. The disadvantage is that improper filter media allows fine particles back into the shop air.
Air-Exhaust Dust-Collection System: The advantage of locating a central collector outside the shop is that fine dust escaping filtration doesn’t reenter the shop. The disadvantage is that heated or cooled shop air is lost to the outside.
Sizing ductwork: Properly sizing duct work can involve some intense calculations, including factors such as the length of the run and static-pressure losses. However, in a small shop, you can get decent results by following a few simple shop layout recommendations and simplified duct-sizing guidelines:
1. Find the size of pipe needed for each branch duct as per the machine it serves, using the chart on the facing page.
2. Next, add up the cfm requirements of all machines that will be used at one time (which shouldn’t exceed the capacity of your collector).
3. Use this number to determine the main-duct diameter, gleaned from the chart at left.
Connecting the ducts: The way that ducts connect to one another is as important as their proper diameter for good air flow. For the most iir-efficient connections between main and )ranch ducts, they should join at a 45-degree angle (rather than at 90 degrees) by using fittings called 45-degree lateral tees. Be sure to urn corners in either main or branch ducts gradually, not sharply, by using either “long radius” elbows or a pair of 45-degree elbows with a short length of pipe in between.

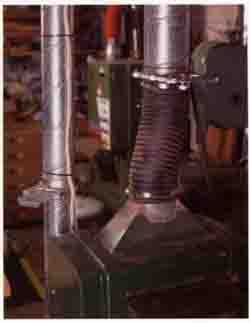
A, properly sized and laid-out system of main
and branch ducts carries sawdust from machines and other sources back
to the central collector. To economize on the number of ductwork branches,
various pipe fittings, such as this custom Y branch, allow several sources
to be connected to a single branch duct.
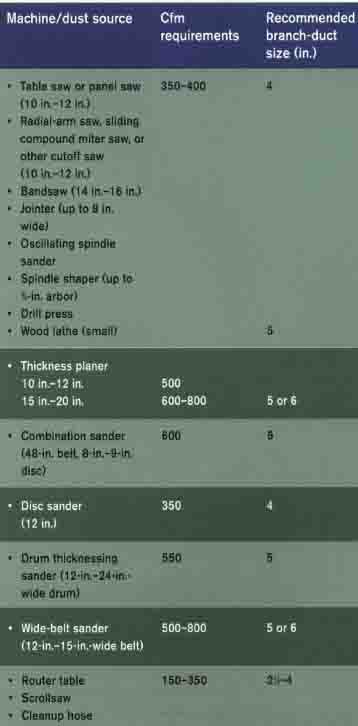
CFM AND DUCT DIAMETER REQUIREMENTS FOR WOODSHOP MACHINES
Installing the ductwork: When you’re ready to install the ductwork, assemble the main duct on the ground first -- then mount it. It is usual to run the main duct around or across the hop at ceiling level or, in vaulted-ceiling shops, at height where it’s out of the way. The main duct, as well as suspended branch ducts, are hung with metal hangers or pipe strapping.
If your shop has a wood floor with enough space, running the main duct underneath can provide a convenient means of reaching machines located at the center of the floor. Ductwork can even be run in concrete slabs but must be set in before the slab is poured.
After the ductwork is assembled, all joints should be sealed with silicone caulking or duct tape to minimize air losses that can zap system efficiency.

For best air flow in a collection duct work
system, branch ducts should join the main duct at a 45-degree angle with
pipe fittings called 45-degree lateral tees.
Blast gates and flexible hoses: In most small central dust-collection systems, the collector isn’t powerful enough to service all the machines at once. To limit air flow to only machines that are in use, blast gates are installed at the end of each branch duct.
Opening only one gate at a time reduces the size of the blower needed to power the system (for convenience, the bigger the blower, the better; with a higher air-moving capacity, you can leave two or three blast gates open at once at machines you use most often).
Blast gates should be located within easy reach of the machines they serve, pop-riveted to the end of the branch. Flexible hose that is the same diameter as the branch connects the machine’s dust port to the system. The ribbed hose creates a lot of air resistance, so it should be kept as short as possible.
If the machine has a dust port that’s smaller than the duct diameter, use a reduction fitting at the port itself (don’t downsize the hose to match). If the machine lacks a ready dust port, a collection hood is needed to contain and direct the stream of sawdust coming off the blade or cutter into the ductwork. But take care not to constrict the air flow. For example, sealing up every nook and cranny of an enclosed-base tool, such as a table saw, can cut air flow to the point where dust collection is practically nil.
Grounding the system: One of the reasons that metal pipe is preferable to plastic is that it is easy to ground, which is necessary for safe operation. Start by making sure all machine frames and motors are grounded, as well as all components of the collector. To connect the machine ground to the ductwork, peel the rubber or plastic coating from the helical wire in the flexible hose, and make sure it touches bare metal at both ends. For added security against a fine-dust explosion, which is rare but possible, add a ground strap to the filter bag house or metal drums or bins that collect fine dust.

Sample Ductwork Layout for a Central Dust-Collection
System: An air register allows clean air from the filter bag to re-enter
the work-shop; Just collector housed in a small, enclosed shed saves
floor space in the shop; Short lengths of flex hose connect rigid ductwork
to machines; Blast gates at each machine control air flow.
Switching options: Because the central collector is usually switched on and off concurrently with machines, putting it on its own dedicated circuit will avoid thrown breakers. To make switching the collector on or off easier, many woodworkers use a remote switch or automatic switching system to control the collector. Remote-control systems are available that work with either 110v or 220v systems and have a small transmitter that will operate the collector from anywhere in the shop.
Automatic-control systems make life even easier. Using sensors placed inside your shop’s electrical-service panel, the system recognizes when current is flowing through wires powering machines connected to dust collection and switches the collector on and off. It ignores portable power tools, lights, and other devices, so the collector comes on only when you want it to. Automatic switches are great for group shops or schools, so that no one forgets to turn the collector on or off.
To help a central collector provide the strongest
suction, air flow can be limited to machines that are in use via blast
gates installed at the end of branch ducts. A short length of flexible hose
connects the end of the branch to each machine.
Sanding tables: Central systems typically only collect chips from machines and aren’t well suited to connecting to portable power tools. But because fine sanding dust is one of the worst sources of lung pollution in the shop, it pays to take extra care in controlling the dust produced by sanding operations -- especially power sanding using portable tools -- by working atop a sanding table connected to dust collection.
A sanding table uses downdraft air to suck fine particles away from you, collecting them in your shop vacuum or central system. To contain dust generated by belt sanders and random-orbit sanders, which tend to throw dust horizontally with quite a bit of force, it’s best for a sanding table to have a raised back and sides, as shown here.
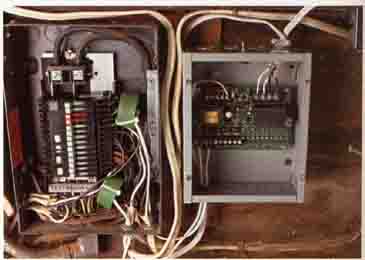
This automatic dust-collection switch (inside
the electrical box at right) has sensors inside the shop’s electrical
sub-panel (left) that recognize when machines are switched on or shut off,
which prompts the unit to switch the central collector on and off accordingly.
Checking a collection system’s efficiency: If a dust collector or vacuum doesn’t have the oomph to suck up the chips produced by your thickness planer, the piles of chips around the machine provide a pretty good indication. But how is your system handling the fine dust that’s the cause of respiratory problems?
Unfortunately, your eyes can’t tell you whether or not your dust-collection system is doing a good job of collecting respirable dust (remember, such dust is imperceptibly small). You can get a pretty good idea though by cleaning up your bench and toolbox tops thoroughly after an afternoon of power-tool use. If those surfaces are covered with a fine layer of dust the next morning , you can be pretty sure that your system isn’t up to snuff (no pun intended).
Unless your typical day of woodworking produces tremendous amounts of fine dust or your collector is seriously undersized, the usual culprits for poor fine-dust control are the filter bags. A single- or two-stage collector is likely to come with inexpensive cloth filter bags that do a poor job of removing respirable dust. The best bet is to replace them with thick felt polyester bags that are made from an industrially rated fabric that filters out a large percentage of respirable particles.
There’s always going to be some dust that evades collection, even in shops with a terrific central system and a good shop vacuum servicing portable power tools. Add to that dust that’s created by hand-sanding and portables that don’t easily hook up to dust collection, and you can end up with a lot of fine dust floating around the shop.
Prev.: Shop
Vacs and Portable Dust Collectors
Next: Ventilation and
air filtration