Making Exterior Changes: Adding a Skylight
| Home | Wiring | Plumbing | Kitchen/Bath |
|
In many areas of the country, adding a skylight to your home can have several benefits. The most obvious, of course, is an abundance of natural light. Skylights transmit up to five times more light per square foot than conventional wall windows. The switch from artificial lighting can transform dark inner areas of the house. Although flat sheets of acrylic plastic are sometimes used to custom build a skylight, it’s difficult to achieve a permanent weathertight seal because of expansion and contraction. A better choice is to buy a prefabricated skylight made of acrylic or glass. These units are easier to install and , if sealed properly, less likely to leak. They also have interior gutters to catch and remove condensation drips. Some are self-flashing; others require flashing added during installation. If glass is used, the building code generally specifies wire mesh or tempered glass with wire screening, although laminated safety plate is acceptable in many areas. Most prefabricated skylights are constructed with two domes or panes, either clear or tinted. A thermal insulation barrier between the two minimizes the transfer of heat or cold through the skylight surface. If both glazings are clear, the sky and sun are visible from inside the house. If the inner dome is translucent (white or tinted), the incoming light is distributed more evenly without glare. Rain streaks and debris such as twigs and leaves are also less noticeable. If additional ventilation is important, choose a style that opens and closes. Skylights are sized to fit between standard rafter openings. The smallest, 14½-inches wide, nests snugly between rafters 16 inches on center. Other modular sizes, such as 32 and 48 inches, require cutting one or two rafters. Thus, the existing rafter spacing in your house is a major factor in determining the proper size skylight. A second factor to consider is the following rule of thumb: the ratio between the skylight opening and the covered floor space is approximately 1:20. This means that a 4-square-foot skylight (24 by 24 inches) provides adequate lighting for 80 square feet of floor area; an 8-square-foot unit (24 by 48 inches) accommodates 160 square feet.
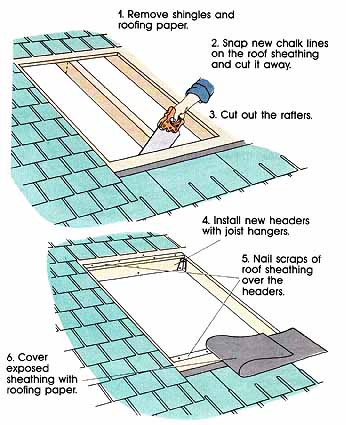
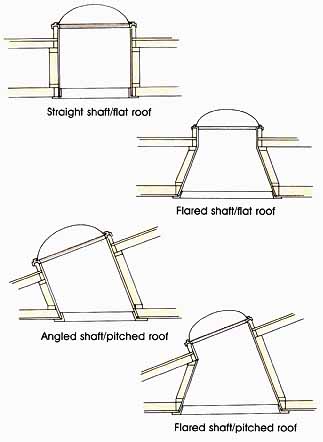
Preparing the Rough Opening To cut into the roof, begin from the inside and mark the proposed opening on the sheathing between existing rafters. If the rafters are covered, first strip the ceiling surface. Because new headers must be added between the rafters, be sure to add ½-inches to the top and bottom edges of the opening. The header size should be the same as the rafters. (If only one rafter needs to be cut, single headers of 2-by lumber are generally sufficient. If you’re cutting two rafters, however, the headers may need to be doubled. The rafters them selves may also need to be doubled on either side of the opening, in which case the ceiling material must be removed along the length of the rafters. This depends primarily on the snow load in your area, so ask the building department for advice.) At each corner of the opening, drive 16d nails or drill guide holes through the roof. On the root double check the dimensions because you may not have driven the nails straight through. Snap chalk lines to connect the corners and outline the opening. Next remove the shingles inside the lines, plus enough extra around the edges to install the curb. Exactly how much has to be removed depends on the type of skylight. If the unit is self-flashing, follow the manufacturer’s recommendations for stripping the roof. In some cases this may be 12 to 16 inches beyond the rough opening. If the unit is without flashing and the roofing is asphalt shingles, cut an extra 1½- to 2 inches outside the chalk lines at the top and sides. This is generally sufficient for slipping new flashing under the shingles. With wood shingles or shakes, you should remove an extra 8 inches all around. Asphalt shingles can be cut with a utility or shingling knife. Lift the shingles and remove the exposed nails with a pry bar. If the shingles are bonded together with roofing cement or self-sealing tabs, use a stiff putty knife to separate them. To remove shingles that have been nailed twice with the upper row of nails hidden, cut or rip out several shingles at the top of the opening. Then, once the nails are exposed, work your way down. If the manufacturer recommends stripping beyond the rough opening, work carefully so as not to damage shingles that don’t need to be removed. Those removed will need to be replaced with new shingles later. With wood shakes or shingles, use a utility knife to split the upper row and pull out the pieces. Then work downward, removing the exposed nails with a pry bar. To cut hidden nails, slip a hacksaw blade underneath. In some cases it may be easier to start at the peak of the roof and remove a section of the roofing all the way down to the opening. Once the roofing material is removed, use a utility knife to cut away the building paper. Snap new chalk lines on the sheathing and cut through it with a reciprocating or circular saw. Pry the pieces from the rafters. With a square, mark the intervening rafters that need to be removed and cut them with a reciprocating or handsaw. Cut two headers to fit between the rafters and secure them with joist hangers. Also nail the headers to the ends of the cut rafters. Nail the new strips of sheathing (cut from the removed sections) over the tops of the headers. Cover with new building paper. You could install the headers and any trimmers needed to double up rafters before cutting the roof opening. This is a good procedure when threatening weather reduces the time you want to have the roof opened up. orth-brt-78-0.jpg Installing the Skylight: 1. Toenail the curb through the sheathing into the rafters and headers. 5. Put a generous bead of caulking on top of the curb. 6. Set the skylight on the curb and screw it in place. Installing the Skylight If the skylight requires a curb, build a 2-by-4 or 2-by-6-inch frame with the inside the size of the rough opening. Set the skylight over the curb and check for fit. If the skylight isn't self-flashing, have top and bottom collars made up by a sheet metal shop, as well as step flashing for both sides, ready for installation, Set the curb on the rough opening so the inside is flush with the sheathing. Toenail the curb in place. Next, with asphalt shingles, use a hacksaw blade to cut away any nails securing the shingles within 4 or 5 inches of the rough opening. Then nail the bottom collar against the curb so it laps over the top of the second row of shingles below the skylight opening. When the shingles just below the skylight are replaced, they go over the collar. Nail the top corners in place with galvanized roofing nails. Next tuck a piece of step flashing between each course of shingles on both sides of the curb, starting at the bottom. Nail the uphill corners of each step flashing to the curb and into the shingles. Finally, install the top collar so its wings overlap the shingles down- slope from it, but its top tucks under the upper course of shingles. Finish by placing the final course of shingles over the collar, tucking each one under the course above it. Next apply strips of foam weatherstripping or a bead of clear mastic to the top of the curb. Then fit the skylight over the curb and tap down. Drill pilot holes for screws or special nails with neoprene gaskets and se cure the flanges all around the curb. Re-nail the shingles around the edges of the opening but don’t nail through the bottoms of the flashing. Apply roofing cement to any exposed nail heads, If the skylight requires no curb, apply a layer of roofing cement around the opening. Position the skylight and screw the unit to the sheathing and rafters according to the manufacturer’s instructions. Apply roofing cement along the edges up to the unit. Cut strips of building paper and place the bottom piece first. Apply cement over the corners and then add the side pieces. Follow the same procedure for fitting the top strip. Apply more cement over the paper and replace the shingles up to the edge of the skylight. If you need to build a light shaft, it can be straight, angled, or flared. The flared design is preferred be cause it maximizes the distribution of light. The construction is essentially the same for all three; the only difference is in marking the opening and framing. To build a straight shaft, drop a plumb bob from the four corners of the skylight. Mark the opening on the joists and then follow the procedure noted earlier for cutting and framing a stairway opening. For an angled or flared shaft, cut a larger opening into the ceiling. The sides of the opening are in line with the sides of the skylight to avoid breaking extra joists, but the other two sides are flared. Enclose the shaft with short 2-by-4 walls complete with top and sole plates. Insulate between the studs with fiberglass batts, facing the vapor barrier to ward the inside of the shaft. Finish with wallboard and paint white or a bright color to reflect the incoming light. A final touch is to provide movable insulation for covering the skylight at night. A shutter can be improvised by covering a piece of rigid foam or fiberglass board with attractive fabric. Attach it to the skylight opening with hinges and rig a pull string. A 3-inch thick shutter can have an R-value of 19, versus 5 or 6 for a triple-glazed skylight unit.
|
| HOME | Prev: Introduction, Adding a New Window or Sliding Glass Door | Next: Building a Dormer |


