Making Exterior Changes: Introduction, Adding a New Window or Sliding Glass Door
| Home | Wiring | Plumbing | Kitchen/Bath |
|
Beyond painting and roofing, you may find good reasons to work on the outside of your house: expanding floor space, adding a window, or putting in new doors. A simple skylight may completely change how you use a room. This section concerns changes that affect exterior parts of the house. The change may be a modest skylight barely noticeable from the street, or it may be a dramatic second-floor addition that alters your entire home. In this section you will learn how to make cosmetic changes, such as a new window or sliding glass door. You will also learn how to expand the living space in your home, either by converting a garage or by building a room addition outward, upward, or downward. Adding a New Window New windows come in a wide range of sizes and styles. The catalog of one manufacturer, for example, lists more than 200 different stock sizes. If you need a nonstandard size, windows can be custom milled, so the choices are practically unlimited. In fact, you may spend more time selecting a new window than actually installing it. Four basic styles of windows are available: double-hung, casement, gliding, and awning. Each style can be used alone or combined in a number of variations:
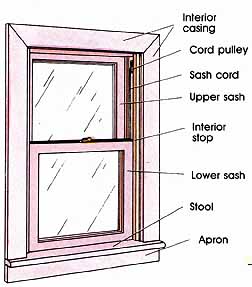
Selecting a new window depends on several factors. A primary consideration is the type of windows al ready in place. If possible, the new unit should be an identical match or at least compatible in style, proportion, and material to the existing windows. Mixing a large aluminum casement with multipane double-hung wood windows can spoil the exterior appearance of the house. Energy conservation is another important consideration. Double-glazed windows have two panes of glass permanently sealed in the sash to create an insulating air space. This cuts heat loss through the glass area by almost half and minimizes winter moisture problems such as fogging and condensation. If you live in a hot or cold climate, by all means consider double glazing. (In some areas the code demands it.) Triple glazing can be a worthwhile investment in certain areas. Most window styles are available in either wood or metal. As a rule wood offers better insulation than metal. Although the heat flow through aluminum is 1,700 times faster than through wood, more expensive metal windows are now constructed with a thermal barrier between the inside and outside frame. Check heat loss carefully when you compare models and prices. Maintenance is a third factor to consider. Baked or anodized finishes on aluminum windows require no up keep. Wood exposed to the weather requires periodic care. One compromise is to choose a wood window encased in rigid vinyl. These top-of-the-line windows combine the superior insulating qualities of wood with the no-maintenance advantages of plastic. Most prefabricated skylights are made with domes or panes of clear or tinted glass. Removing a Window The steps in removing a window are basically the same for all styles. Since double-hung windows are the most common, they’re used here to illustrate the process. First remove the interior stops that hold the lower sash in place. Use a flat bar or broad wood chisel to pry the stops from the jambs. If the edges are lapped with paint, sever the joint with a sharp utility knife. Next remove the interior trim around the window. If the corners are mitered, try to drive the finish nails completely through with a small nail set. Often the interior trim can be reused once the new window is installed, so handle these pieces with care. Use a flat bar to gently pry the side and top trim from the wall. Wrap a wood block in cloth to gain leverage and yet protect the wall surface from gouging. If the window has an interior stool — most double-hung windows do—raise the lower sash and pry or tap the stool from underneath to loosen and remove it. From this point the correct procedure depends on the window. Examining the type of installation will tell you how to proceed. Older windows are often built in place with the jambs and exterior casings nailed to the studs. Newer windows are installed as a unit with nails through the exterior casing securing the window to the studs. Prying the casing loose should free the entire unit. If the nails in the exterior casing are visible, drive them through the wood with a nail set. Or use a flat bar to pry the casings from the studs. Sever any surrounding caulk with a chisel. Pry the casings loose from the rest of the window and remove them. This should expose the nails securing the jambs to the studs. If there’s room, slip a hacksaw blade into the opening and cut the nails. Use a chisel to pound out any shim stock hiding the nails. An alternate technique is to disassemble the entire window, taking out the sash first and then the jambs. If the window operates with a sash cord and weights, cut the lower cord and let the weight fall inside the wall. Lift out the lower sash and remove the parting bead that separates the two sashes. Then cut the remaining cord and lift out the upper sash. If the sashes are spring-loaded, remove the cover from the metal channel. Release the tension from the springs and lift out the lower and then the upper sash. Pull out nails or screws holding the channels in place. Once the sashes are removed, pry the jambs from the studs or saw them in halt and pry out the pieces. Pull out any remaining nails inside the rough opening. Removing an Old Window:
Installing the New Window Measure the rough opening to be sure the new window will fit. There should be 1/4 to 1/2-inch clearance all around. To make the opening slightly smaller, nail spacer boards to the sides of the studs. If you’re replacing an old-style sash-and-weight window, the rough opening is probably 2 to 2½-inches wider on each side. The extra space accommodated the balance weights inside the wall. Nail new studs or spacer blocks inside the opening to create the proper size. If there’s no building paper on the sheathing around the opening, or if it’s in poor condition, staple new pieces in place. This minimizes air and moisture penetration once the window is installed. Check to make sure the existing drip cap is in good condition and wide enough to fit over the new exterior casing. If the new window or opening doesn’t have a drip cap, cut and crimp a piece of aluminum flashing to fit. If possible, the flashing should extend 3 to 4 inches under the siding and ½-inch beyond the exterior casing. Often you can buy pre-molded flashing when you pick up the window. Unless the manufacturer’s instructions say otherwise, leave any braces in place until the window is installed. Cut off any protective horns at either side of the frame. From the outside, position the window in the rough opening and center it between the trimmer studs. Most new pre-hung windows come with the exterior casing attached. (The procedure for a custom-milled window without the exterior trim is similar except that you secure the window by nailing through the inside jambs. The exterior trim is added later.) The exterior casing should fit snugly against the outside of the sheathing, under the drip cap, and between the edges of the siding. If the siding needs to be cut, use a circular saw set to the depth of siding and trim the excess away. Make sure you don’t cut into the sheathing. Allow 1/8- to ¼-inch clearance on either side. You can fill this with caulking later. Drive a finishing nail through the upper corner of the casing into the header. Level the window and if necessary have a helper on the inside shim under the side jambs. Then drive a second finishing nail through the opposite corner of the casing. Check the window for plumb by placing a level along the side jamb, Shim at least two places along each jamb. Be careful not to over-shim and bow out the jambs. Next check the sashes. If the window wobbles when opened, more shimming is necessary If the sashes won’t open freely, the shims are too tight. Make sure the space between the sash and the frame remains the same when the window is opened and closed. Once the window is level and plumb with enough shims in place, secure the position by driving finishing nails through the sides of the exterior casing at 10-inch intervals. Countersink the nail heads and fill with wood putty. Caulk completely around the window between the exterior casing, drip cap, and siding. On the inside, add insulation between the window and the studs. It’s also a good idea to cover it with a plastic vapor barrier. Reinstall the old interior trim or add new.
Cutting a Wall for a New Window To add a new window where none exists, you must cut into the exterior wall and frame a new opening. Follow the same procedure for removing a window and re placing it with a larger size. Locating the new window depends on preference and the present openings. As a rule the tops of windows and doors are 6 feet 8 inches above the finish floor, but this varies with the age and style of the house, Consistency is the key, especially on the exterior. If the new window is the same size as the old, align it with the top of the existing windows. If the size or style is different, position the window carefully so the harmony of the exterior isn’t disrupted. Positioning the window next to an existing stud simplifies the framing, but this isn’t essential.
In planning a new window, consider safety requirements such as the need to use safety glass for any window within 18 inches of the floor, to protect toddlers. (Some codes require safety glass in all installations.) Also, overall size may influence thickness of the glass, and therefore, the cost. You should have the new unit on hand for measuring before you cut the rough opening. If you have any questions or aren’t completely sure of the size, be sure to check with the dealer first. An interior wall surface is generally easier to cut and patch than exterior siding, so start from the inside. Mark the outline of the rough opening on the wall and locate the two studs on the outer edges. Be sure to turn off any electrical circuits in the vicinity before you begin cutting. Remove the insulation from the space and re route any electrical wiring. Then cut and strip the surface between the studs. If the ceiling joists run perpendicular to the wall, erect a temporary support to carry the bearing load (. If the ceiling joists run parallel to the wall, supports aren’t necessary. Next prepare a header of sufficient size to carry the weight of the wall and any other loads once the studs are cut. For openings up to 4 feet wide supporting only the roof, the header generally should be a 4 by 4. For openings up to 5 feet wide, the header should be a 4 by 6. But this depends on the location of the window and the weight the header must support. Check the local code to determine the exact size required. The header can be solid wood or built up from 2-by lumber with plywood spacers in between. The width of the header should be slightly less than the width of the studs. If the studs are 3½-inches wide, use 3/8 plywood for spacers. In an older home the studs may be wider than this, so ½-inch ply wood can be used. Nail the header together on both sides with 16d nails staggered along its length about every 12 inches. Mark one of the studs inside the opening with the desired height of the window. Add a second mark above this that includes the depth of the header plus ¼-inch for clearance. Use a square to mark each stud and then cut with a backsaw or reciprocating saw. To deter mine the lower cut, add the depth of the rough opening, plus 1½ inches for a new 2-by-4 rough sill, plus ¼-inch for clearance. Mark and cut the studs; then remove the pieces from the opening. Use a pry bar or hit the side of the stud with a hammer to loosen from the sheathing. If one or two new full-length studs are necessary, toenail them to the top and sole plates. Otherwise use the existing studs at the outer edges of the opening. Cut two trimmer studs to fit between the sole plate and header. Use a plumb bob or level to be sure they’re plumb; then nail to the full-length studs with 10d nails every 12 inches. Position the header over the trimmers and check for level, Drive three or four 10d nails through each full- length stud into the end of the header. Then toenail the header to the trimmer studs and to the cripple studs overhead. If necessary, shim between the cripples and the header for a snug fit. Cut and install the rough sill by nailing it to the cripples underneath. Shim as necessary to make the sill level. At this point the rough opening is complete, and you can remove any temporary supports. An alternate technique. Instead of marking and cutting the studs inside the opening, remove them completely Cut the trimmers from the salvaged studs; then install the trimmers and header as described previously. Cut the necessary cripples and toenail in place. Finally add the rough sill. A second alternative. Removing the wall surface beyond the exact size of the rough opening, as just de scribed, simplifies the framing process. But this also means the wall must be patched once the window is installed. If you’re experienced with this type of framing problem, you may choose to cut the opening closer to the exact size and thus eliminate much of the patching. The difficulties with this approach are in cutting the wall material precisely without damage, and in securing the trimmer studs inside a narrow wall cavity. Installing Sliding Glass Doors Sliding glass doors are essentially oversize windows large enough to walk through. Two-panel units are most common—one door slides and the other remains stationary Triple panels are also available. Standard widths range from 5 to 8 feet, and the usual height is 80 to 82 inches. Most doors are pre-glazed; otherwise the glass is added after the doors are in place. Selection and installation procedures are similar to those for a pre-hung window. Like new windows, sliding glass doors are available in wood, metal, and vinyl-clad wood. Choose a style that’s compatible with the rest of the house. You should also consider the amount of maintenance involved. The larger the opening, the more it jeopardizes the wall’s shear strength. Adding plywood panels on both sides of the new door increases shear strength. For energy savings compare different models and investigate the types of weatherstripping and thermal barriers available. Since the glass area is so large, double-pane insulating glass is highly recommended. If small children may be in the house, also consider the benefits of safety glass. Accidents happen all too easily. For safety’s sake view the additional cost as an inexpensive insurance policy Installing a new sliding glass door isn't that difficult since much of the frame and hardware are pre assembled by the manufacturer. The major task is pre paring the rough opening. For that you can refer to the previous section on adding a new window (see above), with one precaution: when installing a large slider in a wall supporting a second story, be careful to size the header properly and shore the ceiling during installation. The process of cutting and framing the opening differs in only a few ways.
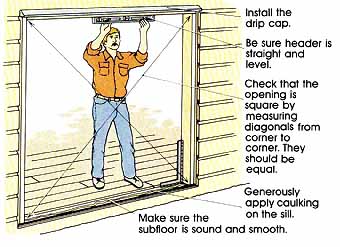
• It’s critical that the rough opening be square and plumb. If it isn’t, the frame may not fit or the door may not slide or latch properly. Measure diagonally to check. • The subfloor should be sound and smooth. Alter you remove the sole plate, you may need to add a tiller board to bring the subfloor to the proper depth. Slight irregularities can be planed or sanded smooth. • If there is a slight bow in the header material, be sure to install the crown or high side to the top. • Install the drip cap before the frame. If the door frame isn’t assembled, set it up according to the directions provided by the manufacturer. Apply a generous amount of caulking to the bottom of the sill. Paper flashing is also advised. Working from the outside, position the frame in the rough opening. Take care not to twist the frame out of shape. It’s advisable to have a helper to hold the frame in place. Otherwise secure it temporarily by driving finishing nails through the exterior casing into the trimmer studs. If the frame has no casing, use C-clamps to hold it against the sheathing. Press down along the length of the sill to spread the caulking. This will create a tight seal between the frame and the subfloor. To ensure trouble-free operation, the sill must be level. If it isn’t, shim as necessary. Then screw the inner edge of the sill to the subfloor every 10 to 12 inches. If the floor is concrete, drill holes for expansion shields and anchor the sill with screws. Check the side jambs for plumb. At the location of each predrilled hole in the frame, shim between the jambs and the trimmer studs. Make sure you don’t over-shim and bow the jambs. Drill pilot holes and drive wood screws through the jambs and shims into the trimmer studs. Follow the same procedure for the top jamb. Tighten the screws snugly but don’t pull the jambs out of shape. If you do, the door won’t seal or slide smoothly For a frame with exterior casing attached, drive finishing nails through the casing into the trimmer studs and header at 10- to 12-inch intervals. If the manufacturer has provided a sill support, place it under the sill overhang and secure to the exterior sheathing with screws or finishing nails. Otherwise cut a 1-inch wood support the length of the sill and nail it in place. Position the stationary panel in the outer channel of the frame. To get the right position, align the predrilled screw holes. Next secure the panel to the frame. This depends on the type of door and the manufacturer. Most panels are anchored with one or two brackets in the top and bottom rails, plus security screws through the parting strip that separates the stationary and sliding panels. Next install the sliding panel. Tip the panel at the top and slide it along the channel to the closed position. Secure the door in the track according to the manufacturer’s directions. Slide the door back and forth to check its operation. If it sticks or binds or isn’t square with the frame, locate the adjustment screws and raise or lower the door. If the frame requires a threshold, fasten it to the floor with screws. Add insulation between the frame and the studs; then patch the wall with wallboard or trim with molding. Finally patch any cavities left in the finish floor with new flooring material.  Installing Sliding Glass Doors: 1. Temporarily secure side jambs with nails while leveling and shimming; then screw in place. 2. Level the top jamb with shims and secure with screws. 4. Install sill support under outside sill overhang. 5. Install the stationary door in the outside track. 6. Then install the sliding door and secure it according to the manufacturer’s instructions. 9. Patch the wall covering where necessary and finish the floor. |


| HOME | Prev: A New Stairway | Next: Adding a Skylight |