Making Interior Changes: Installing Wallboard
| Home | Wiring | Plumbing | Kitchen/Bath |
|
Wallboard is known by many names. Whether it’s called gypsum-board, plasterboard, drywall, or Sheetrock (a trade name), the product is the same: a solid gypsum core covered on both sides with heavy paper. It’s an inexpensive, all-purpose surface that can be used in any room of the house. Installing wallboard panels is relatively simple. It’s the taping and finishing that require patience and practice. Before you decide to do it yourself, consider hiring professionals to handle the job. This is especially true if you dislike projects requiring careful attention to detail. As a rule of thumb, if more than three panels or 100 square feet are involved, get estimates first. The total cost of a professional job may compare favorably with your material costs alone.
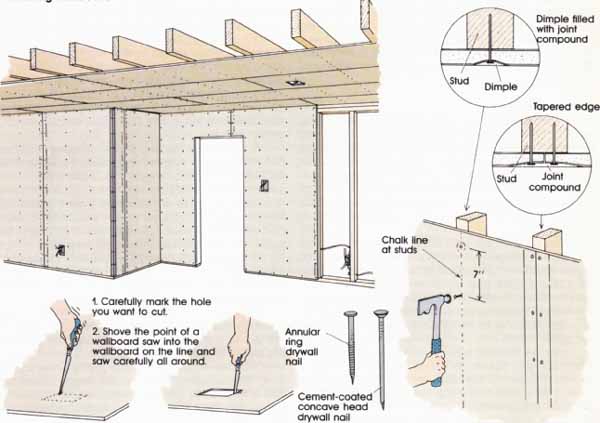
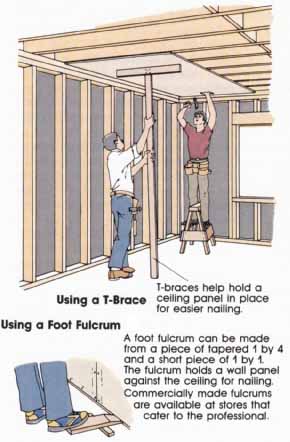
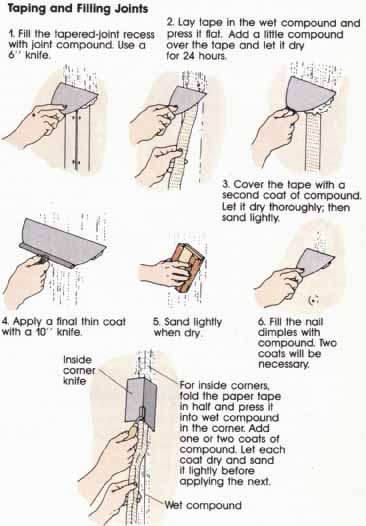
Planning Begin by planning the installation on paper. Work out a pattern that results in the fewest number of joints. Al though minimizing waste is always a concern, in this case minimizing your labor is even more important. Wallboard is so inexpensive that you should use full sheets whenever you can. It’s not worth bothering with small pieces just to save a few dollars. The long edges of wallboard panels are tapered slightly to accommodate several coats of joint com pound; the 4-foot edges aren't . So plan to join panels along the long, beveled edge whenever possible. When end joints can’t be avoided, stagger them so they’ll be less noticeable. Longer panels, such as 4 by 12s or even 4 by los, make it possible to span the entire length of most walls. Planning joints to fall above and below windows and above doors also means less taping. For ceilings, use panels that span the longest distance, providing they run perpendicular to the joists. The longer lengths are heavier and harder to install, but you’ll save time because less finishing is required. Preparing Studs and Joists Before any panels are applied, prepare the studs and joists. Pull any nails and scrape away small pieces of old wallboard or paneling. If you are replacing lath and plaster, the new wallboard probably isn’t the same thickness as the old surface. In order to make the trim around doors and windows lie properly, use any of the following techniques that apply. • Add matching wood strips behind the trim to fill the gaps. This takes time but is practical if there isn’t much trim. If the gaps are small, you may be able to fill them with caulking after the wallboard is installed. • Use two layers of wallboard. This solution is generally too expensive to be feasible, although it does provide extra soundproofing. • Shim the studs with old lath or any suitable stock that creates the proper depth. For example, to replace 3 plaster with 1/2-inch wallboard, shim the studs with 1/4- by 1 ½-inch lath. Tack the lath in place along the length of each stud. When the panels are applied, use a longer nail that drives through both wallboard and lath into the stud. • Check the studs with a plumb bob to see if they are reasonably plumb. As long as the wall is a smooth plane, slight irregularities won’t be noticed. Use shim stock to correct obvious problems. • Check the wall and ceiling surfaces to see if they are square. Measure the diagonals of the surface. If the dimensions disagree by more than 1/2 inch, you may need to trim one or more panels along the edge to fit. Or you can try compensating slightly as each panel goes up. Otherwise you’ll come to a panel that falls off the edge of a stud or joist. • Check the wall and ceiling for sufficient nailing surfaces. Wallboard panels should not be applied with unsupported edges. If a corner or ceiling line needs a nailing surface, nail in lengths of 1 by 2s or 2 by 4s as needed. If only part of the surface is to be replaced, and the old wallboard is cut next to a stud, nail a 1 by 2 along the stud to serve as a nailer for the new panel. • Check where any wires or pipes go through the studs or joists. They should be at least 1 1/4 inches back from the edge, or protected by metal stud guards. • Finally evaluate whether any of the walls needs additional shear strength. Adding shear strength usually involves glue nailing 1 or 3 plywood to the studs before wallboard is applied. Your building department or a qualified engineer can advise you and recommend a nailing pattern for the plywood panels. If you have to strip some walls anyway; adding shear panels in the right places is a very cheap way to substantially strengthen your home. Cutting Panels When cutting panels, use a guide such as a 4-foot-long wallboard T-square or a straightedge. Any long, straight piece of wood will do. The panel can be leaning against the wall or lying flat on the floor. With a sharp utility knife, cut through the face paper and score the gypsum core. Use several light strokes rather than bearing down on the knife. Then apply firm, even pressure to snap along the cut. Fold the cut portion back and slit the paper on the other side. To cut an opening, first measure carefully. Then double check it. Remember which surface is the front and always measure from the top down. A technique that's sometimes helpful is to cover the edges of electrical boxes with chalk. Then transfer the chalk to the wall board by pressing the panel against the wall. However, be sure to keep cuts on the front of the panel smooth, with no ripped paper. Once the opening is marked, cut the sides with the utility knife and punch out with a hammer. Or, using a pointed wallboard saw, start the cut by plunging it through the panels well within the outline. For right angles mark the opening with a pencil and cut the shorter leg with a wallboard saw. Then cut and snap the remaining leg with the utility knife. For U-shaped openings first cut the two opposite legs with a saw and then cut and snap the remaining side with the knife. Cut edges will often be slightly uneven. Don’t waste time planing or chipping them smooth. Cut the panels 1/4 inch short in the first place. The jagged edges will fit together more easily, and the gap can be filled later with joint compound. Without enough clearance, at tempts to force the panel in place will usually break the core and spoil the edge. Applying Panels Apply the ceiling panels first. For this you need at least one helper, maybe two. (A 4-by-8 panel 1/2 inch thick weighs about 60 pounds.) Even with a helper, renting a wallboard jack or using two T-braces, called deadmen, is a good idea. Make the braces from 1 by 4s or 2 by 4s. The top of the T should be 2 to 3 feet wide, and the total length should be the floor-to-ceiling height plus 3/4 inch. Be careful not to gouge the paper surface of the panel. Another technique is to temporarily nail a 1 by 4 to the ceiling joist and use this as a lip for the edge of the wallboard. This carries some of the weight while the panel is nailed in place. Position the length of the panel perpendicular to the ceiling joists. The edges should cover just half the width of the surrounding joists. Drive nails through the center of the panel first and then work around the perimeter. If you have difficulty sighting the joists, mark the panels with a pencil or snap a chalk line as a guide. The correct nailing pattern depends on the local building code. Check this beforehand. In many instances this is every 7 inches on ceiling panels and every 8 inches for walls. Along the perimeter the nails should be 3/8 to 1/2 inch from the edge. Once the nail is flush, give it one last blow to slightly dimple the surface but not hard enough to break the paper. This allows the nail heads to be covered with tape and joint compound. Don’t countersink the nails or break the paper. To cover the walls begin, with an upper corner and position the panel flush with the ceiling. For vertical panels lift from the bottom edge with a foot lever, which is simply two pieces of 1 by 4 or shim stock used to create a fulcrum. If you’re applying the panels horizontally, have a helper support some of the weight. Several nails or a wood block nailed beneath the lower edge of the panel can also serve as temporary supports. Be sure the leading edge of the panel is vertical and covers just half the width of the last stud. If the corner isn’t square, you can leave a gap of up to 1/2 inch, which can be covered with tape and joint compound. If the studs are new wood, use two nails 2 inches apart spaced every 12 inches, instead of a single nail every 7 or 8 inches. This will minimize the chance of popped nails in the future. Once the wall panels are in place, cover any out side corners with metal corner beads. Drive nails through the bead into the framing about every 5 or 6 inches. The nail heads and bead will be covered with joint compound. Taping and Finishing To cover the joints and nail heads, use the ready-mix joint compound that comes in gallon or 5-gallon containers. Use a separate container or mortarboard while applying the compound. Otherwise dried pieces will work their way into the fresh compound and make the job more difficult. In total you will put down three separate layers (each about 1/16-inch thick), gradually build lug the surface each time. Keep in mind that smooth, neat work at each stage is rewarded with less work in the long run and a better-looking finish job. Using a 6-inch knife, cover all the nail holes in the center of the panels with joint compound. Next fill the gap between panels and spread a thin layer about 4 or 5 inches wide over the joint. Use your fingers or your knife to press a section of paper tape into the wet com pound. Although the most efficient technique is to unroll the tape with one hand and use the other to smooth the tape with the knife, this takes practice. Feather out the edges and add a small amount of compound over the top of the paper. Be sure to eliminate any wrinkles or air bubbles. For inside corners apply compound to both sides. Then fold the paper in hall, press into the corner. and smooth with the knife. Let this first coat dry overnight. Repeat with a second coat 24 hours later, feathering out several inches on either side of the first coat. The total width of the joints is now 7 to 10 inches. Use a 10-inch knife for the third and final coat. The width of the joints should be about 10 to 13 inches. For inside corners it’s often easier to do one side at a time and let the compound dry Then come back and do the other side. After the compound is thoroughly dry smooth the joints and nail heads with 80- or 100-grade sandpaper wrapped around a wood block. If you’ve done a careful job with the knives, there’s little sanding to be done. Because the paper on the panels fuzzes easily, be sure to sand only the compound. An alternate technique that eliminates the gypsum dust is to use a wet sponge. This smooths the compound nicely as long as the surface isn’t allowed to get too wet. The next step is either painting or texturing. Texturing involves trowel techniques best left to a professional. Painting involves priming with a special latex sealer called PVA and finishing with a final coat or two of the chosen color.
|
| HOME | Prev: Adding Insulation | Next: Converting an Attic |