Basic Remodeling Techniques: Taking Out the Old: Finish Materials
| Home | Wiring | Plumbing | Kitchen/Bath |
|
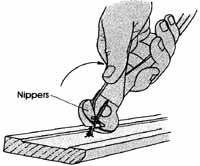
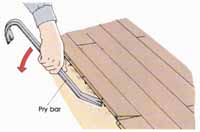
Removing Finish Materials Whether you want to remove a medicine cabinet or knock out part of the wall between your living room and dining room, all the planning and preparation you’ve done will pay off once you pick up your tools. In this section you’ll find instructions for removing wood trim, doors and frames, sinks. washbasins, toilets, bathtubs. cabinets, and built-ins. You will also see how to remove sections of lath and plaster, wallboard, wood paneling. and ceramic tile, hardwood flooring. resilient tiles, linoleum, sheet vinyl. and carpeting. Wood Trim First examine the trim and determine the original installation sequence. Then reverse the order. If you want to save the trim, use a flat bar to pry the piece gently from the wall. You may need to sever the wall surface from the trim by scoring with a utility knife. If the wall or ceiling is be saved, protect the surface by using a wood block wrapped in cloth behind the head of the pry bar. You may be able to drive the finish nails through the trim with nail set. This is especially true for mitered casings around doors and windows that have been nailed through the corners. Immediately remove any nails from trim to be saved. Otherwise the pieces may be gouged scratched before reuse. Often nails can be pulled through from the back or cut off with nippers so the face isn’t marred at all. If you don’t intend to save the trim, rip it off with a wrecking bar. Flatten the nails for safety and easier handling. If wood trim is glued as well as nailed in place, it’s impossible to salvage much.
Doors and Frames If you wish to salvage any hardware, remove it carefully first. Then remove the door from the frame by tapping out the hinge pins. Remove the trim and casings as just outlined. In some cases you can remove the jambs by prying from the bottom. If the finish floor interferes, an alternative technique is to cut through the side jambs and remove them by sections. If you intend to save the jambs, cut the nails holding them to the studs. If the nails are hidden by shim stock, tap it out with a chisel or flat bar. Once the nails are visible, cut them with a hacksaw blade or place the V end of a pry bar over the nail and rap sharply with a hammer to shear the nails. Then lift or pry the frame carefully from the rough opening.
Sinks and Basins There are three types of sinks and washbasins: built-ins, wall-hung models, and pedestal sinks. The demolition process is similar for all three. First shut off the water supply. You will probably find two shutoff valves beneath the fixture or the nearest branch line. Disconnect the waste line from the sink by removing the slip nut with a wrench. If you can reuse the trap, leave it in place; otherwise remove it. Be sure to cover the trap or exposed drain line to keep debris from entering the waste system and to keep sewer gases from entering the house. Stuff the end of the pipe with paper or cover with a plastic bag and tape it down. Next disconnect the supply lines from the sink and cover the ends. If the sink is built-in, temporarily brace it from below by nailing across a scrap 2 by 4. If the sink is tiled in with ceramic tile, chip away some tiles with a chisel to free the sink. (For information on removing tile, see below) Remove any screws that clamp the sink to the counter- top and lift the sink out. Wall-mounted sinks are hung by a hanger bar or brackets from a support screwed into the studs. Alter disconnecting the plumbing, lift one side of the sink at a time up and away from the wall. If the sink is a pedestal model, disconnect the plumbing and any bolts securing the pedestal. If the pedestal is cemented to the floor, rock it back and forth to break the bond. For more detailed information on removing plumbing fixtures, see our guide Basic Plumbing Techniques. Toilets First shut off the water supply and flush the toilet. Remove as much water as possible from the bowl with a sponge. Next disconnect the supply pipe. Cover the ends to keep debris from entering the supply system. If the tank and bowl are separate units, disconnect the elbow connecting them. If the tank is attached to the wall with hanger bolts, prop it temporarily with scrap wood or have a helper hold it while you remove the bolts. If the tank is bolted to the bowl, as in newer toilets, remove the bolts and lift the tank out. Next remove the nuts connecting the bowl to the floor. Break the seal between the toilet and the drain pipe by rocking the bowl back and forth from side to side. Because the built-in trap inside the bowl is filled with water, lift the bowl straight up if you can. To keep debris out of the waste line and sewer gases in, stuff newspapers or rags into the drain pipe and cover with a plastic bag. Bathtubs Taking out a tub isn’t quite as simple as removing a sink or toilet. Often it’s a job best left to professionals, unless the tub is an old free-standing model. In that case the plumbing lines are exposed and can be easily disconnected. Modern tubs, however, are usually built into the surrounding walls, which means you must take off part of the wall surface before you can remove the tub. Before you begin, measure the tub. If it won’t fit through the existing doorway, you may have to remove part of the wall framing. Another option with a cast iron tub is to break it up with a sledge hammer. The first step in removing a tub is to remove the fixture hardware, such as the spigot and faucet handles. Next you need access to the drain and supply lines. Check the wall surface in the room opposite the end of the tub. If you’re lucky, you will find an access panel. Remove it, shut off the water supply, and disconnect the drain and supply pipes. If there’s no panel, you’ll have to cut into the wall surface to gain access. Before you do this be sure to shut off the nearest water supply, such as the branch run. When cutting into the wall, be careful not to damage the plumbing. Once you’ve gained access disconnect the supply and waste lines. If the tub is surrounded by ceramic tile, remove at least the bottom course, plus any mortar bed or wallboard behind the tile. Once the studs are exposed, remove any nails or screws that connect the tub flanges to the wall. Then the tub can be lifted and carried from the room. If the tub is cast iron, it’s going to be heavy—you may need three or four people to get it out. Cabinets and Built-ins The type of cabinetry determines the demolition process. Manufactured cabinets usually can be removed intact without much trouble. Unless they are solid or exotic wood, used cabinets have little resale value. If you intend to reuse them elsewhere in the house, such as in a workshop or garage, you’ll obviously want to exercise more care than if you’re throwing them away. Start with the base cabinets. If a sink is involved, remove it first by following the steps outlined above. If the counter and backsplash are covered with plastic laminate, you should be able to remove the entire wood framework in one piece. Remove any screws or nails that connect it to the base cabinets and lift it off. If the counter is ceramic tile, follow the instructions below for removing tile. Next examine the base cabinets to see how they are attached to the wall. Most manufactured cabinets are screwed to the wall and to each other. Removing the doors is optional at this point. If you intend to reuse the cabinets, removing the doors first may lessen the chance of damage when you carry them out. If you have some one to help carry; as well as sufficient clearance, it’s possible to take out several units at one time. Remove the screws that attach the cabinets to the wall, but leave the side screws in place. If you’re doing the job alone, however, remove the wall and side screws and carry out each unit separately. For the upper cabinets follow the same procedure, with one exception. Before you remove any screws, prop the cabinets with a number of 2-by-4 legs for support. You can also nail a 2 by 4 to the wall beneath the cabinets to provide temporary support. Old-style cabinets that are built in place generally have to be demolished. It’s not practical to disassemble them piece by piece and rebuild them elsewhere. First remove any trim between the ceiling and wall surfaces. Next determine how the cabinets are attached to the wall. If you can locate any screws or nails that mount the back of the cabinets to the wall, remove them. You may be able to pull the cabinets down in one piece. Other wise use a wrecking bar to rip the cabinets apart. In older homes cabinets were often installed before the walls were finished with plaster. As a result you may have to resurface the studs with wallboard before you can put up new cabinetry.
Lath and Plaster You can use several tools and techniques to remove lath and plaster. Although power tools can be used in some instances, hand tools are generally better. All the techniques result in dirty, messy work—there’s no escaping that. If you are removing just a section of plaster, it’s important to cut it cleanly from the surfaces to be saved. Otherwise large portions of the wall or ceiling you intend to save will be pulled away during demolition. Prepare for the cut by marking an outline, with pencil, of the section to be removed. Then place masking tape along the side of the line where plaster is to be saved. Start the cut by scoring along the pencil line with a sharp utility knife. The deeper the cut the better. You can also use a masonry chisel with a broad blade. Next use a wrecking bar, maul, or claw hammer to knock down the plaster. Rip off all the plaster first, remove it from the room, and then pull off the lath. It’s easier to shovel up the plaster before the lath is mixed in with it. Work carefully around any plumbing or wiring. To reach the ceiling use a step ladder or build a simple scaffold with planks. With ceiling surfaces all you can do is rip and duck, so be sure to wear your goggles, hard hat, and mask. If you want to speed the cutting process, you can try a reciprocating saw or circular saw with a masonry blade, But be forewarned: for this job you’re better off sticking with hand tools. With the reciprocating saw the motion of the blade causes the lath to vibrate, and chunks of plaster you intended to save will be knocked down. With a circular saw the blade kicks up so much plaster dust that your work area is totally obscured within a matter of minutes. Some installations use metal lath or at least a metal edge strip along the inside and outside corners. Use a cold chisel to pound this out, or cut the metal with tin snips. If you are removing only part of the wall or ceiling, cut next to a stud or joist if possible. If you cut between them, the unsupported plaster will vibrate and break in a jagged line. To make a small opening in lath and plaster (for an access panel or electrical outlet), first drill a small starter hole. Then use a keyhole saw to cut the opening. If it’s not possible to cut near a stud or joist, use short, deliberate strokes to prevent the plaster from breaking unevenly. It you are going to do any patching, save some of the longer pieces of lath. You may also need them to fur out the studs before you install new wallboard. Save whatever lath you can, within practical limits. Buying new lath for furring isn't that expensive. Carry the debris outside frequently. If you pull down the whole wall or ceiling and then try to clean up, you’ll have an impossible mess.
Wallboard The techniques and tools used for removing wallboard are essentially the same as those used for lath and plaster, except that the process is easier, quicker, and less messy. In most wallboard installations the ceiling panels are put up first, then the walls. In demolition reverse the order and remove the walls first. With some practice you will be able to pull off large pieces of wallboard from stud to stud or joist to joist, but even large sections have no salvage value. New wallboard is so inexpensive it’s not worth saving any of the old. If the panels have been glued and nailed to the studs, use a chisel or wood scraper to remove small pieces stuck to the studs. To remove only a single 4-by-8 panel, cut the paper seam between the panels with a sharp utility knife. It pulling the panel starts to damage the adjoining surfaces, try to find the nail heads and drive them through with a nail set. Wood Paneling First remove any trim along the baseboard and corners. If the paneling is composed of individual boards, use a flat bar to pull each board away from the studs or furring strips. You may have to damage the first piece to gain access. With 4-by-8 plywood panels, use a nail set to drive the nails through the paneling. Or you can try prying the edge of the panel from a stud—the nails may pull through easily. Generally there’s a small gap between the floor and bottom edge for access. If the panels are only nailed to the wall, they can be salvaged without much difficulty, but if the panels are nailed and glued, salvage is practically impossible. The glue bond is so strong the wood will tear and rip. Unfortunately the most expensive paneling—the type you most want to save—is usually glued and therefore unsalvageable. Hardwood Flooring Old hardwood floors are usually refinished or covered with carpeting or other material. In some cases, however, you may need to remove the old hardwood flooring. If you want to save any sections of the floor, number the back of each piece as it comes up. This makes relaying much easier. If you have other hard wood floors in the house, save some pieces for future repairs. Otherwise you may have a difficult time finding a good match. Begin by removing the baseboard trim. If there’s a gap between the first piece and the wall, use a pry bar to pull it up. If there’s no access, you may have to use a wood chisel or circular saw to cut the first piece. Set the saw to the depth of the finish floor and use a utility blade. Once the first board is out, the others should pry up easily Tongue-and-groove (T&G) flooring will take more care than boards that are ship-lapped or face-nailed. The boards are nailed through the tongues, so be sure to pry from that side. Wood flooring is occasionally nailed over the joists without a subfloor. This practice leaves you three options: protect the finish floor and wait until the rest of the demolition is completed to refinish it, remove and re place it with a stronger subfloor before work begins, or cover it with particle-board underlayment before put ting down new vinyl flooring.
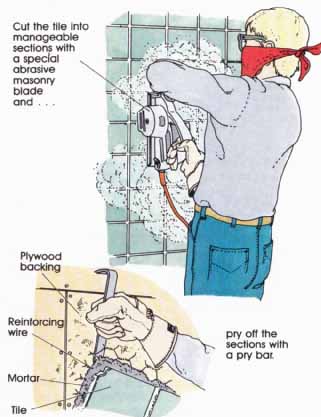
Ceramic Tile Removing ceramic tile depends on the type of installation. In older homes the tile is almost always laid on a 3 or 1-inch-thick mortar bed, which is essentially reinforced concrete. Because it lasts so long, this type of installation is still used in new construction. In many newer homes, though, ceramic tile is set with mastic on a plywood or wallboard backing. If you’re going to remove the entire wall, there’s no need to save any tile. With a mortar bed use a maul to pound out both tile and mortar. Keep in mind that some walls have plumbing connections behind them, so don’t be overly zealous. Be sure to wear goggles to protect your eyes from flying chips. The dust can be irritating, too, so wear a mask. To cut away whole chunks at a time, use a circular saw with a masonry blade. The saw will kick up even more debris, so be careful. If the backing is plywood or wallboard. pound out the entire wall or chip the tiles away and then remove the backing. Generally plywood or wallboard will be gouged and chipped so badly it will have to be re placed. Don’t try to save it.
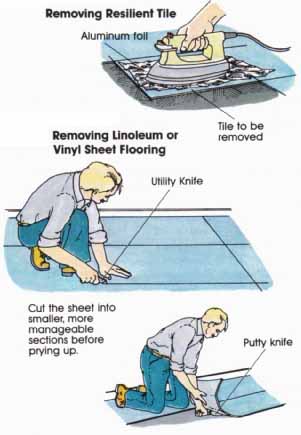
To remove only a few tiles, you can smash each tile with a hammer and then chip out the pieces. Or use a masonry chisel and chip around the edges of each tile. If you want to save any for patching, proceed slowly and learn as you go. Use a lot of light taps instead of solid blows. You may lose the first four or five tiles until you find an approach that works for you. Resilient Tile First remove all the baseboard trim. H you want to save the tiles, applying heat makes removal easier. Use a propane torch, or an iron over a sheet of aluminum foil. When the tile has softened, slip a putty knife under the edge and lift. If you’re not saving any tiles, chip them out with a stiff putty knife or chisel. A flat bar or a long- handled scraper with a flat blade also works well. If you’re lucky, the tiles are glued to building paper, and both materials will come up together. If the tiles are glued to a particle board or a hardwood floor, the job of chipping and lifting is more tedious. In the case of underlayment, it may be easier to saw the tiles and underlayment into 4-by-4 squares. Using a circular saw, set the blade depth so it will cut through the particle board but not into the subfloor. Pry up the large squares and remove them. New particle board underlayment will have to be nailed down to the subfloor if you plan to use tiles or sheet flooring. Remove any mastic stuck to the subfloor after the tiles are up. Some mastics dissolve with acetone or mineral spirits. Be sure to use these with adequate ventilation. Under no circumstances should you use kerosene or gasoline, which are extreme fire hazards. If nothing dissolves the mastic, use a scraper to get it off. If only a little mastic remains, sand it smooth with a power sander. The process can be expensive, though, since the mastic quickly gums and destroys sanding belts.
Linoleum and Sheet Vinyl These two materials are similar to resilient tile. Both are glued with mastic over a variety of underlayments, such as felt, building paper. hardboard. or plywood. First try cutting the flooring into strips with a utility knife and pulling up a section at a time. This may not be possible if the flooring is old and brittle. If it breaks into small pieces, follow the procedure just outlined for removing resilient tiles. Often it’s faster to cover the old floor with a new underlayment and finish floor. Carpeting Carpeting is generally attached to the floor with tack strips around the perimeter of the room. These strips are narrow pieces of thin cardboard or wood embedded with rows of nailing tacks. You may be able to grip the carpet at one edge and pull it up by hand or to insert a pry bar to lift the tack strip from the floor. In any case removing the carpeting itself isn't the major problem— it’s the foam or felt padding underneath that’s likely to give you the most difficulty. If the padding is stapled to the floor, it pulls up easily, but the staples stay behind and have to be removed one by one. If the padding is glued to the subfloor with mastic, much of it will fall apart when you try to pull it up. so follow the procedures outlined earlier for scraping and lifting resilient tile. Although carpeting can often be used elsewhere, padding is generally so compressed and torn up that it’s impossible to reuse. |
| HOME | Prev: Planning Demolition | Next: Utility Systems |


