Basic Remodeling Techniques: Taking Out the Old: Planning Demolition
| Home | Wiring | Plumbing | Kitchen/Bath |
|
Learn what to save and what not to. Here are techniques for removing finish materials,
utility systems, and walls.
Removing finish materials usually takes a little skill, a few tools, and quite a bit of patience. Remodeling differs from new construction in one critical way—you must work with and around what is already there. Or you may need to work through it. Taking out a wall or ceiling requires knowing something about how it was put in. In this section you’ll learn how to become a demolition expert. That phrase may suggest an old-time war movie with John Wayne or Richard Widmark blowing up bridges somewhere in Germany. This section contains no dramatic explosions, however. You may send a bit of debris flying, but in most remodeling you can become an expert in demolition without detonating anything. Demolition in remodeling simply means taking out the old in preparation for the new. In some cases that requires methodically dismantling part of your house piece by piece. In other cases demolition involves pounding out a wall or ceiling surface with a maul. If you follow the basic safety precautions, neither process is particularly dangerous or dramatic—it’s just messy. Walls aren't sacred. They come down easily once you know how. The process requires some physical strength and knowledge of construction, but usually demolition can be handled by the homeowner without great skill or experience. The techniques outlined in this section will enable you to take out almost any surface, fixture, or wall in your home. Demolition is a good area to save money. The cost of remodeling can be greater than that of new construction because the old has to be removed before starting the new. If you plan to hire professionals for part of your remodeling, you’ll save on labor costs by preparing the job site yourself. Of course, if you’ve never tackled demolition work before, some uneasiness is understandable. The prospect of tearing out a wall, for example, may seem formidable. All you have before you is a smooth plaster surface. What’s behind it? Is the wall supporting your house? If so, what happens once the wall comes down? This section will give you clues to identify what’s likely to be inside that wall, and the information on the anatomy of a house in Section 2 will alert you about what to expect. In demolition, though, you can never be certain what you’re getting into until you begin the work. You can anticipate many of the problems but not all. So work carefully and cautiously. If you expect the un expected, you will be better prepared to solve any problems that crop up. Planning Demolition In demolition you must reverse the construction process, working from finish to structure, from the exposed to the hidden. Hardware and finish materials are generally removed first, then the wall and ceiling surfaces. Wiring and plumbing are removed or rerouted. Finally the ex posed framing can be torn out or rebuilt.
There are exceptions. The process can always be modified to fit the particular circumstances. If you find ways to simplify the work, fine. Practicality is the key. For example, the finish floor is usually laid last, but that doesn’t mean it must always come up first. You may choose to leave it down until you have cleaned up most of the debris. The reason for this is simple. Shoveling chunks of plaster and sweeping dirt and dust is much easier over a smooth vinyl or linoleum floor than over a rough plywood or board subfloor. Before you begin any demolition project, reevaluate your plans. Consider the consequences of any changes. If you remove a wall, will the new space be come too large? How will the change affect the traffic patterns? Are the ceiling heights in the two spaces the same or compatible? Are the floor levels the same? Will you have to reroute any plumbing or heating lines? Anticipate patching you may have to do. Ceilings usually aren’t much of a problem. But what about the flooring? Will you need a threshold between existing floors? Is a completely new finish floor necessary? Do the adjacent wall surfaces match? Once you’ve reviewed your plans, think through the entire demolition process several times. What are the necessary steps? What is the correct order of events? What tools will you need? You’ll want to remove the old materials with a minimum of effort, so don’t create un necessary work for yourself. Often you can minimize your work load by planning ahead. There’s an old saying—”measure twice, saw once.” Careful measuring and cutting may enable you to open a wall for a new doorway without patching the plaster or wallboard at all. If so, you will have saved a lot of time and extra work. In all cases protect the surrounding area and work carefully. Otherwise you can easily destroy irreplaceable woodwork or decorative details. Even if the materials can be repaired, you’ve only added to your list of things to do. Handle materials in large pieces whenever possible. Pulling off sections of the wall or floor in one piece is more efficient and results in less debris. Finesse can be more important than brute strength. Some pieces have to be worried out, not overpowered. Don’t go out of control with a 10-pound maul. Be methodical in your approach, Evaluate each part of the demolition by asking “Is this step necessary?” You may be able to cover up the old material rather than expend the time and energy to remove it. If you have a lath and plaster surface in bad shape, you have two choices: rip it of f and resurface the exposed studs with new wallboard or nail the new wall board panels right over the old surface. The latter choice is especially practical for ceilings or walls that have little trim and few electrical outlets. You can locate the joists or studs, use a longer nail, and nail right through the wallboard and plaster. If a wall has a lot of window or door trim, this cover- up approach may not be practical. The new surface adds at least 1/2 inch to the wall, so the trim must be shimmed out to accommodate the added thickness. But it’s an option to consider. Floor coverings, too, can be covered rather than removed. You can leave linoleum, vinyl tile, or hard wood floors in place and lay new flooring over them. New tile or sheet vinyl will need an underlayment of hardboard or particle board to smooth the old surface, but laying them is simple and generally faster than rip ping out the old flooring first. Where old and new surfaces meet between rooms, the slight difference in height can be minimized with a step-up threshold, Exploring the Structure Before you start any demolition, you should answer two critical questions. The first and most significant is, “Will the demolition jeopardize the structural stability of the house?” The structure of your house is affected whenever you cut into or remove one of the following:
The last four situations are infrequent. If you are planning demolition work that involves cutting or removing joists, such as adding a stairway, see this page details. If you want to cut or remove any rafters to add a skylight or attic dormer, see these sections. Removing posts or foundations requires extreme caution.
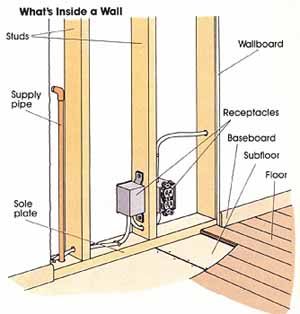
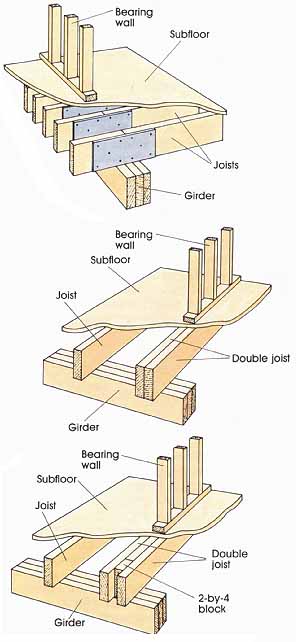
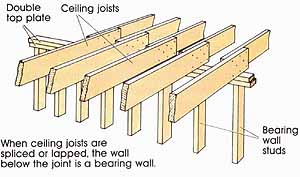
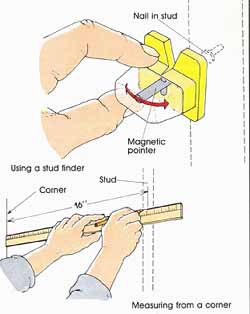
Bearing and nonbearing walls. Before you can proceed safely, you must know the differences between bearing and nonbearing walls. In simplest terms, bearing walls hold up parts of the house. They are essential to the structure. Nonbearing or partition walls only en close and divide the interior space. First, assume that all exterior walls are bearing walls. Even though the end or gable walls bear less weight than the side walls, you should consider all out side walls to be bearing. Second, because not all interior walls are bearing, the problem is to identify those interior walls which help support the weight of the house. Most homes have one main bearing wall running down the center of the house. This is because ceiling joists generally aren’t strong enough to span the entire width of the house. When two joists are used, the wall where they overlap is a bearing wall. Thus a key step in identifying bearing and non- bearing walls is to determine the direction of the floor joists or ceiling joists located above the wall, If the wall is parallel to the direction of the joists, it's probably nonbearing. If the wall is perpendicular to the joists, it's usually bearing, The best place to check the joist direction is an exposed basement or attic area, or an exposed basement ceiling area if you are removing basement walls. If this is impossible, use one of the techniques out lined in the box for locating joists and studs. The weight a bearing wall carries must be transferred to the ground. This fact provides another clue for identifying main bearing walls: any interior wall with a girder, post, or foundation beneath it's probably bearing. In a building of two or more stories, these bearing walls are usually stacked on top of one another. Of course, all rules and guidelines have exceptions. Short sections of wall around a closet, for example, may be perpendicular to the joists but aren’t necessarily bearing. If you have a central hallway running the length of your house, one wall is probably the main bearing wall. (In the attic, check where the ceiling joists overlap.) Depending on the size of the joists, the other hallway wall may carry only a small portion of the load. Another exception to look for is the use of strongbacks in the attic. The strongback is a board set on edge, or even a beam, that runs perpendicular to the joists in the middle of their span. Typical construction is a flat 2 by 4 nailed to the joists, with a 2 by 8 or 2 by 10 set on edge and nailed alongside the 2 by 4. It looks like the strong- back is resting on the joists, but in fact it's helping sup port them. Its two ends, or even points along its length, bear on walls below, like a bridge supported by its piers. The purpose of the strongback is twofold: to straighten the joists during framing and to prevent long joist spans from sagging once the finish ceiling is applied. The weight of the strongback, and of the joists, is supported by the walls at each end. As a result any wall directly beneath a strongback should be treated as a secondary bearing wall, In some cases strongbacks also help to support the rafters, which means additional weight is transferred to the walls below. Inside the walls. The second question to answer before starting any demolition is, “What’s inside?” Although you can never answer this question completely, it’s important to have some idea of what to expect before you begin. Don’t tear out any wall, floor, ceiling, or cabinetry without first looking for clues. You’re likely to find one or more of the following: • Electrical wiring • Water supply or DWV plumbing pipes • Pipes and ducts for the heating system • Gas pipes • Abandoned wiring, pipes, vents, and flues • Insulation Before any demolition do some detective work. Note the location of all electrical switches and outlets in the area. The attic may reveal the location of electrical wiring. In most demolitions electrical wiring can be pulled out or rerouted easily. You may be able to do this yourself, or you can hire an electrician. Go down in the basement and look for pipes and ducts that run in the vicinity. The proximity of the kitchen and bath will give you clues about the location of the supply and drain pipes. If the area includes plumbing or heating pipes, avoid unnecessary rerouting if you can. Of course, it’s not impossible to remove or reroute the lines, but the job can be more complicated and ex pensive than you might imagine. So if you are unsure, call a plumber or heating contractor to take a look. ** A word of caution**: If the demolition area involves any natural gas lines, call a professional. If you discover what you suspect is a gas line during demolition, stop work immediately and seek expert advice. Inadvertent damage to the pipe could have dangerous consequences. This is one area that should be handled only by an experienced professional. Salvage and Debris In many demolition projects you’ll be faced with the dilemma of salvaging materials. The question of whether to save or not to save is best answered on a case-by-case basis. Some items can be salvaged easily: others represent a complete waste of time. When to salvage is primarily a matter of judgment. What to save. There are four main reasons for salvaging existing materials. • For resale value. Although few built-in fixtures or materials in the average home have resale value, don’t automatically assume everything is worthless. What is junk to you may be a valuable antique to others. Age is usually the determining factor. If your home is more than thirty years old, you may have items worth selling. If you’re removing old plumbing fixtures such as a Victorian pedestal sink or clawfoot tub, call several salvage yards or antique dealers to find out if they’re interested. The same is true of decorative bath accessories, light fixtures, and door knobs. Brass electrical plates may have salvage value. Even if your plumbing fixtures aren’t antiques, inquire about their value before you rip them out. You may not be offered much, but selling them can save you the time and expense of hauling them away yourself. Some metals have resale value. Old radiators and cast iron plumbing fixtures, for example, can be sold for scrap metal. Copper and brass plumbing can be recycled. Copper wiring, however, isn’t worth much unless you have a lot of it, or large-diameter wires. Large timber beams and expensive wood paneling have value if they can be salvaged easily. In some areas salvage dealers are interested in used hardwood flooring. Before you go ahead, though, weigh the offered price against the time it will take to remove it carefully enough for salvage. • For future use. To salvage materials for your own future use, all you need is sufficient space to store them safely. Be sure the storage area is dry, protected from vermin, and out of the way so materials won’t get broken or scarred before reuse. • For use on the present job. You’ll want to salvage materials for possible use on the present job for two reasons. First, you may need some of the old material for patching or repair. For example, if you’re removing only part of a wall or floor, save some of the finish material if you can. If you inadvertently damage the remaining finish, you’ll have extra pieces for patching. Saving some of the lumber from an older home can be useful. Often the dimensions are different from present-day lumber, and you just can’t buy matching stock anymore. Second, your plans could change halfway through the project. In that case you might be happy to have some of the old material on hand. As a rule of thumb, if something can be saved easily, save it. • For its esthetic value. Salvage is often a matter of taste and preference. If you like the style and appearance of the old material, save it. Even if it’s not cost-effective, you may decide it’s worth saving. What not to save. In some situations, of course, salvaging is neither practical nor desirable. Your goal is maximum value for minimum effort. If you’re going to remove a surface completely and start over, you may not need to bother with salvage. If new materials of comparable or superior quality are readily available for reasonable cost, it’s probably better to replace the old with the new. Investigate the cost of new materials and then decide. Salvaging isn’t always cost-effective. Sometimes you’ll have to spend too much time cleaning up the old material for reuse. If you are planning to hire professionals to do some of the work, think twice about using salvaged materials. Most professionals don’t like working with used goods. New materials are faster and easier and offer fewer surprises. The more time spent trying to repair the old, the more the labor will cost. You may have to rely on the contractor’s judgment here. Even when you’re doing the work yourself, be practical about saving old materials. Your time is worth some thing, too. For example, it’s usually not sensible to try to save small sections of lath and plaster if you are installing new wallboard anyway. If a section is left under a new window or 2 feet at the end of a wall, go ahead and rip it out. It’s faster and easier to put up another piece of wallboard than to try to patch the old plaster and new wallboard together. Often the same is true of old plumbing. In many instances it’s more practical to run new copper or plastic pipe than to take the time to patch and rejoin existing galvanized and cast iron pipe. If what you find is obviously not right, it’s usually better to rip it out and start fresh. For example, it’s sensible to replace a jerry-built wall that has unorthodox framing or spacing between the studs, or unconventional wiring and plumbing installations. Dealing with debris. In thinking through the entire demolition process, it’s easy to overlook the final step— what to do with the debris, You should make the necessary provisions for handling and hauling the rubble before you begin any demolition work. As a rule of thumb, 1 square foot of wall area results in approximately 1 cubic foot of debris. This can be quite heavy. Don’t use boxes or containers that are too large or pack them too tight. Consider buying or renting a wheel barrow to speed the removal process. You can also save yourself a lot of backbreaking labor by building a temporary chute or slide to get the debris outside. If you’re going to set aside some materials for future use. prepare a convenient storage area before any demolition begins. The location should be easy to reach but well out of the work area. This could be a garage, basement, or back porch. In most communities the municipal garbage system won’t pick up debris from a remodeling project. Al though it’s worth a phone call to find out, many areas have stringent limits on the weight and number of extra containers allowed. If you’re going to do a lot of demolition, the practical solution is to rent a dumpster. The cost is a daily or weekly rental fee, plus a charge for each pickup. In some communities a permit is necessary to leave the dumpster on the street. Check with your local building department on this. If the job isn’t large enough to warrant a dumpster, you can rent a trailer or pickup truck and cart the junk away yourself. When comparing costs, don’t overlook the cost of gas and municipal dump fees you’ll have to pay Also keep in mind that hauling debris takes time. You may decide it would be more cost-effective to stay on the job site and pay for someone else to remove the debris. You might get bids from high school or college students who run a weekend hauling business. Preparing the Work Area Demolition can be a dirty job, especially if you’re re moving plaster or wallboard surfaces. Seal off the room and confine the mess to one area if you can. This keeps the rest of the house livable, and you spend less time cleaning up. If you’re taking out a wall, prepare the rooms on either side. Open windows in the work area to provide plenty of ventilation, but close others throughout the house to keep dust from coming in. Hang canvas, old linens. or plastic sheets over doorways to the work area. Be sure to protect any finish surfaces you want to keep. Porous wall surfaces such as wallpaper should be covered with sheets of thin plastic. you want to save the finish flooring, put down building paper, canvas drop cloths, plastic sheets, or an old rug turned upside down. A large tarpaulin that can be picked up and carried outside is convenient, but put plastic sheets underneath. Another good system is a layer of plastic covered with building paper. Plastic alone isn’t strong enough and tears easily. Building paper alone doesn’t keep the fine dust out of the cracks and seams in the flooring. (Once there, it’s practically impossible to remove—you’ll see it forever.) Tape the edges of the building paper to keep the debris from working underneath. Plaster and wall board particles are gritty and will quickly mar finish floors if ground in. If you’re going to remove the ceiling surface, put down several sheets of inexpensive 1 CDX grade plywood or old carpet over the building paper. This will prevent large jagged pieces of plaster or wallboard from gouging the finish floor. You need to protect yourself as well as your house. Always dress appropriately for demolition work. This means long sleeves, gloves, and heavy work shoes—no canvas or running shoes. For overhead work a hard hat is recommended. Use goggles to protect your eyes from flying debris. If there’s any dust, especially plaster dust. wear a mask. Throw-away paper masks are adequate; a mask with replaceable filters is much better. If your demolition project involves electrical wiring, turn off the appropriate circuits before you begin. You don’t want any live wire surprises once you start swinging a sledge or cutting through walls with a saw. Shut off everything in the vicinity even if you don’t plan to touch the wiring. You never know exactly where the wires run until you get inside the wall or ceiling. Use along, heavy- duty extension cord to provide electricity to power tools and portable lights. To identify which circuits need to be turned of f, refer to the circuit map in your service panel. Many rooms are wired on several circuits, so don’t assume one dead outlet means the entire room is dead. Use a volt age tester or night light to be sure all outlets and switches in the area are off. If the area involves plumbing lines, locate the appropriate shutoff valves for the branch run or fixture. Even if you don’t plan to remove the pipes, shut off the water supply before you begin. Mistakes do happen. If the water is turned off first, you’ll avoid sudden floods. Plan to clean the area often during demolition. Don’t let accumulated debris interfere with the work in progress or create a safety hazard. Carry the rubble outside regularly. Otherwise you might stumble over it and cut yourself on nails or jagged pieces of lath and plaster. Also, excessive plaster dust in the air can irritate the eyes and lungs. As an added safety precaution, remove or flatten all nails from each piece of trim or framing material as it comes down. Protruding nails can easily rip your clothes or skin. Without them, handling and stacking the pieces is more convenient. Although some demolition veterans may not take the time, this additional precaution is a sound idea. Your safety is more important than a few minutes of your time. |
| HOME | Prev: Developing Your Plan (parts 1 and 2) | Next: Finish Materials |