Low-Maintenance Landscape Walls and Walks
| Home | Wiring | Plumbing | Kitchen/Bath |
|
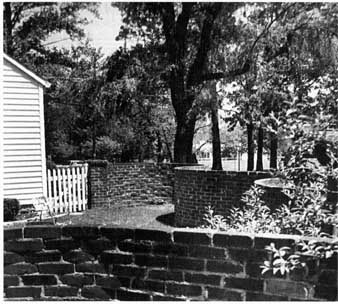
An old jingle tells the low-maintenance story effectively when it comes to garden, terrace, or other freestanding walls you might wish to accent your landscape with: Wood or metal, cheap and fast; But only masonry will last. Masonry and Stone versus Everything Else for Walls We Americans have never taken to stone walls too readily, Robert Frost and New England to the contrary. We associate them with wealth and /or lots of labor. When we want a wall for privacy around our homes, we naturally lean toward wood or sometimes give in to the ugliest temptation of all—a nice chain link fence filled in with those god-awful plastic or aluminum strips. Wood and metal may be faster, but are they really cheaper? It is hard to quote a price for chain link fencing with aluminum fillers because the fence is available in a number of gauges—at least 9, 10, 11, and 12—and the thicker the gauge, the higher the price. Then one must count in the innumerable posts, top rails, end rails, post caps, end rail caps, tension bars, tension bands, etc., which significantly add to the cost. But with the aluminum fillers for privacy woven into the chain link fencing, and using the heavier, longer-lasting gauges, the price is over $8 a running foot easily, and that’s not counting installation charge—nor your labor if you do the work, nor the concrete you ought to put around the end and corner posts in the ground. Solid wood privacy fencing—stockade fences as they are called, or solid picket fences—is not really cheap either, and the quality of the wood is questionable. For example, I’m looking at a mail-order catalog that offers a stockade fence of “western white wood stained to look like red cedar.” There happens to be no such species of wood called white wood. So what is it? Mostly white cedar, I would hope, but white cedar isn't specified as it's in the posts, so you don’t know. Also offered, a little cheaper, is a fencing called “mixed northern white woods.” Obviously the wood could be anything and therefore not likely to last very long unless you continually paint it or stain it. And even then I wouldn’t bet that the $5 to $6 a foot these privacy walls are going to cost you, installation and painting not included, is worth it. If you can find good red cedar fencing, split out of enduring heartwood, you are going to pay quite a bit more. The point is that even if we disallow the greater beauty of stone or masonry, does it cost that much more to build something that can last forever? I can’t say what a masonry wall will cost per running foot since materials vary in price so much, and much depends on whether you do the work yourself, but believe me, there are used bricks available that will cost you much less than wood or chain link fencing, and laying up bricks isn't necessarily as hard a job as installing a chain link fence. Just slower. And even if the wood fence is faster and easier, you will do it three times in your lifetime, not once as with brick. Of course there are practical objections to masonry. As a garden wall, it's awfully permanent, and you may want to move your garden. Some people move gardens around like they do furniture. To each his own. A masonry wall around a terrace or patio may be more practical. In either case, the rewards are worth it: You achieve protection from prying eyes, rambling dogs, raucous noise, and cold and damaging winds, to a degree no other kind of wall can provide. Indeed, centuries ago gardeners learned that stone or brick walls actually soaked up heat during the day and gave it off on chilly nights to protect tender plants espaliered against them. Since building a masonry wall is considered such a laborious proposition, allow me an offbeat but contradictory example. Twelve years ago I dry-stacked bricks into a circular little wall for a wishing well in our yard. I did not install any kind of foundation under it. The first two or three courses of brick are belowground. That’s all. On the inside of the circular wall, the bricks touch the ones contiguous to them. On the outside, they are about 2 inches or more apart, straddling the two bricks immediately below. In twelve years of extreme freezing and thawing, that circular wall has hardly budged. I have had to adjust a brick that shifted slightly out of place only three or four times. Some of the stability of the wishing well wall has to do with the circular shape. Shifting, if any, tends to work the bricks tighter together in a circle rather than farther apart. I know this is true because, unlike the wishing well, the square fireplace I built of dry-stacked bricks nearby (also without a foundation) requires some yearly realignment of the bricks.
But the point is that in a freestanding wall, much can be forgiven the amateur builder, and his wall will still stand. You certainly want some kind of foundation under a wall that's going to be at least 6 feet tall for privacy. But you do not need a formidable house footer. If it extends below the frost line (and that's the main point), the foundation need not be solid concrete or mortared masonry units. You can pile in rocks solidly, or dry-stack bricks or concrete blocks level and straight and that will do. (Frank Lloyd Wright once argued that in some situations, gravel would be a better footer than solid concrete because if thawing and heaving did occur, the movement would be absorbed by the gravel, not transferred to the house frame. Some of the older information on building field walls of stone appears to support that conclusion.) Once above ground level, if the wall is kept plumb, you can dry-stack bricks, crisscrossing alternate double courses, or dry-stack a single course of decorative cement blocks, and you will be amazed how long they will remain stable. You might say that mortar’s most advantageous purpose is to keep passersby from walking off with your bricks or blocks! I’m not necessarily suggesting you actually build the wall this way, but just want to impress upon you that if that foundation is solid and the wall plumb, you will be forgiven minor mistakes in your mortaring job. Mortar does not add as much strength in a freestanding wall as you think. A family near Findlay, Ohio, has a serpentine brick wall of just one course of brick along one side of their property—modeled after the serpentine wall on the University of Virginia campus that Thomas Jefferson supposedly designed. It isn't so much the mortar that holds that seemingly fragile wall so strongly, but the shape—the curvature, as in my wishing well wall—that exerts integral strength. It works in much the same way the key in an arch is held in place by the arch and in turn gives great stability to the arch.
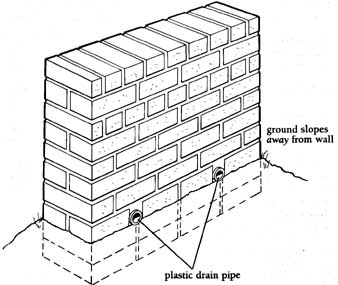
After making sure that the foundation reaches below frost line and plumb, you need to make sure water does not linger in the wall or against it. The ground should slope slightly away from the wall. If the wall is on a slope, provide small openings through the wall at ground level every 10 feet or so to allow runoff water to run on through. Short lengths of plastic pipe will do. Mortared retaining walls should have the same kind of base drainage. It is also important that the top of the wall is sealed (mortared), tilted to the side slightly, or otherwise shielded from rain so water runs off, not down into the wall where it might freeze and cause cracking. Fencing Several years ago I did a little private survey into what I call The Things That Really Matter in the Local Community. Once past the usual subjects of family gossip, the number one cause of anxiety and crisis among neighbors, whether I surveyed in Iowa or Ohio or anywhere else, was their neighbors’ dogs. Dog owners, despite all kinds of ordinances, will not confine their dogs to their own property and when they do, the damn things howl all night. There is no easy solution to this problem. But you can build a dog-proof fence around your property if there’s not an ordinance against that, too. Fencing isn't low-maintenance landscaping, but it can contribute to low-maintenance sanity. A second observation about fences: If you do not have anything to pen in or pen out, why do you want a fence? Decorative fencing, for example those split rail fences, have a life of about 12 years before repairs become necessary and are just one more thing you have to dodge with the mower. Wrought-iron fencing is both decorative and practical, but very ex pensive even if it does last forever. But because old wrought-iron fence appears to be about as expensive or more so than new, you probably can get your money back should you ever decide to sell any that you buy now. If you have the money to spend, it's probably a good investment. Next best in terms of low maintenance and price is a good chain link fence. A free instruction booklet on how to install chain link comes with your purchase so be sure to ask for it. You’ll need it. If you can afford it, professional installation is a wise investment. Haggle for a good price. A regular livestock fence in suburb or city will cause more palpitations among the neighbors than howling, loose-running dogs. But in the country it's a good buy if you know how to use a woven wire fence stretcher and buy top-of-the-line fencing. Top-of-the-line fencing should have 9-gauge top and bottom wires and no smaller than 11-gauge for the other wires. For keeping dogs in or out, 6-inch rather than 12-inch mesh is stronger. The wire should be heavily galvanized and contain copper to fight rust. A 330-foot roll of this wire (20 rods) will cost around $120 to $130, and the next heaviest about $80 to $90. From long experience, I can tell you the extra $40 is worth it in terms of long life. For directions on proper installation of livestock fence, see the book Practical Skills (Rodale Press, 1985). Sidewalks and Driveways Concrete is better than blacktop for low maintenance since blacktop should be recoated with a sealer every few years. Mortared stone and masonry walks equal concrete in low maintenance but are slightly more laborious to build. Gravel and unmortared masonry or stone make rather high-maintenance walks and drives because weeds and grass coming up through them must be constantly controlled. Gravel drives need periodic, even yearly, applications of new gravel, unless at least a foot of large (fist size) stone is laid down first. Even then, in areas of freezing and thawing and heavy rains, the gravel will continue to sink slowly into the ground. There is a general feeling among quarrymen that crushed stone, the individual fragments of which are more squarish than round, holds up better than round, pebbly gravel. Another maintenance problem with gravel or crushed stone is that car tires dig ruts and throw stones out to the perimeter of the drive. Also, when clearing snow, we inevitably throw some of the gravel on the lawn. In any case, gravel or loose stone drives have to be leveled occasionally. Despite their drawbacks, gravel is about the only choice for a long drive unless money is no object. Excavate about a foot and lay down a bed of fist-sized stone, then surface with about 3 inches of gravel or No. 7 crushed stone. The driveway surface must be higher than the surrounding terrain, and if it blocks the natural flow of runoff rain, some sort of drainage pipe should be installed through the drive to carry away water. In most urban and suburban situations, your driveway comes with the house and invariably is concrete or blacktop. If it's an old concrete drive, with enough cracks in it to merit repair, the best choice is to resurface it with blacktop, just as engineers are doing on highways. Part of the cost of blacktop is in preparing a foundation under it, and in this case, the old concrete drive serves the purpose. Concrete Sidewalks Blacktop, or hot mix as it's sometimes called, is almost always installed by professionals. But invariably, sidewalks are built by homeowners since the skill and time involved are perceived to be minor. Sidewalks involving concrete aren't really all that “minor,” and a local contractor who specializes in that kind of work at a reasonable price might be a wise investment. If you proceed on your own, here are some general guide lines—which also apply to pouring a concrete driveway: • A 4-inch slab is thick enough. For forms, use regular 2 X 4s raised just slightly above the soil surface. • Concrete can be poured right on a good, solid earthen surface. There is no need to put down a gravel bed first, although many people do. If you do, wet and tamp the gravel down well so it settles and doesn’t draw water out of the concrete. • To minimize cracking, lay down standard reinforcing wire mesh before pouring the concrete. For a driveway, you can use the full width of a standard roll, but for a walk, the roll will have to be cut to fit. You will pay more per foot for nonstandard pieces, but if the hardware store does the cutting for you, the trade-off isn't bad. It takes good wire cutters to cut the stuff—a tool most homeowners don’t own. Ideally, the reinforcing mesh should be positioned so there are 2 inches of concrete under it and 2 above, but don’t worry if you don’t get it just right—it’s very difficult to do exactly. Unroll the wire, hold it down flat with bricks or stones if necessary. The natural rumple of the mesh will cause it to run unevenly through the slab, from perhaps a little too low to a little too high, which is fine. The only problem you must guard against is the tendency for the mesh to rumple up above the concrete surface. If it sticks up when you are troweling, you can generally push it down and it will stay. If the ends of the mesh wires stick up, you can bend them and then push them back into the concrete. • You need a steel trowel, an edger, and a groover to finish a concrete sidewalk attractively. A wood floater is nice to have to go over the wet concrete first; it will settle the large aggregates. But you can accomplish that task with the steel trowel in a pinch. • Rather than trowel the surface smooth, which results in a “slippery when wet” walk, you can texture it with an old broom after the surface is semisolid. • Use the groover to put a contraction joint in the walk about every 6 feet. Use a board for a straightedge and run the groove at right angles to the sidewalk’s edges. These grooves give the concrete space to move instead of cracking, or as most concrete workers say wryly: “If the slab does crack, it cracks in the groove and you don’t notice it.” • Expansion joints instead of grooves ( strips of wood) aren’t usually necessary in normal-size sidewalks but are advisable in drives or terraces. A really neat way to provide expansion joints in terraces is to use 2 X 4 redwood planks as dividers between various square or rectilinear sections of concrete. If from heartwood, the dividers will last a very long time and make a very attractive design as they age to a silvery gray. • After the concrete sets up but is still moist and workable, run the edger down both sides of the walk to round the edge and smooth it. The edger leaves a margin of about 2½ inches, which adds a decorative touch. • As mentioned earlier, be sure the sidewalk does not rise much more than an inch above the surrounding yard so that you don’t have to worry about hitting it with the lawn mower blade. Variations on Concrete Walks and Drives There are many, many ways you can combine concrete and stone or masonry units to make attractive sidewalks. Embedding bricks or slate or whatever into wet concrete isn't , however, as easy to do as it would appear. It is difficult to scrunch bricks, for example, into a bed of wet concrete and get them even and evenly mortared. The proper way to do the job is to pour about 2 inches of concrete down and then set the stones or bricks in it. Then fill the joints with mortar. You can, as some professionals do, squeeze mortar out into the cracks through a bag that has a funnel opening at one end. Or you can simply use a large tin can you have flattened slightly at the top to make a pour spout. You’d better have a steady hand for these last two. Another method is to sprinkle a mixture of dry sand and mortar (two parts sand, one part mortar) over the stone or masonry surface, sweep the dry mortar into the cracks, then soak it with a gentle spray of water.
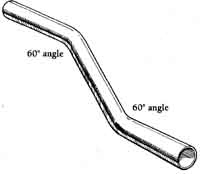
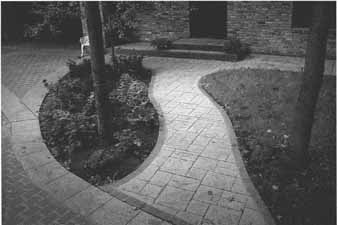
Another alternative is to make the concrete surface look like flagstone or brick. You can use the pattern forms described in section 2 to imprint a brick or tile-like surface into the wet concrete. Or you can lay out your own design of irregularly shaped flagstones. Make a jointer out of a piece of ¾- inch copper pipe that's about 18 inches long to fake the joints in your irregularly shaped “flagstones.” Bend about 4 inches of the piece of pipe out to a 60-degree angle at one end, and a 60-degree angle in the opposite direction at the other end (see the illustration). One end is your handle, the other your marker. Of course, you can use a regular jointer if you have one, but it will make a joint a little too narrow for the space usually left between flagstones. Mark your “joints” in the wet concrete surface after the concrete has begun to solidify. Then at the proper time, trowel the whole surface, going lightly over your joint marks. When the troweling is complete, smooth over your joints again and sweep out any loose concrete with a whisk broom. The walk will look remarkably like flagstones.
For driveways, sidewalks, and terraces, there are on the market some very beautiful concrete surfaces (mentioned briefly in section 6) that mimic closely the beauty of stone, brick, or tile at a lower price. Concrete block “payers” in many colors, textures, and shapes are now being produced by larger concrete block manufacturers throughout the country. Although payers have found a ready market from institutions and businesses willing to spend the money for a very distinctive look, they’re not that terribly expensive for a home installation, so long as you don’t have an unusually long or wide drive to pave. Check with the nearest concrete block factory or write National Concrete Masonry Association. Even more radically beautiful are special patented concrete products that mimic stone and masonry for walls, floors, walkways, and driveways. One company that makes these is a firm that I mentioned earlier: the Bowmanite Corporation (see Appendix A). Another is Coronado Products, Inc. ( 1325 6th Avenue North, Nashville, TN 37208-0568), although most of Coronado’s facsimiles are for interior walls and floors. These surfaces are installed only by specially trained and equipped crews, and with an almost unlimited choice of color, texture, and design. It is hard to believe concrete could be so beautiful. Bowmanite even has for sale a concrete paving it calls Solarpave, through which water from a swimming pool or whatever can be circulated and heated by the sun, for a price the company says is competitive with rooftop panels. Another new idea from Bowmanite is Grasscrete, a “porous, structural concrete pavement, cast in place, that drains storm water runoff and produces oxygen like a lawn.” Grass can grow in strips right up through this pavement!
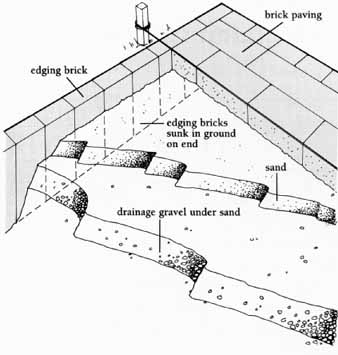
Unmortared Walks low-maint-p180.jpg Stepping stones make an almost instant maintenance free walkway. With a heavy mulch like this surrounding them, mowing and trimming around them is unnecessary. The mention of grass brings us back to the typical unmortared side walk and garden path most of us settle for because of low cost—and through which we try in vain to keep grass from growing. But if the following guidelines are kept in mind, a homemade unmortared stone or masonry walk will prove to be quite low maintenance. 1. Instead of a conventional walk, use the “stepping stone” idea. Larger flattish stones or precast concrete units are embedded in the lawn more or less irregularly and individually. Since there are no cracks between the stepping stones but perhaps as much as a foot of space, there is no upkeep, no precision to be enforced on nature. You just mow over the stepping stones and don’t worry about them. If one or the other heaves up a bit in time, just dig out a little dirt from under it and resettle. 2. For a standard, continuous walk, it's important to first lay down a foundation. Excavate about a foot of dirt, then fill with about 6 inches of cinders or gravel, then 3 inches of sand, more or less as needed to bring the brick or stones you are setting in up to grade. Then with bricks or stones in place, sweep in sand to fill the cracks between them. 3. Crucial to the low-maintenance success of the walk, especially if it's brick, is edging. Unmortared stone or masonry walks tend to creep apart with freezing and thawing, and to prevent that, you need to sink a border along both sides 6 to 8 inches deep. Bricks set on end in the ground make a good edging. Flat, longish stones will work as well. Landscape ties that are embedded a few inches in the ground and held in place with spikes driven through holes first drilled in the ties make tight and neat borders. 4. Really long-lasting unmortared walks owe their endurance against heaving to good drainage. The classic walk or garden path has a tile drain underneath the gravel bed, but in a typical suburban or urban situation today, there may be no way to outlet such a tile. The gravel itself improves drainage. The walk should in addition have a grade or slope to it so water flows away and never stands on or next to it.
|
| HOME | Prev: Flowers and Vegetables | Next: |
