REPAIRING PARQUET FLOORING
Parquet flooring comprises rectangular blocks of wood that may be arranged in varying designs. Commonly, herringbone patterns are used. Over time, the blocks may become damaged through wear and tear, or they may become loose.
Tools, Materials and Supplies: Hammer, chisel, scraper, wood adhesive, belt sander, wax, cloth
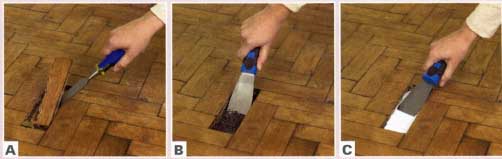
A. Lever out the block. If it remains firmly stuck, try breaking it up further, using a hammer and chisel.
B. Remove excess adhesive from the back of the block, and from the floor surface, using a scraper.
C. Apply some wood adhesive (latex-based) to the back of the block and to the floor surface.
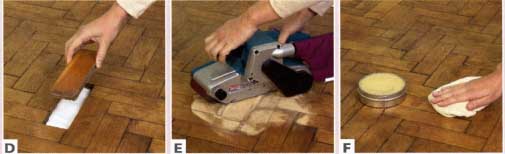
D. Position a new block, and press it firmly into place.
E. If the block isn't flush with the surrounding surface, sand the area until it's smooth. A belt sander is ideal for this.
F. Apply finish to the floor surface. This may be wax or varnish, depending on the existing floor.
REVIVING PARQUET
To revive an old parquet floor, use a technique similar to that shown for sanding a floor. As long as the blocks are stuck tight, undulations can be removed by sanding. Work across the floor in the direction of the grain. A traditional herringbone design would require diagonal runs, to deal with the orientation of the blocks.
REPAIRING A LAMINATE FLOOR
If a damaged section is near the edge of a room, it can simply be replaced with a new piece. If this isn't possible, a small dent or scratch can be repaired with a laminate repair compound kit, as shown here.
Tools, Materials and Supplies: Scissors, repair compound kit, scraper
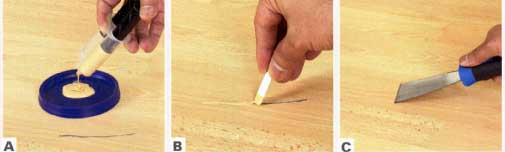
A. Cut off the nozzles on the two- part syringe. Squeeze the repair compound into a tray, where the two elements will mix together.
B. Use the plastic scraper included in the repair kit to press the repair compound into the damaged area.
C. Remove any excess compound, with a metal scraper, from the area before it dries.
PATCHING CARPET DAMAGE
Aside from using cleaners, damage to carpet can be hard to remedy. But specks of paint can be removed with a utility knife, and a small area of damage can be replaced with a patch, if you have offcuts of the carpet.
Tools, Materials and Supplies: Scissors, utility knife, metal lid or similar object, spray adhesive.
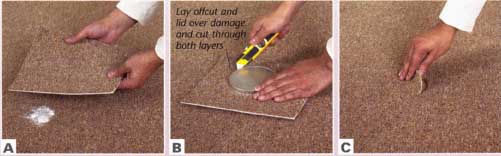
A. Cut a patch of carpet to a size that's larger than the area that needs to be repaired.
B. Find a metal lid or other circular object, slightly larger than the repair area. Cut around it, down through the patch and the carpet below.
C. Remove the cut circle of damaged carpet, and replace it with the circle of new carpet. You may wish to use spray adhesive.
PATCH-REPAIRING VINYL FLOORING
Although hardwearing, vinyl can be damaged by sharp objects or by heat, such as a cigarette burn. Re-covering an entire floor is expensive, but where vinyl has a pattern, such as “tiling”, it can be used to aid the repair process. If you use this technique, be sure that the junctions between the patch and existing vinyl are firmly stuck down. Otherwise people may trip over them.
Tools, Materials and Supplies: Scissors, tape, utility knife, double-sided tape, seam roller
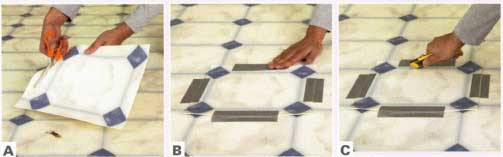
A. Cut a section of new vinyl, to a size that's slightly larger than the damaged “tile” area.
B. Tape this piece loosely over the damaged area, making sure that it's aligned exactly with the pattern.
C. Use a utility knife to cut through both layers of vinyl, using the “tile” edge as a guide line.
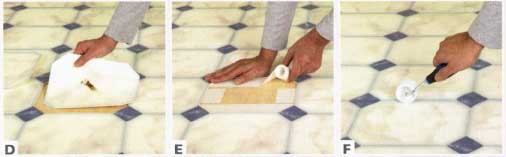
D. Remove both sections of vinyl. As you lift out the damaged section, the cut shape will be revealed underneath.
E. Apply double-sided tape around all the edges of the revealed section of floor.
F. Position the new vinyl section. Press down its edges, as well as those of the remaining old section. A seam roller is ideal for this.
REPLACING A BROKEN HARD TILE
Floor tiles can crack due to wear and tear, or through damage if a heavy object is dropped on them. Replacing a single tile is more cost- effective than retiling an entire floor. Wear goggles while drilling into the tile, in case any shards fly toward you. Wear gloves to protect your hands.
Tools, Materials and Supplies: Grout raker, drill, goggles, gloves, club hammer, cold chisel, scraper, level, tile adhesive, grout, grout shaper, sponge
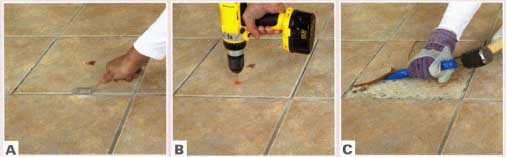
A. Remove grout from around the edge of the tile. A grout raker is ideal for this process.
B. Drill a series of holes into the broken tile. This breaks it up, making it easier to remove.
C. With a heavy hammer and cold chisel, remove the broken tile. It will come away in sections.
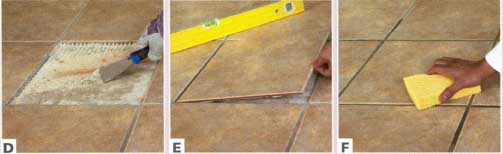
D. Scrape any hardened old adhesive off the floor surface revealed by the tile’s removal.
E. Apply adhesive to the back of the new tile and position it. Use a level to make sure it sits flush with the surrounding tiles.
F. Allow the adhesive to dry, then grout the new tile. Clean off any excess with a sponge.