|
The components of a room air conditioner are essentially the same as those of a central air-conditioning unit, except they’re contained in a compact box that can be mounted to a window or through a wall. Individual room units are less expensive to install in an existing home than a central system, especially if there is no ductwork. Because room air conditioners can be controlled on a room-by-room basis, they may also be more energy-efficient than a central system. Room air conditioners are labeled with an energy efficiency ratio (EER). The EER is calculated by dividing the unit’s capacity, in BTUs per hour, by the number of watts of electrical energy needed to run it. Efficient room units will have an EER of 9 or higher. |
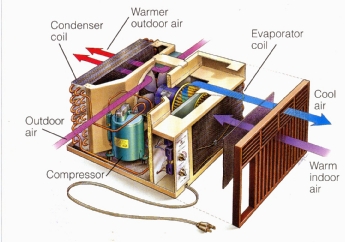 Above: How a room air conditioner works. Every air conditioner contains two coils, which are composed of panels of aluminum fins and loops of copper tubing. A compressor circulates refrigerant through both of the coils. One fan draws room air across the evaporator coil, where the air is cooled and dehumidified. Another fan blows outdoor air over the condenser coil, where the heat absorbed from the indoor air is ejected. A barrier with a door separates indoor air from outdoor air. |


Window InstallationWindow-mounted air conditioners work best with double-hung windows. Measure the window opening before purchasing a unit. Many units can't be removed from the casing, as shown below, and must be installed fully assembled. 1. Remove air conditioner from its casing. Slide the casing into the window opening and screw it into the sill and sash. The casing must tilt slightly toward the outdoors so condensate will drain away from window. 2. If casing extends more than 12 in. (30 cm) beyond the outside sill, it needs exterior bracing to sup port it. Fasten bracing to the wall and adjust the pitch with leveling screw. 3. Slide the air conditioner into its casing. Most units require two people to install. Seal around the casing and the gap between upper and lower sashes with foam rubber. Install expandable curtain for side gap. |
 |
Wall InstallationThe advantage of a wall unit is that you can choose an optimum location, preferably on an eastern or northern wall out of the heat of the sun. The disadvantage is it takes significantly more effort to install. 1. Outline the cutout on the exterior wall. Make the cutout 1/4 in. (3 mm) higher and wider than the air-conditioner casing. Nail a straightedge to the wall as a guide and saw through the sheathing and siding. From inside, cut back studs above and below the opening to make room for header, sill and jamb that will create the opening. 2. Frame air-conditioner opening as you would a window. Attach a header and sill to the existing wall frame and add 2x4 side jambs. Inside dimensions of the finished jamb are the same as those of the out side wall cutout. Jamb thickness is equal to stud width plus interior sheathing. Slip the jamb into the rough opening and fasten. 3. Install the unit using the same steps as for window units. Screw the casing into the finished jamb and slide the air conditioner into the casing. Always lift the air conditioner from the base pan on the bottom; never pull or lift from the plastic parts. Take care not to damage fins or electrical wiring. Seal around exterior and interior of the unit. Cover in winter. |
 |
Maintenance
The secret to room air-conditioner maintenance is simply good, regular cleaning. When an air conditioner doesn’t seem to cool well, most people assume the coolant needs recharging. But most often the culprit is dirt, a problem solved by cleaning the coils.
Room air conditioners, like central air conditioners, have two sets of coils. A coil is an arrangement of fins and tubes for efficient heat transfer. The condenser coil is on the outside and the evaporator coil is on the inside. Keeping these coils clean is 90 percent of the battle in keeping your air conditioner operating efficiently.
The most important maintenance steps are easy, but if this is the first time you’ve cleaned the unit, allow about half a day to pull things apart and put them back together. To clean it properly, you’ll have to remove the unit from its window or wall opening. Air conditioners can be very heavy, so recruit some help before you begin.
Unplug the unit and lift it from the opening. Remove the front cover and lift off the case, following your instruction manual, to expose the compressor, fan motor and evaporator coils. If you have a well-sealed wall unit, you may want to leave the casing in place and slide out the air conditioner to work on it.
Vacuum the fins: Vacuum evaporator fins with a soft brush attachment. The evaporator coils protected by a filter; replace it or wash and reuse the old one. |
 |
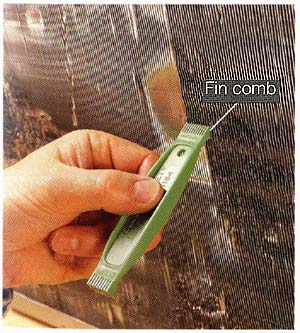
Straighten bent fins: Straighten bent fins. Fins are delicate and can easily bend when you handle the unit. Straighten bent fins with a special, inexpensive plastic fin comb to improve air circulation. You can use fin combs on outdoor units of central air conditioners, too. |
 |
Lubricate the motor: Lubricate the motor with five drops of electric-motor oil (oil made specifically for electric motors), if you can find oil ports. Check owner’s manual for specific lubrication instructions. Don’t apply too much oil—more isn't always better. |
 |
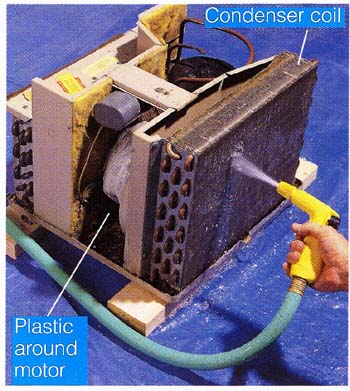
Wash condenser coil: Wash the condenser coil with a spray of water from outside inward. Cover the fan motor with plastic to keep it dry. Rinse and wipe up as much dirt and crud as possible from the bottom pan, making sure drain holes or overflows are open. |
 |
Split air conditioner
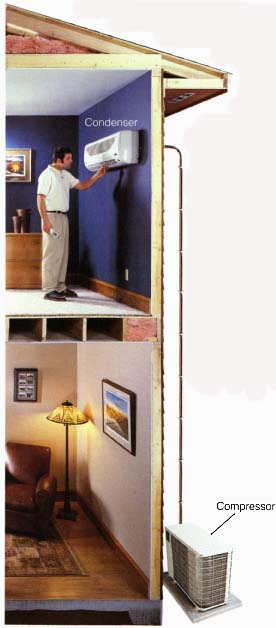
A split air conditioner is similar to a conventional window air conditioner except that its operations are split in half. The unit that contains the noisy compressor is usually on the ground outside the house. Refrigerant lines connect it to an indoor air handler, or condenser, that’s typically mounted to a wall or ceiling in the area you wish to cool. A very quiet fan blows room air over the cool coils to distribute the conditioned air.
