Home Climate: Whole-house Fans


Whole-house fans are an economical, energy-efficient alternative to air-conditioning. In some regions, it may be the only cooling mechanism you need; in others, it can shorten the length of time you need to run your air conditioner and save hundreds of dollars annually.

Capacity. Whole-house fans come in different sizes to accommodate different attic construction and house sizes. Increase the convenience by installing a timer or thermostat. Fans are sold according to their cubic feet per minute (CFM) capacity, which indicates how much air they move. Depending on the climate, you need a fan that will change the air in your house every two to three minutes. To determine the CFM requirement, take the total above- ground square footage and multiply it by three for moderate climates or four for warmer climates.

Location. For this type of fan to work effectively, install it in a central location on the upper level of the house; usually the hallway that leads to the bedrooms. Check for obstructions in the attic after you’ve determined the best location. In cold climates, make certain the units can be tightly sealed and insulated during heating season.

Operation. Use a whole-house fan only when the outside temperature is cooler than the inside temperature. To use it, shut off the air-conditioning and , in the rooms you want cooled, open the windows about 2 to 3 in. (5 to 7.5 cm) and block open the doors.

Caution: Don’t use the fan when windows are closed. This will cause interior air to be exhausted without being replaced with fresh outside air. When this happens, back-drafting can occur, which means deadly carbon monoxide fumes given off by water heaters and other gas-burning appliances may be drawn into your home rather than exhausted through their venting systems.

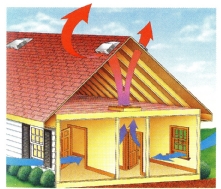
How attic fans cool.
Above: How attic fans cool. Attic fans cool by pulling cooler, outside air in through windows that are open by 2 to 3 in. (5 to 7.5 cm) and drawing the warm air in the house up into the attic. The warm air in the attic then exhausts under pressure through vents in the roof.

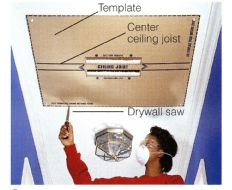
1. Locate center ceiling joist for fan location and cut out a slot on either side. Align and position template on center ceiling joist and, after checking for obstructions, cut completely around outer edge. Remove drywall.
1. Locate center ceiling joist for fan location and cut out a slot on either side. Align and position template on center ceiling joist and , after checking for obstructions, cut completely around outer edge. Remove drywall.

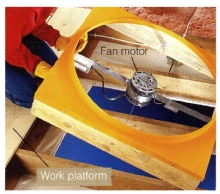
2. Position the fan by placing its motor over the center ceiling joist with fan edges aligned with the drywall cutout. Place plywood or lumber across joists for a comfortable work platform.

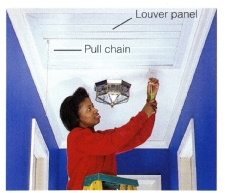
3. Mount the switch box to the ceiling joist. Run cable from a new circuit or nearby power source and make connections. The switch box may contain a pull chain for operation or you can install a wall switch.

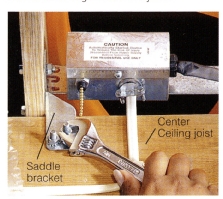
4. Secure saddle brackets to the center ceiling joist with nuts and bolts. Make sure the fan is centered before you drill holes in the joist.

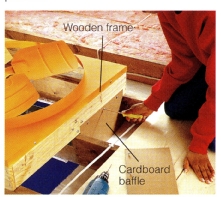
5. Fill the gap between the ceiling and fan frame with cardboard baffles; some manufacturers supply them. Cut baffles to fit between ceiling joists and screw the baffles to the fan frame. Cut insulation to fit up to the baffles.

6. Attach the louver panel to the ceiling with screws into the joist and drywall anchors into the drywall. Louvers are drawn upward when fan is turned on and weighted to shut tightly when the fan is off.


continued...


Shop for hand tools, power toools, hand tools and equipment.


Updated: Saturday, July 21, 2007 16:08 PST

saddle brackets Center ceiling joist