When it comes to working with the logs, most of us know little about it and have to start at the beginning. And because logs are the basis for log houses, it seems reasonable to investigate further. In fact, there are a good many things to discuss. This section will be of particular interest to do-it-yourselfers who want to start their log building projects at the point of origin, with the trees themselves. However, much of the information will also be needed by anyone planning to purchase raw or partly milled logs from a dealer.
WOOD CHARACTERISTICS
There are somewhere around 865 species of trees that are native to the portion of North America that lies north of Mexico. In addition, there are a number of other species that were imported from other countries years ago and have become naturalized, and there are many ornamental varieties. Obviously not all these species are suitable for log house building, or for that matter, any kind of log construction. There are many reasons for this. Some never grow tall enough, or big enough around to cut into a “log” much bigger than a walking stick. Many other species are in too short supply, or appear as widely scattered individual trees which would be difficult to gather in any quantity. Some grow gnarled and crooked and can’t be cut into straight logs, while others consist mostly of branches. But even after all these species are eliminated from the running, that still leaves several dozen others that can potentially be used for log construction. Of these, about two dozen are widely used. Most of them, fortunately, are common varieties in forest regions throughout the country, and have names familiar to those who work with wood. These species have differing characteristics.
Of the many characteristics, there are several of particular interest to the log builder. The species, as well as each individual tree used, must be of sufficient stature so that fairly long lengths of log of suitable diameter can be cut. Relative uniformity in length and roundness is important, as is a fairly gradual taper along the length of the log. The typical number of branches, their size, and the manner in which they branch is a factor. The trunk must be relatively straight, though minor imperfections, surface irregularities, and a slight degree of crookedness usually present no problems. In fact, these often add to the character of the pre pared log, and thus the building itself.
Besides the physical traits that are readily apparent, there are other qualities not visible to the eye that must be considered. Strength, the resistance to applied stress and strain, is one such factor. Wood is an elastic material; once the limits of elasticity are reached, the wood will fail in one way or another. The elasticity of various species can be determined by test, leading to a value of relative stiffness called the modulus of elasticity.
Further testing gives rise to strength values against the three principal forms of stress: compression, tensile, and shear. All these strengths are variable depending upon the particular species, and may be measured across or with the grain of the wood. Compression strength parallel to the grain is an important consideration for structural members like support columns. Perpendicular to the grain, it reflects resistance to crushing and deformation under load. Tension strength perpendicular to the grain indicates, for example, resistance to splitting and checking. Shear strength parallel to the grain reflects the resistance of the wood fibers to separate in a plane, as in a glue joint. A fourth property is the bending behavior of wood, and is crucial to structural design; this is usually denoted as the allowable bending stress value. These values allow calculation of deflection of a structural member under load-carrying capacity, stiffness, allowable spans, and various assessments of the mechanical performance of structural members.
Assessment and calculation of these strength properties of woods is a complex engineering subject well beyond the scope of this guide, and there is much yet to be discovered in this field. The point here for the would-be log house builder is that such factors must be taken into consideration in the design of the house.
If you are going to design your own house, you have two choices; the empirical approach, or the engineered approach. The first makes use of past experience in log building. Materials, techniques, procedures, beam spans and sizes, general designs, and construction details that have been successfully used for decades will continue to be successfully used in the future. All you have to do is find out what has worked before, and follow suit.
To use the engineered approach, you have four possibilities. First, study the subject thoroughly and do your own engineering—a difficult and lengthy process, and chancy. Second, make up your sketches and list your de sign ideas, then consult with a qualified architect or engineer and have them translated into a functional design. Third, make up the complete structural design yourself, then take it to a qualified architect or engineer and have all of the details checked for accuracy and modified as necessary. And last, have all of the engineering, and perhaps the design as well, done for you.
Why must all this engineering be done? So the completed structure will be safe, sturdy, and long-lived without a lot of problems, and also so that it will conform to building code regulations. For example, floor joists must be of a certain size, number, and unsupported length to hold up the weight imposed upon the floor. Roof members must withstand certain snow, wind, and dead-weight loads. Trusses must be properly designed if they are to hold up properly. Tie beams must be correctly figured and placed to withstand various stresses. The list could go on, but you get the idea.
Workability of a wood species is another significant factor, especially for a do-it yourselfer. Some woods work easily with cutting tools, other do not. Furthermore, some woods react well to certain kinds of cutting or shaping, and not to others. The greater the workability of the particular species of wood, the more easily the logs can be shaped and fitted to construct a house.
Different species also have different shrinkage characteristics. Some logs will shrink rapidly and to a considerable extent, while others might shrink slowly and to only a slight extent. For example, the volumetric shrinkage of most softwoods runs around 10 to 12 percent, from fully green to oven-dry (no moisture at all). Proper allowances usually have to be made for this factor during construction.
Logs also have a certain insulating value, and this varies from species to species (al though not markedly). Usually the thermal insulating value of wood is measured in terms of the R-factor or R-value per inch of thickness. Generally speaking, the lighter in weight the wood is, the greater its insulating value. The moisture content of the wood has a definite effect on insulating value, and the greater the moisture content the lower the value. Northern white cedar, for instance, is one of the lightest woods used for log construction, and at a 12 percent moisture content has an insulating R-factor of 1.41 per inch of thickness. Hickory, on the other hand, has an R-factor of only 0.71 per inch of thickness.
Some logs are more fireproof than others, though that might sound strange. In general, woods that have the best R-values because of a relatively low thermal conductivity rate also are more reluctant to burn and have a slow char penetration, and thus can resist fire penetration for a relatively longer time. Tests have shown that a 5 ½-inch-thick wall of northern white cedar will resist fire penetration for better than four hours. Most other species will not do as well.
The weight per cubic foot of the wood is important from a couple of standpoints. First and most obvious is that the heavier the logs are, the harder they will be to maneuver around and to erect into a log structure. For instance, the weight of western red cedar runs only about 23 pounds per cubic foot at a 12 percent moisture content. Beech, however, weighs about 45 pounds per cubic foot. It is apparent that the cedar will be easier to handle than the beech. In any case, if the logs have a high moisture content or are still green, right off the stump, the weight is far greater than the figures noted. Again, this varies according to the species, but the weight can easily be double or even more. The weight of the logs also is a factor in designing the foundation, which must hold up the en tire weight of the structure without buckling, cracking, or settling.
Resistance to decay and insect attack is an- other factor to consider. Some species naturally have a high resistance; decay cannot get a foot hold and insects are repelled because of the natural constituency of the wood. Redwood and cypress have an extremely high resistance, while birch and maple are at the opposite end of the scale. White birch left on the ground will rot away in one season. Redwood heartwood can be buried in the ground for years with few ill effects.
How does one decide, then, what should be used in log construction? Regardless of the final choice, a considerable amount of com promise is usually necessary. Any of the various woods used by commercial log home manufacturers are satisfactory—some are better in some ways than others. Another possibility is to check around your own area to see what readily available species have been used in the construction of log buildings. Whatever has been used in the past and has held up well can be used again to the same purpose.
If you plan to cut your own logs, you might find only one or two species locally available that fulfill the physical requirements appropriate for log construction. In fact, you can mix two or more species if you wish, and with proper care you can build a log house from virtually any species that will provide you with logs sizable enough to be suitable and work able. With one construction method, which will be discussed in Section 6, you can even use short chunks. A point for scratch-builders to keep in mind is that you might be able to get some good, solid information and advice on selection, cutting, tree thinning, reforestation, and like matters from the nearest U.S. Soil Conservation Service office and/or your state forestry department. Note too that permits for cutting cull trees on National Forest lands can sometimes be obtained through local Forest Service offices.
The conifers, or softwoods, are in greatest favor for log house construction at the present time. This is because they are the most readily available, usually the least expensive, and their uniformity, lightness, roundness, workability, and substantial size makes them easier to work with than most hardwoods. The inherent weakness of softwoods can be overcome by proper sizing, spacing, bracing, and other common construction practices.
Specifically, northern white cedar is per haps one of the best woods for log house construction. Western red cedar is also an excellent choice, and Douglas fir is strong and durable. Lodgepole pine is durable and easy to work and tamarack is also fine, though less workable. Englemann spruce is a reasonable choice but not as weatherable and workable as the others. Western hemlock can be used and so can eastern hemlock, though both are susceptible to decay and the latter is difficult to work. Balsam is a fine wood to work with but decays easily and doesn’t weather well, so is best used for interior work. White pine and red pine have built many a house. Among the deciduous trees, quaking aspen and yellow poplar (tulip tree) are about the easiest to work with, but the former has low decay resistance. Many other species, like locust, beech, yellow pine, red oak, and jack pine prove satisfactory. The table below shows the characteristics of several of the more commonly used species.
Table of Wood Characteristics:
Species |
Weight lbs/cu ft; 12% Moisture |
H-Factor Per Inch Thickness |
Shrinkage |
Decay Resistance |
Workability |
No. White Cedar East. Red Cedar West. Red Cedar Redwood Hemlock White Pine Ponderosa Pine Douglas Fir Tamarack Red Pine Yellow Pine Aspen Cottonwood White Birch White Oak Sugar Maple Beech |
22 33 23 28 28 25 28 34 36 34 38 26 26 34 47 44 45 |
1.41 1.03 1.09 1.00 1.16 1.32 1.16 0.99 0.93 1.04 0.91 1.22 1.23 0.90 0.75 0.80 0.79 |
Very low Very low Very low Very low Low Low Low Medium Medium Low Low Low Medium High Very high High Very high |
High High High High Low Medium Medium Medium Medium Low Medium Low Low Very low High Low Low |
Excellent Excellent Excellent Excellent Fair Excellent Excellent Fair Fair Excellent Hard Fair Fair Hard Hard Hard Hard |
LOG SELECTION
The first step in selecting logs is to figure out exactly what you are going to need to build the house with. The average log diameter is the first question. Log size is often, but not necessarily, scaled to building size; small logs for small structures, large logs for large buildings. The possible range is anywhere from about 6 inches to 20 inches or better, but 8 to 10 inches seems to be the most common choice, probably because this size range is most readily avail able, and also a good compromise for weight, ease of handling, and visual impact. The aver age log diameter for the house relates to the mean diameter of each log. A log of 10-inch diameter at the butt and 8-inch at the tip would have a mean diameter of 9 inches. If all the logs in the house were kept about to this size, the average would thus be 9 inches. Whatever the diameter chosen, all of the logs used for each different structural purpose should be about the same. There is an exception: occasionally a log house design calls for large wall logs at the bottom, gradually becoming smaller toward the top.
Next, if you’ve not already done so, decide whether you will lay up the walls of the house first and then cut in the window and door openings, or set the window and door bucks first and piece the logs to them (this is the way most kit houses are built). For scratch-building, the former method is usually considered the best, using as many full-length, wall-to-wall logs as possible (all of them, preferably). This results in a strong structure that goes up nicely, without a lot of fooling around with shorts, bracing, and props. But, a case can be made for the other method, too, especially if long logs are in short supply.
Figure out how many logs high the walls will be, according to the average diameter. If your plans call for 8-foot walls and you have decided on 8-inch-diameter logs, the stack will be 12 logs high. It is best to stay with an even number, by the way, because in most constructions this is the easiest way to obtain a level top row; the even-numbered rows level out the odd-numbered ones and there is no need for split-log fillers. You will also need to deter mine what other structural members will be fashioned from logs rather than dimension stock, such as partitions, floor joists, tie beams, support posts, girders, trusses, purlins, or rafters. The diameters and required lengths of these pieces must also be established.
Now you can make up your grocery list, a complete schedule of each and every log section you will need to put the whole house together, keyed and numbered (see Table of Typical Log Materials Keying, below). For example, the first log on the east wall might be EW-1, the second EW-2, a floor joist FJ-1, a purlin P-1, and so on. You will have to make up your own code, depending upon exactly what members are needed. Note the length of each log, allowing about 2 feet or more on each end for wall logs, and noting the diameters needed if different from the wall logs. Floor joists, for instance, need not necessarily be as thick as the wall logs, and can be spaced close or wide depending upon the diameter you finally settle upon. Other logs, such as the ridge pole, purlins, rafters, collar ties, and brace poles will be of various diameters. They can be just thick and long enough to fulfill their structural functions, or, as in the case of a visible ridge log and rafters, greatly oversized for dramatic impact.
Talley up the total number of logs needed for each different diameter. Make note of any logs that perhaps should have special characteristics, like an extra-massive and straight ridge log or particularly good sill or plate logs. If you will be using short lengths—as between a pair of windows set in as the walls are laid up—note the approximate diameter each piece should be at each end. Reference them against their position in the wall relative to the full length logs below them so that you will have an approximate diameter match and a consistent taper.
Table of Typical Log Materials Keying.
Walls—8” Diameter |
|
EW-1 to 3—18’ EW-4A to 9A—6’ EW-4B to 9B—3’ EW-4C to 9C—4’ EW-10 to 12—18’ SW-1 to 12—12’ SWW-1 to 12—7’ WW-1 to 3—18’
|
Main Floor Joists—8” MJ-1 to 22—12’ MJ-23 and 24—8’ Ell Floor Joists—7” EJ-1 to 8—8’ Main Roof Purlins—8” MP 1-8—24’ Ell Roof Purlins 6” EP-1 to 8—10’ |
There are two more items to add to your list. First, talley up the number of pieces you will need of each different diameter, and make a rough estimate of the number of trees you will need to fell of each diameter to fill your needs. You can base this on an estimate of the length of the full-length logs that can be obtained from your woodlot. And second, determine a maxi mum and a minimum butt-end circumference for each log diameter category, and make a note of it.
As an example, if your wall logs are to average 8 inches in diameter and you want a maximum taper of 3 inches for the full-length logs, the average butt diameter would be 9½ inches. Add to this an allowance for bark thickness, which depends upon the species of tree you will be cutting. If the bark happens to run about ¼ inch thick (all you can do is make an educated estimate), add ½ inch for the bark. Clearly, not all the trees that you select will be exactly 10 inches in diameter at the butt, so it is best to settle upon a diameter range that will be workable, say, plus or minus 1 inch. Then translate these maximum and minimum diameters, including bark, into the tree trunk circumference sizes that you will need to look for. Multiply 9 and 11 inches (to follow this example) by 3.1416. Thus, you would select trees between about 28¼ inches and 34½ inches in diameter. The measurement should always be taken at about waist height, not down near the ground where you will likely be cutting, or where the trunk flares outward as it reaches the root system.
Once you have made up a complete list of all your requirements you can take tape mea sure in hand and amble out into the woods to begin searching. Select the straightest, truest trees of your chosen species that you can find, and be picky about it. The less taper the better—strive for about 2 inches from butt to tip of the longest lengths you need. Not 2 inches for an entire log, necessarily, because while some trees might only yield one working log, others can be cut into two or more. The fewer branches the better, because this reduces felling problems, limbing labor, and peeling time.
Check each tree for straightness by standing well away—100 feet if you can manage it— and eyeballing the trunk, then move off to a 90-degree angle and do it again. If the tree looks good, move up to it and sight directly up the bole into the branches. If the tree is indeed straight, that fact will be apparent. Check also for obvious defect: splits, lightning damage, growths, or anything that might affect usefulness. Avoid trees with spiral grain (an obvious barber-pole effect) at all costs, because they are nothing but trouble.
As you search, bypass problem trees and select only those that can be felled with a mini mum of difficulty. You can always come back to them later if you run short of prime choices. Trees that lean beyond just two or three degrees from the vertical can be troublesome, for example. Avoid any that do not have a relatively clear felling path and might get hung up in the branches of other trees while falling. Trees that grow out of the ground at an angle and curve upward contain reaction wood and will be very difficult to cut and to work. Those that grow out of ledges or rock piles, or are located on steep slopes, are more trouble to fell than they are usually worth. In short, pick only the easy ones, unless forced to do otherwise by a short supply.
As you find each tree that seems suitable, measure its diameter at about waist height. If it falls within your diameter range, wrap a length of brightly colored plastic survey tape (available at any lumberyard) around it and go on to the next possibility. Work your way through your list of requirements, keeping track of the numbers and ticking off each category when you feel you have just about filled it. It is a good idea to write on the survey tape with an idelible marker what purpose you had in mind for the tree. When your initial selection is pretty much complete, you can come back and start felling them. After the trees have been felled, the process of selection continues. The logs have to be cut into lengths and keyed to your materials list. This will be discussed later in this section.
If you will not be cutting your own logs but instead buying them from a log supplier or directly from a mill, you will still need your list of requirements. In fact, you might want to refine it even more so that everything is clearly spelled out in the way of sizes. If possible, get permission to make the selection of logs your self, with the help of the supplier. Failing that, request that you be allowed to inspect all the logs chosen for you before or as they are loaded at the shipping point, with the right of refusal for any inferior or incorrect pieces. The criteria to apply in selecting or inspecting purchased logs are just the same as for those you would cut yourself. In addition, though, you will need to look carefully for cracks, splits, checks, mechanical damage, structural defects or weak nesses in each log. There’s no point in paying for logs that you can’t or won’t use. But it is also a good idea to include a few extra logs in your order, against whatever circumstances might arise later on.
FELLING TREES
If you think that hacking down trees is an easy job, think again. It requires care, caution, physical exertion, and, above all, thought. Expert tree felling is a craft that requires the development of skill and judgment. A good woods man or a professional logger can make everything look easy, but that comes from experience. A beginner who has never taken a tree down is well advised to start in on some thing besides those trees that have been singled out for use in the log house. (In fact, you could hire a professional to do all the felling, if you are wary of it.) Select a few small trees around the place that need to be culled out. Practice on these and trim them for later use as fence posts or deck railings, or buck them up and stack them to cure for firewood.
There are three ways you can cut down a tree. The traditional method is with an axe, and exactly which type you use of the several avail able is mostly a matter of personal preference. There are various combinations of head styles, weights, and handle configurations from which to choose. Select a single-bitted axe in the interest of safety and convenience, and leave the big double-bitted jobs to the loggers. For felling, a substantial head weight of 4 pounds or perhaps a bit more is good. The handle should be straight-grained and clear hickory with no knots or blemishes, no paint or varnish, and no warps or crookedness. A length of from 26 to 30 inches is about right, depending upon your reach. The same axe can be used for limbing, though many prefer a somewhat lighter model, around a 3-pound head with the same handle length.
The second method of felling uses an axe in combination with a saw. For working alone, choose a pulp saw or a one-man timber saw. The two-man timber saw, which is available in several lengths and blade widths, is easier and faster to use—provided you can talk someone into manning the opposite handle. A narrow blade is best for felling, a wide one for bucking. Saws of this sort can often be bought used if you happen to live in timbering country, or can be purchased new through various tool supply houses. Either way, they are not terribly expensive.
The third and most favored method of felling is by chainsaw. There are many brands currently available, and choosing one is not a difficult matter. Price is a consideration, of course, and so is readily available service. Stay away from the production and gear-driven types, which are heavy and intended primarily for constant-duty, commercial production work. Choose a name brand, direct-drive saw of relatively light weight.
The power of a chainsaw is dependent in large measure on the engine displacement in cubic inches. A small saw has a displacement of about 1.5 cubic inches, ranging up to 9 cubic inches or more for the monsters. For general all-around work a displacement of about 3 or 4 inches is usually sufficient, and a saw of this size is fairly easy to handle.
The size of the guide bar, around which the cutting chain runs, can be matched to the size of the timber you plan to cut. Choose a bar that is a few inches longer than the greatest diameter, at cutting height, of the trees you plan to tackle. Thus, a 16-inch bar is more than adequate for taking down 12-inch trees. And al though a 16-inch bar will cut through a 32-inch-diameter or even larger log on the ground by making two or more cuts, felling is best done with one continuous cut. Incidentally, most chainsaw dealers are willing to give you a demonstration plus a couple of quick les Sons in proper saw care and handling, which is well worth the time spent.
About the only other tools you will need for felling trees, besides sharpening equipment for your saw and axe (which should be kept very sharp at all times) are a couple of wedges. These are used in two ways: to help control the direction of the fall of a tree, and to keep the saw blade from binding in the cut. Wedges are mighty handy to have around, even if you are doing the whole job with an axe. The most common variety of wedge is steel. These are fine for use with axes or handsaws, but they should never be set in the same cut as a chain- saw, because of the possibility of the chain touching the wedge and being ruined in a fraction of a second. And chains are expensive. Plastic or hardwood wedges are best used with a chainsaw, and they are also available in aluminum and magnesium. The usual practice in setting wedges is t6 tap them into place with the back of an axe head, but you can use a small hand sledge if you wish.
There has always been some argument about the best time of year for cutting house logs. From some standpoints the best time is winter. This is the easiest time on both logs and loggers. Tree felling is hot, hard work in the best of circumstances, so working when the temperature is down is more pleasant. Also, you won’t have to fight with black flies, mosquitoes, and other bothersome critters. More to the point is that there is little sap up in the trees, which makes for better curing when the logs are cribbed. Also, a snow cover acts as a protective cushion for the logs when they fall. Skidding the logs out is often easier on a frozen track, and the logs handle better and stay cleaner. On the other hand, there is the difficulty of getting around in deep snow, the possibility of too much cold, and the dangers presented by ice on logs or underfoot. Also, felling frozen trees can sometimes be tricky.
Late fall is a good time for felling. There is little sap activity at this time, though more than in the winter, so the logs will cure nicely and the cutting presents no problems out of the ordinary. This makes for a good time schedule, too, because the logs have time to cure fairly well in the 6 or 7 months before they are needed for summer construction.
Late summer or early fall works out reasonably well, too. Spring and early summer cutting is the best as far as the logs are concerned if you plan to peel them. This is when the job is most easily done, but only if they are peeled almost immediately after cutting. Other wise the bark dries and shrinks, adhering tightly to the wood and making it more difficult to remove. And, immediate bark removal is itself an arguable proposition; some builders prefer to leave it on for slower curing and protection of the wood. For the logger, spring cut ting tends to be miserable. There might be rotten snow, rain, soft ground or mud, and in sects to contend with. Skidding, as well as general working conditions, might be difficult. In addition, spring-cut logs, depending upon the species, have a higher susceptibility to in sect and fungus attack, and might be more likely to split, check, and crack as they dry.
Now, how does one actually go about the business of felling a tree? The first thing to do is check the lie of the tree. A tree is extremely heavy, often with a large percentage of the weight toward the top (depending upon the species and the season of the year). Many trees are impressively top-heavy, in fact, and invariably a tree leans in one direction or another, even if only slightly. By checking the lean and noting the conformation of the treetop to get an idea of about where the top-heavy weight lies, you can get a good indication of the direction in which the tree should naturally fall. Note that some trees also tend to be side-heavy, which can add to the fun.
Next, check the path of the fall and the area where the tree will land. The felling pathway and drop area should be clear, with no other trees or branches to interfere seriously, and no great boulders or a tangle of deadfall that might hinder the fall, hang the tree up, or smash the trunk when it hits the ground. Remember that these logs will be used for both structural and architectural purposes, so you don’t want them gouged and bashed and beat up. It is very easy to break a tree’s back or weaken the log with splits by felling it across another log or a big rock.
The natural fall line of a tree might be ideally clear, in which case you can go right to work. But more often than not there are other trees or ground obstructions in the way. Some times obstructions can be cleared away and interfering trees limbed or trimmed out completely to make a clear path. If this can’t be done, the felling chore becomes trickier, be cause you have to redirect the natural lean of the tree so that it will drop in a more suitable direction.
Redirecting is not a job for a beginner, and often as not the best course is to leave the tree and select another. The possibilities of a “hanger,” a tree that gets tangled up and comes to a halt halfway through its descent, is to be avoided. They’re difficult and dangerous to work with, and should be left alone or taken down by a professional.
Another factor to keep in mind as you are making your felling calculations is the wind. The branches of a tree act as a sail to catch wind currents, and the pressure exerted in total from even a light breeze, even if there are no leaves on the tree, is amazing. It can create foul-ups that can be extremely dangerous. Moral: Don’t try to fell trees on a breezy, much less windy, day.
Once you have settled upon what you feel is the proper fall line, clear away the area where you will be working. Lop off any brush, kick dead branches out of the way, and make sure you have good, solid footing and a stumble-free working spot. Then choose your own path of retreat. This is extremely important, because when the tree starts to topple, you will want to get out of the way quickly, and you’ll need to know ahead of time exactly where to head.
Never pick a route toward the fall line direction, nor directly opposite and away from the fall line. Always move to left or right of the fall line and somewhat back and away. Pick a clear path that will move you out at least several feet, with no obstacles to trip over. Remember, the tree might go straight forward and fall just as planned, but it might also twist to one side or the other, or the butt could spring off the stump and be driven several feet back toward you. A falling tree is as unpredictable as a grumpy brown bear, so don’t take any chances. And an eye peeled for widow- makers, those loose dead branches balanced in the limbs above just waiting to come crashing down at the slightest vibration.
If you are felling standing deadwood, either for use or just to clear out a felling path, all the foregoing applies, plus some additional points. Deadwood in good condition can be very hard. This makes cutting with an axe difficult, so beware of glancing blows and keep the axe as sharp as you can get it. On the other hand, deadwood often saws more easily than green. Deadwood might also be weak, punky, or pithy, and so react peculiarly when being felled. There is a constant danger of weak or rotted limbs, or even a whole tip, crashing down on you. Also, deadwood can be brittle and prone to splitting or cracking, even breaking in half, when felled. A clean, clear bed must be made for the tree to fall onto.
With all these details sorted out, you can begin work. The first cut in the tree is called the undercut and is made on the side of the tree toward the fall line, and at a right angle to the fall line. Start the cut at a comfortable working height above the ground, below your marking tape. Make a flat-bottomed and wide-mouthed notch that extends approximately a third of the way through the bole (Fig. 3-1).
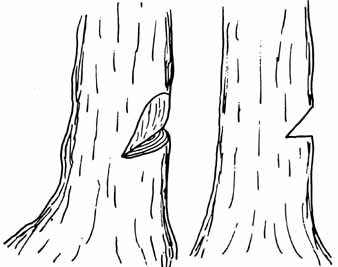
Fig. 3-1: The first step in felling a tree is making
the undercut.
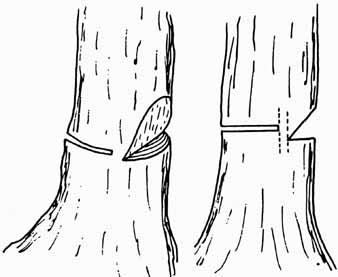
Fig. 3-2: The second step in felling a tree is making
the backcut, leaving the hinge (dotted lines).
The second cut is called the backcut, and is made on the opposite side of the tree and parallel with the undercut, but from 1 to 2 inches higher (Fig. 3-2). Some loggers choose to start a bit higher and slant the cut slightly down ward. Continue this cut until you get within about an inch or so of the undercut, or a couple of inches or more if you are working a big tree that leans. It never hurts, too, to stop be fore you get to this point and listen to the tree talking to you (shut off your chainsaw if necessary). A lot of creaks and groans and pops might mean she’ll keel over sooner than you expected, or could be heralding a twister or a kicker: beware.
In any event, the narrow strip of wood left between the two cuts is called the hinge. It should be about the same thickness all across the bole, and theoretically should help guide the tree in its fall until it finally breaks apart. If, some way into the cut, the saw blade begins to bog down and bind, tap a wedge into place with the saw still resting in the cut. Drive the wedge just far enough to free up the blade, no more. On many trees, especially if you have correctly assessed the lean and the natural fall line, this will not be necessary because the saw cut will open of itself.
As you approach the point of making the hinge, slow the cutting down and watch the width of the saw cut, meanwhile keeping alert for any movement and/or splitting, cracking sounds. Continue cutting slowly, keeping a sharp eye and keen ear. The tree might give you warning, but it might also just suddenly start to fall. The instant the cut begins to open rapidly and the tree begins to lean, snatch the saw-blade out. Forget about the wedges, they’ll fall out. If the sawblade suddenly binds and you can’t jerk it free on the first tug, you’ve probably got a twister—forget about the saw too. Just get yourself clear away, down your escape route.
If, despite your best intentions, you end up with a hanger, your best bet is to just let it hang unless you are well experienced in felling. Or, you can have a pro finish the job, if it happens to be a choice log. A tree that has gotten tangled and bound up halfway through its descent contains a tremendous amount of unreleased energy. It might spring loose at the slightest touch, or it might not. Somewhere in the tangle there probably will be a few key branches that are holding up the works. Determining which is which is difficult and always chancy, and many a logger has gotten seriously hurt by making a wrong choice.
LIMBING TREES
Once the tree is on the ground, the next chore is limbing and topping. This can be done with either an axe or a saw; you can use a chainsaw, too, but this leaves a ragged cut that you will probably want to hew smooth and flush later. Trim the branches close to the trunk so that no protruding stubs are left, and work carefully so as not to gouge the trunk. When using an axe, cut with the lie of the branch, from the bottom through to the top. Beware of glancing blows that can catch you in the legs. Saw cuts can be made in either direction. Large branches are often best cut from side to side, with an under cut made on one side followed by a topcut on the opposite side (Fig. 3-3).
Start at the butt end of the log and trim off all the branches that are free and accessible. Trim the log clear to the point where the diameter is down to 3 or 4 inches or so. Cut the remaining tip off and drag it out of the way.
Then go back and tackle the branches that are caught up under the log and are under pres sure. The best approach is to roll the log until a branch frees up, cut it off, roll the log some more, and so on, but sometimes this is impossible or not convenient, if you have to cut a branch under pressure, watch out that it doesn’t snap back at you or release the log onto your foot. Make a topcut first, about halfway through the branch, followed by an undercut from below (Fig. 3-4).
Finish trimming to the tip, then go back down the log to the point of least usable diameter, and lop the tip off the log. The tips can eventually be bucked up for firewood, or per haps used in porch railings or furniture. Stack the branches into small windrow slashpiles to provide habitat for small wildlife and help pro mote forest floor growth.
There is no question at all that felling trees is a dangerous occupation, and safety precautions deserve stressing. Perhaps the most important point is to think safety and always be on the defensive. Plan ahead, be alert, observe the basic safety rules, and use the appropriate safety gear when working with cutting tools. Always wear a hard hat. Safety goggles are not necessary when you use a handsaw, but re a good idea when using an axe and mandatory with a chainsaw. Hearing protectors should be worn when you use a chainsaw, too, to lessen the constant drone of the saw and to minimize the very real potential damage to your hearing. Heavy leather gauntlet gloves are a good idea, and so are steel-toed work boots. Watch out for dangling scarves, unbuttoned shirt sleeves or jackets, and baggy clothing that might get caught up.
Axes must be kept as sharp as you can get them with file and stone; there are few hand implements more dangerous than a dull axe. Chainsaw chains must also be kept sharp and frequently touched up, so that they will not bind and kick back. Check the chain tension often, too, to minimize the danger of throwing a chain off the bar, and discard any chain that is worn way down or doesn’t cut properly.
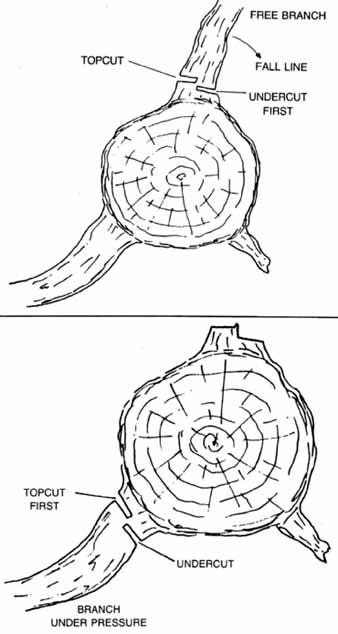
Fig. 3-3. A method of trimming a tree and unobstructed
limb from a felled tree; Fig. 3-4. Use this method to trim
a limb under pressure from the felled tree.
Handle fuel safely; shut the chainsaw off when not in use. When using an axe, always check behind you to see that there is nothing there to interfere with your backswing. Keep axes sheathed and all cutting tools set well aside when not being used, where they can’t be bumped against or fallen upon. And finally, never go felling alone. Always have a companion with you, even if only for the company.
BUCKING LOGS
With the trees felled and limbed, you have a choice to make. You can cut the logs—buck them—into the required lengths where they lie, before skidding and yarding them, or you can haul the full-length logs into the yarding area and buck them there. The former course is easier in that the logs to be skidded are shorter and lighter, and the possibility of damage during skidding is lessened. On the other hand, the bucking operation might be easier on a cleared, level spot in the yarding area where you can easily set up some props to hold the logs steady and give you a clear cutting line.
If you buck on the felling site, take your materials list along with you and coordinate the notes you made on the log survey tape with the list. Cut each log into appropriate lengths ac cording to your needs for each kind of component—wall, joist, rafter, purlin, and so on. As you buck each piece, write on the butt end with a lumber crayon the key for each (EW-1, J-1, R-1) and check it off your list. Make sure you have matching logs for opposite walls; East Wall 1, for example, should be about the same size as West Wall 1. If you run short of logs before you fill your requirements, search out a few more trees to fell; having an extra or two is not a bad idea, either, in case one or two get damaged later or show some hidden defects.
The process for bucking after you skid the full-length logs into the yard is much the same. However, first transfer your notes from the survey tape to the butt of each log before you skid them, so you’ll know what you had in mind for it. Then make your selections for the individual pieces and buck the logs up. Which ever system you choose, the piece selection should be done with thought, so that you make maximum use of the logs and at the same time come up with good, usable pieces of the right diameters at both ends and the taper you want. Most likely, the pieces cut from each log will have different purposes; a girder plus a wall log from one, a wall log and a rafter from another, a rafter and a porch support post from a third, and so on. There will be bits and pieces left over, which will serve nicely for stovewood for the next winter or so.

Fig. 3-5. A log schedule and bucking chart like
this one helps get the most out of the logs.
One approach to this process is to make up a bucking chart. Inventory all your logs first, noting the usable butt and tip diameters and length of each. Then, before doing any cutting, balance the inventory against your materials list, inspect the logs as necessary, and decide for which purposes each can best be cut. As they are, note each on a log schedule like the one in Fig. 3-5. As you buck each piece, write the key on it with a lumber crayon.
Bucking the logs can sometimes be tricky, especially if done at the felling site where the log will probably have uneven support. The best bet is to move the log around if you can, so that you have a clear cutting line and proper support under the log so that the saw won’t bind or the pieces jump apart or splinter off at the bottom of the cut. If some binding does occur, just tap a wedge into the bottom of the cut.
Ideally, there should be equal support under the log immediately to each side of the cut and toward each end of each section (Fig. 3-6), but this is not always possible. If the log is held up at one end, undercut about a third of the way through and then finish with a top- cut (Fig. 3-7). If the log is supported at both ends, topcut to about one-third the diameter of the log and finish off with an undercut (Fig. 3-8). Always stand on the uphill side of the log, and expect the cut pieces to do the unexpected. They might grab the saw, or roll, jump, or snap back at you. Be ready. You can avoid all this by bucking in the yard, by rolling the logs onto chunks of scrap log or dimension timber placed to support the pieces evenly and give you good ground clearance beneath the cut line. Then you can buzz right down through the log, top to bottom, in one pass.

Fig. 3-6. Bucking logs is most easily done when there are four supports
for the log.

Fig. 3-7. Use this bucking method when the log is propped up at only
one end.
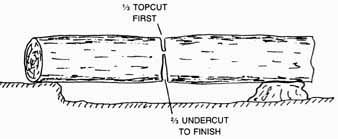
Fig. 3-8. Cutting sequence for bucking a log supported only at the
ends.
YARDING LOGS
Whether you buck in the field or at the storage area, the logs must be yarded. Or if you prefer, twitched. Or hauled. No matter the term, the idea is to transport the logs out of the woods and to a storage area, which is best located directly adjacent to the building site. The closer the better, because this reduces the amount of handling necessary.
There are a number of ways to tackle this chore. One is to skid the logs out one by one with a horse providing the pulling power. This is the traditional method called twitching, and even in this mechanized age it is still used quite a bit. The logs are grabbed with a stout rope or chain, or grapple hooks or log tongs are attached to the horse’s harness, and the logs are pulled out over the easiest and most convenient path. This method has the advantage of being simple and inexpensive, particularly effective in snowy woods, and doesn’t require building any roads. It is easy on logs when they are pulled on snow, low vegetation, or even mud, and causes a minimum of disturbance to the forest. An experienced skidder with a good twitch horse can also snake logs out of spots that are impossible to reach with machinery. Of course, for this purpose you have to have a good twitch horse and know how to handle it, not a common circumstance these days.
A more practical possibility is to pull the logs out singly with a small machine. If the logs are not too large even a big garden tractor, or a three- or four-wheel all-terrain vehicle can often do the job.
Yet another alternative is to pull them out in twos or threes on a skidding pan or a yarding sled. The butt ends of the logs are secured to the sled or pan with chains or ropes, while the tip ends drag on the ground. Motive power can be provided by a horse, but for most operations a tractor, pickup truck, or fairly heavy four-wheel-drive vehicle of any sort is more practical.
After the large logs are yarded, small logs or short lengths can simply be muscled into a pickup truck and carted away. Obviously this situation requires at least a rudimentary track suitable for vehicles, and can be tough on both the woodlot floor and the vehicle if not done with care.
If the logs are close to a reasonably decent tote road, or can be worked into a few piles that are accessible by large truck, the fastest and easiest method of bringing in logs—especially if the felling location is remote from the building site—is to hire a self-loading logging truck and an operator for a few hours. The truck can drive right to the stacks, or perhaps even to the individual logs, pluck them up with its boom- mounted loading tongs, stack them on the back of the truck, and be gone in a mailer of minutes.
When the logs are unloaded, they can be set down with no fuss and no strain exactly in the desired positions for curing.
CRIBBING AND CURING LOGS
There are two schools of thought regarding the proper curing of logs for house construction. One maintains that logs should be cured for a minimum of 6 months before they are used, the other that logs are best put to work right off the stump while they are still green. There’s some thing to be said for both sides; both methods work if done just right.
When a tree is cut the wood will eventually season, regardless. There’s no way to keep a log green. But the object is to assist the seasoning process so that the end result is most beneficial to the builder. In the cure-before- using method, the logs must be cribbed to allow them to season properly. Choose some fairly level patches of ground and lay out a series of skids, which could be small logs, chunks of old beams, or anything else that happens to be handy. Arrange your logs on these skids, butts at one end and tips at the other, and spaced at least 3 or 4 inches apart (Fig. 3-9).
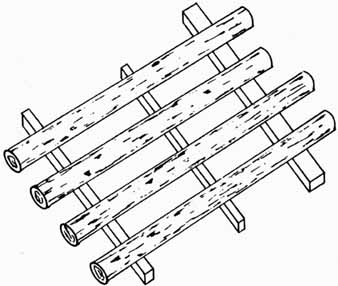
Fig. 3-9. A single layer of logs cribbed on skids allows effective
curing and easy handling.
The entire row of logs should rest at least 6 inches above the ground, with no brush or debris below them. The idea is to allow full air circulation completely around all the logs except where they rest directly on the skids. There should also be enough skids beneath the logs so that the spans are quite short and the logs will not sag.
If space is short in the yard, you can arrange another layer of logs parallel to the first and set upon stickers (cross-sticks), a third layer on top of that, and so forth. Cover the top layer of logs with a screen of evergreen branches or brush to break the sunlight. Or, you can build a temporary shed roof on poles over the cribs. Plastic sheeting or a tarpaulin should be suspended well above the top layer of logs and never draped directly over them, so as to maintain a good air flow and eliminate condensation. Leave the logs cribbed up for at least 6 months and preferably longer before putting them to work.
If you have room, there is a better arrangement. Lay all the logs out on skids in a single layer, rather than cribbing them. Cover the logs in some protective fashion, allowing for plenty of air movement. About once a week turn all the logs 90 degrees from their previous position. This will minimize the possibility of their taking a set and warping unduly in one direction or another.
In either case, the rapidity of seasoning depends to some extent upon the weather, and the average relative humidity at the curing site. Curing proceeds relatively slowly during cold, damp winter months, much faster during hot, dry weather. Most of the drying takes place during the first two or three months of storage, depending upon air temperature and movement, humidity, the species of wood, and whether or not the logs have been peeled be fore cribbing. Until the wood reaches a level of approximately 28-percent moisture content—the average fiber saturation point for most woods—no shrinking takes place. After two or three months the free water contained within the cell cavities in the wood will have largely disappeared, and moisture absorbed in the cell walls begins to evaporate. Then shrink age begins and can theoretically continue down to zero-percent moisture content (but this level can only be reached by forced oven-drying, done only for testing and research purposes).
A further curing period beyond three months or so will usually bring the moisture content down to around 15 percent, and the level will eventually go lower than that in hot, arid climates. Thus, if the logs are properly air cured for a fairly lengthy period, most or per haps all of the initial shrinkage will already have taken place by the time construction be gins. They will never, however, dry out completely. Regardless of how it is dried, any wood will eventually reach and maintain an equilibrium moisture content (EMC), a condition where a certain amount of bound moisture within the wood stays at a variable level in balance with the surrounding air temperature and relative humidity. As those factors change, so does the EMC. Thus, the wood never reaches complete dimensional stability; there is always some degree of shrinking and swelling going on.
Advocates of building with green logs have one argument in particular against cribbing logs and letting them season for a long time. They contend that this allows the logs a chance to take a firm set, depending upon how and where they were stacked in the crib, how often they were turned if at all, how much weight rested on them and so on. It’s a valid point. Also, green logs are somewhat more limber, so slight curves can be pulled straight or a particular log can be more easily aligned with its neighbors despite some slight deformities. Cured logs, on the other hand, do take a set and are less easily aligned, especially if they hap pen to be short and thick. Hence the reason for not stacking them high and turning them frequently.
There are some other advantages to green log building, too, Peeling is easier, notching and cutting is easier, spiking is easier, the likelihood of splitting is reduced. Also, when the joints are cut and the logs fitted green, they will shrink and lock into place with one an other, if properly managed. And, of course, there is no waiting period for curing before construction can begin.
To build with green logs the method is to cut and fit them in the usual manner. Some builders do not compensate for the shrink factor, but spike everything together thoroughly. Other builders do compensate, using techniques that will be explained in later sections of this guide. Most builders, including nearly all kit log house manufacturers, feel that shrinkage compensation techniques should be used at least to some degree in any log structure.
One method that is often used in green-log building is to assemble only the walls and the framing members. The whole affair, minus doors, windows, flooring, roofing, and all other appurtenances, is left to stand as is and open to the weather for several months for seasoning. By then, most of the shrinkage has taken place, and the remainder of the construction can go ahead. Even at that, there is likely to be further shrinkage and settling by the time the job is finished.
One further note: There is good reason to believe that the optimum seasoning of logs takes a minimum of two years, depending upon species and conditions. Many professional woodworkers believe that proper curing should be done over a period of three years, longer if possible. You will probably want to com promise.
PEELING LOGS
Log houses can be made from peeled logs— that is, with most or all of the bark removed— or with unpeeled logs. Peeled logs are usually preferred for several reasons. First, the bark is the least durable and weather-resistant part of the log. Bark simply does not stand up well, especially under continued exposure to the elements. Second, bark is particularly susceptible to retaining moisture and harboring insects, both of which can lead to structural damage of the wood from fungus, decay, and insect at tack. Third, bark left on a log eventually separates from the wood, usually in a patch work of chunks and strips, and most of it will eventually fall off anyway. This might take several years, but in the meantime the logs take on a shabby and scruffy appearance. There is no adequate way, even on interior log faces, to seal or otherwise treat the bark of most species so that it will remain on the logs, or pre sent a decent, finished appearance. Also, effective chinking and sealing off between the wall logs is almost impossible. Last, peeled logs are generally easier to handle and to work with, especially when it comes to marking and scribing them for measurements and saw cuts.
On the other hand, logs with the bark left on do have a more natural appearance, at least for a while. Also, a great deal of time and labor is saved by not bothering with peeling. It’s reasonable to decide that, because the bark is probably going to fall off anyway, there isn’t much point in bothering—Reasonable, that is, if you don’t mind the shabby appearance for a while, and provided you don’t mind running the risk of fungus, rot, insect attack, and wind whistling through the loose chinking. Of course, all of these conditions are of less con sequence in hot, arid climates than cold, damp ones. Unpeeled logs are employed only on log houses built from scratch, and often with logs that have been sawn flat on two or three faces (bark outside, or outside and inside).
Spring-cut logs are easiest to peel, especially if they are tackled right after cutting. However, as noted earlier, there are some draw backs to spring cutting that can outweigh the advantage of easy peeling. Logs cut in other seasons will peel harder, but season better. All things considered, the best combination seems to be early-winter cutting and spring peeling, but that’s a matter of opinion, and often opportunity as well.
If the logs are to be seasoned for a considerable length of time, don’t peel them until just before they will be used. As long as the logs are well protected from the weather, are checked occasionally for excessive moisture (condensation, storms) and for rampant insect attack or fungus growth, and are turned regularly, the bark provides excellent protection for the seasoning wood. This helps to eliminate mildew, weathering, darkening of the wood, and mechanical damage. Some staining might occur or a few bark beetles take up residence, but by and large this causes no problems and could even add a bit of extra character to the wood. Peeling is no more difficult because of the time lapse, and in fact might be somewhat easier depending upon the tree species (the bark tightens at first, but then begins to separate from the wood).
The peeling process involves a combination of two tools: a peeling spud and a drawknife. Peeling spuds come in a number of forms, and can be bought from a logging sup ply house, or sometimes picked up at an auction or in secondhand shops. You can also cobble one up yourself by sharpening one end of an old car spring leaf; by cutting down, reshaping, and sharpening the end of a curved garden spade; or by attaching an oversized handle to a large (2-inch or bigger) carpenter’s slick or wood chisel. Drawknives are readily avail able through woodworking tool supply houses, and are also common second-hand.
To peel a log, first secure it in a position where you can work on it comfortably. Prop one end up well off the ground on a short, notched chunk of log so that it is firmly set. A log dog, which is just a length of heavy steel bar turned down at each end into a pointed hook (Fig. 3-10) can be driven into the log and the chunk to further stabilize it. Or better, roll the log up onto a pair of narrow, very stout saw- horses and lock it in place at stand-up working height. Attack the bark with the peeling spud, paring off large chunks, but take care to gouge the wood as little as possible. After taking off most of the bark, finish up by shaving with a drawknife. (With some species, the bark is thin enough that the whole job can be just as easily done with the knife alone).
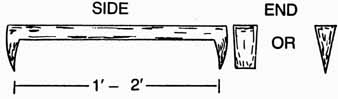
Fig. 3-10. A log dog like this can be easily made from steel bar
stock.
You can leave traces of the cambium and inner bark if you wish, for visual effect, and the overall result is a characteristic hand-finished appearance. Place the peeled logs in stacks or back in the crib, and protect them from dam age or dirt and mud. Stains of any sort are difficult and time-consuming to remove later on, and they always seem to end up in the most visible places.
PRESERVATIVE TREATMENTS
Despite the fact that some woods, like the cedars, redwood, cypress, and black locust, have a natural resistance to fungus, rot, and insect attack, all logs used in house construction are best treated with a preservative. The naturally resistant woods only remain so for 20 years or so, far less than the expected life of a well-built house. True, probably far more log structures have been built without the benefit of preservatives than with, but that doesn’t alter the fact that preservatives add measurably to the longevity of a structure, as well as reducing repair and maintenance work. Even though this is an added step that involves some problems and extra work, it should be considered necessary.
The biggest problem with preservatives lies in adequately penetrating through the surface of the log and deep into the wood fibers. Treatment under great pressure is the system used commercially, but is obviously out of the reach of the do-it-yourselfer. Alternate hot and cold baths in conjunction with steam heating are effective, but also unavailable to do-it yourselfers.
The next best method is a cold soak in preservative, and this can be done on-site and with a minimum of equipment. All that is needed is a tank or trough of sufficient size to hold the largest logs on hand. A soak tank can be made from old 55-gallon drums. Cut them in half lengthwise and weld them together end to end. Or split a length of culvert lengthwise, weld end to end, and cap at the open ends, with legs or cradles welded here and there to keep the trough stable (Fig. 3-11).
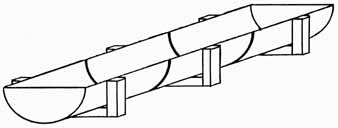
Fig. 3-11. A preservative trough made out of old
steel drums cut in half lengthwise and welded together end to end.
An alternative is to build a rectangular trough from heavy plywood, with seams sealed with silicone caulk. The outside frames must be well braced so the seams cannot spring apart, and closely spaced so there is plenty of strength to hold the weight of both the preservative and the log. With either type of trough, the log is rolled up a pair of short ramps and then lowered gently into the trough partly full of preservative. If the log cannot be completely covered, it can be turned from time to time. A soaking time of 5 minutes or so is adequate, but longer is better. For trough application you probably will have to have 100 gallons or more of preservative on hand. Some of this will be left over, but can be stored for later use.
Another possibility—not quite as effective, but a whole lot more convenient for the do-it yourselfer—is preservative applied with either a brush or a spraygun. You can use an ordinary garden sprayer, but a small, inexpensive paint sprayer, either compressor or vibrator type, is easier and faster. When spraying, wear gloves, buttoned-up old clothing, a hat, and above all, an approved respirator. Wash up thoroughly when you are done.
Whatever method you use, apply preservative to the whole logs before they are finally put in place. Ideally, the logs should be cut and fitted and all cutting or notching done before treatment. This is often not possible or practical, so any cuts in the treated wood of what ever sort—even light planing or trimming—should be liberally dosed with a brush before the log is finally installed. Penetration by either method, especially brushing, is not very great, so the exterior of the completed structure should be completely re-sprayed or re-brushed soon after the building is complete, and about every two years thereafter for maximum protection in humid climates. In very dry climates this can be extended to every four or five years.
No materials that are treated by dipping or coating should be direct-buried in the ground. Use only commercially pressure-treated woods for structural purposes. Redwood and cypress can be used for some purposes, though, like deck or fence posts. Also, do not use any preservative of potentially toxic nature on interior surfaces after the initial treating has been done. By the time the house is occupied, the initial toxicity will have disappeared.
Until recently, preservatives based on pentachlorophenol were the choice for do-it- yourself application. However, this material has been found to be very toxic, and is now virtually unavailable. Other more benign products have taken their place. Those containing copper napthenate are popular and effective, but leave a green tinge that remains a long time. Clear preservatives that work well are zinc napthenates (Cuprinol Clear #20), clear TBTO (bis[tributyltin]oxide) such as Sherwin Williams Clear Wood Finish, and copper-8-quinolinolate such as Woodguard, which is also a termite repellant. In all cases, apply according to the manufacturer’s directions, and use caution.
SHAPING LOGS
As construction of the log house proceeds there is a substantial amount of shaping that must be done to the logs. A number of procedures are used, requiring different tools. Knots and stubs that were not cleanly trimmed off with an axe or saw during the limbing operation, as well as bumps and other irregularities that show up after peeling, might require some attention. Knots and stubs in particular are very tough, and because the cutting must be done across the grain, they are doubly difficult to work. The best approach is to trim them carefully by hand with a wide carpenter’s chisel or slick, tapped with a heavy wooden mallet. You can trim with great precision using these tools, and the resulting surface is much smoother and better dressed than if you use a saw. There is also less chance of barking up the surrounding wood. You can use the same tools to clean off any other irregularities, and sometimes a drawknife or a hand plane works as well or better.
Making a perfectly straight cut through a thick log with either a handsaw or a chainsaw is difficult to do freehand. A handsaw blade is apt to wander off the line, while a chainsaw cuts so rapidly that accurate control is some times difficult. The best way to get smooth and square cuts, such as those that are necessary next to window and door bucks, is to set a simple miter guide in place, secured with a couple of nails (Fig. 3-12). Nominal 1-inch boards can be used for this purpose, but 2-inch stock provides a better guiding surface for the saw blade. Keep the blade lined up with but not tight against the guide as you saw, and you’ll end up with a nice straight cut.
Though log homes are sometimes built with logs that remain completely in the round, more often they are flatted top and bottom, at least slightly, for easier and tighter construction. Sometimes the interior faces are flatted as well. (Some builders hew, saw, or mill the logs flat on all four sides and call the structures made from them log houses. To many folks, these do not have the appearance of log houses, and in fact they are variously called solid wood beam, precut, hand-hewn, or timber houses.) Even with round log construction, log joists are usually flatted on the top surface.
The time-honored method for flatting logs, whether on one face or all four, is with a broadax followed up with an adze. This gives the highly prized hand-hewn look that is nowadays so often imitated using other methods— with a notable lack of success. If you care to take the time and trouble, and have the patience to develop the necessary skill, hewing with broadax and adze is the most satisfactory, and to many the most satisfying, way to shape logs. It is also the most difficult and time- consuming.
The process begins by propping a log up off the ground on short chunks of wood and jamming it in place with log dogs or wedges. The log should be positioned just as you want it to lie when in place in the building. Mark a plumb line down across the butt of the log, bisecting it (Fig. 3-13). Do the same at the tip end. Drive a small nail into this line about an inch down at each end. Secure a carpenter’s chalkline from nail to nail along the centerline of the log, end to end. Then stand a level up plumb at the midpoint of the log, next to the chalkline (Fig. 3-14). If the log is bowed right or left, move the level so that the edge facing the line is, by eye, about at the true centerline of the log at that point. Then raise the line, keeping it just slightly away from the still- plumb level, and let it snap down.
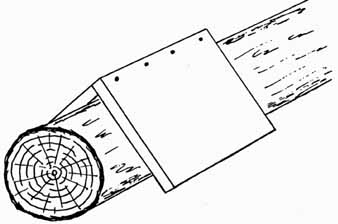
Fig. 3-12. This simple miter guide set over logs aids in making straight
cuts.
Next, decide the width of the flat. With a steel rule laid across the top of your level, rest the side of the level against the butt end of the log, and adjust it until half of the required flat dimension is to either side of the plumb centerline. Zero on the rule should be at the edge of the log on the left and the full dimension figure on the edge of the log at the right, with the level dead level. Draw a line across (Fig. 3-15), then go to the tip end and repeat the process. Roll the log until one end or the other of that cross-line or the other is at the 12 o’clock position, and snap another chalk line the length of the log, adjusting as necessary as you did for the centerline. Roll the log back, and do the same on the other side. You now have three lines (Fig. 3-16), the centerline which will get hewn away, and the two side guidelines, which you must hew to (hence the old expressions, to “hew the line” or “hew to the mark”). Incidentally, setting these lines sometimes needs some judgment, some “eyeballing,” and some shifting of lines—it’s not a terribly exact procedure.
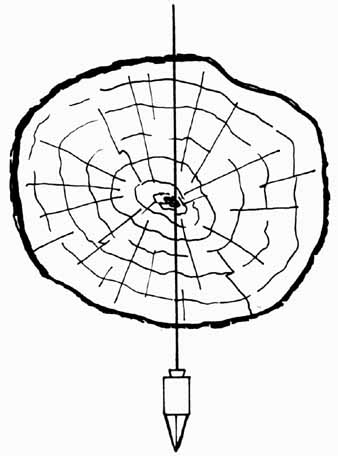
Fig. 3-13. The first step in establishing hewing guidelines is to
bisect the log butt and tip.
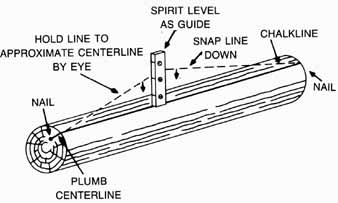
Fig. 3-14. Step two in establishing hewing guidelines is to strike
a longitudinal centerline along the log from butt to tip.
The next step is to score the log (Fig. 3-17), which you can do with either a handsaw or a chainsaw. To do so, work with, the saw in three positions. Cut the near side first, with the saw tip canted upward 10 or 15 degrees, and cut down to the guideline. Then tilt the saw down ward and cut down just to the line on the opposite side. Finish the cut with the blade held level, straight across the log, but don’t go below the side guidelines (Fig. 3-18). Do this every 6 or 8 inches along the log top, or a little more or less depending on how well your particular species of wood splits.
Next, chop out the chunks of wood from score to score. You can do this with an ordinary axe, which will leave a rough flat with the bottoms of the saw cuts still visible. Or, you can stand on the opposite side of the log and knock the chunks out with a broadax, working backward from score to score (Fig. 3-19). Be cause of the way the broadax is made—with the blade flat on the inside, the cutting edge beveled to the opposite side, and the handle offset—you can swing the broadax straight down and straight back, leaving a clean face. One blow for each score should do the trick. This takes a bit of getting used to, but with some practice you’ll do the job with great precision. Old hands at the task can stand atop the log and work steadily along, never missing a beat and leaving a true surface behind (not recommended for beginners). As you gain experience, you might be able to move the scores further apart, depending upon the wood species.
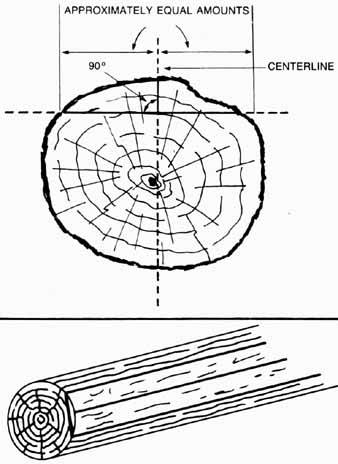
Fig. 3-15. Step three in establishing hewing
guidelines is to set the flatting lines at the log butt and tip. Fig.
3-16. The last step in establishing hewing guidelines is to strike
the side guidelines along the length of the log.
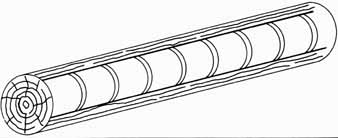
Fig. 3-17. To begin the hewing process, make scoring
cuts along the log every 6 or 8 inches.
For general construction purposes and where the flatted faces will be hidden anyway, no further work is usually necessary if you’ve done a good job with the broadax, save perhaps to whittle down a few high spots. For a more finished appearance, as on wall log interior faces or portions of joists or beams that will be exposed, the next step is to smooth the flat and leave the characteristic hand-hewn finish, and here you have some choices.
In the first method, place the log on waist- high sawhorses, set and secured so the flat faces your best working side, Then hew with a broadax held close to the head, rather like a big hatchet, moving forward down the log from one end to the other. Or, you can leave it low to the ground on chunks, and straddle it or stand on the opposite side. Swing the broadax full length, working backward along the log (wear sheet-metal leg protectors, like a cow boy’s chaps if you do this). Or, you can leave the log face upward on the chunks, straddle the log, and hew backward along the face with an adze. This is usually the preferred method (Fig. 3-20). Swing the adze in short, choppy, con trolled swings, straight down between your legs. Be sure to keep your feet and legs well out of the way. Each stroke should take out a small chip or curl, finishing the surface with a slight rippling effect. The finished patterns left by the different methods do not look quite the same, but all look good.
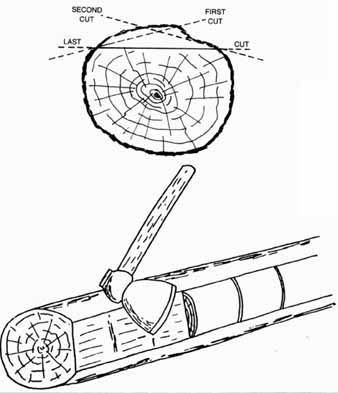
Fig. 3-18. Make the scoring cuts in three steps:
upward, downward, and straight across to meet the side guidelines. Fig.
3-19. Use a broad hatchet, a broadax, or an ordinary axe to chop
out the chunks between the scoring cuts, and hew the log face flat to
the side guidelines.
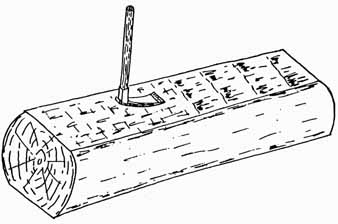
Fig. 3-20. To further smooth the hewn log face, chip away at it with
a straight-edged adze.
Fortunately there are easier methods of flatting logs. You could use a handsaw, and saw the log flat to the line instead of hewing to it, but there’s lots of exercise involved with this method too. By far the simplest method is to use a device known as a chainsaw mill. This machine uses two chainsaw motors with a long continuous bar and chain between them, and is outfitted with a series of rollers and guides. Operated by two men, one on each end, it is simply set to the proper cutting depth and drawn along the top of the log, against a guide, to flat it off. The same machine can be used to cut successive boards or planks from raw logs in the field. Smaller, single-motor mills are also available (Fig. 3-21). If a large amount of cut ting must be done and if the cost can be justified, a portable bandsaw mill (Fig. 3-22) does a fine job.
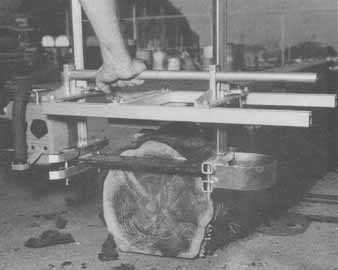
Fig. 3-21. A small chainsaw mill like the Alaskan® makes flatting
logs relatively easy.
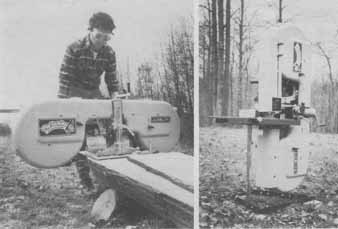
Fig. 3-22. A portable bandsaw mill like this one not only flats logs
easily, it also will produce large quantities of boards or dimension stock
in short order. (Courtesy of Delta International Machinery)
Note that if you are buying logs from a mill or supplier you can order them flatted in any way you wish, for an extra charge.
Log construction requires that the logs be interlocked with some sort of joint where they meet at corners. This requires cutting a great many notches of one sort or another, and complete details will be discussed in later sections. Suffice it to say at this point that the notches are made with the same sort of tools used for other kinds of log shaping, including an axe, hatchet, or broadax, saws, and carpenter’s slick and mallet.
Splining is one of the common methods of joining stacked logs, usually but not necessarily flatted. This helps hold them in place during construction and aligned afterward, and provides a better weather seal. Setting splines requires first that matching grooves be cut to accommodate the spline itself. This can be done in several ways. Narrow and relatively shallow spline grooves can be easily cut with a router. Insert a suitable bit in the router and align the machine so that the cut will be made down the centerline. Nail a guideboard to the log that will keep the router properly positioned and traveling in a straight line. Set the router bit to the desired depth and run the groove the full length of the log (Fig. 3-23). Use a carbide bit for longevity, and make two or more passes if the grooves are deep. In some cases double splines are used, and the procedure is the same.
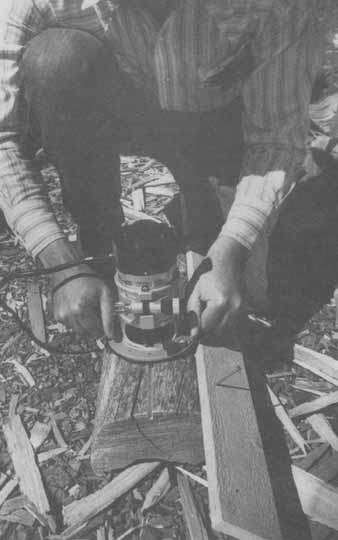
Fig. 3-23. This demonstration shows one way of routing spline grooves
in Jogs. The more guides the better, so that the router does not wander.
Narrow grooves as well as relatively wide and deep ones can be made with a circular saw in much the same way. Nail a guideboard to the log to act as a straightedge for the saw, and set so that the center of the saw cut splits the centerline (for a single spline) of the log. Repeated passes can be made—resetting the straightedge each time—with a standard saw blade, leaving about a ¼-inch groove each time. This is a tedious process, however. A better system is to use an adjustable dado blade of the type that is made specifically for portable circular saws. Just set the blade to the desired width of cut and the shoe of the saw to the desired depth; the groove can be cut in one pass.
If you happen to be an artist with a chain- saw, you can make a wide spline cut down the centerline of a log flat free hand. Experienced workers often do just that, especially if the spline is a relatively loose-fitting one. How ever, for a cleaner and more accurate job, and to compensate for the average unsteady hand, the best bet is to use a special attachment that bolts to the chainsaw bar and guides the chain.
These have to be made up specially for the job by a local machinist, but are worth the effort spent. They result in accurate control of cut depth, place the cut in the same relative position on each log face, ensure a straight groove, and save a lot of time.
V-cuts are sometimes used in fitting wall logs together instead of flats or other methods. There are two ways they are used. One consists of a V-cut along the centerline in the bottom of each log, so that the cut just rests down over the rounded top of the log below. The other method uses a V-cut in the bottom of the log with a matching V-shape—a peak—on the top of the log below. The single V-cut is made by first placing the log to be cut temporarily on top of the one on which it will eventually rest. The log is then secured in place so that it can’t shift about. The next step is to scribe a line with a pair of dividers the full length of the log and on each side (Fig. 3-24). If you keep the dividers always at a 90-degree angle from the surfaces being scribed, the line on the upper log will faithfully follow the contour of the top of the lower log. Thus, when the cut is made along these lines, the log will drop into place with a good fit. After scribing the lines the log is removed and a 45-degree (or shallower) V cut is made with a chainsaw, freehand but care fully controlled. If the cut is well made, the fit between the logs should be very good, needing only a little trimming along the feather edges of the V with a small coping saw to mate the logs.
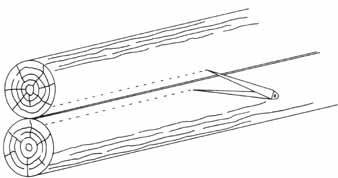
Fig. 3-24. Scribing the upper log cut to the bottom log face ensures
a perfect fit with nearly identical contours.
Mating V-cuts can also be made completely with a chainsaw, or with a large portable circular saw for the V and a chainsaw mill for the inverted V. Scribing is necessary for a good fit, and the angles of the cut should re main constant if the edges of the inverted cut are to remain unobtrusive. This process re quires exact control over guideboard placement and cut dimensions and angles, as well as exact positioning of the top and bottom cuts opposite one another.
Another method of mating logs is by cup ping or coping, a process of cutting a rounded groove the full length of the bottom of each log. The traditional way of doing this is with a gutter adze. This tool is similar to the straight bladed adze except that the blade is curved, arid the cuts are made with a continuous scooping action. This is a long and tedious job. When the cope method is used nowadays, the process is hastened by using a chainsaw to rough out grooves, then the remaining wood is cut out and the groove finished with gouges. Some times the cope is used only on the endwork of the logs, from the corner joints out to the ends, with a V-groove joint used along the middle section of each log (Fig. 3-25). This gives a tight fit with no gapping at the visible log ends, allowing a more attractive and more weather-tight construction.
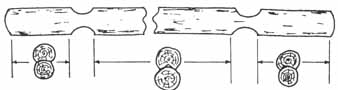
Fig. 3-25. Logs can be V-grooved through most of their length for
ease of cutting, then cupped only at the ends for appearance and a tight
fit.
MANEUVERING LOGS
Logs certainly are not the easiest things in the world to handle and maneuver about. They are heavy, clumsy, awkward, and often contrary. This is especially true of green logs, and of the large sizes often used in building a log house from scratch. Most of the kit logs tend to be somewhat smaller and usually have a low moisture content, which helps with the weight problem. Logs wet from rain can be murderously slippery. Milled logs with one or more flat edges are easier to handle than round ones.
Unfinished logs or those that won’t be adversely affected by the addition of a few scrapes and scratches are most easily shoved and rolled around with a peavey or a cant hook (similar to a peavey but with a blunt instead of spiked tip). Carrying logs and setting them in place at the lower levels can be done with two or more lug hooks, which require two persons each to act as bearers. Temporary-duty lug hooks can be made by running a stout length of pipe through the rings of two or more sets of grapple hooks or loading tongs. A pair or more of short nylon-strap cargo slings attached to pipe or wood beam crossbars work nicely for carrying milled or finished logs around, because the nylon straps will not dam age the wood. Nylon automobile tow straps work just as well, and are easier to come by. Sets of big old ice tongs also work well for shifting logs about.
If you need to haul the logs a fair distance from the storage lot to the building, consider cobbling up a narrow dolly, perhaps using a pair of wheelbarrow or go-cart wheels, or other fat tires that won’t dig into the ground. Fashion some sort of cradle on a two-wheeled axle, to which the log butt can be lashed. Lift the tip with tongs, and trundle the log into position. Alternative for short logs: a high-wheeled (bicycle-type) garden cart.
Boosting heavy logs onto upper courses or into position as rafters or girders often requires some ingenuity, as well as a lot of caution. One method is to raise the logs bit by bit up a stairstep scaffolding. The scaffold can be built up from dimension stock, but adjustable steel scaffolding or staging is easier and safer to use. This can be rented for a nominal sum on a daily or weekly basis from an equipment rental house or a building contractor. By arranging staging at various levels and flooring the sections with heavy planks, you can maneuver material into place more easily and work from a better vantage point.
The most efficient way of handling this problem is with machinery. Assuming good access around the building, a high-lift type of forklift will make short work of lifting logs into place. A backhoe or a big front-loader equipped with slings will also work. There are also several kinds of elevator-like building material hoists that can be erected against the side of the building; these can be rented, and save a great deal of time and effort.
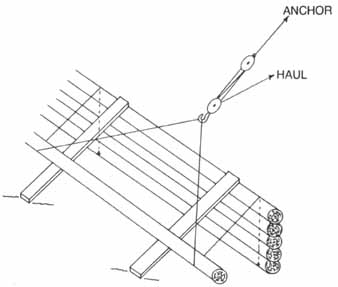
Fig. 3-26. One method of hauling logs up ramps is to use a cross-haul
rope lift arrangement.
Perhaps the most common way of hoisting high logs into place is one that could loosely be called rigging. Rigging consists of using lines, block and tackle sets, come-alongs, chain falls, inclined planes, anchors and deadmen, jammers, props, gin poles, levers, and what ever other gear seems indicated and in what ever combination necessary to lift and guide a load into the proper position. The aspects of rigging are difficult to explain because they differ in each individual case and there are liter ally hundreds of possibilities involved. Basically, though, the process consists of attaching one or more lines to the log, finding a suitable anchor point, providing a lever or crane for outward lifting or ramps for inward lifting, and arranging a mechanical advantage by means of block and tackle or some similar device so that a heavy load can be moved with a small force.
One of the most often used basic variations, which works well, consists of a simple arrangement of haul rope, an inclined plane, blocks and tackle, and an anchor (Fig. 3-26). The two ramp logs or beams are secured to the top of the wall with the log to be raised resting at the bottom. The haul rope is well secured at each end on the other side of the wall, probably at floor level, and passes to the outside of the ramps, under the log at each end, and back to the hook of the forward block. The other block is secured by an anchor line attached to some immovable object like another portion of the building, a convenient tree, a vehicle, or a deadman sunk in the ground. The anchor line and blocks must be directly in line with and centered between the two ramps. A relatively light pull on the free line of the blocks rolls the log up the slope and into place.
Hauling flatted logs into place this way has to be done carefully to avoid damage or rope burns as they drag along. Tapered round logs will roll unevenly, moving along faster at the butt end than at the tip, so the ropes must be adjusted and the log shifted on the ramps to compensate. It is helpful to have someone stationed at each end of the log to guide it and keep it in position. But for safety’s sake always stand outside the log and away from the haul rope so that if something slips or breaks loose there is no danger of getting caught.
A variation on this theme that works well when the logs are fairly light and the incline fairly gentle, uses two separate ropes and two sturdy haulers. One end of each haul rope is anchored within the building. The ropes pass over the wall and under the log near the ends, and back into the building. Two persons pulling on the ropes with equal strain can scoop the log right into position (Fig. 3-27). This sys tem has an advantage in that the haulers can control the log as it comes u the ramp by adjusting the pull on each rope to the rate of travel of the log tip or butt, keeping it square to the ramps.
In either case, the trickiest part of the pull comes when the log is about to go over the top. Full-length logs with extra length for the end- work can be accurately positioned on the ramps so that they will roll out onto the sidewalls. The ropes can then be removed and the log fitted into place. Short logs have to be stopped, preferably by something rather than someone (unless the logs are small and light). Stops should be provided by securing 2 x 4s to the inside of the wall. If necessary, more stops can be secured to the outside to hold the log in place while it is being worked. Much of this process is a matter of ingenuity and common sense.
Placing very high logs, especially big truss logs or a massive ridge log, or even some of the smaller vertical or angled truss members, can be very tricky. The use of hoists, block and tackle sets, steady lines, and usually a series of props, supports, and staging is required. This is difficult work that should be done slowly and carefully and with forethought for every move; it is also dangerous work for all concerned. Several hands are often needed, and a good knowledge of rigging is handy, too. If you are at all unsure about what approach to take, you might be better off to hire some experienced help or consider a different method. Or investigate the possibility of hiring a boom truck or a crane. They are expensive, of course, but so are hospital bills, and they can accomplish in a matter of hours the work that might otherwise take weeks to finish up. Have all the high-lift work lined up and ready to go, along with a crew of two or three workers, and you’ll have the whole job done in less time than it takes to describe it.
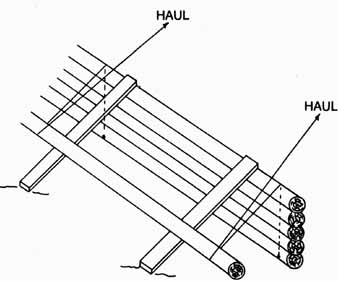
Fig. 3-27. Two separate haul ropes, closely coordinated, can be used
to roll or skid logs up ramps.
PREV: Log Homes: The Beginnings
NEXT: Log Home Foundations
© CRSociety.net