.Once you convince yourself that a log home is exactly what you’ve always wanted and you successfully get past the first hurdle of financing, or lack thereof, you can actually begin the project. The first steps consist of designing the house, planning the house (two different matters), selecting the property, and integrating the house with the chosen site. All these operations are extremely important, because they form the basis for not only the house, but also the completed, improved property in its final state. Mistakes, deficiencies, and problems that occur in these early stages are difficult, expensive, and sometimes even impossible to correct later. Give all the steps all the time they need, plus a little extra. The last step before construction—preparation of the building site and immediate surroundings—also deserves considerable thought, though this aspect is unfortunately often short changed and just attacked hastily at the last moment.
Although each item will be considered separately here, in practice all but the site preparation (and sometimes even that) frequently overlap or even coincide.
DESIGNING AND PLANNING
Designing the house is as much concerned with architectural detail, colors, general layout, and overall construction as it is with planning a home in which you can live comfortably and pleasurably with a maximum of convenience and a minimum of bother. This is an immense subject, one about which many volumes have been written and which we can only touch upon lightly here. But at the outset, you need to determine your basic design parameters. You have already chosen a log house style, so that is one major decision behind you.
The next step is to analyze yourself and your family, to see exactly how you live now, and how you would like to live in your new home. All your planning should revolve around the needs and desires of you and your family. Forget about how other houses are de signed, except insofar as you might be able to use certain facets that you particularly admire or feel would be useful to you. After all, this house is for you, not somebody else. Draw up your plans the way you want them, not the way a developer or a real estate peddler or your brother-in-law would like to have them. If you build well and design for maximum convenience and comfort, the chances are pretty good that some family later on will feel the same way about the house as you do, if and when you decide to sell.
While you are considering your lifestyle and habits, work up a list of your basic requirements. You will want a certain number of bedrooms, a certain number of baths, a kitchen, and so forth. You might also want a specialized room or two not included in most houses, such as a full-fledged workshop, a library, a billiard room, a working pantry or a summer kitchen, a canning room, a root cellar, a separate room for a model railroad, or whatever. You need to determine whether or not you want a full basement, what you require in the way of storage areas and what type, the size of the garage if you want one, and also such auxiliary items as pool, greenhouse, decks and porches, hot tub, corral or paddock, or what ever else your interests and style of living suggest.
This is a good time, too, to consider the pros and cons of a two-story versus a single- story house. Many feel that a log house looks best in a low-posted, ground-hugging design that integrates closely with its surroundings. A two house-story, on the other hand, must be well designed if it is not to stick up on the horizon like the proverbial sore thumb. Compromises can be made via the split- and multi-level designs, or by building into a hillside so that the top floor is at grade level on one side and much of both ends, with the remaining side at two full levels.
There are advantages and disadvantages to both single-story and two-story designs. For example, when levels are stacked, there is less roof and sidewall exposure for a given floor area of living space, especially if the bottom level is at least partly below grade. Less wall, roof, floor, and foundation material is required, and usually there are fewer hallways and partitions needed. Also, the building is more com pact and requires less ground space, is easier to heat/cool and ventilate, and solar exposure can often be better developed. Because of the compactness, less piping and wiring is usually needed. A single-floor house, on the other hand, can be built on a lighter foundation, including piers, and there are no stairs to take up valuable space, to build, or to clamber up and down. Emergency evacuation is usually easier. The structure is not a wind and weather catcher, as is a tall building. Design and floor layout tends to be easier, and also more interesting. Construction is easier because materials do not have to be juggled as high. Soundproofing and sound isolation is easier, and the one-level arrangement is ideal for elderly, ill, or infirm occupants; it is the only alternative for wheelchair occupants or others unable to climb stairs, unless an elevator is in stalled. Exterior shading is easier, and smaller roof overhangs can be used for sun and weather protection of windows and sidewalls. The structure tends to be more stable with less bracing, masonry work is simpler, chimneys are much shorter.
As you develop your broad requirements, you might want to work with both single- and multiple-level designs at the Outset, to see which seems most satisfactory. If you already have your building site, the topography will probably influence your thinking. In any case, work out the rough sizes that the various rooms should ideally be. Most people have some fairly definite ideas along these lines, and this is the best time to figure out just what you like and what you don’t. For instance, you might now have a tiny U-type kitchen that you abhor. Obviously you will want to change this situation, perhaps to a much larger L-type kitchen, maybe with a work island or two. Maybe you detest tiny bathrooms, or perhaps you prefer them for their efficiency. You might want a separate dining room, or maybe a combined living/dining area.
Whatever the specifics, work out some minimum dimensions for all your required rooms, taking into account the furnishings and built-ins that you would eventually like to have in them. You can arrive at appropriate size estimates simply by making a series of comparisons. Use the rooms that you now occupy as guidelines, and enlarge or reduce the sizes as necessary on your list or sketches. Compare with various rooms and room arrangements in friends’ houses, and visit model homes that are open to public viewing. Eventually you’ll arrive at a set of reasonable figures.
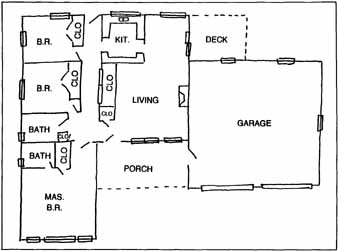
Fig. 2-1. Typical rough-sketch floor plan.
With these basics worked out, the next step is to sketch a series of floor plans. Simple pencil drawings, not even to scale, work fine during these preliminary phases. Probably you will do a good many of them, so there’s little point in turning out artistic renderings suit able for framing. A floor plan is just a layout of room arrangements as viewed from directly above, one for each level or floor of the house (Fig. 2-1). While you are doing these sketches, you can probably get some valuable ideas on room arrangements and overall house layouts by studying some of the published plans found on web sites, in magazines and house-plan books. Lay the rooms out in rough proportions as a series of blocks, or other suitable shapes if your design concept is geometrically irregular. Add in the windows and doorways at points you think appropriate, and include major architectural elements like fireplaces or stairways. Shuffle these components around as you will, trying them first one way and then another.
What you are striving for right now is a workable relationship of rooms (or areas), halls, stairways, and access points, all blending together to provide the greatest amount of convenience and flexibility of living. Construction details, decorating schemes, final sizes, kinds of materials, and similar details are of little con sequence yet—you are still working with concepts.
Analyze the traffic patterns so that all are logical and there is free and easy access to all points. For instance, the dining area should be handy to the kitchen and probably the living room as well, not in some remote location. Access to the only bath on a particular level should not be through a bedroom, nor should entrance to one bedroom be gained by going through another. Hallways should be kept to an absolute minimum because this kind of space is not well utilized and is therefore ex pensive. On the other hand, when hallways must be included, try to make them of decent size, not dark and narrow, and see if they might serve some other purpose than just traffic flow. For instance, perhaps one wall could be used as a little art gallery, or contain a large storage shelf section. Arrange rooms, storage areas, and access points so that as little space as possible is wasted or only marginally usable. Some compromise in room arrangement is almost al ways required, but with enough chewing on the end of your pencil you’ll be able to work out a suitable preliminary plan.
As you make these initial sketches, there are a few important points to keep in mind that have to do with log house construction characteristics. The first is that the strongest log structure always consists of squares or rectangles. They can be single or multiple, but 90-degree corners are the secret of strength. This is be cause all of the outside corners are jointed and locked together at each exterior wall corner, whether an inside or an outside corner. The 90-degree joints are the most effective; joints made at lesser angles hold together with less effectiveness because the angle either diminishes or increases. Also, 90-degree joints are the easiest to cut and fit. The second point bears on the first. Because the strength of a log structure lies in large measure in the corner construction, all window and exterior door openings should be kept as far as possible from either inside or outside corners. In addition, the fewer the openings of any sort in exterior walls, and the smaller they are, the stronger the structure will be.
After you have the preliminary room arrangement laid out, check the locations of interior doors to make sure they don’t interfere with one another, can be fully opened, and are at the best possible location in relation to furnishings (or even the potential future location of furniture) and the traffic pattern. Place the exterior doors at the most convenient points, allowing ready access at the front of the house, at the rear, onto porches and decks, and to areas of major use such as a service yard or garage. Two exterior doors is an absolute minimum even in a small house, while large ones might have eight or ten.
Spot windows in the perimeter walls where they will do the most good. Some probably will be used only to admit light and to see out of; others will play a part in warm-weather ventilation. Still others may be placed because of a view. Keep cross-ventilation in mind; it should be available in every habitable room. In moderate climates large expanses of glass will do no harm, but in hot or cold climates the heat gain or loss can be terrific, adding greatly to the cooling or heating load of the building. Note, though, that some of the new types of glass can minimize these difficulties. In some cold-climate locales there are building code restrictions on the amount of glass that can be installed in a home—for instance, a maximum of 20 percent of the total exterior wall area. On the other hand, in areas where any of the model building codes apply, there are minimum glass areas that must be installed in all habitable rooms, typically 10 percent of the floor area of each room but no less than 10 square feet. Regardless of the possible regulations that might apply, if you live in an area of temperature extremes, keep the total glass area as low as seems reasonable in order to ease your heating/cooling burden.
As you locate windows, make a list of general specifications for them. Figure the approximate sizes you would like to have, note whether they will be fixed or openable, how high or low in the wall they will be positioned, whether framed with wood or some other material, and details of this nature. For openable windows, choose the types you want, such as double-hung, casement, awning, slider, patio door. Reference to a window manufacturer’s catalog will help you out with standard sizes, styles, and types that are available.
When you have the room arrangements and the door and windows shuffled around into a floor plan that appears to be practical so far, add in the last of the principal elements of the house. These include the major plumbing fixtures such as shower stalls, bathtubs, toilets, and sinks. Locate places for the laundry equipment, hot water tanks, and furnace or individual heating units. You might need space for air conditioning equipment, well pump and water storage tank, or similar items. Include also any major built-in units that take up room space, like kitchen cabinets, storage walls, window seats, sewing center, permanent work benches, and built-in bunk beds. Items of this sort become part of the house and should be planned for from the beginning even if they will not immediately be installed.
Now take a few moments out and dream about the future. Do you anticipate the need for a nursery later on, or a guest bedroom? Perhaps you might need an office at home. If you’re planning a large family you might need more bedrooms than you presently have in your plans. Maybe you’d like an attached green house or sunspace sometime. Will you want a larger family room eventually? Is the plan you now have expandable anywhere, without major reconstruction, or are you locked in to what you have? Maybe your future needs will be no greater or no different than they are now, or they might be even less demanding.
Many families outgrow their new homes after only a few years. Ideas change, lifestyles change, living patterns change, and new needs and desires crop up. The time to make provision for future expansion is in the present, before that potential need becomes a reality. Many homes simply are not expandable with out a major reconstruction job, but nearly any house can be expanded if the original design is made up with that possibility in mind, even if no specific, detailed plans are made.
The last part of the initial design stage involves a double check of everything that has been sketched out so far, along with an in- depth consideration of the whole arrangement. As a starting point, work up a ballpark estimate of how much it will cost to build the house you have designed. This is not an easy chore, but try to develop a reasonably true approximation. If the resulting figure appears to fit within your budget, fine. If not, you will have to redesign, perhaps making all the rooms a little smaller, chopping out a room or two, leaving off the decks or garage, setting aside a portion of the house to be built later (but staying with the original design), or whatever is necessary to bring the estimated cost into line with what you can presently afford.
After redesigning and re-estimating as necessary, further reconsideration is in order. This is not something that should be done in an hour or two after dinner, but rather is a lengthy process of mulling the plans over and letting them come together. If you can, think it over for several weeks or more, making such pal sewer system. This entails having a percolation test made to see how much moisture the soil at the leach field site will absorb before be coming saturated, working out a suitable and acceptable design for the system, and having the installation inspected for proper installation. This process is usually governed at the state level but administered by local county or city officials, and there will be an attendant fee.
Well Permit
If you cannot tap onto a municipal or water district supply system, you will probably want to have a well drilled. In many parts of the country you must have a permit and pay a fee to do so, and often the usage will be specified as domestic, not agricultural or irrigation. Again, this is controlled at state level but locally ad ministered. You must first file an application; the waiting period before approval might be fairly long, so this matter should be checked into early on.
Water Tap
If your building site is within reasonable reach of a municipal or water district supply line you must tap onto it. This involves some paperwork and a fee, often substantial. You will pay for installation of the service line to the water main, which must be done according to their specifications, and they will make the actual lap onto the water main. You can obtain details at your local city water department or water district offices.
Sewer Tap
As with the water tap, if your site is handy to a municipal or a sanitation district sewer line, you must tap onto it; you cannot use a septic system. Again, paperwork and a fee are in yoked. You will have the main drain installed, and they will make the tap. Check with local r for details.
Improvement Survey
An improvement survey is a formal land survey made of your property, which is translated into a plot plan and certified by a registered or licensed professional surveyor of your choice. You pay the surveyor for services rendered. Such a survey is often required by a lender if the property and/or the house is being financed. It might also be required for the issuance of a building permit. If required in both circumstances, and if the time period between the two needs is short (usually six months or less), one survey will serve both purposes.
Fireplace Permit
As a pollution control measure, a number of municipalities have cracked down severely on fireplace and woodstove installations. In some places fireplaces can no longer be installed in new buildings, and in others that can only be done in certain circumstances and under certain specifications. In several states only approved and certified models of woodstoves may be installed, and they might be limited to one per occupancy unit. In the future, some towns and cities might ban them altogether. Permits, fees, and inspections are required. You can get the necessary information from local building or health department officials.
Certificate of Occupancy
A certificate of occupancy, or CO, is usually part and parcel of a building permit, though not always. It is mentioned here because it is some times misunderstood or ignored, to the chagrin of the would-be house occupants. In locales where a CO is used, a new house (or other building) must not be occupied until a formal CO is issued to the owner or the prospective occupants. Otherwise, all sorts of strife and consternation, not to mention fines and legal problems, can occur. Issuance is made only after the structure has had its final, inspection and is deemed by the inspector to be safely and healthfully habitable. This situation is worth checking into, as you might find that you can not move into your partly completed new house at as early a stage in the construction as you would like to.
In addition to these codes and permits, you might also come up against a few other, more minor ones that will impact your plans. These are likely to be regional regulations, such as a locally written fire code, ordinances against building in a designated floodplain, potential earth-slip area, or wetlands. You might have to consult with Fish and Game or Department of Wildlife officials about the potential impact of building in or near a winter deer grazing range or an elk migration route, or check with local officials on land use ordinances.
PLANS and SPECIFICATIONS
The next stage in the planning is to boil down all those design sketches into working drawings, and all your ideas into a set of specifications. The extent to which this is done depends upon individual circumstances. If you plan to do all the work yourself and have a good grasp of log construction as well as general residential construction practices, and if the local building department does not require formal blueprints, you might need little more than a rudimentary set of sketches with the major dimensions. Specifications might not be necessary at all, if you already know what you want and can wing it as you go along. A few notes might help, though, so you don’t forget what you had planned on.
If you are not intimately familiar with residential construction practices and materials, especially those applicable to log houses, you cannot now go ahead with this step in the planning. This is because many of the details and available construction options will have a direct bearing upon your refined plans and are essential to the specification sheet. You have two choices: The first is to seek the help of a professional—an architect or engineer, or a log house kit manufacturer. Using your basic sketches and doing a lot of consulting, you can end up with a full set of plans, for a fee. The second choice is to study the subject in depth and gain the knowledge you need, using this guide and others. You might also at tend a course in log building and/or residential construction, or even go to log-building school; such opportunities are available throughout the country, often as adult education classes. You might also hire on as a helper on a residential builder’s crew for a while; the practical experience is irreplaceable.
If a subcontractor is to do part of the work, those jobs should be covered by complete, ac curate working drawings and specification sheets so that there is little chance for error or misinterpretation. If most or all of the work is to be done by a builder, you will need a full set of working drawings, completely dimensioned and detailed, and a complete set of specifications. Rare indeed are the occasions where an owner/designer and a builder communicate so well that only a few sketches on an old shopping bag are needed. If there is any financing involved, the lender will also probably require a similar set of plans and specs. Sometimes these need not be formal architect’s blueprints but can be design sketches neatly done to approximate scale and with full dimensioning and detailing.
Probably the most valuable set of working drawings you can devise is a series of scaled floor plans (Fig. 2-2). Copy your original floor plan sketches, but make them as large as you reasonably can. In these drawings include the thickness of the walls, and draw in to scale all the details that you did previously, even the direction the doors swing. Draw in all of the built-ins, too. As you do so, you might discover some difficulties that were not apparent earlier. Perhaps a room is a bit too small, a window is in the wrong spot, a stairway doesn’t fit quite right, or some elements are out of proportion. This is the time to straighten out all these de tails and to make sure you have ample space everywhere.
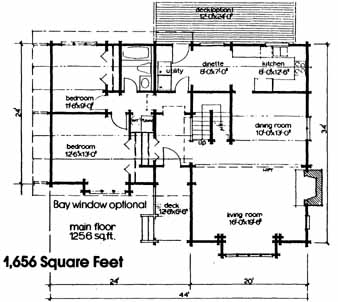

Fig. 2-2. Typical scaled and dimensioned formal floor plan. A working
blueprint floor plan would be much larger and include even more detail.
With this satisfactorily out of the way, scale in all the major pieces of furniture, both present and contemplated. An easy way to do this is to draw out the furnishings on a piece of stiff paper or light cardboard, then label them and cut them out. Then you can shuffle them around to suit. When you find a suitable spot, outline the cutouts lightly. Use actual dimensions where you can, and chase down approximate sizes in web sites, books and catalogs where you cannot.
The purpose of this exercise is to make sure that your furniture will fit comfortably into place with no crowding, that there is ample room to move around them, that they do not interfere with built-ins, windows, or doors, and that the traffic patterns remain free. Here again, you might run into some problems that will re quire moving a door or window, changing the swing of a door, setting a partition back a bit, or even changing an entire section around. Be sure, too, that all your doorways are sufficiently wide; 2 feet 8 inches is the most common width, but making all passageway and entry doors 3 feet wide is the best arrangement. Doorways should also be handily placed, al lowing you to move furnishings and appliances in and around with a minimum of difficulty.
Next come the elevations, your second most important drawings. An elevation is a view of one exterior plane of a building, as though you were looking at it straight on (Fig. 2-3). In a simple design there are four elevations: front, back, and two sides or ends. These plans should also be done to scale and include all exterior detail. Position windows and doors accurately, include whatever portion of the foundation is visible, draw the roof in perspective if it is visible in that elevation, and add any trim or other architectural details that might be present. The finished drawing is a picture of just what that particular face of the house will look like when completed. Once again you might discover some problems. Perhaps the window placement is not symmetrical but should be, or you don’t like the way the front entrance shapes up, or the trim you have chosen seems out of proportion. Make whatever changes are indicated, and at the same time coordinate those changes as necessary with your floor plans.
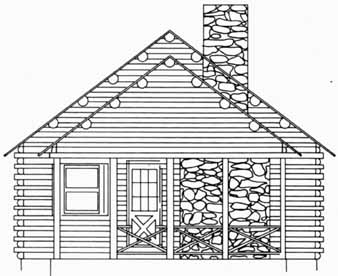
Fig. 2-3. Typical blueprinted formal elevation.
That completes the most fundamental of the working drawings, but there is yet more work to be done. You need to draw a foundation plan. Also, there are some peculiarities in log construction that must be accounted for at the outset or you will encounter a lot of difficulties later on. Many of these details depend upon exactly how the house will be constructed, and whether or not and where conventional framing methods will be used in combination with log construction. These de tails will be considered at the appropriate points throughout the rest of this guide, so unless you are already familiar with both log and frame construction you will need to digest this information—and perhaps do some further study as well—before you can adequately go ahead with final drawings, detailing, and specifications.
There are two particular points concerning log construction to keep in mind. The first is that all log houses settle to some degree, usually far more than conventional structures. There are a lot of specifics involved here, but you can usually anticipate anywhere from ½ inch to 5 inches or more of settling to take place in the walls. This means that certain methods must be used to attach things to these walls, because everything solidly anchored will be carried downward. This can lead to interesting problems like buckling pipes, bowing partitions, and support posts being driven through the floor.
The second point to remember is that the utilities cannot be installed in a log house with the same ease as in a framed house. Water pipes, wires, heat ducts, and vent pipes must be routed around the logs, and all points of conflict must be eliminated before construction. Spaces, chases, and pathways for utilities materials have to be planned for ahead of time. Many pipes and wires must be installed as the construction proceeds, rather than afterward, because there are no spaces or paths (or those become blocked in) into which they can be placed later.
This in turn means that the electrical, heating, and plumbing systems, as well as auxiliary systems like door chimes, stereo speakers, telephones, and security systems, should be located on additional plan sheets so each pipe and wire can be routed with the least number of problems. If this is not done, you might discover too late that you have a toilet sitting squarely atop a 12-inch girder, or a doorbell system that cannot be installed because you can’t get the wires through, or a heat duct that sticks clear out into the room because no provision was made for recessing it.
These auxiliary plans, then, should be drawn up before construction begins, and coordinated with the floor plan and other plans and/or detail drawings that show the layout of the floor framing, foundation, rafters, etc. Installation details for doors, windows, fire places, chimneys, interior walls, cabinets, and built-ins can also be spelled out in auxiliary drawings (the details themselves will be discussed in later sections). Admittedly this is a good deal of work, but if done now will save considerable time and probably a few headaches later on, and result in a more satisfactory job.
SITE SELECTION
If you are going to build a new house, the first thing needed is a piece of ground to put it on. The selection of a home site is a highly personal matter that needs to be addressed with great care. Every bit as much care, in fact, as you exercise in the designing and planning of the house itself. For in truth, the two go hand in hand and must form a happy marriage, as will become evident as we go along.
The site should be the biggest and best one that you can afford and reasonably take care of, even if the initial cost seems a bit high. There must be something about it that draws you, entices you, makes you feel that this, rather than somewhere else, is where you want to be. That something might be a gurgling brook, an expansive view, a stand of old oak trees, a desert at one side or a mountain at the other, or per haps a combination of factors. When you see the perfect place you’ll know it, but only you can decide what elements go into the final decision to settle here or to move on.
As far as general locales where a log house might fit in, there is no right or wrong even though some spots will obviously be better than others. A log house will stand proudly in just about any surroundings you can name. It also fares as well in urban settings as in rural, though from a property-value standpoint it should be in keeping with the general tone of the neighborhood.
There are some practicalities involved in choosing a piece of land, and you will probably have to make a few further analyses of your lifestyle and your likes and dislikes as you go about making your selection. Cost is a prominent factor, because it’s entirely possible to tie yourself tip so tightly with land that you can no longer afford to build the house. The tax burden is another important item—not so much the taxes that are imposed upon the bare ground as you buy it, but those that will come into effect once the house is finished and the property is improved. You’ll also have to decide upon the general type of land you want, depending upon your interests. You might like ground suitable for a garden, pasture land for horses or cows, a mixed hardwood and soft wood woodlot for cutting your own firewood or the logs to build your house with, or per haps just enough land around the house to admit a postage-stamp lawn and a few flower borders.
You’ll also have to figure out how urban or rural you would like to be. These decisions revolve around such factors as proximity to one’s work, the presence of children and their ages and activities, whether you prefer the readily available cultural, social, and shopping opportunities of the city or the peace and solitude of the country, and how much travelling you are willing to do for shopping and assorted errands.
There are other important considerations, too. For instance, how close do you need to be to medical and hospital facilities? Or a fire station? Or a police station? Evaluate the pros and cons of tapping onto a municipal sewage sys tem and water supply as opposed to having and maintaining your own well and septic system. How about noise from highways, airports, schoolyards, or cattle feedlots? Do you want neighbors close by, or would you prefer no one around at all? How about a view, shade trees, maximum sunshine, irrigation water, a nearby creek? All these questions need to be answered as you sort through pieces of land offered up by the real estate folks.
As you narrow your choices down to two or three spots, your questions about whether or not this one or that one is the right spot should become more and more pointed. Spend some time at these locations, during different parts of the day, different seasons if you can, and in varying weather. Note sun directions, shade possibilities, the prevailing wind directions. A spot high on a hilltop might have a fine view, but is open to the weather, and sound might travel upward to it. A spot low in the valley might be well protected, but damp and chilly. Are there trees and vegetation that can become part of the eventual landscaping plan? What about swampy spots, or a high water table, or runoff that might come through in the spring or during heavy rainstorms? Are there rock ledges that might have to be blasted out in order to build, or is there a lot or earthmoving or excavating to do? Can you build a drive way or access road without much trouble? The property should have as many natural assets that you can put to work for you, and as few drawbacks that will work against you, as possible.
Then come the final practicalities. Make sure the title to the property is clear and that there are no liens or other encumbrances that might cause future problems. Be sure you have free access to the property, and don’t have to cross other private property to reach yours. Many an unwary landowner has ended up locked in (or out) with absolutely no access legally available.
If a septic system is required, be certain that the soil will pass the necessary percolation tests for soil/water absorption. If it can’t, you won’t be able to install a septic system and might not be able to build your house. If a water supply is needed, make certain the water rights don’t belong to somebody else, and that a permit can be obtained if that regulation pertains. Also try to determine whether or not there is any underground water at a reasonable level to be had in that area. Drilling a dry hole is an expensive proposition.
Don’t forget to get all the information on utilities, such as telephone service, fuel oil delivery, electrical service, natural gas hookup, television reception or cable, water and sewer tap fees if applicable, and any other matters that might be important to your building pro gram and your future way of life. Be sure to check on all codes and regulations that might affect you, too. If all are acceptable, abide by them cheerfully and your building chores will proceed with a remarkable lack of bureaucratic hassle.
SITING THE HOUSE
Once the piece of property has been selected, the next step is to determine the best spot to locate the house. On a city or town lot this is usually a simple matter, because the house can only be shifted a few feet in any direction. On a large parcel of land, you could have several choices which must be worked down to a final location by the process of elimination. This spot should have as many advantages going for you as you can muster, and there are plenty of possibilities. Most of them come at no extra charge, so you might just as well extract as much benefit from them as you can.
Perhaps the greatest gift any homeowner can receive, especially when high energy costs are prevalent, is ample sunshine. The more the better (except in extra-hot locales), because if you don’t have it on the site there is no way you can get it, but if you do, you can control and use it to provide whatever degree of light/shade and heat/coolness you want— within reason. Full sun the day long beaming directly upon the building site is usually a great plus. That sunshine will provide plenty of good light inside the house. It will also provide free heat during the cool months, but can be adequately blocked out when desirable during the warm months. And of course if your design includes solar heating/cooling of any kind (an excellent idea), day-long sunlight is a primary requirement. Solar heating systems, incidentally, can be incorporated very nicely into log structures.
A corollary of sunshine is shade, which can be another plus factor in proper house siting. If you know where the sun strikes at the site, and for how long, and at what angles and directions it falls in during the various seasons, you can determine where the shade will be and to what extent throughout the year. This includes not only the shadows cast by existing trees and shrubbery, but also that of the house itself. With this knowledge you can figure out the most effective compromise in the lie of the house to provide both sun and shade at various points simultaneously, and at different times of year. For instance, you might plan for a series of decks around the house that would be suitable for either sunbathing or relaxing in the shade at any given time. The same information might affect the placement of windows, greenhouse, gardens, various species of flowers or shrubs, or a swimming pool.
Another point to consider in siting the house is the weather. In most locations there will be one prevailing wind direction, as well as a secondary one from which the wind will blow less often and usually less forcefully. Major storms will generally follow the principal track, with minor ones coming in along the secondary track once in a while. There might also be a primary fair-weather wind direction and a somewhat different primary storm-track direction. By figuring out just where these tracks lie you can turn them to your advantage. Position the house so that the impact of the prevailing winds and the principal storms is minimized. This usually involves setting the narrowest portion of the building, that which has the least exposure of wall and roof, into the wind/storm flow so that the current has relatively less to slam into and moves on around the structure. This has the effect of reducing wind pressures and thus the possibility of structural damage, of reducing the overall weathering of the house exterior, and of reducing the total heat loss of the house during cold and windy weather.
Knowing the wind/weather patterns at your building site can also give you some clues as to window and door placement. For in stance, as little glass as possible should be placed in walls that face the track, in order to conserve heat and minimize damage possibilities. Exterior doors, whether located in a vestibule-type air lock or in an exterior house wall proper, can also be placed out of the weather track, and can be positioned so that they swing open against the wind. This cuts down the amount of air (and debris as well) that enters when the door is opened. Also, as it is opened the door forms a shield for the user, and doesn’t stand as much chance of being ripped off its hinges by a gust. By determining both the bad-weather wind track and the fair- weather track, you can arrange windows for the maximum of cross ventilation and a minimum of storm impact. Casement windows, for in stance, can be installed so they open outward into the fair-weather breezes to act as scoops that direct fresh air into the house.
There might be other advantages in your building site, ones that can be all too easily overlooked. Before you barge ahead with a bulldozer, do a little looking around. See where you can make the lay of the land work for you, perhaps by providing a natural drainage watershed away from the house. Place both house and any proposed outbuildings so as to destroy as few trees and shrubs as possible. All these growing things can be easily worked into an overall landscaping plan, thereby saving you an immense amount of labor and dollars. If need be, you can always cull some or all of them out later on.
Make full use of any natural features like a big boulder, a meandering rivulet, a natural terrace, or whatever. Incorporate such features into the overall landscaping design and let them complement the house rather than going to the expense and difficulty of removing or reengineering them. Choose the easiest and most natural path for the driveway or access road. The results are usually much more pleasing and a good deal less expensive than blasting a road through all manner of obstacles. In short, many of the natural features of the home-site and its immediate surroundings can be used in your favor in one way or another if you take the time and exercise the imagination to coordinate them into a master estate plan.
Then there is the matter of a view. No matter where or how your house is located there is always a view, actually several of them. They may be short range—20 feet into a forest, or long range—40 miles toward a mountain back drop. Whatever the case, situate the house, the windows, and the decks or porches so as to take the greatest advantage of them. And while you’re performing this chore, plug in a few other factors as well. You’ll want to see the sun rise from the breakfast nook, the sunset from the deck, the moon from your master bedroom window...
Does all this seem impossible? It isn’t really. Compromise is necessary, and there will inevitably be some elements that will have to be either disregarded or completely eliminated. Nonetheless, list all the advantages in order of priority, shuffle them about, and squeeze all the good out of them that you can. The result is worth the effort.
But how do you begin? About the best way to tackle the problem of siting is to gather up all your information, arm yourself with a bundle of survey stakes, a hammer, a big ball of string, and go to the building site. With a com pass, orient yourself so you know just where the cardinal directions lie, and then work out the sun and wind/weather tracks. Next, lay out one axis of the house so that it faces exactly in the direction you have selected as the most desirable (for solar designs, or for maximum solar input into non-solar designs, the major collecting elements should face due south, plus or minus about 15 degrees to the east or west).
The next step is to locate all the corners of the house, measuring out the proper distances with a 50- or 100-foot tape, keeping the whole outline as square and proportionate as you can. You’ll probably have to do a bit of re-staking and adjusting here and there, but with a little care you can make a surprisingly accurate layout. Run string from stake to stake to make an outline of the house. With a few more stakes you can include the first-floor rooms as well. You’ll just have to imagine any upper or lower levels, but now you should be able to visualize the appearance of the house after construction, and you can see approximately how well the structure will fit in with its surroundings. You can also see if you have goofed anywhere.
For instance, by relating your sketches and plans to the full-size outline you have just made, you might discover that some of your window placements are not as good as they could be. Or perhaps there isn’t quite enough room for the garage, the deck hangs out over a ledge or runs into a big tree that you want to save, or the driveway really shouldn’t go where you had planned to put it. With the house in place, maybe there is no longer enough room at the immediate site to readily truck in, maneuver, and yard the logs for the structure—which is a must. You could even find that the overall orientation is not quite right, and the entire house should be moved a few feet this way or that in order to take full advantage of some natural features. You might also discover some new advantages or different possibilities in the siting, or that you even want to re-site.
This kind of siting work is about the last chance you have to make any substantial changes and to reconsider your overall design. The final decisions should be made now, so that the paperwork can be finished, the final plans or working drawings made, and the business of site preparation begun. Therefore, there is no valid reason to rush at this stage. Take all the time you need, wander around the building site pondering and muttering to yourself. Shove all your questions back and forth until you get satisfactory answers; remember that you’ll have to live with them, probably for quite a while. Curb your impatience to get on with the project. When you have covered everything you can think of and are satisfied and content with what you have wrought, quit. Set the stakes and strings in their final approximate locations and leave them for future reference. Pack up your gear and go home to make a plot plan.
The plot plan is the last one of the entire series. It shows in outline form the piece of property and the house, plus any outbuildings, in dimensional relationship to the property boundaries (Fig. 2-4). The building and the plot should be oriented to the proper compass direction. This plan will also show the driveway, power line route, septic tank layout or sewer line, well or water line, and any other pertinent details including some of the major dimensions and distances. Depending upon the scale and the actual size of the plan itself, you can also include any of the principal topographical features immediately surrounding the house, such as gardens, shrubbery, and shade trees. Such a plan can often be drawn up using a property improvement (or other) survey map as a basis.
A similar large plan can be drawn of just the house and its immediate surroundings, that shows all the plantings and natural features. This is called a landscaping plan and is not usually a part of the standard blueprint pack age of a residence, but rather is for the convenience of the owner or for a professional landscaper’s use. Sometimes these plans are drawn up in minute detail by a professional landscape architect, even spelling out exactly what plants are to go where.
SITE PREPARATION
Site preparation is exactly what the term implies, getting the building site and the immediate vicinity ready for the construction process. To many builders this means hauling in a bulldozer and a backhoe, hacking out an access road, scrubbing the site clean and flat, gouging out a big hole for foundations, and carving a series of trenches for water lines, power lines, and waste disposal system. This could as easily be called “site ruination,” for the result looks like something left over from a bombing raid. Speed and convenience, which translates into dollars saved, are the demons that drive such builders. And to be sure, construction is a bit easier when there is nothing at all in the way and the site is as level as a pool table. How ever, the ultimate loss to the homeowner is sizable, because site restoration then must follow—at a huge outlay of both labor and expense and a lot of elapsed time. And the natural assets of the setting are virtually destroyed.
This is one aspect in particular of the building process where the homeowner is well advised to take an active part. The exact approach depends to some degree upon the type of foundation to be built, the kind and extent of the utilities systems, and the characteristics of the site. The goal to shoot for is an absolute minimum of disturbance to anything on or around the site that has not previously been earmarked as being fair game. This means careful consideration ahead of time about what must be moved or removed and what must not. Earth-moving and excavating machinery can be worked to great advantage if the operators are experienced, capable, and told exactly what they are to do, and have the benefit of constant supervision by someone who knows exactly what should be done. The homeowner usually best fulfills that role.
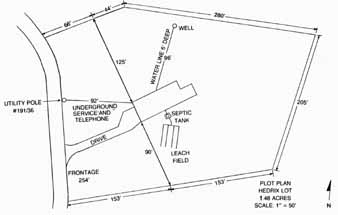
Fig. 2-4. Typical plot plan. A large version also might include grade
elevations, topographical features, sun and weather track, and other
site features.
It is possible for the homeowner to prepare the site almost entirely alone, and by hand. Don’t scoff; this has been done many times and will be again in the future. Not all of the following elements are necessary at every site, of course, but this is the general routine.
To begin, clear a route for the driveway, if necessary, by cutting out brush and trees with axe and/or saw. Buck up the trees and stack them to cure for firewood. Pile the brush and slash for removal, or burning it if that is convenient and permissible. Have the driveway rough-graded with a small machine. (Even though the job takes a bit longer, a small ma chine is more maneuverable and potentially causes less damage than a big one.) Determine ahead of time where any excess dirt will be placed. In some cases spoil dirt is best removed entirely from the site.
Perform the same tasks in the area where the construction materials will be placed and where the foundation will be built. If the foundation consists of piers, dig the pier holes with a post-hole shovel and a bar, or a power auger. Save the topsoil for use elsewhere, and pile the subsoil where it is handy for backfilling the piers; after the piers are set the little remaining subsoil can be scattered about.
A trench for underground power and telephone lines need only be 2 feet deep or less, and can be dug with a pick and shovel, or a power trencher that makes only a narrow slit. Water lines can be laid in the same way in warm areas, but in cold climates will have to be dug down 4 or 5 feet or more by machine, preferably a small, narrow-bucket backhoe. Choose a path that will disturb the least amount of vegetation and at the same time involve the least amount of digging. The hole and trenches for a septic tank and leach field can be dug by hand, but that’s a big job; a machine is faster, easier, and damage can be minimized with care. However, all backfilling can be done by hand.
Most other kinds of foundations require a certain amount of excavation, and the only practical means is by machine. Again, opt for the smaller ones, and have a spot already picked out for disposal of spoil dirt. Exception: if a large full basement must be dug back into a hillside and a great deal of spoil removed, a big bucket-loader will do the job better, faster, and cheaper. Some of the spoil will be needed later for backfill, so this should be kept close at hand but out of the way of the construction work. Use the remaining spoil advantageously for fill or contouring, if possible; otherwise, have it trucked away. Topsoil should be scraped off first and set aside for later use in re-vegetating.
Investigate the relative difficulties of re-vegetating your particular area. In some places a cut made even deep into the subsoil will quickly re-cover itself and take on a natural appearance in short order. In semi-arid or arid areas, however, the natural process can take years. Forced restoration of vegetation is also difficult and costly, and can take a lot of time and attention before presenting a decent appearance.
In many cases a driveway comes directly to the house, so the parking pad, turnaround spot, or the area on which the garage will eventually sit are good possibilities for material storage and vehicle parking during the first stages of construction. Try to avoid indiscriminate piling of materials here and there around the site. Also avoid random driving around the building, especially when the ground is moist. The resulting damage is very difficult to repair. Sometimes the driveway and garage or parking pad are separated from the residence proper by a considerable distance. If so, the excavating equipment must make a track from drive way to house site, but you should only have to use it a few times. If you keep supply trucks and workers’ vehicles off this track, your sub sequent job of restoration will be much easier. Though more effort is involved at the time, store materials in the driveway and pack them to the construction site by hand. There might be a lot of complaining about this, but the alternative for you is a considerable amount of cost and labor later on in repairing the dam age to thoroughly torn up premises.
You’ll be accused of doing everything the hard way, but if you make a conscious, deter mined effort to preserve every shrub, bush, tree, patch of natural wild grass, and clump of flowers, within a year after construction your new home will look as though it has always been right there.
One last point. Of all the natural elements to be found on your building site, by far the most valuable are the trees. Try to preserve every single tree possible around the site that hasn’t been used for building. It takes a long time to grow a tree, but only a few minutes to destroy one. Trees that are damaged during house construction might well die within a sea son or two. Protect any trees that are close to the building site and might suffer mechanical damage by wrapping the trunks with burlap sacking or standing a row of boards or a ring of old auto tires in a cylinder around the trunks, wired or tied in place. If the bark of a tree gets gashed or skinned off, trim the bark carefully and then paint the wound with a commercial tree paint.
Re-contouring the land also presents difficulties. If you push fill dirt around the trunk of a tree any deeper than just a few inches above the original grade, the tree is likely to die. Likewise, if you strip the soil away from around a tree, even if you don’t lop off any major roots, it is also likely to die. When the grade level must be raised around a tree, build up a masonry or stone wall in a cylinder around the trunk first. This creates a well that should allow at least a foot of free space around the tree trunk; 2 or 3 feet is better. Base the wall on the original grade, then fill around the out side of it to the new grade level (Fig. 2-5). When you lower the grade level around a tree, reverse the situation, leaving a circle of original earth around the tree several feet in diameter. Build up a retaining wall from the new grade to the old, or higher (Fig. 2-6). Even at that, the tree might die if you have to cut away much of the root system. But both of these methods work fairly well in preserving trees that otherwise would be lost. The same methods, incidentally, serve equally well to preserve large shrubs and clumps of bushes.
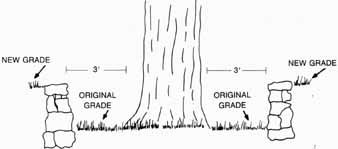
Fig. 2-5. When a new, higher grade level is established around a
tree, create a large well around it with rock, railroad ties, or concrete
landscaping block and leave the original grade undisturbed.
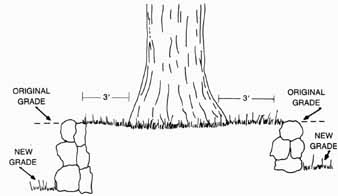
Fig. 2-6. When a new, lower grade level is established, maintain
the original grade level for 3 feet or more around a tree by cribbing
the soil with rock, railroad ties, or concrete landscaping block.
PREV: About Log Houses
NEXT: Working with Logs
© CRSociety.net