Cutting Tools
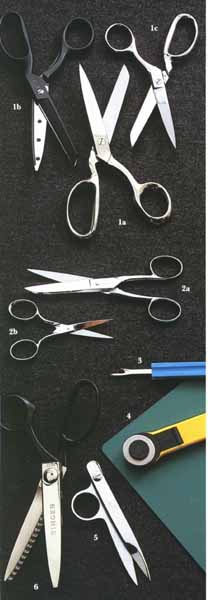
Buy quality cutting tools and keep them at their best with periodic sharpening by a qualified professional. Scissors have both handles the same size; shears have one handle larger than the other. The best quality scissors and shears are hot-forged, high-grade steel, honed to a fine cutting edge. Blades should be joined with an adjustable screw (not a rivet) to ensure even pressure along the length of the blade. Sharp shears make clean cuts and well-defined notches. More important, they don't damage fabric. Dull shears slow the cutting process, and make your hand and wrist tire easily. Sewing shears should not be used for other household tasks such as cutting paper or twine. Scissors and shears last longer if you occasionally put a drop of oil on the screw assembly, wipe them clean with a soft dry cloth after use, and store them in a box or pouch. The following list relates to the image of cutting tools immediately following it:
1) Bent-handled dressmaker’s shears are best for pattern cutting because the angle of the lower blade lets fabric lie flat on the cutting surface. Blade lengths of 7” or 8” (18 or 20.5 cm) are most popular, but lengths up to 12” (30.5 cm) are available. Select a blade length appropriate to the size of your hand — shorter lengths for small hands, longer lengths for large hands. Left-handed models are also available. If you sew a great deal, invest in a pair of all-steel, chrome-plated shears (1a) for heavy-duty cutting. The lighter models with stainless steel blades and plastic handles (1b) are fine for less-frequent sewing or lightweight fabrics. For synthetic fabrics and slippery knits, a serrated-edge shears (1c) gives maximum cutting control.
2) Sewing scissors (2a) have one pointed and one rounded tip for trimming and clipping seams and facings. The 6” (15 cm) blade is most practical. Embroidery scissors (2b) have 4” or 5” (10 or 12.5 cm) finely-tapered blades. Both points are sharp for use in hand work and precision cutting.
3) Seam ripper quickly rips seams, opens buttonholes and removes stitches. Use carefully to avoid piercing the fabric.
4) Rotary cutter is an adaptation of the giant rotary cutters used by the garment industry. It works like a pizza cutter and can be used by left or right-handed sewers. Use the rotary cutter with a special plastic mat available in different sizes. The mat protects both the cutting surface and the blade. A special locking mechanism retracts the blade for safety.
5) Thread clipper with spring-action blades is more convenient than shears and safer than a seam ripper.
6) Pinking shears or scalloping shears cut a zigzag or scalloped edge instead of a straight one. Used to finish seams and raw edges on many types of fabric, they cut a ravel-resistant edge.

Pressing Tools
Pressing as you sew is one important procedure that's often neglected. It may seem like a needless interruption, but pressing at each stage of construction is the secret to a perfectly finished garment.
If you need help getting into the pressing habit, locate your pressing equipment near your sewing area. It also helps to press in batches. Do this by stitching as much as possible at the machine. Then press all the stitched areas at one time.
Pressing doesn't mean ironing. In ironing, you glide the iron over the fabric. In pressing, you move the iron very little while it's in contact with the fabric. Use minimum pressure on the iron, and press in the direction of the fabric grain. Lift the iron to move to another section.
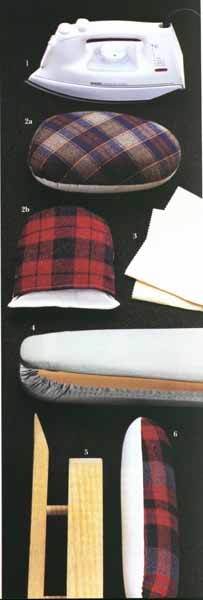
Your pattern directions usually tell when to press, but the general rule is: Press each stitched seam before crossing with another. Press on the wrong side to prevent iron shine, and protect the iron’s soleplate by removing pins before pressing. The following list relates to the image of pressing tools immediately following it:
1) Steam/spray iron should have a wide temperature range to accommodate all fabrics. Buy a dependable, name-brand iron. An iron that steams and sprays at any setting, not just the higher heat settings, is helpful for synthetic fabrics.
2) Tailor’s ham or pressing mitt is used when pressing shaped areas such as curved seams, darts, collars or sleeve caps. The ham (2a) is a firmly-packed cushion with rounded curves. One side is cotton; the other side is covered with wool to retain more steam. The mitt (2b) is similar to the ham but is especially handy for small, hard-to-reach areas. It fits over the hand or a sleeve board.
3) Press cloth helps prevent iron shine and is always used when applying fusible interfacing. The transparent variety allows you to see if the fabric is smooth and the interfacing properly aligned.
4) Sleeve board looks like two small ironing boards attached one on top of the other. It is used when pressing seams and details of small or narrow areas such as sleeves, pants legs or necklines.
5) Point presser/clapper is made of hardwood and used for pressing seams open in corners and points.
The clapper flattens seams by holding steam and heat in the fabric. This tool is used in tailoring to achieve a flat finish and sharp edges on hard-surfaced fabrics.
6) Seam roll is a firmly packed cylindrical cushion for pressing seams. The bulk of the fabric falls to the sides and never touches the iron, preventing the seam from making an imprint on the right side of the fabric.


