Perfect machine stitching is easy to achieve if you thread the machine properly and make the right adjustments in the stitch length, tension and pressure. These adjustments depend on your fabric and the kind of stitch desired. Consult your machine manual for threading procedures and location of controls.
The stitch length regulator is on either an inch scale from 0 to 20, a metric scale from 0 to 4, or a numerical scale from 0 to 9. For normal stitching, set the regulator at 10 to 12 stitches per inch, or at the number 3 for metric scale machines. On the numerical scale, higher numbers form a longer stitch; if a shorter stitch is desired, dial a lower number. An average stitch length is at number 5.
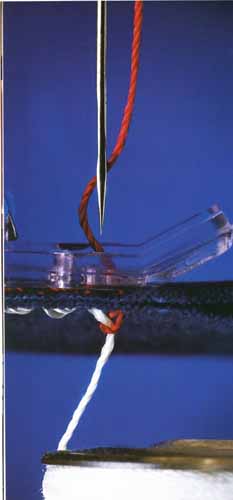
A perfect stitch depends on the delicate balance of pressure on the fabric, action of the feed, and tension on the stitch formation. In the ideal stitch, both top and bobbin thread are drawn equally into the fabric, and the link is formed midway between fabric layers.
The stitch tension control determines the amount of pressure on the threads as they pass through the machine. Too much pressure results in too little thread fed into the stitch. This causes the fabric to pucker. Too little pressure produces too much thread and a weak, loose stitch.
Adjust the pressure regulator for light pressure on lightweight fabrics, more pressure on heavy fabrics. Correct pressure ensures even feeding of the fabric layers during stitching. Some machines automatically adjust tension and pressure to the fabric.
Always check tension and pressure on a scrap of fabric before starting to sew. When experimenting with pressure and tension, thread the machine with different colors for top and bobbin thread to make the stitch links easier to see.
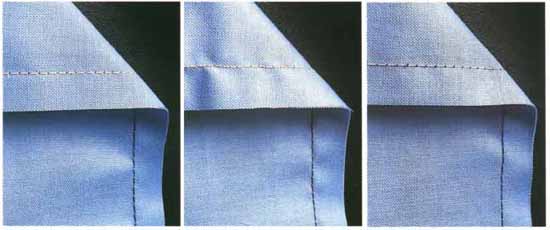
Straight Stitch Tension and Pressure
(left) Correct tension and pressure makes stitches that are linked midway between the fabric layers. The stitches look even in length and tension on both sides. Fabric layers are fed evenly through the feed and fabric isn't marred. (center) Too tight tension results in stitch links that are near the top layer of fabric. Fabric is puckered, and stitches are easily broken. Turn tension dial to a lower number. If pressure is too heavy, the bottom layer gathers up and may be damaged. Stitches may be uneven in length and tension. Dial pressure regulator to a lower number. (right) Too loose tension results in stitch links that are toward the bottom fabric layer. Seam is weak. Correct the problem by turning tension dial to a higher number. Too light pressure causes skipped and uneven stitches, and may pull fabric into the feed. Dial pressure regulator to a higher number.
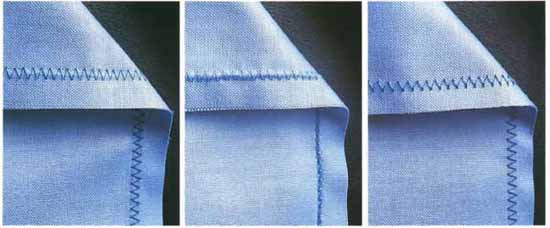
Zigzag Stitch Tension and Pressure
(left) Correct tension and pressure in zigzag stitching produces stitches in which the interlocking link of threads falls at the corner of each stitch, midway between fabric layers. Stitches lie flat and fabric doesn't pucker. (center) Too tight tension causes fabric to pucker. The thread link falls near the top fabric layer. To correct, decrease the tension. Incorrect pressure isn't as apparent in zigzag as in straight stitching. But if the pressure isn't accurate, stitches will not be of even length. (right) Too loose tension causes the bottom layer to pucker and the thread link to fall near the bottom fabric layer. Increase tension to balance stitch. The zigzag stitch should be properly balanced in normal sewing. Loosen tension slightly for decorative stitches, and the top stitch pattern will become more rounded.


