|
Before you decide to buy a new sewing machine, you may want to consider keeping the one you have, for several reasons. First, not all old machines are useless. In fact, some of them make
better stitches than newer machines. Second, keeping, cleaning, and possibly repairing the machine you have will be much cheaper than buying
a new one. HOW TO CLEAN AND REPAIR THE MACHINE YOU HAVE A sewing machine is the most complicated appliance you have in your
home. Perhaps it's stretching a point to compare a sewing machine to a car (both have a motor, belts, gas pedal, gears, lights), but I find that many sewers have the same attitude toward both: You want it to get you there, but you don’t care how it works. Well, you don’t have to know how your car works to understand that you must change the oil and clean the air and gas filters once in a while. Doing so will prolong any car’s life and keep it running smoothly. It is easy and economical to take good care of your sewing machine—much easier and cheaper than taking care of your car, that’s for sure. By cleaning your machine yourself, you will save the typical $39.95 dealers charge for a “tune-up” and double the life of your machine. Keep that $40 (and the fabric it can buy) in mind as you read the following sections; it helps to make a potentially tedious topic a lot more interesting. Why and when to clean and oil You must clean your sewing machine to keep it free of dust, grit, and gummy grime, like that caused by cigarette smoke or poor-quality or inappropriate sewing-machine oil. All of these materials act like sandpaper and glue, resulting in the machine’s poor sewing performance and , ultimately, shortening its life. Enter enough grit, gum, heat, and friction and the machine stops dead. When metal rubs against metal, the result is friction and heat, wear and tear, and , finally, poor performance or breakdown. You must oil your sewing machine, but not the motor, to keep the parts moving if the manufacturer recommends doing so. (Most older machines and some new ones require oiling, but some are designed to be self-lubricating, and it's a mistake to oil them. Check the manual that came with your machine.) Many of today’s sewing-machine manufacturers have replaced metal parts with plastic ones for sensible reasons: plastic is lighter and cheaper than metal, of course. And certain kinds of plastic—nylon, for instance—are self-lubricating and very tough. But plastic is more susceptible to grit, and it doesn’t have the expansion and contraction properties of metal, so it can crack. While cleaning and oiling are sewing-machine maintenance twins—things that you usually perform at the same time—they are really very different tasks: cleaning takes out the grit; oiling lubricates. You take out the grit before you put in the oil. Inspecting the machine There is an important difference between “repair” and “inspect and clean.” Few of us are prepared to repair sophisticated mechanical equipment ourselves, and I don’t think we should. But, with a bit of guidance, all of us are capable of inspecting and cleaning any piece of household machinery. We do it all the time with typewriters, vacuum cleaners, refrigerators, stoves, irons, and , when push comes to shove—my personal nemesis—cars.
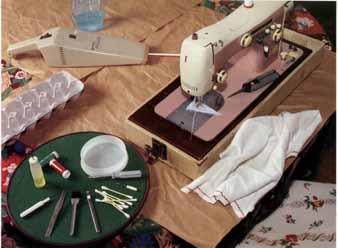
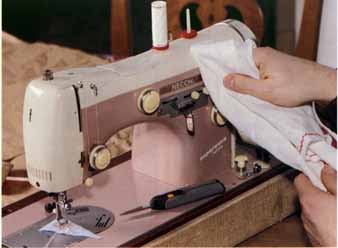
To inspect a machine, set it on brown (grocery-store bag) paper, newspapers, or carpet squares (to keep tools and screws from rolling around) on a well-lit, sturdy, flat surface (see the photo above). I use the kitchen table. Have your tools within reach. Unthread the machine and remove the needle, foot, and bobbin. Plug in the machine, step lightly on the gas pedal and listen. Yes, close your eyes and listen. A “healthy” machine runs quietly, is clink- and tick free, and is relatively free of vibration, especially at modest speed. Machines with rotary hooks, where the hook goes continuously around, usually sound quieter than oscillating ones, where the hook goes back and forth. Also, more expensive models should sound quieter than cheaper ones. The machine shouldn’t sound like your electric mixer when you ask it to handle too much cookie dough. When you buy a new or reconditioned machine, close your eyes and memorize its “healthy” sound. You’ll quickly be able to tell when your machine needs help if and when the sound changes. The machine shouldn’t hesitate to start when you step on the accelerator. If the motor hums, strains, and hesitates, and then the machine takes off rapidly, the machine probably needs to be lubricated. Complete the inspection and cleaning process as I recommend, and you may find that the machine will be more responsive. Don’t run a machine that makes loud noises or clicks or that shows a lot of resistance to the motor; there may be a serious problem. Unplug the machine and take it to the repair shop.
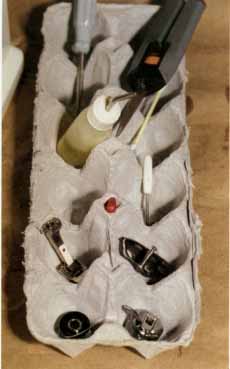
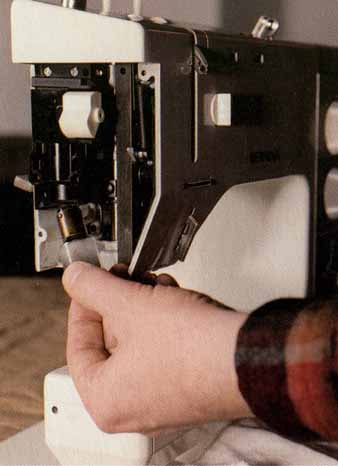
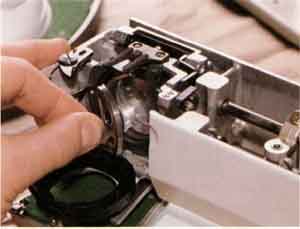
Cleaning the upper level of the machine Before going “under the hood,” take a moment to inspect and clean some of your machine’s important external parts. • Clean the thread spool-holders and replace the circle felt pads if worn. The pads keep the spool turning smoothly and prevent clattering. • Clean the thread-tension discs and bobbin-winder spring with a soft cloth dipped in some rubbing alcohol. • Clean the outside “skin” of the machine with a soft cloth sprayed with a household cleaner. • If the motor belt and bobbin rubber ring are worn, buy replacements at any hardware store. • If there are nicks in the needle plate, buy a replacement plate at any sewing-machine repair shop. Now let’s go inside. There are one to four servicing entrances on most machines: the needle-and-light door, the lid, the bobbin-mechanism door, and the bottom-of-the-machine door (see the photos below). First open the needle-and-light door, which is the left-hand door just above the needle, if there is one. It usually hinges open to the left, snaps off, or is held in place with a single screw. Put the screws and all the parts you remove in an egg carton or ice-cube tray, where they will be easy to find and differentiate when reassembling.
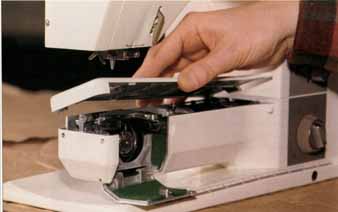
Now take off the lid (check your manual to see if the manufacturer indicates maintenance points here; some newer machines don’t). Usually there are one or two screws holding the lid in place. Unscrew them (they can be very long), and gently jiggle the lid a little to see which way it comes off. Some lids slide, some clip on, some are hinged, and some just fall off. Once the needle-and-light door and lid are off or open, you can look inside. Do not panic. You are not going to do anything here but inspect and clean. Relax, you no longer need the screwdriver. Now take a deep breath and a good look.
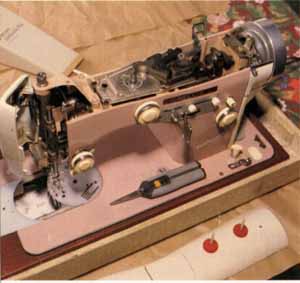
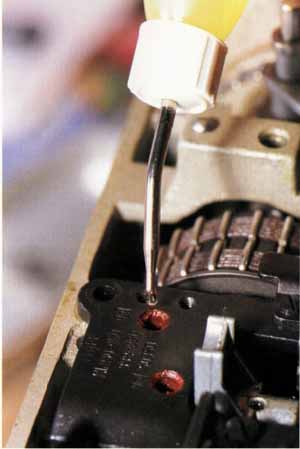
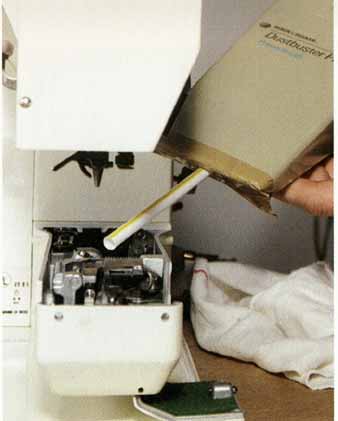
Some machines have just a few parts, while others, like the sophisticated mechanical ones built in the ‘50s and ‘60s, are often very complicated and look a lot like intricate clock mechanisms. Look for red (“oil me here”) dots, moving parts (turn the handwheel toward you a bit), plastic parts, and belts. The red dots identify points of high friction. If they are dry, put one drop of good-quality sewing- machine oil on each (see the photo at right). If your machine doesn't have any oiling dots, put a drop of oil on any point where two pieces of metal are moving against each other (plastic and nylon parts don’t need oil). Are there any cracks in the plastic parts of your machine (hairline cracks may not matter right now, but keep your eye on them)? Are the drive belts worn thin, slipping, or cracked? If so, bring the machine to a reputable dealer and have those parts replaced before they cause serious damage. Turn the handwheel toward you. Things should be moving smoothly. Now look at the left end of the machine. Unscrew the light bulb and clean it with a nonabrasive household spray cleaner; it usually gets covered with fabric resins and oil film. Dry it well, but don’t replace it yet. Clean the inside of the front cover to help diffuse more light onto your sewing. If the surface next to the light bulb is dark or dull, you can improve the lighting by pasting a piece of aluminum foil there, shiny side out. If the bulb is very old, get a new one; it will be brighter. Your eyes are worth 59 cents. Locate the upper part of the shaft that holds the needle. This is a high friction area, so clean and oil this shaft often, If you see a lot of fuzz, use a vacuum to suck it out. Most vacuums are too strong for this, so I just cover the mouth of my Dustbuster with duct tape, pierce a hole in the tape with a sharp pencil, and insert a plastic drinking straw (see photo). It works great. Don’t blow your own air or canned air into the machine; that just sends the dust deeper and will cause more problems later Does the needle shaft feel dry? If so, put a drop of oil on your finger and rub it up and down that part. Turn the handwheel toward you a few rotations to spread the oil around. Also put one drop of oil on the thread-uptake lever and the foot-pressure lever. Too much oil anywhere in this area of the machine will drip on your fabric, so use a light hand. Replace the bulb. Put the lid and side panel back in place, and move on to the next step.
Cleaning the middle level of the machine Accumulation of fibers, dust, grit, oil, and dead skin forms a “felt” under the feed dogs of all sewing machines. Eventually, this felt will prevent the dogs from rising to their proper height to pull back the fabric to make the stitch. Soon the stitches seem to get shorter in spite of the fact you haven’t changed the stitch- length setting. When this felt really builds up and petrifies with age, the machine will stop feeding your fabric altogether. Unscrew the plate below the needle (some just flip off; check your manual) to expose the feed dog and the area around it. Use a soft brush, a vacuum, and then a soft, cloth-covered cotton swab to clean out all the dirt, lint, and dust.
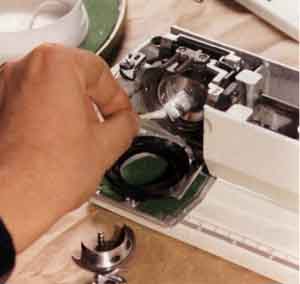
The bobbin area is another point of high friction on a sewing machine. Take out the removable parts and clean them regularly, following the directions in your manual (see photos above). On some machines, the bobbin race is held in place by a clamp, but in others it's built in, and there is no case for the bobbin. No matter which kind, vacuum the dust, threads, and grit out now. If there is a heavy buildup, loosen the fuzz or felt with a brush with one hand while holding the vacuum near it with the other. After vacuuming, clean the part with a soft cloth or cotton swab on which you’ve put a drop of oil (see photo below), Again, don’t blow the dust farther into the machine; the object is to get the dirt out, not to hide it!
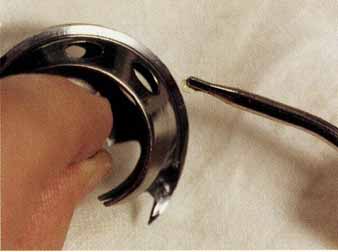
Never use a metal tool to clean around the bobbin area. Nicks and scratches on the hook destroy thread. If the nick or scratch is minor, you can probably smooth it out with a bit of crocus cloth from your hardware store. If the damage is serious, get a new race from your dealer. You don’t have to bring in the machine, just the part. Look at the hook carefully. There is an oil groove ¼ in. from the edge on each side. Using your fingernail wrapped in a soft cloth, wipe out the groove Now put one small drop of oil on each side of the hook (see photo) and fit it back into the shuttle (don’t force it; it will fit right in if you turn it right). Lock the race into place, and close the bobbin area door. You’re almost done. There’s one more step—and it's an easy one.
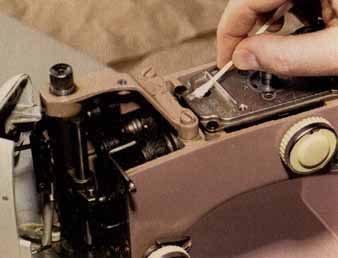
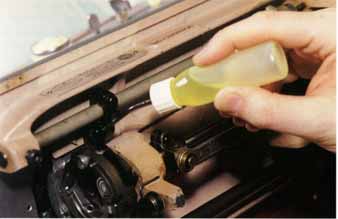
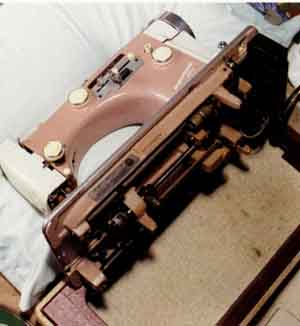
Cleaning the lower level of the machine Flatbed machines, especially those in tables or carrying cases, usually have no bottom cover (Singer machines are an exception; just remove the screws that are usually hidden in the rubber feet). Tilt the machine back on its hinges, and oil the moving parts just as you did on the top of the machine (see the photo above). I like to tilt my machine back onto an old bed pillow, as this steadies it and makes it easier to work on (see the photo below).
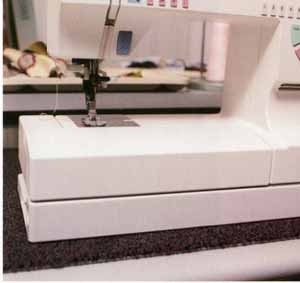
Free-arm machines hide the lower mechanism of the machine under a small sleeve. Sometimes you get to these parts from the top of the free arm (on Bernina and Elna models, for example) and sometimes from the bottom. Some machines have a release lever, while others have screws. Check the manual to see if there are lubrication points on the bottom of your machine. There, you’re done. Set the machine right side up. Insert a new needle, and thread the machine with high-quality cotton. Put some fabric under the foot, plug her in, and step on the gas. Can you hear the difference? Questions? Call a dealer that sells your brand of machine and ask. Good dealers don’t mind answering maintenance questions, knowing that you will eventually bring the machine in for a major checkup or repair. But don’t let the dealer talk you into a $80 tune-up if you can do it yourself. HOW TO MODERNIZE AN OLD MACHINE While an older sewing machine will never have the built-in conveniences of a computerized machine, there may be lots of reasons for you not to trade it in or throw it out. You may even consider buying a good used machine if the price and features suit you. Older machines were built to last; that’s why so many of them, perhaps yours, are still going strong. Because they have no electronic components, they are not affected by irregularities in electricity, and you need not fear using magnets like pin holders or seam guides around them. These quiet, smooth-running machines are relatively easy to keep in excellent working order; repairing them is usually inexpensive and uncomplicated assuming they have been taken care of over the years. But the best reason for keeping your old machine may be the quality of the stitch. Some of these oldies produce the finest straight stitch you have ever seen; you need only to talk to the owner of a little Singer Featherweight to know what I’m talking about. That’s all this Singer does, but it does it very, very well. Another reason to keep your machine is that many hold on to a good portion of their value, and some are even worth more today than what they sold for originally. A used Bernina 830 or 930 isn't cheap if you are lucky enough to find one. Sewers in the know wait in line for a used Pfaff 1222. If money doesn’t speak to you, then perhaps sentiment will. One of the best reasons to hold on to that old machine is that you love it. Perhaps it was given to you as a wedding present. Perhaps it was your mother’s or grandmother’s. Perhaps you had to scrimp and save nickels and pennies to get it, or perhaps you used it to sew your first baby’s clothes. You can’t give up those memories, and you just can’t give up that beautiful old machine. So don’t. With a few tricks I’ve learned over the years, you can modernize that older machine and feel like you’ve just gone out and spent a fortune on the latest top-of-the-line model. Well, almost! Here are 10 ways to modernize an older machine: Bobbin-empty indicator New machines often beep or flash when the bobbin thread is about to run out. What a convenience, especially when you are doing decorative work. You can have this feature on an older machine by using this little trick: Before you start sewing, fill two bobbins with the same thread. Put one of them in the usual place, and use the other as the top thread. Since you use nearly the same amount of top and bottom thread, when the top bobbin is getting low, so is the one under the needle that you can’t see. Voilà! A bobbin-empty indicator. Needle up/down Most new machines allow you to choose whether you want the needle to be in or out of the fabric when you stop sewing. You push a button, for example, and the needle always stops in the fabric—a very handy feature. By keeping your older machine in tip-top running order, by oiling it regularly, and by making sure the belts and foot control are in good shape, you can regulate the position of the needle with a simple tap of the control. A clean, well-oiled machine should be very sensitive to the foot control and not start and stop unpredictably. Have your machine tuned by your dealer or follow my cleaning and maintenance directions and you will be amazed at how responsive your machine can be. Portability Unlike older machines, most modern ones have built-in handles so you can carry them around. If your older machine is fixed into a sewing table, you can remove it and put it into a travel case. Ask your dealer if he has a good used case that fits your machine. Because your older machine is probably heavy, you can then put it on a luggage carrier and wheel it around. You can remove a flatbed (as opposed to a free-arm) machine from its carrying case or table and set it on any tabletop or flat surface. It has built-in metal feet that allow it to stand upright for repairs. Make a heavy-duty canvas carrier much like one used to carry logs, and you have turned your stationary machine into a portable. Quiet function Many of the older machines are actually quieter than newer ones. But you can soften the sound of any machine by putting it on a carpet square or a rubberized place mat (see photo). This will reduce vibration and keep the machine from sliding around. If your machine is in a sewing table, you can quiet it considerably by putting some flannel or sound-deadening foam in the space underneath it.
Horizontal thread feed When thread is unwinding from a vertical spool, it tugs at the spool itself, causing drag and friction. Modern machines and some older ones, such as the Singer Touch and Sew models, allow you to place the spools horizontally so the thread slips off without turning the spool. The result is a smoother stitch. You can have this feature for a few dollars by buying a thread stand. A thread stand allows the spool to remain stationary, while the thread is brought up vertically and then carried over to the machine. The heavy metal stands are the best, but you can use the cheaper plastic version by putting some modeling clay in the cavity underneath so the stand won’t tip when you use a large cone of thread. Fancy stitches One of the most seductive qualities of newer machines is their astonishing menu of stitches that you can call up, often at the push of a button. You will never get these stitches on your 1939 Singer, but chances are you have one of those Sears, Elna, or Brother models that came with cams—the little, round plastic things that you never use. Dust them off and use them. There are probably other types of cams besides the ones that came with your machine, so ask your dealer if he has them. A box of cams should cost only a few dollars. Some of these cams (Elna, for example) are marked so that you know where the pattern begins and ends. If yours have no marks, it’s easy to mark them. Cut out a small triangle from the sticky portion of a Post- it note and put it on the cam where the pattern begins. Put a similar mark on the machine opposite the cam. When the two triangles meet, you’ll know you are at the end of the pattern. Good lighting Older machines (and many modern ones for that matter) often have very poor lighting in the needle area. Modern machines use quartz lights that provide a whiter, brighter light, But you can have excellent lighting by simply taking out and cleaning or replacing the bulb. Most of the bulbs in older machines last a long time but yellow with age. You can also line the inside of the light area with a small piece of aluminum foil, shiny side out, Use a glue stick to set it in place. Of course, the best way to improve lighting on any machine is to do what’s done in commercial sewing—buy a cheap gooseneck lamp and set it so you can direct the light just where you want it. If you don’t like the idea of setting the lamp on your sewing table, buy a cheap 1950s gooseneck floor lamp, put it at your right elbow, and aim one of the lights at the needle area. Automatic needle threader It’s such a great idea, but how many built-in needle threaders have you seen that actually work? Not many are useful. But there is a very simple thing you can do to “automatically” thread any machine; my Aunt Jane taught it to me ages ago, and I’m passing this professional “secret” on to you. Never unthread your machine. When you want to change the top thread, cut it off at the spool. Tie the new thread to the old with a box knot and , with the presser foot level in its up position, pull the knot through the entire system until it gets to the eye of the needle. At that point, hold the thread on both sides of the needle and gently pull the knot through. You just automatically threaded your machine in a few seconds. Auto thread holder/cutter Almost all new machines have a little clip and blade just above and to the left of the needle area to hold and cut your thread. Some older machines have a piece of black steel clipped to the foot shank, but I never liked these very much. Here are two things you can do: First, for $3 you can buy a holder/cutter and paste it to the side of your machine. Or if you are a do-it-yourselfer, you can simply tape a bent, smooth paper clip to the bed of your machine. The clip will hold the thread, but it won’t cut it. Shiny new exterior Let’s face it—a new machine is a new machine. Just like a new car, it smells good, looks good, and feels good. When was the last time you took your machine to the beauty parlor? Get some cotton swabs, a soft cloth, household spray cleaner, and machine oil. Loosen screws and get into those corners with that grease-and-oil remover. Dry the machine well with the cloth, then put a drop of machine oil (but never 3-in-One oil) on that cloth and polish it up. Go ahead, dab a little of your favorite perfume on that soft cloth and rub it over the machine to make her smell pretty. You know that a clean car drives better; well, a clean machine sews better, too.
|
| PREV: Smart Ways to Choose a Sewing Machine | NEXT: Smart Ways to Buy a Sewing Machine | Home |
Saturday, 2020-05-02 8:15