The basics of sewing—machine stitching, hand sewing, pressing and assembling—are
especially important when you’re using shortcuts. Your ability to handle these
elements determines the success of the garment you make and how much time you’ll
save.
MACHINE TECHNIQUES
Good machine stitching is the biggest difference between the finish of a professional and the look of an amateur. It determines the appearance and durability of
every garment, and it can't be overemphasized. The most valuable timesaver
you’ll ever learn is how to use your sewing machine to the best ad vantage.
Learn to stitch it right the first time—it’s time-consuming and boring to rip
it out and stitch it again!
Adjust the Machine for the Fabric
Insert the correct size and type of needle. This procedure is made easy for the home sewer since the shank of the machine is flat on one side with the long groove on the other side. The needle is always placed in the machine so that the thread is inserted into the long groove. This groove always faces the last thread guide on the machine. (Fig. 7)
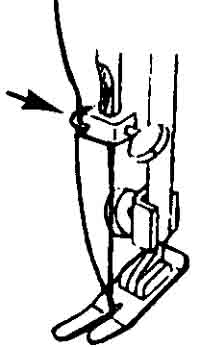
Thread the machine. Place the spool of thread on the spool spindle so that the slash is at the bottom of the spool to prevent the thread from catching in the slash. If there isn’t a small felt circle under the spool, place one under it so that the thread will feed off the spool properly through the guides, tension discs, and take-up lever. To thread the needle, cut the thread at an angle. The thread should be relaxed when you cut it. If it's taut, the end will unravel and require further trimming. Slide the end of the thread down the groove of the needle until the thread slides into the needle hole. All you have to do then is catch the end on the other side and pull the thread through. If you have difficulty seeing the needle eye, hold a white card behind the needle.
Fill the bobbin and place it in the bobbin case. The slash on the bobbin case indicates the proper way to insert the bobbin. The thread comes off the bobbin in the direction of the slash (Fig. 8)
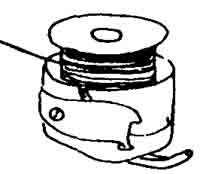
Pull the bobbin thread up through the needle hole by holding the needle thread firmly in your left hand and turning the hand wheel with your right hand. The needle will enter the needle hole and bring the bobbin thread up. Pull both threads—bobbin and needle—back and under the ç foot about 6” (15.2 cm).
If the bobbin on your machine isn’t filled through the needle, you can use this industrial timesaver— set up a bobbin spool for filling and let it fill while you are stitching so that you will be ready for the next garment.
Use the straight-stitch foot and small-hole throat plate instead of the zigzag foot and plate when straight stitching for greater control, speed, and accuracy.
Check the stitching. Before beginning each new garment, make a line of stitching across the bias through two layers of fabric to check the tension, thread color and size, needle size and sharpness, stitch length, and stitch formation.
Adjust the tension. Stitch seams with a balanced tension so that the stitches look the same on both sides of the work. Loosen the upper tension for ease- basting and some topstitching.
Regulate the pressure. The fabric should feed evenly and smoothly.
Set the stitch length. The stitch length is important in all stitching. Most seams are stitched with 10—12 stitches per inch or a 2—2½ mm stitch. This length is sometimes referred to as regular, regulation, or permanent stitch.
A longer stitch, 6—10 stitches per inch (2½— 4 mm), is needed on vinyl, leather, suede, and pseudosuede fabrics to avoid cutting the material. Heavy or bulky fabrics also require a longer stitch because the fabric thickness causes the stitch to shorten.
A short stitch, 20 stitches per inch (1.25 mm), is used for reinforcing.
A very short stitch, 30 stitches per inch (.75 mm), is used for security.
A basting stitch, 6 stitches per inch (4 mm), is used to hold two or more layers together temporarily and to mark garment sections.
The stitch length can be changed anytime to meet your needs. If you near the end of a stitching line and see that another stitch will carry the line too far, ad just the stitch length to a shorter length. Apply this technique whenever you must stop precisely, as when you are stitching buttonholes or setting pockets.
Set the stitch width. Adjust the stitch width for the desired stitch pattern. The stitch width on most zig zag machines can be adjusted from 0—4 mm. One mm is a narrow width, 2 mm is medium, and 3-4 mm is wide. Replace the straight-stitch foot and small-hole throat plate with the zigzag foot and plate, and set the stitch pattern.
The Sewing Procedure
Approximately 75% of your time is spent get ting ready to sew and cleaning up after you sew, leaving only 25% for stitching. If you rip a lot, you may stitch as little as 10% of the time.
Save a little clean-up time with advance preparation. Spread the floor with a crumbcloth and place a wastebasket near the machine.
Don’t waste time. Have everything you need on hand, ready to sew, when you begin working. Organize your work into units so you won’t waste time looking for pieces. Place the sections you plan to stitch first in your lap; place the other sections on a nearby table.
Work with a positive attitude. Strangely enough, it's easier to get a professional finish in less time when you expect it.
Arranging Your Work
Position the fabric under the presser foot with the bulk to the left. When you set waistbands and stitch shell hems, position the bulk to the right of the presser foot.
Match the cut edges of the fabric layers unless directed otherwise. Match the notches, clips, or other indicators as you work.
Complete all small sections such as pockets, flaps, and collars first.
Stitch directionally. Arrange the garment sections so that you will be stitching with the grain. This will preserve the grainline and prevent stretching. Generally, stitch from the wide part of the garment section to the narrow part when stitching directionally. (Fig. 9)
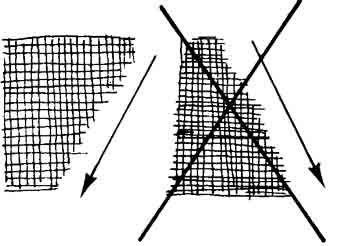
Shoulder seams especially should always be stitched directionally from the neckline to the arm hole. This not only preserves the grain in the shoulder area, it also ensures matching the seam exactly at the neckline. If the seam is off ½” (3.2 mm) at the armhole, it's less critical than if it's off ½” (3.2 mm) at the neckline.
Directional stitching is especially important to pre vent rippling when seams are self-finished. Self-finished seams include French, standing-fell, and flat- fell seams.
Arrange as you go. Arrange only the first inch or less for stitching before placing the work under the presser foot; anchor it by lowering the needle into the fabric and the presser foot down; then arrange the next section, which may be 6”—10” (15.2 cm— 25.4 cm) on straight sections or 1”—2” (2.5 cm—5.1 cm) in intricate areas. Try to arrange from one notch to the next without pinning. If you need a lot of pins to hold the fabric in place, hand baste in stead. Pin basting takes more time than you realize because you must remove the pins as you stitch. Do not stitch over pins.
Arrange your work so that you always stitch away from difficult-to-match points instead of toward them.
Sew flat. Complete as much as possible on each section before joining it to another. Set the pockets, zipper, collar, finish the unnotched facing edges, and apply any trims while the sections are fiat.
When you are stitching a loop seam such as an armscye, sleeve, or pant leg, stitch inside the loop or circle. Overlap the stitching line at the beginning and end for ½” (12.7 mm) instead of using a back- tack.
Stitching
Hold the needle and bobbin threads securely be hind the needle to eliminate a thread bubble or an unthreaded needle when you begin stitching.
Fasten the stitching securely at the beginning and at the end of the stitching line. There are several ways to fasten the thread. Use the method which is easiest for you and most suitable for the garment.
- Make a backtack or backstitch by stitching for ward ½” (12.7 mm), then backward, then forward again. Stitch backward by reversing the machine or by pulling the work forward to prevent the fabric from feeding normally. Several stitches will be made over the first stitches.
- Spot tack by stitching with the stitch length set at 0, by lowering the feed dog or by holding the fabric in front of the presser foot so that the fabric doesn’t move. Spot tacking doesn’t always make a satisfactory knot.
- Stitch ½” — 1” (12.7 mm — 25.4 mm) with very short (30 spi, .75 mm) stitches.
- Knot the threads. Twist the two threads together and make a tailor’s knot at the end of the stitching line. This method is used most often at the ends of darts.
- Thread the ends of the thread into a needle or needle threader and hide them between the fabric layers.
If you begin stitching in the middle of a seam which won’t be pressed open, it isn’t necessary to backtack. Begin the new stitching line at the cut edge and overlap the previous stitching ½” (12.7 mm).
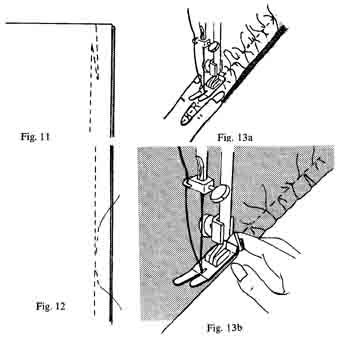
Seams which will be trimmed should be secured where the seamlines will cross, instead of at the edge of the section, to avoid trimming away the backtack. (Fig. 11)
When a section of the stitching line has been ripped, restitch so that the ends of the stitching are in the seam allowance. (Fig. 12)
Match and control the fabric as you work, interrupting the stitching procedure as needed. Anchor your work when you stop to adjust it by lowering the needle into the needle hole to avoid an irregularity in the stitching.
Work with dexterity, using your hands to control the fabric. Hold fabrics that creep or slip firmly in front and back of the presser foot so that the material is taut to eliminate excessive feeding of the under layer and puckered seams. This technique often eliminates skipped stitches, too.
I also use my fingers as an aid in controlling the fabric. To do this, I place my index and middle fingers flat on either side of the presser foot, holding the upper layer flat when stitching. To avoid the possibility of running the needle through my fingers, I stop the machine each time I reposition them. (Fig. 13a)
Use your index finger for crimping. This is some times called crowding, stay-stitching plus, or ease plus. Hold your index finger firmly behind the presser foot as you stitch. (Fig. 13b) This causes the fabric to pile up and make small pleats, forcing more fabric into each stitch than usual. Use this technique to clean-finish curved areas and to ease shoulder seams, sleeves, waistlines, or darts. Woollens and permanent press fabrics don't actually crimp; how ever, the crimping action usually forces more fabric into each stitch. If there is too much crimping, break some of the threads to remove the extra ease.
Use your scissors to position difficult-to-stitch sections. Holding the blades of the scissors together in the palm of your hand, use the points to adjust fullness and hold the upper layer of fabric flat in front of the presser foot or push it up to the foot.
Stitch at an even speed. Use the speed dictated by the garment design and fabric. Stitch long seams at full speed, stitch difficult-to-handle sections, such as corners and curves, slowly. Turn the hand wheel manually to walk the machine around intricate seams.
Use a gauge to keep the stitching line an even distance from the cut edge. The presser foot is the easiest gauge to use, and you can utilize the inside and outside edges of the foot as a guide. Lines marked on the throat plate permanently or with tape are also convenient. Metal seam guides are helpful for straight seams, but they have limited use when the seams are curved.
Use gauge stitching to mark difficult-to-match and difficult-to-stitch sections.
Key and quarter the garment sections so that they are easy to match and stitch accurately.
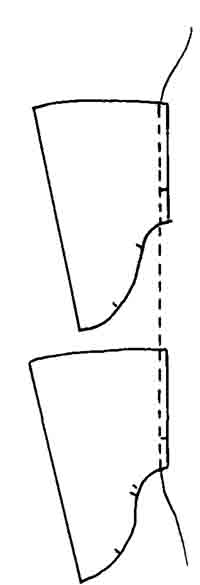
Chain stitch. Stitch continuously from one section to the next section, connecting them with a thread chain. Stitch to the edge of one section or seam; se cure the threads with a backtack; then stitch onto the next section without cutting the threads or raising the presser foot. A thread chain bridges the two sections. Stitch as many pieces as possible before cutting the threads. Chain stitching is the most effective way to release the work from under the presser foot, and it eliminates thread bubbles which might form at the beginning of the stitched line. It also eliminates unthreaded needles. As you finish one seam, feed another under the presser foot and keep stitching. (Fig. 14a)
When you don’t have another section ready to be stitched onto, stitch onto a small scrap of fabric to continue the chain. (Fig. 14b)
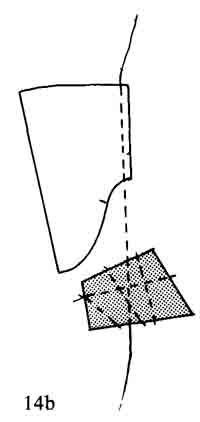
Chain stitching requires stitching a short distance without fabric between the presser foot and the feed dog. This will not damage your machine.
If chain stitching is impractical when the stitching line is ended, raise the presser foot and the take-up lever to the highest point, then pull the stitched section to the back of the machine to avoid breaking the needle or the upper thread.
If you are not chain stitching when you begin a stitching line, hold the needle and bobbin threads behind the presser foot securely.
Stitching Techniques
These techniques, used regularly, will not only improve the quality of your work, they will also make sewing quicker, easier, and more fun.
Staystitching. Staystitching is a line of stitching through a single layer of fabric to preserve the grain of the garment section, to provide a guide for clip ping and joining, and to prevent stretching.
Staystitch with the grain just inside the seamline 9/16” (14.3 mm) from the cut edge.
If you rip a lot, staystitching will help preserve the garment shape. If you are an experienced seam stress and rip rarely, you can safely eliminate most staystitching except at the neckline.
Edgestitching. Edgestitching is often used on garments. Stitch along the folded or finished edge of the garment section so that the folded or finished edge moves along the inside of the presser foot, making the stitching line (1.6 mm) from the edge. (Fig. 15)
Understitching. Understitch faced edges to prevent the seamline from rolling to the outside and to hold the seam allowances in the desired position.
With the facing face-up, stitch through the facing and seam allowances (1.6 mm) from the seam- line, using the inside of the presser foot as a guide. (Fig. 16)
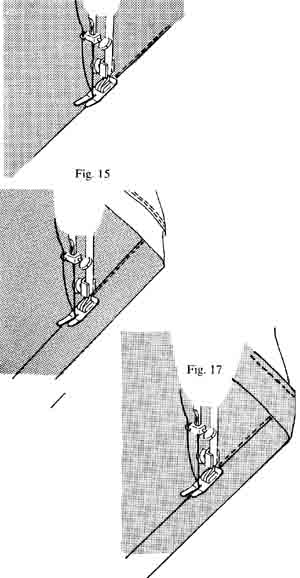
Most garments are understitched before the seam is trimmed, clipped, and pressed.
Understitching usually eliminates the need to press seams open; however, the seams of extra-special garments should be pressed open, then understitched, trimmed, and clipped.
Understitch delicate fabrics by hand with a tiny backstitch.
Stitch-in-the-ditch. This technique is sometimes called crack stitching or ditch stitching. Stitch-in-the- ditch to secure waistbands, facings, linings, bindings and elastic. From the right side of the garment, stitch in the groove or well of the seam. (Fig. 17)
If the fabric is bulky and a ridge is formed when the seam allowances are pressed to one side, use a zipper foot, Ease basting. The success of this method is the un even tension which causes the bobbin thread to float on the underside of the fabric and the short stitch which prevents pleating. If you accidentally pull the needle thread or stitch from the wrong side of the fabric, you must rip the stitching out and begin again.
Ease basting can be used to control ease on any fabric.
1. Loosen the upper tension.
2. Set the stitch length to 10—12 spi (2.5 mm). On lightweight fabrics, use a shorter stitch. Do not use a long basting stitch except on heavyweight fabrics.
The fabric will pleat in a long stitch.
3. From the right side of the garment section, place
a line of stitching just inside the seamline.
4. Pull the bobbin thread to ease the fabric.
Gauge stitching. It is more difficult to gauge a width of 5 (16 mm) than a width of ¼” (6.4 mm) or ½” (3.2 mm). Gauge stitching is used to mark difficult-to-match and difficult-to-stitch sections.
Place a line of gauge stitching in the seam allowance 3/8” (9.5 mm) or ½” (12.7 mm) from the cut edge to help you locate the seamline when matching plaids, setting zippers, or stitching lapped seams.
Paper stitching. To eliminate puckered seams, skipped stitches, creeping underlayers, and curling fabric, insert paper between the fabric and the feed dog before stitching.
I prefer papers like wax paper, adding-machine paper, or typing paper because they’re easier to tear away than tissue paper. However, these papers can not be used successfully on some machines because the feed dog won’t feed properly with heavier papers. Many times you can insert the paper between the fabric and presser foot instead to stitch a perfect seam.
If you must use tissue paper, remember that paper has a grain just like fabric. It will tear away more easily when you stitch with the lengthwise grain than when you stitch with the crosswise grain. Make a sample to determine which is which.
Bartack. Using a very short, narrow zigzag stitch (W 1-L,.5), stitch ¼”—½” (6.4 mm—12.7 mm) at stress points to make a bartack.
Bobbin stitching. Bobbin stitching eliminates a knot at the point of a dart.
1. Thread the machine and pull up the bobbin thread 15”—20” (38.1 cm—50.8 cm).
2. Tie the bobbin and needle thread together. (Fig. 18)
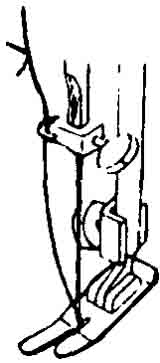
3. Wind the needle thread onto the spool, pulling the bobbin thread through the needle, up to the ma chine and to the spool.
4. Stitch the dart from the point to the garment edge.
5. Rethread the machine to stitch the next dart.
Keying
Keying is a method of marking the seamlines which will be matched on corresponding sections. Collars, zipper tapes, and plackets are marked on the seam- lines to ensure both sides are finished the same length.
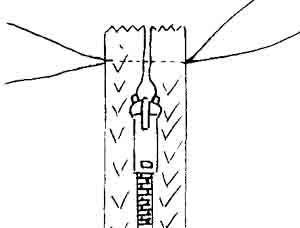
Keying zippers. Close the zipper. Stitch across the ends of the tape 3/8” (9.5 mm) above the zipper teeth, chain stitching from one side of the zipper to the other. (Fig. 19a)
Cut the thread chain and set the zipper, matching the keyed lines to the stitching line on the garment neckline, armscye, or waistline.
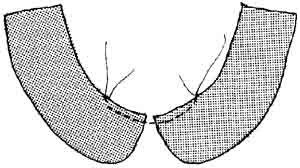
Keying collars. Fold the collar in half at the center back and match the ends of the collar. Measure an even distance from the collar points to the neck edge and mark the stitching line at the neck. Unfold the collar and chain stitch from one side of the collar to the other at the marked points. (Fig. 19b)
Cut the chain and set the collar to the garment neckline, matching the keyed lines to the stitching lines at the neck edge.
Keying plackets. Match the sides of plackets. Mark the seamline on each side of the placket. Chain stitch from one side of the placket to the other. (Fig. 19c)
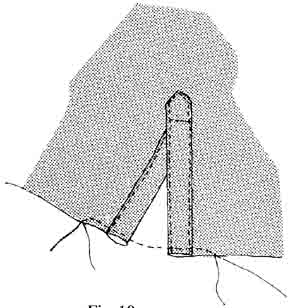
Cut the chain and set the cuffs, collar, or waist band.
Quartering
Divide collars, cuffs, waistbands, and the edges they match into quarters if there are no notches. Match and pin the marked points, then stitch them together. Note: The quarter points on a collar won’t match the shoulder seams and the quarter points on a waistband may not match the side seams.
TOPSTITCHING
Topstitching is a decorative detail which emphasizes the structural lines of a garment. It also serves an important and practical function by holding seams and facings in place and by keeping edges flat.
Thread
Regular thread is suitable for most topstitching. For greater emphasis, however, use thread from two spools. Thread the two as if they are one. Some machines don’t have two spool spindles—fill two bob bins and stack them on the spindle with a small circle of felt between them. The felt circle keeps the top bobbin from spinning and feeding the thread too quickly.
You can also use two strands of thread on the bobbin. Fill the bobbin carefully, feeding both threads through the guide evenly.
Use polyester buttonhole twist and topstitching threads to greatly emphasize stitching lines or silk buttonhole twist for a high luster. Metallic threads provide an interesting effect on dressy garments and sportswear.
The color of the thread can be matching or contrasting. A shade lighter than the fabric often gives a subtle emphasis.
Needles
Select a needle one size larger than usual for top- stitching with regular thread. Universal needles per form consistently well.
Use a size 100 (16) or 110 (18) needle when you are topstitching with buttonhole twist. Tithe large needles leave holes in your fabric, try a topstitching needle, a smaller needle with a large eye. If a top-stitching needle is unavailable, fill the bobbin with decorative thread and stitch from the wrong side of the fabric.
Use twin, triple, or wing needles for special effects. Loosen the tension if you don’t want a raised fold between the stitched lines. The upper and lower tension should be tighter than normal when stitching pin tucks or the creases in slacks. The tighter the tension, the greater the ridge between the two lines.
Twin needles can be used with decorative stitches, but the stitch width is limited by the width of the hole in the throat plate. Check the width setting by turning the hand wheel manually to be sure the needles won’t strike the throat plate.
Do not pivot with twin needles in the fabric. Raise the needles so that they rest on the fabric surface. Lift the presser foot halfway, take one stitch, turn the fabric again, lower the presser foot, and finish topstitching.
Pressure, Tension, and Stitch Length
Loosen the pressure on the presser foot when top- stitching to avoid pushing the upper layer of fabric. If a drag line still forms, use an even-feed foot or roller foot.
Balance the tension to form a perfect stitch. If you want the stitches to make a noticeable indentation in the fabric, loosen the upper tension slightly so that the tension will no longer be balanced. Experiment with the loosened upper tension; if the bobbin thread is too tight, the seam will pucker.
Use long stitches for sportswear and very short stitches on dressier garments. The French stitch you find on those little $400 silk blouses is a stitch one millimeter long, that's , twenty-five stitches in every inch.
A very narrow, close zigzag stitch on tweeds and heavy fabrics will create a solid line and an elastic straight stitch will create a heavy line.
Gauges
The edge of the straight-stitch or the zigzag foot is the easiest, most convenient gauge. It can be used to gauge distances from 1 (1.6 mm—9.5 mm).
The three important variables are the needle position (L-C-R), the inside of the foot, and the outside of the foot. Decide on the desired width and experiment with the two feet until you find a satisfactory gauge.
If you are using an even feed foot or roller foot to eliminate a drag line, use it as a gauge.
Tape on the machine bed and scoring on the throat plate are convenient gauges for topstitching along the edge of the garments.
Seam guides that attach to the machine bed with a screw or magnet are helpful for beginners to stitch along straight edges. The guides can be set to use on curved edges, but they are cumbersome.
Other aids for gauging include quilting gauges and quilting feet. The simplest quilting guide is se cured to the presser bar with the screw that holds the presser foot. The snap-on foot assortment includes a quilting guide which can be inserted into the ankle and used with any of the snap-on feet. Some quilting feet are not available with a hinged ankle, making stitching over seams even more difficult than usual. Some machines are designed so that the quilting gauge can be inserted into the presser bar.
Use chalk, soap, basting thread, drafting tape, transparent tape, and special topstitching tapes to mark intricate stitching lines. Stitch next to the marked line, not on it.
A cardboard template secured with doublestick tape can be used to outline stitching lines. Stick it to the garment and stitch around it.
Irregularities are less likely to show and occur when the stitch length is short than when it’s long.
Stitching
Always test stitch to check the needle, thread, tension, pressure, and stitch length. Stitch through as many layers of fabric and interfacing as you will have on the garment. This may be as many as eight layers of fabric and four layers of interfacing.
Whenever possible, topstitch one garment unit be fore joining it to another. Stitch with the grain. Stitch each side of a seam in the same direction. If the fabric has a nap, stitch with the nap.
Topstitch with the right side of the garment up. An exception is a jacket with a lapel. Begin stitching at the lower edge of the jacket on the facing, stitch up the front, around the collar, and down the other front. The stitches on the collar and lapel are stitched from the right side. These are most noticeable since they frame the face.
Leave long lengths of thread at the beginning and end of the stitching line. Pull the threads to the wrong side of the garment, knot them, and thread them into a needle. Insert the needle where the thread comes out of the fabric. Take a ½” (12.7 mm) stitch. Give the thread a quick tug to make the knot disappear between the facing and garment. Hold the threads taut and clip them close to the garment to make them disappear to the inside of the garment.
If you find that you have almost finished your line of topstitching and there is no more thread on the spool, tie the end of the thread to the thread on another spool and continue stitching. This technique enables you to finish most jobs. Use this secret on mending day when you are changing thread colors often.
If you have to stop topstitching in the middle of a line, resume stitching by inserting the machine needle precisely into the last hole stitched. Later, secure all threads.
With practice, you’ll develop not only the skill but also the confidence to topstitch with precision.
Stitching Problems
The three most common reasons for stitching problems are improper threading, a dirty machine, and a damaged needle.
When you clean the machine, be sure to remove the throat plate and brush out all lint which has accumulated on top of the feed dog.
Clean and oil the machine after every eight hours of stitching.
Insert a new needle after making a garment in a synthetic fabric, after stitching over pins, and before topstitching.
Improper tension. The proper tension for one fabric may not be right for another fabric. The softness and weight of the fabric, the number of fabric layers, and the stitch type and its length may cause the tension to be too tight, too loose, or unbalanced.
A perfect stitch is formed when the threads inter lock in the center of the fabric layers. (Fig. 20a) If the upper tension is too tight, the upper thread lies flat on top of the fabric. (Fig. 20b) If the lower thread is too tight or the upper thread too loose, the lower thread lies flat along the surface. (Fig. 20c)
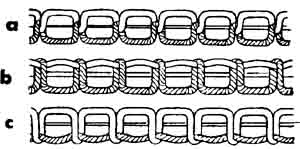
Using the type of thread, needle, and stitch length you’ve selected for the garment, stitch for several inches across the bias of two layers of the fashion fabric.
Look at the stitched line. If the thread floats on top of the fabric layers or the threads interlock to ward the top layer, the upper tension is too tight. Loosen the upper tension by turning the tension regulator to a lower number.
If the thread floats on the underside or the threads interlock toward the bottom layer, the upper tension is too loose. Tighten the upper tension by turning the tension regulator to a higher number.
Sometimes you can’t tell if the tension is balanced just by looking at the stitched line. Hold the stitched line between your thumb and index finger, spacing your hands 2”—3” apart. Pull sharply. If the thread breaks evenly, the tension is balanced. If the thread on the upper layer breaks, the upper tension is too tight. If the thread on the lower layer breaks, the up per tension is too loose.
If the stitching line puckers even though the stitch is interlocked in the center of the fabric layers, both tensions, upper and bobbin, are too tight. This hap pens frequently when the fabric is a lightweight synthetic.
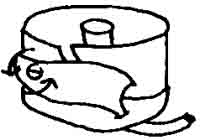
Loosen the bobbin tension by turning the screw in the bobbin case ¼ or ½ turn. (Fig. 21) Be careful;
if the screw falls out, it may be lost forever. If the bobbin case is built into your machine, use the sewing-machine manual to help you locate the screw.
If the stitches are loose and don’t hold the fabric together securely, tighten both tensions.
Needle thread breaks. It isn’t difficult to prevent the needle thread breaking once you know what causes the problem. Here are the most common reasons:
The tension is too tight.
The machine is improperly threaded.
The needle is bent or damaged.
The needle is improperly set.
The thread is too coarse or too fine for the needle or fabric.
The thread has slubs or knots.
The thread is old and brittle.
There are damaged surfaces (guides, tension disc, take-up lever, etc.) over which the thread passes.
The thread is tangled on the thread spindle, a guide, or the spool slash.
Bobbin thread breaks. Eliminate bobbin-thread breaking by finding the probable reason for it in this list.
The tension is too tight.
The bobbin is wound unevenly or too tightly.
The bobbin is placed in the case or sewing ma chine incorrectly.
The machine is threaded improperly.
The throat plate is damaged.
Lint or dust is in the machine or bobbin case.
The bobbin-case screw has worked out and is catching the thread as the bobbin turns.
Puckered seams. Lightweight, permanent press, and tightly woven fabrics cause the most problems, and all fabrics pucker most when stitched in the direction of least stretch—lengthwise.
Use one or more of these suggestions to eliminate puckered seams.
Use a small ballpoint or universal needle.
Use a polyester or polyester-core thread.
Use a finer thread. The thread may be too thick for the fabric.
Use the same size and kind of thread on the needle and bobbin.
Correct the tension. It may be uneven or too tight. Loosen the tension on both the bobbin and needle threads if necessary.
Lighten the pressure on the presser foot slightly.
Use the straight-stitch foot and small-hole throat plate.
Set the needle position in the right-hand position
if the machine doesn’t have a straight-stitch foot.
Hold the fabric firmly in front and back of the needle so that the machine can’t feed too much fabric too quickly.
Stitch at a moderate speed.
Stitch with a piece of paper between the fabric and the feed dog. (Typing paper or wax paper is easier to tear away than tissue paper.)
Skipped stitches. Understanding the cause of skipped stitches is the key to solving this problem. The fabric clings to the needle when the needle penetrates the needle hole in the throat plate. This causes the thread to stay so close to the needle that it doesn’t make a loop large enough to allow the shuttle hook to catch it and make a stitch.
Thread the machine properly.
Use a new needle. The old needle may be bent, blunt, or coated with sizing or lint. It may be the wrong size or type. Use the smallest needle size possible for the fabric.
Use a universal needle, a topstitching needle, or a needle with a medium or large ballpoint.
Use a larger needle. A small needle may not make a large enough hole in a resilient fabric. Some times the reverse is the case—a large needle may cause fabric distortion which causes skipped stitches. Then try a smaller ballpoint needle. Different fabrics react in different ways.
Set the needle properly. It may not be inserted all the way into the needle clamp, or it may need to be lowered a fraction so that a bigger loop is formed.
Increase the pressure. The increased pressure holds the fabric more firmly so as to make it less likely to cling to the needle.
Use the straight-stitch foot and small-hole throat plate.
If the machine doesn’t have a straight-stitch foot, set the needle position in the right-hand position.
Cover the large hole on the throat plate with tape if the machine doesn’t have a small-hole plate.
Loosen the upper tension.
Stitch evenly.
Use a lubricant on the needle, thread, bobbin, and fabric. Test first for spotting.
Level the presser foot. The machine will skip stitches when the presser foot isn’t level. Hold the toes of the presser foot down as you stitch. If this doesn’t solve the problem, make a leveler of light weight cardboard. Place the leveler under the presser foot as needed to balance it.
Creeping underlayer and drag lines. The sewing ma chine moves the fabric to the back of the machine each time a stitch is made. The fabric is held in place by the presser foot which pushes the upper layer forward while the feed dog pulls the lower layer backward. It is this basic design of the machine which causes the underlayer to creep and become shorter than the upper layer at the end of a seam. When you are topstitching, this action causes drag lines.
Use one or more of these suggestions to prevent creeping.
Stitch with the grain.
Lighten the pressure on the presser foot.
Pull the bottom layer forward with the right hand while pushing the upper layer back with the left hand.
Hold the fabric taut when stitching.
Use the points of the scissors to push the upper layer toward the needle or to hold the upper layer firmly against the lower layer.
If the two sections are uneven in length, position them so that the longer one is on the bottom.
Place a piece of wax paper between the lower layer of fabric and the feed dog.
Use an even-feed foot or a roller foot.
When topstitching, pin, glue, or baste the seam allowances or facing to the garment. Use the points of your scissors to gently push the top layer toward the needle.
RIPPING
To rip or unpick, clip a stitch every inch with the seam ripper. If possible, clip the thread that was on the needle when the seam was stitched, so that the bobbin thread will pull out easily.
If the stitches are difficult to see, rub them with soap to highlight them.
Use a small brush or transparent tape to remove the clipped threads from the fabric.
Do not slide the seam ripper along the seam between the fabric layers. The ripper is difficult to control, and it may cut the fabric.
Press the garment sections before re-stitching the seam.
HAND-SEWING TECHNIQUES
Most garments require some hand work, even in shortcut sewing. There are some tricks of the trade which will speed you along, and show you how hand sewing, properly used, can be a shortcut.
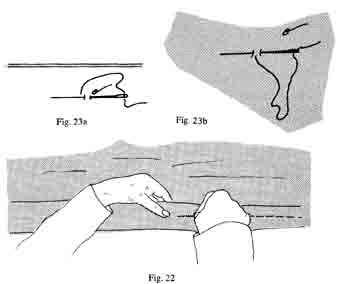
Position your work. Work at a table when you are sewing by hand. Allow the bulk of the garment to rest on the table or in your lap. Hold the section on which you are working in your hands, resting your arms on the table so that you will not tire. If you are right-handed, hold the edge of the garment in your left hand as you sew with your right. (Fig. 22)
Threading the needle. To eliminate knotting and twisting the thread when you sew by hand, wax the thread with beeswax, or a white candle, or coat it with lubricant; then thread the needle.
When cutting the thread, cut at an angle and make sure the thread is relaxed. If it's taut, the thread will unravel. Cut a 30” (76.2 cm) length of thread (approximately an arm’s length from the spool) when you are basting to give you a working length of 18”—20” (45.7 cm—50.8 cm). Cut a shorter length when you are making finishing stitches such as hemming, buttonhole, blanket, or slipstitches.
Most hand sewing is done with a single strand of thread. Use long needles such as darners for basting and short needles such as crewel or embroidery nee 1rs for finishing (hemming).
Secure the thread. Begin and end securely. Using a single strand of thread, knot the end and begin the stitching line with a backstitch to prevent pulling the knot through the fabric, leaving a hole. (Fig. 23a)
If you don’t want a knot under a button or snap, secure the thread with several small stitches on top of each other. This is easier to do if you begin with a knot ½” (12.7 mm) away from the button location, make several small stitches to secure the thread under the button, then cut off the knot. (Fig. 23b)
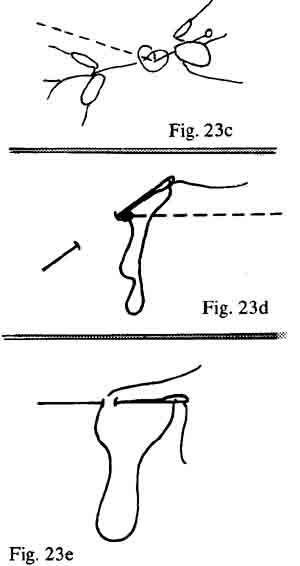
Secure the thread at the end of the stitching line with a tailor’s knot. Twist the thread ends together, loop them around your index finger, then roll the ends through the loop with the thumb. If you have difficulty forming the knot exactly at the end of the stitching line, insert a pin in the loop. (Fig. 23c)
Insert the needle into the fabric as close to the knot as possible, take a ½” (12.7 mm) stitch, and give the thread a sharp pull. This will make the knot disappear between the fabric layers. (Fig. 23d)
Begin and end basting stitches with a single back stitch, without a knot. (Fig. 23e)
Hand Stitches
Backstitch. The half stitch, prickstitch, and pickstitch are all variations of the backstitch. These stitches are the strongest of hand stitches and used to repair seams in hard-to-reach places, to understitch delicate garments, and to set zippers by hand.
Working from right to left, secure the thread, then take a small stitch by inserting the needle to the right of the thread. (Fig. 24)
Basting stitches. Few enjoy hand basting, but the right stitch at the right time can be a timesaver. It guarantees a perfect seam the first time you stitch it, ensures a professional finish, and eliminates redoing seams, stretched garments, and frayed nerves.
When basting a garment edge that requires pressing, position your stitches ¼” (6.4 mm) from the finished edges, thereby avoiding an edge that ripples. When basting a faced edge, work from the wrong side of the garment and roll the seamline to the underside as you baste.
Remove basting stitches whenever possible before you press. This is especially important when seams are pressed open. If you can't remove the basting, use silk thread to avoid leaving pressing impressions.
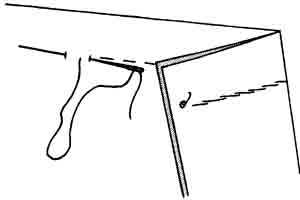
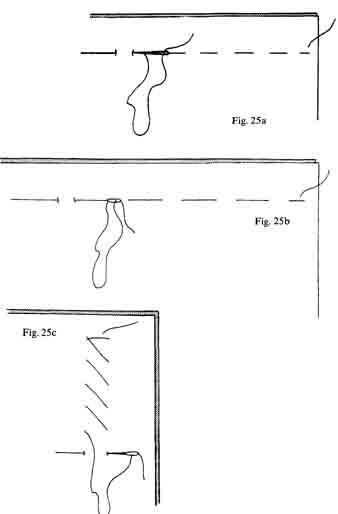
Even basting is used to hold seams together that require close control. Working from right to left, take short, ¼” (6.4 mm), evenly spaced stitches. (Fig. 25a)
Uneven basting is used during construction and fitting for straight or slightly curved seams. It com bines a long stitch of ½”—1” (12.7 mm—25.4 mm) and a short stitch of ¼” (6.4mm). (Fig. 25b)
Diagonal basting is used to hold two layers or edges together during construction or pressing. Working from left to right or top to bottom, make the parallel stitches large or short. (Fig. 25c).
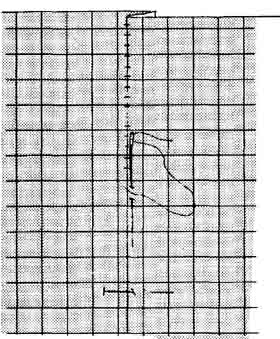
Slip basting is used to match stripes, plaids, or prints and to make fitting adjustments from the right side of the garment.
Working with the garment right-side-up, turn under the seam allowance of one section and pin the folded edge so that it meets the stitching line of the adjoining section, matching the fabric design. (Fig. 25e)
Dressmaker’s basting is used to baste long seams with little or no stress and to mark placement or guidelines. Take one long stitch (1” or 2.5 cm) and two short stitches (¼” or 6.4 mm). (Fig. 25d)

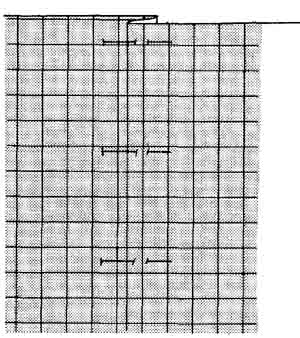
If you can’t estimate the width of the seam allowance accurately, gauge stitch ½” (12.7 mm) from the cut edge or mark the stitching line on the right side of the fabric with a soap sliver or chalk.
Working from right to left, take a ¼” (6.4 mm) stitch in the folded edge of the upper layer, then a stitch in the lower layer. Make several stitches forming a ladder, then pull the thread taut. (Fig. 25f).
The ladder is the secret that prevents the layers from shifting and ensures a matched seam. Each stitch must begin exactly opposite the end of the last stitch, thereby making the stitches between the two layers straight, not slanted.
Blanket stitches. Blanket stitches are used to finish an edge decoratively or to make French tacks, belt carriers, and thread eyes.
Working from left to right, insert the needle into the right side of the fabric the desired distance from the edge. Loop the thread under the needle point. Pull the needle through to form a stitch at the fabric edge. (Fig. 26)
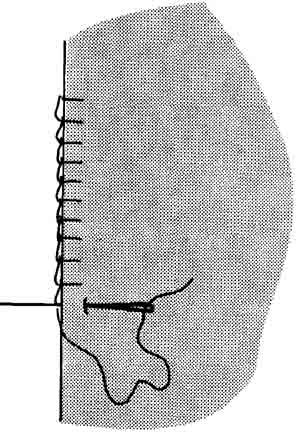
Buttonhole stitches. Working from right to left, insert the needle into the wrong side of the fabric 1/16”—1/8” (1.6 mm—3.2 mm) from the edge. Loop the thread behind the needle eye and under the point. Pull the needle through to form a purl stitch at the fabric edge. (Fig. 27)
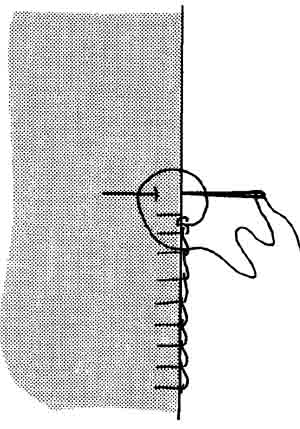
Cross stitches. Make cross stitches to secure lining pleats. Work from left to right or top to bottom. Se cure the thread, take a small stitch 1/4” (6.4 mm) to the right and ¼” (6.4 mm) below the knot. Take the next stitch ¼” (6.4 mm) to the right and ¼” (6.4 mm) above the last stitch. Continue the stitches the desired distance. (Fig. 28)
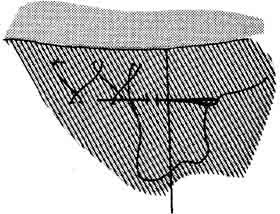
French tacks. French tacks are used to secure the lining to the garment at the hem. Secure the thread in the hem of the garment. Take a stitch in the hem of the lining opposite the first stitch. The thread between the two layers should be 1”—1½” (2.5 cm— 3.8 cm) long. Take another stitch in the garment hem, leaving the thread the same length. (Fig. 29a)
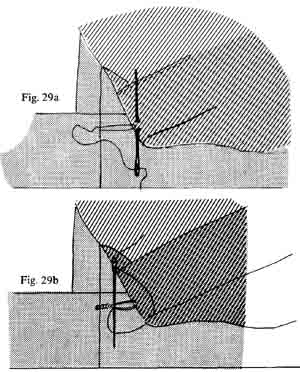
Cover the stitches with blanket stitches and fasten the thread. (Fig. 29b)
Hemming stitches. Most better garments are hemmed with a blindstitch.
Working from right to left, secure the thread in the hem or seam allowance. Pick up one thread in the garment, take a small stitch in the hem ½” (12.7 mm) to the left. Alternate stitches between the garment and the hem. Do not pull the stitches too tightly. The stitches will look like small “v’s” and the hem will be inconspicuous on the right side of the garment. (Fig. 30a)
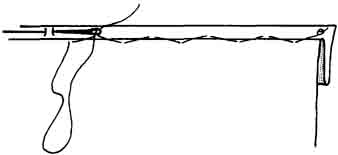
The catch stitch is used in tailoring and in hemming heavy fabrics.
Working from left to right, secure the thread in the hem or seam allowance. Pick up one thread in the garment ½” (12.7 mm) to the right, then make a small stitch ½” to the right on the hem. Alternate stitches between the garment and the hem. Do not pull the stitches too tightly. The stitches will look like “x’s.” (Fig. 30b)
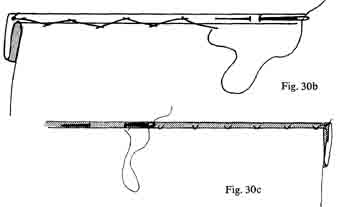
The uneven slipstitch is used to hem garments that are finished with a clean finish or folded edge.
Working from right to left, secure the thread in the hem or seam allowance. Pick up one thread in the garment, take a ½” (12.7 mm) stitch in the fold of the hem. Alternate stitches between the garment and hem. Do not pull the stitches too tightly. The stitches will look like small “v’s.” (Fig. 30c).
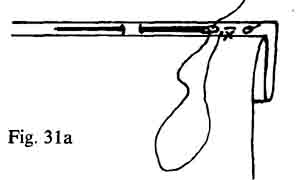
The figure-eight stitch is used to hem knits, crepes, and all other fabrics that are difficult to hem in visibly. Each stitch takes more time, but the stitches can be spaced farther apart.
1. Working from right to left, secure the thread in the hem or seam allowance. Take a 1/8” (3.2 mm) stitch in the hem. (Fig. 31a)
2. Take another stitch on top of the first one. (Fig. 31b)
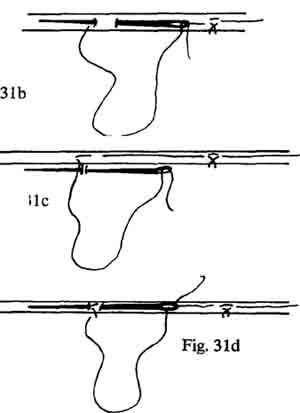
3. Pick up one thread in the garment directly opposite the two stitches in the hem. Do not pull the stitch too tightly. It should be slack, about ½” (3.2 mm) long. (Fig. 31c)
4. Take a third stitch on top of the first two stitches in the hem. The completed stitch will look like a figure eight. (Fig. 31d)
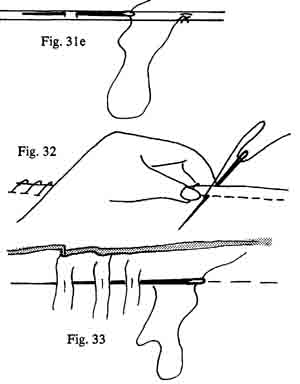
5. Make the next stitch ¾ “—1” (19.1 mm—25.4 mm)
to the left, beginning again in the hem. Allow the thread between the stitches to be slack. (Fig. 31 e)
Overcasting. Working from left to right, space the stitches ½”—¼” (3.2 mm—6.4 mm) apart. Use the thumb on your left hand to hold each stitch on the diagonal. (Fig. 32)
It is easier to make the stitches the same depth if you gauge stitch ½” (3.2 mm) from the cut edge.
Running stitches. Frequently you can use this short, even stitch (Fig. 33) instead of a slipstitch. A running stitch is made from the wrong side of the garment and a slipstitch is made from the right side. Reposition the garment so that you can sew from the wrong side to make a running stitch. You will find it's much quicker and easier to make running stitches than slipstitches.
Even slipstitches. When it's necessary to finish seams from the right side of the fabric, use even slip- stitches.
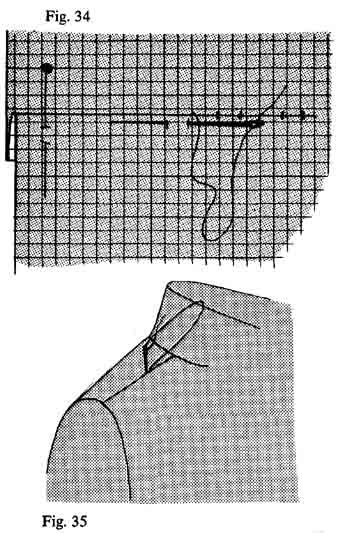
Turn one seam allowance under and pin it to the other seam allowance, matching the stitching lines. Working from right to left, take a small stitch in the folded edge, then a stitch in the underlayer. Make several stitches, then pull the thread taut. (Fig. 34)
Stabstitching. Stabstitching is a loose stitch between two layers that's used to hold two seamlines together or shoulder pads in place. The stitches are made vertically in the groove of a seam from the right side of the garment. (Fig. 35)
Thread loops. There are two varieties of thread loops, chain or blanket-stitched loops. They are used for belt carriers, lingerie straps, button loops, thread eyes, and instead of French tacks.
Chain Loops:
1. Secure the thread, then take a small stitch to make a loop. Reach into the loop with your left thumb and forefinger. Hold the thread end taut with the thumb and forefinger of the right hand. (Fig. 36a)
shortcuts-f36a-36c.jpg2. Use the middle finger of your left hand to make a new loop. Pull it through the first loop (Fig. 36b)
3. Allow the first loop to slip off the fingers. Open the new loop as you pull the first loop taut on the chain. (Fig. 36c)
4. Repeat until the chain is the desired length.
5. Finish the chain by taking a small stitch on the garment before you slip the needle through the last loop of the chain, then secure the thread to the garment.
Quick thread chains can be made with a small crochet hook but they will be looser and less firm than the handmade chains.
Blanket-Stitched Loops:
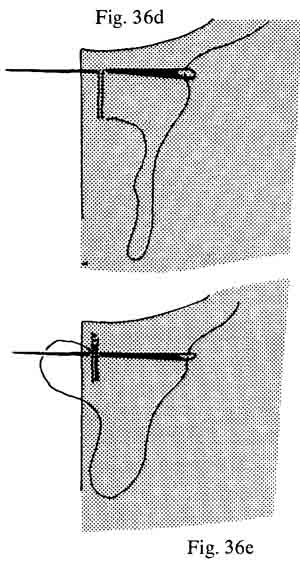
1. Using a single strand of thread, make a 3—4 strand bar. (Fig. 36d)
2. Cover the bar with blanket stitches, securing the thread at the end. (Fig. 36e)
ASSEMBLING TECHNIQUES
In order to get a professional finish, home sewers often have to baste before machine stitching. In addition to hand and machine basting, you can use glue, tape, pins, or fusible bonding agent to hold the sections together temporarily. With practice, you’ll learn to save time by machine stitching without basting.
Baste with a washable glue stick to secure inter facings and underlinings, position trims and pockets, align stripes and plaids, eliminate drag lines when stitching-in-the-ditch, lap seams, and trial fit. Do not glue baste seams which will be pressed open.
Baste with doublestick tape to fit, match plaids, set zippers, and position trims or pockets. Position the tape so that it's out of the line of stitching; al ways remove the tape after stitching. Do not use tape on velvets and velveteens without testing—tape may pull off the nap.
Baste with regular tape to hold collars and cuffs in place while you machine stitch them permanently. When using the tape on fabrics like Ultrasuede, avoid leaving a napless spot by pulling the tape down with the nap to remove it.
Baste with pins. Place the pins so that they are out of the line of stitching whenever possible. Do not stitch over the pins if you can avoid it. Remember:
Every time you insert a pin you’ll have to stop the machine and pull it out before continuing the stitching line. If you can't pin baste sparingly, use another basting method.
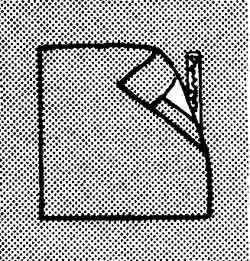
Baste with fusible bonding agents to hold pockets, appliqués, and trims in place. Position narrow strips of the fusible between the garment and the applied section. (Fig. 37) Cover the area with a press cloth; then steam it 2 - 3 seconds to baste the two layers together. Apply the fusing agent to only one layer be fore fusing it to another layer by holding the steam iron or portable steamer an inch above the fusible until the fusible is sticky. Position the section as de sired on the garment and finger press or steam it until it's basted.
Baste by machine using a long stitch to trial fit garments. Hold the fabric taut as you stitch, to eliminate puckered seams. Baste using a regular stitch to secure interfacings and to hold the seam allowances of pockets, collars and cuffs in position for the final stitching.
Don’t overlook hand basting. It is an easy way to position the fabric layers exactly where you want them, enabling you to stitch accurately by machine.
Place the basting stitches next to the permanent stitching line to avoid stitching over them.
If you’ve been using hand stitches to permanently finish collars, cuffs, bindings, and plackets because you’re afraid your machine stitching won’t be perfect, use a basting step to eliminate them. Remember that ready-made garments have few or no hand stitches and when you finish your garments by hand, you’re putting a tag on it that says homemade.
You will be surprised to find the basting-machine- stitching combination requires less time than the old- fashioned method of using permanent hand stitches to finish the garment. In addition to the time saved, your garments will look professional and wash and wear better.
PRESSING TECHNIQUES
Pressing is as important as stitching. Pressing as you sew is an imperative for the home sewer who wants a professional-looking garment. This doesn’t mean you should stitch a seam and jump up to press it be fore stitching another seam. Stitch as much as possible, press everything you’ve stitched, then stitch some more.
Pressing is an up-and-down motion; ironing is a back-and-forth, sliding motion. Press, don’t iron, when you sew. Don’t overpress. Overpressing is worse than not pressing enough.
Pressing can be used to stretch, shrink, shape, mark, and fuse. It’s an aid that will save time and make your sewing easier.
Using Your Equipment
The iron and portable steamer. Set the iron at the desired temperature. Too much heat will scorch or melt some fabrics; too little heat won’t set creases and flatten seams. Check the fiber content and care label when in doubt.
Test the effects of pressure, moisture, and temperature on a scrap of fabric before pressing the garment sections. Use a large scrap so you can com pare pressed and unpressed areas. If you don’t have a scrap, press the garment in an inconspicuous area such as a seam allowance.
Allow the steam iron or steamer to heat completely before using it, to avoid spitting.
Use moisture when pressing linen and cotton fabrics to remove wrinkles, and on woollens to avoid damaging the fibers, causing them to become dry and brittle.
Use extra pressure when pressing thick or bulky fabrics. Set the iron at a lower temperature when pressing lightweight fabrics.
Press cloths and soleplates. Different fabrics re quire different pressing cloths. Commercial press cloths, see-through cloths, old diapers, or tea towels are good for most pressing jobs. Wet the cloth and wring out all the excess water so that the cloth is barely damp.
Use a heavy muslin or drill cloth for tailoring when you will be using lots of pressure and moisture. Wash the cloth five or six times to remove all the sizing before using it. Lay the dry cloth on top of the area to be pressed. Using a very wet, almost dripping sponge, sponge the area, then press.
Use a woolen press cloth when pressing woolen garments. Lay the dry woolen cloth on top of the area to be pressed, cover it with a damp all-purpose cloth, then press.
Use a pile, such as a velvet or velveteen, cloth for pressing pile or such deeply textured fabrics as lace, matelassé, embroidered, or beaded materials. Place the cloth face-up on the pressing pad and the garment face-down on the cloth. Cover the section to be pressed with another pile cloth, then press, using a little pressure and a lot of steam.
Always use a press cloth when pressing with a dry iron.
Keep your press cloths clean and store them with your pressing equipment.
A detachable soleplate will allow you to do much of your pressing without a press cloth. It has the added advantage of not sticking to fusibles, eliminating “gucky” soleplates, and it’s an inexpensive way to renovate an old iron.
Pressing pads, mitts, and point pressers. Use a
tailor’s ham to press and mold curved or shaped areas. Position the garment or garment section over the ham so that the garment curve fits smoothly over the curve of the ham. Use a pressing mitt to press hard-to-reach or small areas which are difficult to press on the ham. Place the mitt on the end of the sleeve board or on your hand.
Use a seam roll to press straight seams open. Position the garment sections wrong-side-up with the stitching line on the seam roll. Using the point of the iron, press only along the stitching line. Because the cut edges aren’t pressed against the garment, they won’t leave an imprint that shows on the right side of the garment. If you don’t have a seam roll, make one using a magazine wrapped with a towel or insert paper strips between the seam allowances and the garment to avoid making an imprint. Strips of adding-machine paper are a convenient width to use when pressing.
Use a point presser, wooden dowel, or yardstick to press open seams in hard-to-reach areas like collars, flaps, pockets, and belts. If you don’t have any of these, use this technique: Place the section on the pressing board with the facing up. Open the seam allowances and press the facing seam allowance toward the facing. (Fig. 38) Turn the section over and re peat the process. Turn the section right-side-out, using a point presser. Underpress.

Clapper or beater. The clapper or beater is used most often in tailoring. Occasionally, you’ll need one for setting pleats and flattening seams and garment edges. Press the garment, using lots of steam or a damp press cloth. Pound the section once or twice with the clapper; then hold the clapper on the section with pressure until the fabric is cool and dry. If you don’t have a clapper, use a brick that's wrapped in fabric.
Tips
If the garment sections are wrinkle-free when you begin construction, if you handle them carefully, if you hang them when you’re not working on them, and if you press as you sew, you’ll find that you have very little pressing to do when the garment is finished.
Use a well-padded surface or pressing pad to prevent press marks on pockets, buttonholes, and hems.
Press as much as possible from the wrong side of the garment. When you press from the face side of the garment, always use a press cloth.
Underpress from the wrong or facing side, rolling the seamlines at the edges to the underside of the garment.
Press with the grain except when pressing naps; then, press with the nap.
Quick-press short seams with your thumbnail, scissors, or the sewing-machine light. Open the seam allowances and press the seamline with your nail or the handles of the scissors, or hold the opened seam against the sewing-machine light to press it.
Remove pins and hastings before you press. If you will be pressing over basting threads, baste with silk thread. Don’t press over pins, hooks, eyes, or snaps—they may leave a permanent imprint on the right side of the garment. Don’t press over zippers— nylon coils may melt and metal zippers may cut or mar the fabric.
Do not press sharp creases until you check the garment fit.
Eliminate a wavy foldline when pressing a narrow strip in half lengthwise by pressing a fold on a large scrap; then trim the strip to the desired width.
Place a piece of aluminum foil on the pressing board under the fabric to reflect the steam and heat when you’re fusing.
Do not press soft pleats, shirring. smocking, or gathers flat.
Do not press over soil, perspiration spots, or stains.
Do not overpress—the fabric should retain its original texture and finish when you are pressing the finished garment.
Darts and Seams
Do not press darts and seams until you’ve checked the garment fit.
j Press darts and seams flat to marry the stitches to the fabric and to smooth the stitching line before pressing the seam open or to one side.
Press darts and seams before crossing them with another seam.
Open seams with your fingers as you press. Move them along the seam just ahead of the steam iron or steamer. Be careful not to burn your fingers.
Press enclosed seams open for a sharper seam line. This can usually be eliminated if the section is understitched.
For a sharper line, press welt and topstitched seams open before pressing them to one side.
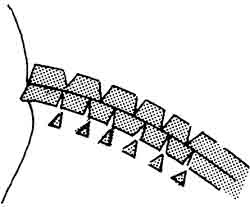
Press straight seams on flat surfaces and shaped seams over curved surfaces to shape the garment. Clip or notch shaped seams as needed to make them lie flat. (Fig. 39)
Slash the darts in bulky fabrics and press them open for a custom finish.
REMEDIES FOR PRESSING PROBLEMS
Hem imprints on the right side of the fabric can often be removed. With the garment wrong-side-up, press under the edge of the hem, using the point of the iron. (Fig. 40)
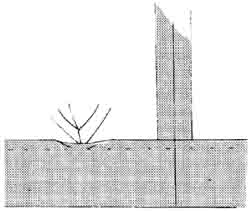
An unwanted shine on the right side of the fabric can often be removed. Brush the fabric with a solution of 1—2 tablespoons of white vinegar to 1 quart of water. Cover the garment with a press cloth and press lightly. Before using vinegar on the garment, test the fabric for color fastness.
Needle holes are sometimes difficult to remove in napped fabrics. Press the fabric, using lots of steam, then brush over the needle holes with a toothbrush. Repeat the process until the needle holes no longer show.
Stubborn creases, hemlines, and seamlines must be removed before a garment is altered. Use a very damp press cloth to press out the crease. If it still shows, use a sponge or paintbrush to brush on vine gar or a vinegar-and-water solution. Test a fabric scrap or a seam allowance for color fastness first.
To clean the soleplate of the iron when you in advertently press over fusible agent or on the fusible side of interfacing, use hot-iron cleaner or this quick method: Sprinkle salt between two layers of wax paper. Iron the wax paper sandwich until the sole plate is clean.
