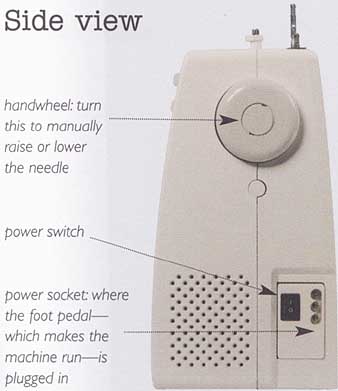
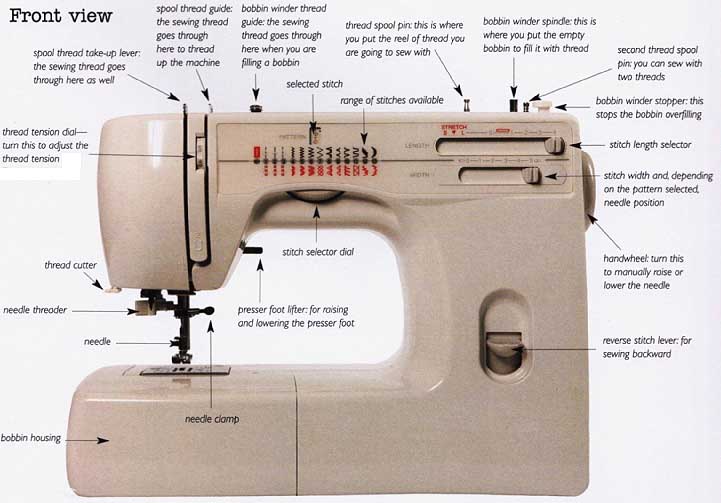
How a sewing machine worksNearly all modern sewing machines work in essentially the exact same way. There will probably be variations in the way the bobbin goes in, the way you thread the top spool, as well as the way you select functions, but the underlying principles are going to be similar You surely don’t require a detailed technical explanation of how all machines do everything, but some data is useful—so the following are some pictures of sewing. In the manual that comes with your sewing machine there should be images like these ones, or diagrams, that tell you about that particular machine. If you don’t have a manual, contact the machine’s manufacturer and see if they can send you one, or check on the internet to see if there is one you can download. Alternatively, if you have a friendly local sewing store, take your machine in and ask them to explain it to you.
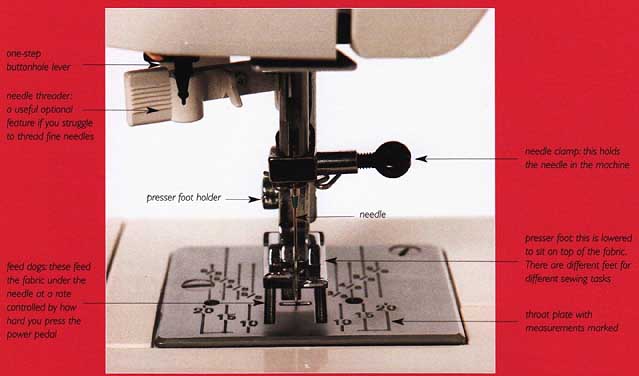
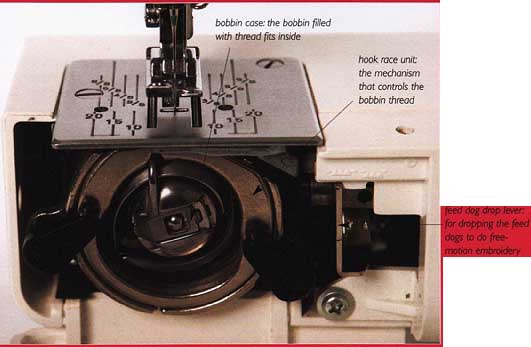
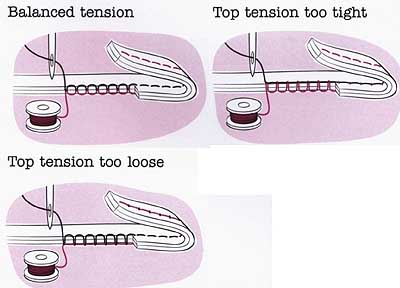
Tension All sewers, novices and skilled seamstresses alike, sometimes wonder if the machine’s tension is what is causing their tension. Incorrect thread tension is probably the most common sewing problem and it can completely ruin a project. The first thing to understand is what sewing machine tension actually is. The term ‘tension’ refers to the amount of pressure on the sewing thread coming from the top reel. This pressure is exerted by the tension discs, which are inside the machine and through which the sewing thread passes when you thread up the machine, Different fabrics and stitches need different amounts of tension. The tension is controlled by the thread tension dial on the front of the machine. Turning the dial to a higher number increases the tension and to a lower number, decreases it. On most machines, turning the dial to number 5 will give you a tension suitable for straight stitch on medium-weight fabric. If the bobbin thread is visible on the right side of the fabric or the spool thread is visible on the wrong side, then the tension isn't set correctly. Also, if seams are puckered, the thread keeps breaking, knotting, or jamming the machine, or stitches are getting skipped, then incorrect tension could be the cause. Before you start a project, always test the tension on a scrap of the project fabric. Fold it double to check how seams will sew; if you are using lining or interfacing, add a scrap of that test the stitches you are planning to use. Duplicate all aspects of the project in miniature and get the tension right—this really is worth the time and effort .If you skip this testing then any tension problems can spoil your project. More tension issues If you’ve adjusted the tension dial but are still having problems, then check the following as they may be affecting tension. Have you threaded the machine correctly, top and bottom? Pull the top thread out and thread it up again. If the machine is new, check the manual to make sure you’re not missing out a stage. Take out the bobbin and re-insert it, again checking that you are doing it properly. How long have you been using the needle? If you’ve been sewing with the same needle for some time then it might be blunt or bent, just pulling on the fabric can bend a needle and the tiniest defect can cause problems. Change the needle, making sure you select the right one for the fabric. In fact, you should change the needle regularly: “new project, new needle” is a good motto. Is the machine clean? As you sew, lint from the fabrics builds up in the machine. If you don’t clean it regularly then the hook race and bobbin case can get clogged with lint and this will cause sewing chaos. A little brush for cleaning out these components should have come with the machine, so use it. What kind of thread are you using? If you are sewing with a cheap thread you picked up in a market, then try swapping it for a good-quality, brand-name thread. Are you using a plastic bobbin? If you are, is it elderly? Nicks in the rim of a bobbin, even tiny ones, can catch the thread. Swap the bobbin for a new one and see if that cures the problem. The other tension The bobbin case also has a tension adjustment, but you should only use it if you really can’t fix the problem by adjusting the top tension, and you have checked that thread, needle, or lint issues aren’t the cause of the trouble. Usually, you would only expect to adjust the bobbin case tension if you were using a thick or decorative thread on the bobbin. Machine embroiderers, who often do use fancy bobbin threads, may have two bobbin cases; one that's never adjusted and is used for regular sewing, and one for their fancy threads, which is fiddled with at will. To alter the bobbin case tension, you use a special screwdriver (which should be supplied with your machine) to turn the tiny screw in the bobbin case. Turn it to the left to decrease the tension and to the right to increase the tension. Hold the bobbin case over an empty box while you do this, because if the tiny screw falls out it’s very difficult to find again. Make a note of the direction you turned the screw in and how far you turned it so that you can re-set the tension to the factory setting when or if you need to.
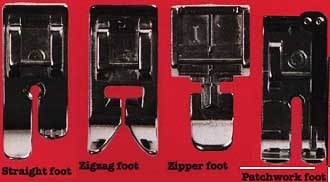
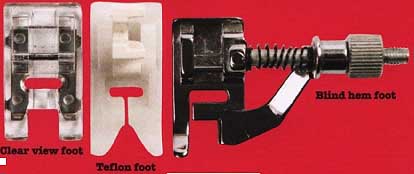
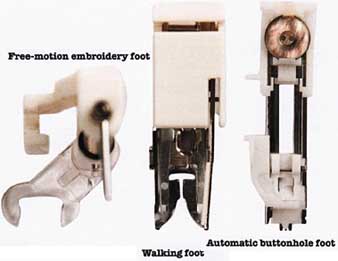
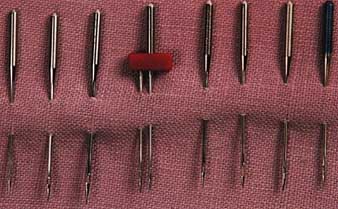
= = A Tension Test = = Sew a line diagonally across a square of fabric, so that the stitching is on the bias (see Making Bias Strip and Binding). Hold the ends of the stitched line firmly and pull hard so the fabric stretches. If only the top thread breaks, then the top tension is too tight. If only the bottom thread breaks, then the top tension is too loose. If both threads break, then the tension is balanced. = = = = Buying your first sewing machine The first step in buying your own sewing machine is to decide which Sewing machines of this type will have the basic straight and zigzag functions you are going to need. Modern sewing machines range from stitches plus some extras, which are all you’ll need. One function I do very basic models that do little more than sew straight lines, to recommend you look for is an automatic, one-step buttonhole. Doing computerized machines with a myriad of features to make your head buttonholes manually on the sewing machine is perfectly possible, but spin. You are almost certainly going to want something in between, doing them automatically is less stressful, quicker, and usually better- For a first sewing machine you need a model that's simple looking enough to use easily and yet sophisticated enough to grow into. You Another useful feature is a variable needle position; this makes it won’t want to spend too much on your first machine, just in case you easier to sew straight lines in odd places as you can align the fabric decide sewing’s not the craft for you, but bear in mind that a really with a throat plate guide or the edge of the presser foot and then cheap machine may not sew very well, move the needle across to sew in the required spot. I recommend choosing a mid-range machine from a good brand If possible, borrow a machine for a few days and have a good play name. This way you get a decent machine and you’ll be able to buy with it. Check out all the functions and see what you think will be most extra accessories: the big brands produce wide ranges of these. Most useful: If you are lucky enough to have a local store that's not manufacturers are sensible and accessories produced for one machine dedicated to one brand of sewing machine, then it’s certainly worth will fit their other models. So when you upgrade your machine, stay asking the staff for recommendations. Otherwise, spend some time with the same brand and you don’t have to buy everything again, browsing the internet and compare reviews. Sewing Machine Accessories Your sewing machine will come with some accessories and to start with you won’t need to buy more. As you develop your skills and master new techniques, you’ll find some of the items shown useful, though you should buy them as and when you need them. Depending on the make of sewing machine you buy its presser feet may not look exactly like the ones shown but they II do the same things.
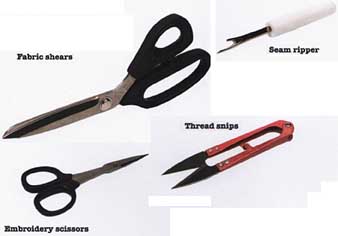
Sewing tools and equipment As well as the basics—such as scissors—here are numerous tools and gadgets you can buy to help you with your sewing. These are items I have bought and actually use, as opposed to pieces that live undisturbed in the box they came in. I have five different pairs of scissors in my workbox, of which you’ll need three: fabric shears, embroidery scissors, and paper scissors. In addition I have pinking shears and thread snips. I don’t buy expensive scissors, but I do take care of them and never use my fabric scissors for cutting paper—it’s a sure way to dull the edges of the blades.
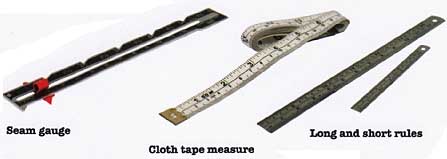
Whatever measuring system you use—metric or imperial—stick to it and don’t chop and change between the two or you’ll end up in a measuring mess. This book has both styles of measurement for every technique and project.
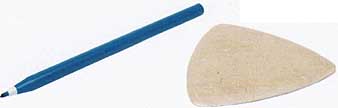
There are various fabric markers available. The two types I use are a water-soluble marker and tailor s chalk. Air-soluble markers are good, but I find that too often the mark has disappeared before I’ve finished the project. Whichever marker you use, always test it on a scrap of the fabric first to ensure it will completely disappear.
|
| PREV: (none) | NEXT: Getting ready to sew | Home |
Monday, 2011-08-08 5:35